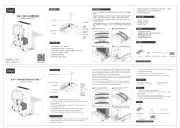
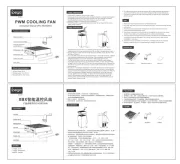
Configuration 1: Zapper – Nunchuk Attached
Both the Wii Remote and Nunchuk
are attached to the Wii Zapper.
See pages 4-5 for details.
You can use this setup either right
or left handed.
Configuration 2: Zapper – Nunchuk Separate
The Wii Remote is attached to the Wii Zapper
while the Nunchuk is held in your other hand.
See page 6 for details.
You can use this setup either
right or left handed.
2 3
Please review the instruction booklet for the game you are playing for information on which Wii
Zapper configuration to use for that game.
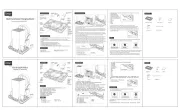
Wii Remote
compartment
B Button
Grip
NOTE: Always hold
the Wii Zapper with
a firm grip.
Nunchuk
compartment
Cable storage compartment
and cover
Nunchuk lock
Wii Remote lock
release
Wii Zapper Components
Wii Zapper Configurations
Please carefully and completely read the Wii™ Operations Manual - System Setup before using this
accessory. This manual contains important health and safety information. Be sure to read the sections on:
• Health and Safety
• Setup of the Wii Remote™
• Setup of the Nunchuk™
• the Wii Console Usage Precautions in the System Setup section
The Wii Zapper must be used with a Wii Remote or with a Wii Remote and Nunchuk (sold separately).
Additionally, you must use a Wii game disc (sold separately) that supports Wii Zapper
game play. Look for this icon on game packaging for games that are designed to be used
with the Wii Zapper.
Unlicensed Accessories: Do not attach unlicensed accessories to the Wii Remote, as the use of unlicensed
accessories may lead to injury to yourself or others and may cause performance issues and/or damage to the
system. Use of any such unlicensed accessories will invalidate your Nintendo product warranty.
TM, ® and the Wii logo are trademarks of Nintendo. © 2007 Nintendo. All Rights Reserved. Nintendo of Canada Ltd., Authorized User in Canada.
PRINTED IN CHINA
NINTENDO OF AMERICA INC.
P.O. BOX 957, REDMOND, WA
98073-0957 U.S.A. 64559A
NEED HELP WITH INSTALLATION,
MAINTENANCE OR SERVICE?
Nintendo Customer Service
SUPPORT.NINTENDO.COM
or call 1-800-255-3700
BESOIN D’AIDE POUR L’INSTALLATION,
L’ENTRETIEN OU LA RÉPARATION?
Service à la Clientèle de Nintendo
SUPPORT.NINTENDO.COM
ou appelez le
1-800-255-3700
¿
NECESITAS AYUDA DE INSTALACION,
MANTENIMIENTO O SERVICIO?
Servicio al Cliente de Nintendo
SUPPORT.NINTENDO.COM
o llame al 1-800-255-3700
Wii Zapper
Operations Manual
Mode d’emploi – page 9
Manual de Operaciones – página 17
C/RVL–A–ZA–USZ