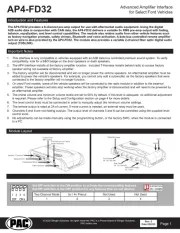
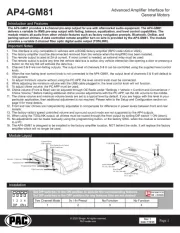
PAC AP4-TY14 Manual

PAC Modtager AP4-TY14

Læs gratis den danske manual til PAC AP4-TY14 (5 sider) i kategorien Modtager. Denne vejledning er vurderet som hjælpsom af 26 personer og har en gennemsnitlig bedømmelse på 5.0 stjerner ud af 13.5 anmeldelser. Har du et spørgsmål om PAC AP4-TY14, eller vil du spørge andre brugere om produktet?

Side 1/5
© 2024 Stinger Solutions
C
Page 1
Rev: 1
Date:09242024
Advanced Amplier Interface
for Select Toyota Applications
AP4-TY14
The AP4-TY14 provides a 6-channel pre-amp output for use with aftermarket audio equipment. Using the full range
xed level head unit output, in conjunction with data bus messages, the AP4-TY14 delivers a variable 5v RMS pre-
amp output with fading, balance, equalization, and level control capabilities. The module also retains audio from
other vehicle features such as factory navigation prompts, Bluetooth and Voice Activation. An accessory controlled
remote amplier turn on wire is also provided by the AP4-TY14. When used in conjunction with the APA-TOS1 (sold
separately), the module can provide a variable 2-channel ber optic digital audio output (TOSLINK).
Introduction and Features
Important Notes
1. Toyota Safety Connect (SOS) can easily be retained. See the page 3 for detailed instructions.
2. The aftermarket amplier must have a very solid ground and the amplier power/ground connections should be made
before connecting the RCA's or Remote on the AP4-TY14.
3. The factory radio's speed controlled volume, DSP, and surround sound mode are not supported by the AP4 outputs.
4. The factory amplier must remain connected and in the vehicle after the AmpPRO has been installed.
5. Prior to testing, cycle the ignition off and back on again to properly initialize the AP4-TY14.
6. The radio's beep setting must be enabled on the factory radio in order to hear the audible tones when making selections
through the radio.
7. Initially, if the beep through the AP4-TY14 does not match the on/off selection through the radio, cycle the beep to the
opposite setting and back, then test again.
8. The radio's beep volume and minimum volume levels are set to 0 dB by default. If you are happy with this level in your
particular application, additional adjustment is not required. Please refer to the Setup and Conguration section on page 4
for more details.
9. The Radio's Nav / VR Voice, incoming E-mail tone, Ringtone, In-Call, Incoming SMS / MMS tone and Incoming SMS Voice
volumes can be adjusted through the radio's settings menu as they were prior to installation of the AP4-TY14.
10. The remote output is rated at 2A of current. If more current is needed, an external relay must be used.
11. Channels 5 and 6 are non-fading outputs. The output level of channels 5 and 6 can be controlled using the supplied level
control knob.
Wiring Connection Chart
To Aftermarket
Amplier
Non-FadingRearFront
1(L) 2(R) 4(R) 5(L) 6(R)3(L)
Non-Fading
Level Control
Knob
Remote Turn On Output (2A Max)
SOS Mute ( - Trigger Input )
GRAY GRAY
BLACK BLACK
WHITEWHITE
28-pin
10-pin
30-pin
© 2024 Stinger Solutions
C
Page 2
Rev: 1
Date:09242024
Advanced Amplier Interface
for Select Toyota Applications
AP4-TY14
Installation
1. Remove the factory radio.
2. Disconnect the 28-pin, 30-pin and 10-pin connectors from the radio.
3. Ensure that you only remove the 28-pin and 30-pin connector that is
closest to the 10-pin connector, the correct 28-pin connector will be
either gray or white depending on the vehicle. There is another 28-
pin connector on the radio that will not be used. See Figure 1.
4. Connect the AmpPRO harnesses to the vehicle harnesses.
5. Connect the AmpPRO harnesses to the factory radio.
6. Set any feature DIP switches that apply to your install.
a. DIP switch 1 is used for two channel mode. In this mode, both
the TOSLINK and front RCA outputs (1 and 2) become non-
fading outputs and makes all chimes play through only the
TOSLINK and front RCA outputs (1 and 2).
b. Set DIP switch 2 on (down) to lower the RCA output voltage to
4v. Leave DIP switch 2 off (up) to keep the RCA output voltage at
5v. See troubleshooting section on Page 6 for more details.
c. DIP switch 3 is not used and should remain off (up).
d. DIP switch 4 is not used and should remain off (up).
6. If you are using the APA-TOS1 (sold separately) refer to the
instructions included with that product for its installation.
7. Connect the AmpPRO harness to the module.
8. Connect the level control knob to the module and install in an
accessible location.
9. Connect the signal cables and remote input from the aftermarket
amplier.
10. The Yellow / Black "SOS Mute" wire will be used in conjunction with
the Safety Connect (SOS) Retention. See Page 3 for more details.
DIP
1 2 3 4
ON
Two Channel Mode 5v / 4v Preout Not Used Not Used
1 2 3 4
Set DIP switches to the ON position to activate the corresponding features.
Set DIP switches to the OFF position for any features that are not desired.
Module Layout
LED 1
Interface Connector 1
Expansion Port
TOSLINK Output
(APA-TOS1 sold separately)
Programming Button
Feature Select
DIP switches
Front Output
Ch. 1(L) and 2(R)
Non-Fading Level Control
Knob Connection
USB Connection Rear Output
Ch. 3(L) and 4(R)
Non-Fading Output
Ch. 5(L) and 6(R)
LED 2
Fig.1
10-pin 28-pin 30-pin


Produkt Specifikationer

Mærke: PAC
Kategori: Modtager
Model: AP4-TY14

Har du brug for hjælp?

Hvis du har brug for hjælp til PAC AP4-TY14 stil et spørgsmål nedenfor, og andre brugere vil svare dig