Phanteks Eclipse G360A Manual

Phanteks Computertaske Eclipse G360A

Læs gratis den danske manual til Phanteks Eclipse G360A (2 sider) i kategorien Computertaske. Denne vejledning er vurderet som hjælpsom af 3 personer og har en gennemsnitlig bedømmelse på 4.9 stjerner ud af 2 anmeldelser. Har du et spørgsmål om Phanteks Eclipse G360A, eller vil du spørge andre brugere om produktet?

Side 1/2
INSTALLATION GUIDE
INSTRUCTIONS
Thank you for choosing Phanteks. Please take a moment to
carefully go through the manual. This manual will walk you
through all of the features the Eclipse G360A has to offer and
installation steps to build a full system.
This manual is intended for:
Eclipse G360A
installation or usage of this product.
VERSION 1.1
| www.phanteks.com
01
USB 3.0
AUDIO/MIC
MODE BUTTON
COLOR BUTTON
POWER BUTTON
INSTALLATION GUIDE
04
| www.phanteks.com
SSD + MOTHERBOARD
SCREW
22x
MOTHERBOARD
STAND-OFF
1x
PSU SCREW
4x
D-RGB 120MM FAN
3x pre-installed
2.5” SSD BRACKET
2x pre-installed
ZIP TIE
6x
280 140 FRONT AIO COOLER 4X MM FANS TOP & FRONT
360 360 FRONT AIO COOLER TOP AIO COOLER
The Eclipse G360A chassis allows for multiple different cooling
configuration. These are four examples to maximize the G360A’s
cooling potential.
FRONT TOP REAR
CLEARANCE
FANS
RADIATOR
120mm
120mm
3x
up to 360
* *
3x
up to 360
1x
up to 120
2x
up to 280
2x
-
-
-
140mm
140mm
CPU cooler height
RAM height
GPU length
Power Supply
E-ATX
Front 360 radiator
Front 280 radiator
Top 360 Radiator
162 mm
42 mm when using top radiator
400 mm
220 / 280 mm
280 mm width
122x398x65 mm
142x330 mm
122x398 mm
AIO 360
AIO 360
AIO 280
VERTICAL GPU BRACKET (PH-VGPUKT4.0_03)
The . G360A chassis supports the Phanteks Vertical GPU Bracket
The Vertical GPU Bracket supports 3 and 4 slot GPU’s with access
to the GPU connectors on slot 1 and 2.
It can be easily installed in the PCI slot area. Follow the instructions
that are included with the Vertical GPU bracket.
OPTIONAL UPGRADE
MODES COLORS
Press and hold the button for two seconds to turn MODE
off LEDs, press again to turn it ON
NOTE | D-RGB control buttons are deactivated if connected to a motherboard.
SOLID
BREATHING
SPARKLE
MUTLI-COLOR
TURN OFF LEDs
Fans can be placed on the front of the chassis behind the front panel.
Maximum number of 140 mm fans
RAM Height Clearance | 42 mm
140MM
140MM
140MM
140MM
120MM
120MM
120MM
120MM
120MM
120MM
120MM
120MM
120MM
120MM
120MM
120MM
120MM120MM
120MM 120MM
140MM
140MM
140MM
140MM
HDD LOCKING SCREW
2x
FAN & RADIATOR SUPPORT D-RGB CONTROLS
INCLUDED ACCESSORIES
RECOMMENDED COOLING CONFIGURATION
FRONT I/O
PRO TIP
For a more vibrant D-RGB light
effect, place the fans directly
under the front panel
It is not possible to install a 360 radiator in the front and top simultaneously
*
INSTALLATION GUIDE INSTALLATION GUIDE
0302
PANEL REMOVAL
HARDWARE INSTALLATION
LEFT SIDE PANEL
MOTHERBOARD POWERSUPPLY
STORAGE 2.5” SSD|
STORAGE 3.5” HDD|
RIGHT SIDE PANEL
FRONT PANEL & DUST FILTERS FRONT FAN BRACKETS
Before starting the installation process, we recommend to
remove all external panels. Follow these steps below.
Loosen the 2 captive thumb screws and slide to remove the
tempered glass side panel.
Remove front panel by pulling the panel from below.
Install the ATX motherboard using 9x motherboard screws. For
M-ATX Motherboards follow the motherboard instructions to
move the stand-offs to the correct position.
Install the power supply with 4x PSU screws.
Remove the front brackets for
easier installation of the front fans
or radiator.
For 140 mm fans
remove only the
left bracket.
Loosen the 2 captive thumb screws and slide to remove the right
side panel.
Slide the SSD Bracket up to remove it from the chassis.
Slide the 3.5” HDD trays out of the HDD cage.
To move the HDD Bracket to a different position, (or remove)
remove 8x screws located at the bottom and the PSU cover.
The HDD cage has 2 possible positions to allow for a front 360
radiator or for additional PSU clearance
Open the side clips, place the HDD and close the clips to secure
the HDD in place.
Secure the SSD with 4x SSD screws to the SSD Bracket.
| www.phanteks.com | www.phanteks.com
PRO TIP
The HDD tray can also hold
a 2.5” SSD
CABLES
Connect the front I/O cables to the motherboard and power
supply.
More D-RGB lighting products can be connected to the integrated
D-RGB controller. Optionally, lighting can be connected and
controlled via motherboard software.
Motherboard header
MOTHERBOARD FRONT I/O
EXPAND WITH MORE D-RGB PRODUCTS SYNC LIGHTING TO THE MOTHERBOARD
SK D-RGB FAN 120MM
TOP FILTER
PSU FILTER
120MM FANS 140MM FANS
SLIDE UP TO
REMOVE
SLIDE DOWN TO
INSTALL
THUMBSCREW
LOOSEN
2x THUMBSCREW
LOOSEN
2x
CASE SCREW
REMOVE
6x
CASE SCREW
REMOVE
3x
MOTHERBOARD
SCREWS
INSTALL
9x
PSU SCREW
INSTALL
4x
PSU
SSD SCREW
INSTALL
4x
65mm
220mm
INSTALLATION GUIDE
VERSION 1.1
280mm


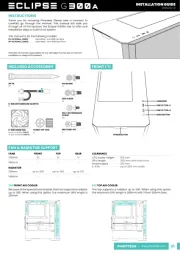
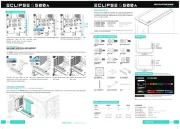
Produkt Specifikationer

Mærke: Phanteks
Kategori: Computertaske
Model: Eclipse G360A
Type: PC
Bredde: 455 mm
Dybde: 200 mm
Højde: 465 mm
Vægt: 6510 g
Produktfarve: Hvid
Pakkevægt: 7840 g
Pakkedybde: 282 mm
Pakkebredde: 513 mm
Pakkehøjde: 537 mm
Formfaktor: Midi Tower
Antal USB 3.2 Gen 1 (3.1 Gen 1) type-A-porte: 2
Materiale: Stål
Belysning: Ja
Kombineret hovedtelefon/mikrofon-port: Ja
Belysningsfarve: Flere
Belysning placering: Front
Strømforsyning inkluderet: Ingen
Tænd/sluk-knap: Ja
Forbedret kabelstyring: Ja
Antal 3.5" bays: 2
Understøttet motherboard, formfaktorer: ATX, EATX, Micro ATX, Mini-ITX
Antal 2.5" bays: 3
Siderude: Ja
Antal udvidelsesporte: 7
Maksimal højde på CPU-køler: 162 mm
Maksimal længde på grafikkort: 400 mm
Maksimal PSU længde: 280 mm
Understøttede HDD-størrelser: 2.5, 3.5 "
Frontventiler installeret: 3x 120 mm
Antal understøttede frontventilatorer (maks.): 3
Understøttede diametre for frontventilatorer: 120,140 mm
Antal understøttede bagerste ventilatorer (maks.): 1
Understøttede diametre for bagerste ventilatorer: 120 mm
Antal understøttede øverste ventilatorer (maks.): 3
Understøttede diametre for øverste ventilatorer: 120,140 mm
Hærdet (ede) glaspanel (er): Ja
Garantiperiode: 5 År
RGB-kontrolknap: Ja
Understøttede størrelser på frontradiator: 280,360 mm
Understøttede størrelser på bagradiator: 120 mm
De mest almindelige radiatorstørrelser understøttes: 360 mm

Har du brug for hjælp?

Hvis du har brug for hjælp til Phanteks Eclipse G360A stil et spørgsmål nedenfor, og andre brugere vil svare dig