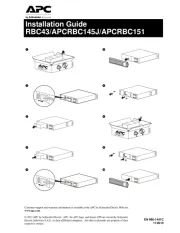
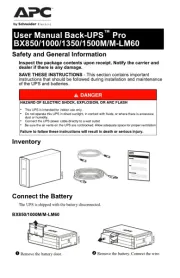
Inspection
The following items are inside the box:
● UPS unit ● User Manual
Remove the UPS from its package and inspect it for damage that
may have occurred during shipping. If any damage is discovered,
re-pack the unit and return it to the place of purchase.
Connect to Utility Power
Connect AC power cord to utility power. Then, the UPS will start to
charge inside battery. For best result, charge the battery for 6
hours prior to initial use.
Connect Modem/Phone Line/Data Line
(only for the model with TVSS port)
This UPS protects a single line (1 in/1 out) phone, modem, or fax
machine from surges when connected through the UPS. Plug
incoming Internet line into the “IN” socket. Use one more Internet
line cable in the “OUT” socket and plug one other end to the
modem input socket.
*Outlet type can be Type F (CEE 7/3), Type E (CEE 7/5), Type G
(BS 1363) and IEC.
LCD display or LED indicators (Please check LED or LCD
section for the details)
Power switch
Battery backup outlets
Surge-protected outlets
USB port (option)
Modem/phone/network surge protection (option)
USB charger port (option)
AC input power cord
AC input with fuse (only for IEC model)
Circuit breaker
Plug in Equipment
There are two types of output receptacles: Battery Backup Outlet
and Surge-protected Outlet.
Battery Backup Outlets
Connect computer and monitor to the "Battery Backup" outlets.
These outlets provide battery backup, EMI filtering, line
conditioning, and surge protection. Battery power is automatically
provided in case of power failure.
NOTE: Make sure that the UPS is powered on to protect all
important devices from data loss during power failure.
CAUTION: NEVER connect a laser printer or scanner to the
battery backup outlets of UPS. The equipment may draw
significantly power to overload the UPS.
Surge-Protected Outlets
Connect a printer, fax machine, or scanner to the “Surge-
protected” outlets. These outlets do not provide power during
power failure.
Connect Com. Port and Install Software
(only for the model with USB port)
Connect one end of the USB cable to PC and the other to the USB
port at the rear of the UPS.
Download the latest version of ViewPower software from
http://software.powerwalker.com
to your hard drive. Follow on-
screen instructions to complete the software installation.
Turn On/Off the UPS
To turn on the UPS unit, press the power switch lightly. Then, the
LED or LCD will light up. To turn off the UPS unit, press the power
switch again. Then, display will shut off.
Input voltage
Load level indicator, flashing
Output voltage indicates overload
AC mode indicator
Battery capacity indicator,
Battery mode indicator flashing indicates low battery
● Green
Off
UPS is operated
★Yellow
Sounding every
10 seconds
Power failure occurs and
UPS is on battery mode.
★Yellow
Low battery
● Red
UPS fault
● LED on ○ LED Off ★ LED flashing