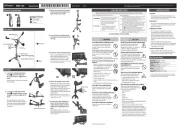
9. Place the stand upright, then loosen the hand knobs of
holders “A” and “B” (two places). Next, spread open the pipes
at left and right.
If the stand wobbles, loosen the bolts on the holders of curved pipes
“L” and “R,” and adjust the height. After adjusting the height, tighten the
bolts on the holders.
Hand knobs
Holder bolts
10. Attach mount holder “L” to the top left of the stand, attach
mount holder “R” to the top right of the stand, and tighten
the respective hand knobs.
Mount holder L 7
Hand knobs
Mount holder R 8
11. Attach the pad mounts to mount holder “L” and mount holder
“R,” and rmly tighten the respective hand knobs.
* The tips of the mounts are sharp. Handle them with care.
Pad mounts
Hand knobs
9
12. Attach mount holder “R” to the snare pipe, and tighten the
hand knob.
Mount holder R
8
Hand knob
13. Attach the pad mount to mount holder “R,” and rmly tighten
the hand knob.
Pad mount
Hand knob
9
14. Insert the two cymbal mounts and the hi-hat mount into
the holders of the curved pipes, and adjust all the holders as
shown in the illustration to complete setup.
Cymbal mounts
Pad mounts
Pad mounts
Hi-hat mount
11
9
10
9
* The tips of the mounts are sharp. Handle them with care.
Notes
• When setting up or storing the stand, be careful not to pinch the ngers
you use to handle the stand.
• Regarding the way of mounting a sound module, pads, or cymbals,
please refer to the owner’s manual supplied with them.
• The pad mount can be adjustable to slide through the holder.
Please keep the top of the pad mount
over the holder for securement in its
adjustment.
• Do not spread the stand wider than 1.0 meters (40 inches).
1.0 m (40”)
3. Using a drum key, loosen the bolt on the holder of curved
pipe “R,” then insert straight pipe “R.”
Curved pipe R 3
Straight pipe R 5
7 cm
Holder
Bolt
4. Position straight pipe “R” so that its tip protrudes by about
7 cm, and then tighten the holder.
Perform steps 5–8 of the assembly procedure with the stand laying
down on the oor; do not place it upright yet.
5. Use a drum key to loosen bolt of the holder “A”(attached to
the left-side pipe of the stand), and insert curved pipe “L” (of
the assembly you created in step 1–2) into holder “A” of the
stand.
Holder A
Bolt
Curved pipe L 2
Stand 1
As a general rule, insert curved pipe “L” until the mark on the pipe can
be seen through the gap in the holder.
After rmly inserting it all the way, use the drum key to rmly tighten
bolt.
Drum key
Bolt
Mark
6. Lower holder “B” (attached to the right-side pipe of the stand)
to the same position as holder “C” (attached to the left-side
pipe of the stand).
Holder B
Holder C 7 cm
7. Use the drum key to loosen bolt of the holder “B”, and insert
curved pipe “R” (of the assembly you created in step 3–4) into
holder “B” of the stand.
Holder B
Bolt
Curved pipe R 3
As a general rule, insert curved pipe “R” until the mark on the pipe can
be seen through the gap in the holder.
After rmly inserting it all the way, use the drum key to rmly tighten
bolt.
Mark Drum key
Bolt
8. Use the drum key to loosen bolt of the holder “C”, and insert
the snare pipe into holder “C” of the stand.
After rmly inserting it all the way, use the drum key to rmly
tighten bolt.
Insert the end of the snare pipe that doesn’t have a cap on it into holder
“C.”
Holder C
Snare pipe 6
Cap
Bolt
Drum key
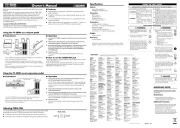
How to Set Up the Stand
Before you start assembling the stand, make sure that you have all of the parts.
No. Name Quantity
1Stand 1
2Curved pipe L 1
3Curved pipe R (with Pad mount) 1
4Straight pipe L (Long) 1
5Straight pipe R (Short) 1
6Snare pipe 1
7Mount holder L 2
8Mount holder R 2
9Pad mount 3
10 Hi-hat mount 1
11 Cymbal mount 2
12 Drum key 1
13 Cable clip 4
14 Cable tie 2
1
2
3
4 5 6 10 11
7
8
12 13
14
9
Fully Assembled View
* If the drum stand is to be used for extended periods in the same
location, we recommend using a Roland drum mat (TDM series) to
prevent discoloration of ooring by the rubber feet.
* In the interest of product improvement, the specications and/or
appearance of this unit are subject to change without prior notice.
1. Using a drum key, loosen the bolt on the holder of curved
pipe “L,” then insert straight pipe “L.”
Curved pipe L 2
Straight pipe L 4
Holder
Bolt
2. Attach mount holder “L” to straight pipe “L.” Then, after
pulling down straight pipe “L” until it can move no further,
tighten the bolt.
Holder
Bolt
Curved pipe L 2
Straight pipe L 4
Mount holder L
7
Before using this unit, carefully read the sections entitled: “USING THE UNIT SAFELY” and “IMPORTANT
NOTES.” These sections provide important information concerning the proper operation of the unit.
Additionally, in order to feel assured that you have gained a good grasp of every feature provided by
your new unit, Owner’s manual should be read in its entirety.
The manual should be saved and kept on hand as a convenient reference. Copyright © 2011 ROLAND CORPORATION
All rights reserved. No part of this publication may be
reproduced in any form without the written permission of
ROLAND CORPORATION.
Roland and V-Drums are registered trademarks of Roland Corporation in the United States and/
or other countries.
WARNING
002a
Do not disassemble or modify by yourself
Do not open or perform any internal modications on
the unit.
003
Do not repair or replace parts by yourself
Do not attempt to repair the unit, or replace parts
within it (except when this manual provides specific
instructions directing you to do so). Refer all servicing
to your retailer, the nearest Roland Service Center,
or an authorized Roland distributor, as listed on the
“Information.”
004
Do not use or store in the following types of locations
• Su bj ect to te mperature ex trem es (e. g. , di re ct
sunlight in an enclosed vehicle, near a heating duct,
on top of heat-generating equipment); or are
• Damp (e.g., baths, washrooms, on wet oors); or are
• Exposed to steam or smoke; or are
• Subject to salt exposure; or are
• Humid; or are
• Exposed to rain; or are
• Dusty or sandy; or are
• Subject to high levels of vibration and shakiness.
007
Do not place in an unstable location
Make sure you always have the unit placed so it is level
and sure to remain stable. Never place it on stands
that could wobble, or on inclined surfaces.
013
Adults must provide supervision in places where
children are present
When using the unit in locations where children are
present, be careful so no mishandling of the unit can
take place. An adult should always be on hand to
provide supervision and guidance.
014
Do not drop or subject to strong impact
Protect the unit from strong impact.
(Do not drop it!)
CAUTION
101e
Use only stand manufactured by Roland
This stand for use only with specific Roland musical
instruments. See apparatus instructions. Use with
other models is capable of resulting in instability
causing possible injury.
101f
Evaluate safety issues before using stands
Make sure to rmly tighten all clamps and bolts after
you have assembled the stand and attached a pad
or unit to it. You should probably also try to make a
habit of checking and retightening them if necessary
before every performance. You risk injury if you have
loose screws or clamps, since a pad or unit can fall
unexpectedly.
104
Manage cables for safety
Try to preve nt co rds and cables from beco mi ng
entangled. Also, all cords and cables should be placed
so they are out of the reach of children.
CAUTION
106
Avoid climbing on top of the unit, or placing heavy
objects on it
Never climb on top of, nor place heavy objects on the
unit.
118d
Keep small items out of the reach of children
To prevent accidental ingestion of the parts listed
below, always keep them out of the reach of small
children.
• Included Parts
cable clips, cable ties
• Removable Parts
screws, washers, nuts, springs, hand knobs
Used for instructions intended to alert the
user to the risk of injury or material
damage should the unit be used
improperly.
* Material damage refers to damage or
other adverse effects caused with
respect to the home and all its
furnishings, as well to domestic animals
or pets.
Used for instructions intended to alert the
user to the risk of death or severe injury
should the unit be used improperly.
The symbol alerts the user to things that must be
carried out. The specific thing that must be done is
indicated by the design contained within the circle. In the
case of the symbol at left, it means that the power-cord
plug must be unplugged from the outlet.
The symbol alerts the user to important instructions or
warnings.The specific meaning of the symbol is
determined by the design contained within the triangle. In
the case of the symbol at left, it is used for general
cautions, warnings, or alerts to danger.
The symbol alerts the user to items that must never be
carried out (are forbidden). The specific thing that must
not be done is indicated by the design contained within
the circle. In the case of the symbol at left, it means that
the unit must never be disassembled.
About WARNING and CAUTION Notices About the Symbols
Placement
354a
• Do not expose the unit to direct sunlight, place it near devices that
radiate heat, leave it inside an enclosed vehicle, or otherwise subject
it to temperature extremes. Excessive heat can deform or discolor the
unit.
355b
• When moved from one location to another where the temperature
and/or humidity is very dierent, water droplets (condensation) may
form inside the unit. Damage or malfunction may result if you attempt
to use the unit in this condition. Therefore, before using the unit, you
must allow it to stand for several hours, until the condensation has
completely evaporated.
356
• Do not allow rubber, vinyl, or similar materials to remain on this unit for
long periods of time. Such objects can discolor or otherwise harmfully
aect the nish.
361
• Do not put anything that contains water on this unit. Also, avoid the
use of insecticides, perfumes, alcohol, nail polish, spray cans, etc., near
the unit. Swiftly wipe away any liquid that spills on the unit using a dry,
soft cloth.
Maintenance
401a
• For everyday cleaning wipe the unit with a soft, dry cloth or one that has
been slightly dampened with water. To remove stubborn dirt, use a cloth
impregnated with a mild, non-abrasive detergent. Afterwards, be sure to
wipe the unit thoroughly with a soft, dry cloth.
402
• Never use benzine, thinners, alcohol or solvents of any kind, to avoid
the possibility of discoloration and/or deformation.
Additional Precautions
553
• Use a reasonable amount of care when using the hand knobs, pipes,
and mounts. Rough handling can lead to be damaged.
559a
• When you need to transport the unit, package it in the box (including
padding) that it came in, if possible. Otherwise, you will need to use
equivalent packaging materials.
IMPORTANT NOTES
USING THE UNIT SAFELY