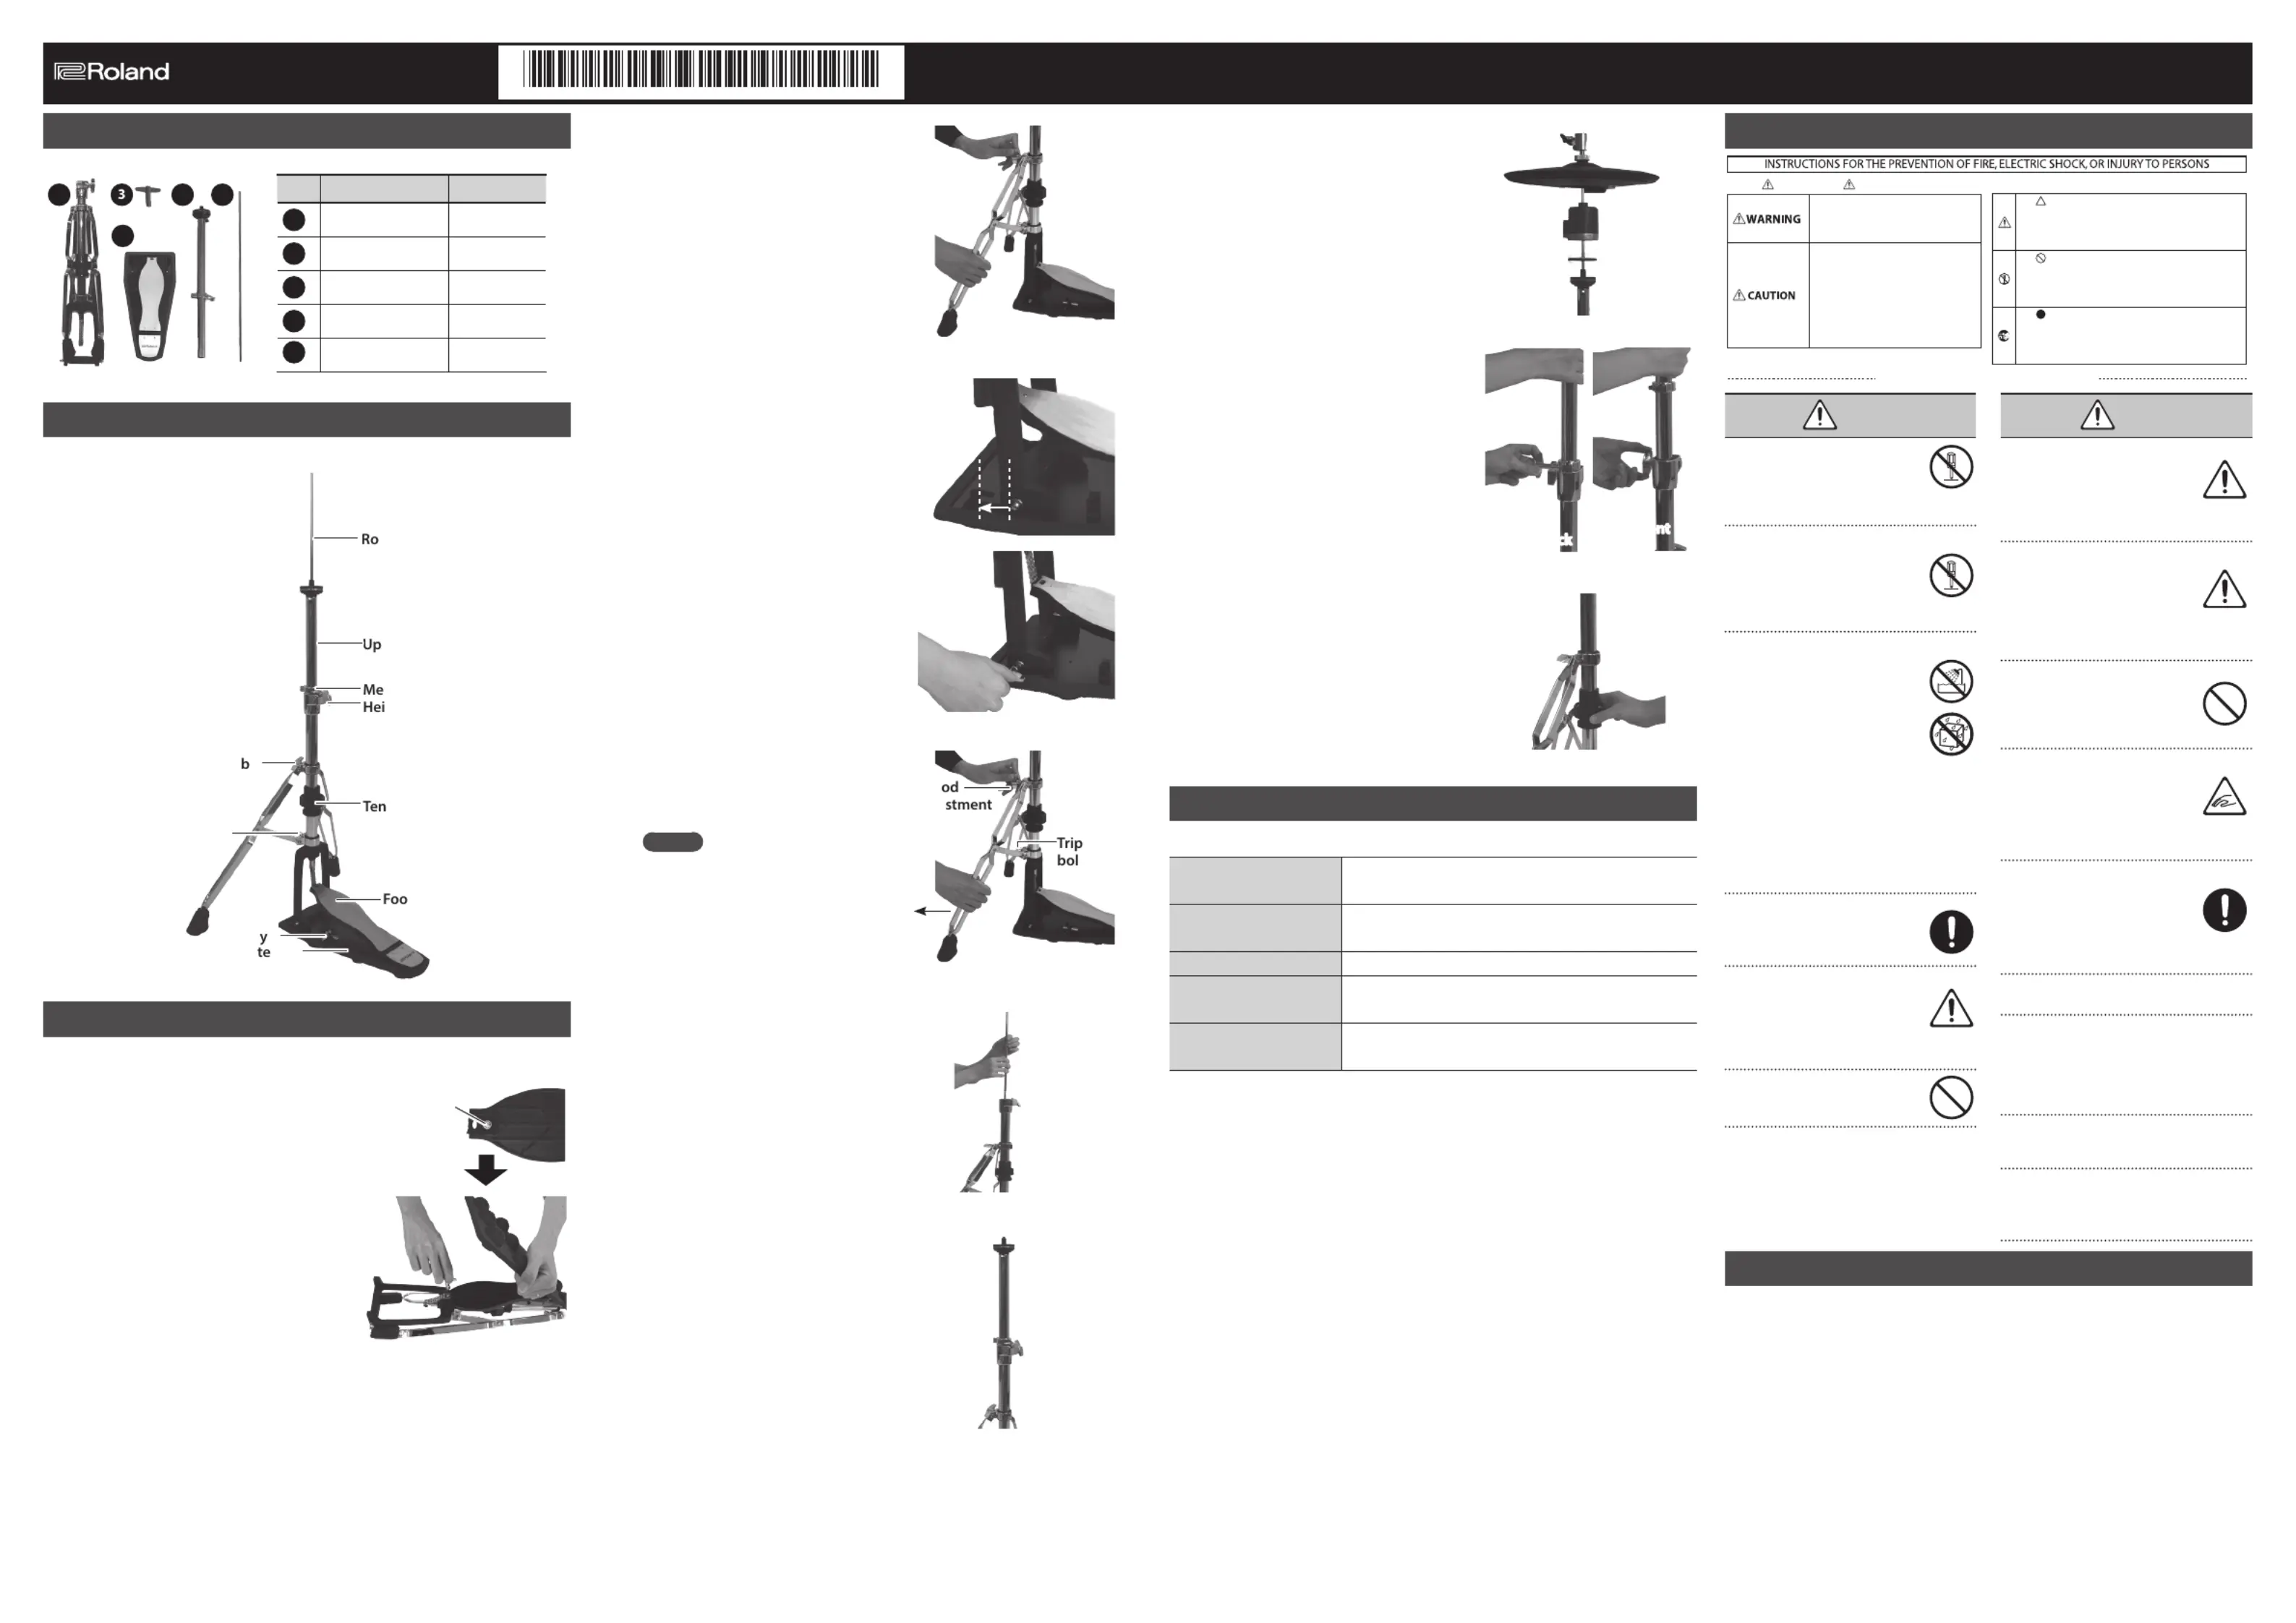
Roland RDH-120 Manual


Læs gratis den danske manual til Roland RDH-120 (1 sider) i kategorien Ikke kategoriseret. Denne vejledning er vurderet som hjælpsom af 44 personer og har en gennemsnitlig bedømmelse på 3.8 stjerner ud af 22.5 anmeldelser. Har du et spørgsmål om Roland RDH-120, eller vil du spørge andre brugere om produktet?

Side 1/1
7. Place the V-hi-hat (sold separately).
1
2
3
Pass the parts through the rod in the
order shown in the illustration.
For details, refer to the owner’s
manual of the V-hi-hat.
8. Adjust the height of the stand.
Memory lock
adjustment
knob
While using one hand to hold the
pipe, loosen rst the memory lock
and then the height adjustment knob.
When you have set the desired height,
tighten the knob and then tighten the
memory lock.
9. Adjust the pedal tension.
Turning the tension adjustment dial
clockwise makes it easier to press the
pedal.
Main Specications
Height Adjustment Range
760–1,000 mm
29-15/16–39-3/8 inches
Pipe Diameter
Upper Pipe: 25.4 mm, 1 inch
Base Pipe: 28.6 mm, 1-1/8 inches
Stand Type 2-Leg, Double Braced
Weight
5.03 kg
11 lbs 2 oz
Accessories
Drum Key
Owners Manual
* This document explains the specications of the product at the time that the document
was issued. For the latest information, refer to the Roland website.
Before using this unit, carefully read “USING THE UNIT SAFELY” and “IMPORTANT NOTES. After reading, keep the document(s)
where it will be available for immediate reference.
RDH-120
WARNING
Do not disassemble or modify by yourself
Do not carry out anything unless you
are instructed to do so in the owner’s
manual. Otherwise, you risk causing
malfunction.
Do not repair or replace parts by yourself
Be sure to contact your dealer, a Roland
service center, or an ocial Roland
dealer.
For a list of Roland service centers and
ocial Roland dealers, refer to the Roland website.
Do not use or store in the following types of locations
• Subject to temperature extremes
(e.g., direct sunlight in an enclosed
vehicle, near a heating duct, on top
of heat-generating equipment);
or are
• Damp (e.g., baths, washrooms, on
wet oors); or are
• Exposed to steam or smoke; or are
• Subject to salt exposure; or are
• Exposed to rain; or are
• Dusty or sandy; or are
• Subject to high levels of vibration and
shakiness; or are
• Placed in a poorly ventilated location.
Do not place in an unstable location
Otherwise, you risk injury as the result
of the unit toppling over or dropping
down.
Be cautious to protect children from injury
Always make sure that an adult is
on hand to provide supervision and
guidance when using the unit in places
where children are present, or when a
child will be using the unit.
Do not drop or subject to strong impact
Otherwise, you risk causing damage or
malfunction.
CAUTION
Use this stand only for specic Roland products
This stand for use only with specic
Roland musical instruments. See
apparatus instructions. Use with other
models is capable of resulting in
instability causing possible injury.
Evaluate safety issues before using stands
Even if you observe the cautions given
in the owners manual, certain types of
handling may allow mounted product to
fall from the stand, or cause the stand to
overturn. Please be mindful of any safety issues before
using this product.
Avoid climbing on top of the unit, or placing heavy
objects on it
Otherwise, you risk injury as the result
of the unit toppling over or dropping
down.
Take care so as not to get ngers pinched
When setting up or folding the stand,
be careful not to pinch your ngers.
• Tripod spread adjustment section
• Footboard
• Height adjustment section
Keep small items out of the reach of children
To prevent accidental ingestion of the
parts listed below, always keep them
out of the reach of small children.
• Removable Parts
Screws, washer, knobs, bolt
• Do not insert your ngers inside the stand
pipe. This may result in injury.
• When you loosen the knob while making
adjustment of each parts, the pipe, product
etc. might fall and pinch your ngers. The
product might be damaged if it falls. Use one
hand to support the pipe or hi-hat mount
while you slowly loosen the knob.
• To prevent the stand from tipping over or
falling, tighten the knobs until there is no
looseness.
• The bottom of the pedal plate has rubber
protrusions that absorb vibration. Although
the stand might sway slightly during
performance, this is not a malfunction.
Used for instructions intended to alert the
user to the risk of injury or material
damage should the unit be used
improperly.
* Material damage refers to damage or
other adverse effects caused with
respect to the home and all its
furnishings, as well to domestic animals
or pets.
Used for instructions intended to alert the
user to the risk of death or severe injury
should the unit be used improperly.
The symbol alerts the user to things that must be
carried out. The specific thing that must be done is
indicated by the design contained within the circle. In the
case of the symbol at left, it means that the power-cord
plug must be unplugged from the outlet.
The symbol alerts the user to important instructions or
warnings.The specific meaning of the symbol is
determined by the design contained within the triangle. In
the case of the symbol at left, it is used for general
cautions, warnings, or alerts to danger.
The symbol alerts the user to items that must never be
carried out (are forbidden). The specific thing that must
not be done is indicated by the design contained within
the circle. In the case of the symbol at left, it means that
the unit must never be disassembled.
About WARNING and CAUTION Notices
About the Symbols
ALWAYS OBSERVE THE FOLLOWING
USING THE UNIT SAFELY
IMPORTANT NOTES
Placement
• Depending on the material and temperature
of the surface on which you place the unit, its
rubber feet may discolor or mar the surface.
Maintenance
• Never use benzine, thinners, alcohol or
solvents of any kind, to avoid the possibility of
discoloration and/or deformation.
Additional Precautions
• This instrument is designed to minimize
the extraneous sounds produced when it’s
played. However, since sound vibrations can
be transmitted through oors and walls to a
greater degree than expected, take care not
to allow these sounds to become a nuisance
others nearby.
• When disposing of the packing carton or
cushioning material in which this unit was
packed, you must observe the waste disposal
regulations that apply to your locality.
Intellectual Property Right
• Roland and Noise Eater are either registered
trademarks or trademarks of Roland
Corporation in the United States and/or other
countries
© 2020 Roland Corporation
English
Owners Manual
* 5 1 0 0 0 7 4 9 3 1 - 0 1 *
Check the Included Items
1
2
4 5
Names of Parts
per pipe
mory lock
ght adjustment knob
sion adjustment dial
Tripod adjustment kno
Pedal pla
tboard
Drum ke
d
Tripod bolt
Assembly
1. As shown in the illustration,
attach the chain to the footboard
using the bolt and washer that are
attached to the footboard.
bolt and
After using your ngers to provisionally
tighten the bolt, use the drum key to
tighten it rmly.
2. Loosen the tripod adjustment
knob, and open the tripod.
Tighten the tripod adjustment
knob to fasten it.
3. Fasten the pedal plate and
footboard.
(1) Slide the bolt located under
the footboard to the indicated
location of the pedal plate.
(2) Use the drum key to provisionally
tighten the bolt, verify that it
is stable, and then tighten it
securely (two locations).
4. Once again adjust the openness
of the tripod.
Trip
adju
knob
od
t
* Spread the legs of the tripod so that the stand
is stable.
MEMO
If you loosen the tripod adjustment
knob and the tripod bolt, the legs can
be rotated left/right as appropriate
for the layout of your drum set. When
you have decided on the position,
retighten the items that you loosened.
5. While rotating the rod, insert it
into the top of the stand.
The insertion point is female-
threaded, and the bottom of the rod is
male-threaded. Turn the rod as far as
it will go so that it is securely fastened
to the stand.
6. Place the upper pipe onto the
rod.
No. Part Pieces
1
Stand base 1
2
Footboard 1
3
Drum key 1
4
Upper pipe 1
5
Rod 1
Hi-Hat Stand


Produkt Specifikationer

Mærke: Roland
Kategori: Ikke kategoriseret
Model: RDH-120

Har du brug for hjælp?

Hvis du har brug for hjælp til Roland RDH-120 stil et spørgsmål nedenfor, og andre brugere vil svare dig


Ikke kategoriseret Roland Manualer

Roland

Roland FV-500H Manual

1 Oktober 2025
Roland

Roland RDH-130 Manual

11 September 2025
Roland

Roland RT-MicS Manual

10 September 2025
Roland

Roland MC-707 Manual

27 August 2025
Roland

Roland DH-10 Manual

27 August 2025
Roland

Roland DV-7DLC Manual

27 August 2025
Roland

Roland SR-JV80-09 Manual

20 August 2025
Roland

Roland SH-2 Manual

20 August 2025
Roland

Roland SO-DA4 Manual

20 August 2025

Ikke kategoriseret Manualer

Nyeste Ikke kategoriseret Manualer