Copyright © 2017 ROLAND CORPORATION
Before using this unit, carefully read the leaet “USING THE UNIT SAFELY” “IMPORTANT NOTES.” and
After reading, keep the document(s) where it will be available for immediate reference.
Main Features
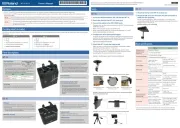
5This is an electronic percussion pad that you can strike with drumsticks or your hand, or step on with your foot.
5Even beginners can easily modify sounds just by intuitively turning knobs.
5The compact design won’t get in your way, and you can attach the unit to a commercially available percussion holder for use.
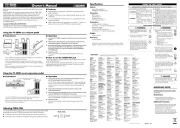
Panel Descriptions
Top Panel
Rear Panel
Side Panel
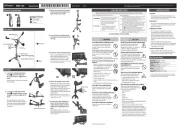
Mounting This Unit on the Stand
If you want to mount this unit on a cymbal stand etc. for use, install the
included attachment and then secure it to a commercially available
percussion holder.
1. Install the included attachment on this unit.
You can orient the attachment so that the unit can be installed on either
side of the percussion holder. Attach the holder mounting screws (nut, bolt,
washers) to the attachment, and use the two included attachment screws
to secure it.
* The illustration shows
assembly for fastening the
right side of the unit to the
percussion holder
Attachment Holder mounting screws
Attachment screws
2. Attach a commercially available percussion holder where
you want to mount the unit (e.g., on a cymbal stand).
* Acceptable rod diameters: 8.0–12.7 mm (3/8–1/2 inch)
3. Secure the unit to the percussion holder.
Pass the rod of the
percussion holder
through the hole
in the bolt, and
secure it with the
nut.
Using the Cord Hook
As shown in the illustration, use the cord hook
to secure the AC adaptor. This prevents the
plug from being inadvertently disconnected by
contact with a drumstick or by an impact.
Tips for Use
5If you switch between striking the pad with drumsticks and striking it
with your hand or foot, you’ll need to adjust the pad’s sensitivity.
Striking with a drumstick Lower the sensitivity
Using your hand or foot Raises the sensitivity
5In an environment where there is high-volume sound, such as if you’re
using acoustic drums, sound or vibration from an external source might
make the this unit produce sound even if it’s not struck. The measures
below can help prevent false triggering.
5 Adjust the position and angle at which the percussion holder is mounted so that
the unit is kept at a distance from the source of the vibration.
5Raises the minimum sensitivity (THRESHOLD) of the pad.
About Batteries
If using the unit on batteries, install four batteries, taking care to orient the
batteries correctly.
* If the TRIG indicator stays blinking, the batteries are low. Install new
batteries.
* If you handle batteries improperly, you risk explosion and uid
leakage. Make sure that you carefully observe all of the items related to
batteries that are listed in the leaet “USING THE UNIT SAFELY” and
“IMPORTANT NOTES.”
Completed setup
Bolt
Nut
Sounds List
5ELECTRO (SPD-1E)
No. Sounds Name Normal Variation
1 Standard Clap Clap Ambience Clap
2 Minimal Clap Trio Clap Finger Snap
3 TR Clap TR-808 Clap TR-909 Clap
4 Proc Snare 1 Deep Fat Snare Dub Step Snare
5 Proc Snare 2 Tight Snare Lo-Fi Snare
6 TR Snare TR-909 Snare w/ Clap TR-808 Snare
7 Elec Snare Analog Snare 1 Analog Snare 2
8 Rim Shot TR-909 Rim Shot Cross Stick
9 Percussion TR-808 Cowbell TR-808 Maracas
10 Cymbal TR-909 Hi-Hat Close/Open TR-808 Cymbal
11 SFX Super Low Air Horn
12 User – –
5KICK (SPD-1K)
No. Sounds Name Normal Variation
1 Std Kick Studio Kick Mellow Kick
2 Hard Kick Heavy Kick Impact Kick
3 Perc Kick Cjan Bass Djembe Bass
4 Stomp Box Stomp Box 1 Stomp Box 2
5 TR Kick Modied TR-909 Kick Modied TR-808 Kick
6 Jingles Jingles Sleigh Bells
7 Cabasa/Guiro Cabasa Guiro
8 Ankle Bracelet Chafchas African Bracelet
9 Cowbell/Claves Cowbell Claves
10 Clap/X-Stick DR-110 Clap Cross Stick
11 Cymbal Splash Cymbal Pedal Hi-Hat
12 User – –
5PERCUSSION (SPD-1P)
No. Sounds Name Normal Variation
1 Tamb/Bells Tambourine Sleigh Bells
2 Shaker/Guiro Shaker Guiro Hit/Scrape
3 Cowbell Cowbell Plastick Block
4 HH/Ride Hi-Hat Close/Open Ride Cymbal Bow/Bell
5 Crash Cym Crash Cymbal Pair Cymbal
6 EFX Cym Chaina Cymbal Stacked Cymbal
7 Snare/X-Stick Wood Snare Cross Stick
8 Conga/Bongo Conga Open/Slap Bongo Open/Slap
9 Timb/V.Slap Timbales Open/Rim Vibraslap
10 T.Chime/Tri Tree Chime Short/Long Triangle Mute/Open
11 Gong/Timp Gong Timpani
12 User – –
Main Specications
Roland SPD::ONE ELECTRO (SPD-1E) / KICK (SPD-1K) / PERCUSSION (SPD-1P):
Electronic Percussion Pad
Expected
battery
life under
continuous use
Rechargeable Ni-MH battery
(AA, HR6)
Approx. 7 hours (Normal use)
Approx. 4 hours (Maximum load use)
Alkaline battery (AA, LR6) Approx. 6 hours (Normal use)
Approx. 3 hours (Maximum load use)
* These can vary depending on the specications of the batteries,
capacity of the batteries, and the conditions of use.
Dimensions 140 (W) x 160 (D) x 56 (H) mm 5-9/16 (W) x 6-5/16 (D) x 2-1/4 (H) inches
(excluding attachment)
Weight 900 g 2 lb
(including batteries, excluding attachment)
Accessories
Owner’s manual (this document), Leaet “USING THE UNIT SAFELY,”
Attachment, Attachment screws x 2, Holder mounting screws (nut x 1,
bolt x 1, washers x 2), Alkaline batteries (AA, LR6) x 4
Options
(sold separately) AC adaptor (PSA-S series), USB cable (micro-B type)
* This document explains the specications of the product at the time that the document was
issued. For the latest information, refer to the Roland website.
English
Owner’s manual
*5100056834- 01*
ELECTRO (SPD-1E)
KICK (SPD-1K)
PERCUSSION (SPD-1P)
923
* The illustration shows the ELECTRO (SPD-1E).
[TUNING] knob
Adjusts the tuning (pitch) of the
sound.
Turning left Lowers the pitch.
Turning right Raises the pitch.
[INST VARIATION] button
Selects a variation for each sounds.
* The way in which the TRIG indicator blinks when you press
the [INST VARIATION] button shows whether the normal
sound or the variation sound is selected.
Number of blinks Sounds
Once Normal
Twice Variation
* Pressing the [INST VARIATION] button stops the sound.
* Pressing the [INST VARIATION] button does not change the
sound for the user sample that you imported into the “12”
position of the sounds knob.
[FX] knob
Two types of eect can be applied depending on the
position of the knob.
ELECTRO (SPD-1E) / PERCUSSION (SPD-1P)
Turning left Increases the amount of reverb.
Turning right Increases the amount of delay.
Center No eect is applied.
KICK (SPD-1K)
Turning left Increases the amount of reverb.
Turning right Increases the amount of distortion.
Center No eect is applied.
TRIG indicator
The indicator lights when you strike the pad, and also
shows the power on/o status and the remaining
battery capacity.
When power turns on Blinking Dimly lit0
When power is on Dimly lit
When switching sounds (busy) Blinking
Pad strike Lights when struck
Low battery Remains blinking
DC IN jack
Accepts connection of an AC Adaptor (PSA-S series; sold
separately). By using it, you can play without being concerned
about how much battery power you have left.
* Use only the specied AC adaptor (PSA-S series; sold separately),
and connect it to an AC outlet of the correct voltage. Do not use
any other AC adaptor, since this may cause malfunction.
* Insert the tip of the plug all the way into the jack.
* If the AC adaptor is connected while a battery is installed, the
power supply is drawn from the AC adaptor.
* We recommend that you keep batteries installed in the unit
even though you’ll be powering it with the AC adaptor. That
way, you’ll be able to continue a performance even if the cord of
the AC adaptor gets accidentally disconnected from the unit.
PHONES jack
Connect stereo headphones.
* To prevent malfunction and equipment failure,
always turn down the volume, and turn o all the
units before making any connections.
* While the TRIG indicator is blinking, don’t remove
the batteries or the plug that’s connected to the
DC IN jack.
OUTPUT (MONO) jack
Connect your amplied speakers or mixer.
[POWER] switch
Turns the power on/o.
* Before turning the unit on/o, always be sure
to turn the volume down. Even with the volume
turned down, you might hear some sound when
switching the unit on/o. However, this is normal
and does not indicate a malfunction.
[THRES] knob
Adjusts the minimum sensitivity (THRESHOLD) of the pad
so that it responds only when struck with at least a certain
amount of force.
* For details on how to adjust this, refer to “Tips for Use.”
Turning left Lowers the minimum sensitivity.
Turning right Raises the minimum sensitivity.
(Responds only when struck strongly)
[SENS] knob
Adjusts the sensitivity of the pad.
Turning left Lowers the sensitivity.
Turning right Raises the sensitivity. (Even soft strikes
produce loud sound)
USB cable (micro-B type)
You can use a micro-USB cable to connect this unit to
your computer, and send and receive MIDI data.
* Take care that your strikes do not damage the
cable.
* Do not use a micro USB cable that is designed
only for charging a device. Charge-only cables
cannot transmit data.
Pad
To produce sound, use drumsticks or your hand to strike
this, or step on it with your foot.
[VOLUME] knob
Adjusts the volume that’s
output from the OUTPUT
(MONO) jack and PHONES
jack.
Sounds knob
Selects sounds. Turn the knob to switch sounds.
Press the [INST VARIATION] button to select a
variation for each sound.
For details, refer to “Sound List.”
* Sound is not heard while you’re switching
sounds (while the indicator is blinking).
* Sounds knob position lets you import and "12"
play an original sound that you created. For
details, refer to the "Supplementary" manual at
the following URL.
http://www.roland.com/manuals/