SOMsocket_S11643-00000_352021_0-DRE_Rev-C
Artikelnr.: 21106V000, -V030
Nennspannungsbereich AC 100–240 V
Temperaturbereich –25 °C bis +65 °C
Speicherplätze 112 Funkbefehle
Einsatzbereich trockene, allseitig umschlossene Räume
Abmessungen (Gehäuse) 138 x 54 x 40 mm
Betriebsart Schaltbetrieb
Einsatzgebiet/Verwendungszweck
• Ein- und Ausschalten von Beleuchtung, Springbrunnen, usw.
Der Empfänger ist SOMlink – kompatibel!
• Der Funkempfänger trennt das angeschlossene Gerät nur (F)
1-polig vom Netz. Zur allpoligen Netztrennung den Stecker des
Gerätes oder den Funkempfänger ausstecken.(F) (D)
• Die Abschaltung des Stromkreises erfolgt mit kleiner
• Das Öff nen des Gerätes ist strikt untersagt und führt zum Verlust
der Gewährleistungsansprüche.
• Die Fernsteuerung von Anlagen mit Unfallrisiko darf nur bei
direktem Sichtkontakt erfolgen!
• Zum sicheren Betrieb müssen die örtlich für diese Anlage
geltenden Sicherheitsbestimmungen eingehalten werden!
• Auskünfte erteilen E-Werke, VDE und Berufsgenossenschaften.
• Der Funkempfänger muss jederzeit frei zugänglich sein.
• Nicht hintereinander stecken
Bestimmungsgemäße Verwendung
Maximalen Laststrom beachten!
• Den Funkempfänger nur an einer Steckdose mit Schutzkontakt be-
treiben, die mit den oben genannten Werten abgesichert ist.
• Die Fernsteuerung von Geräten und Anlagen mit erhöhtem
Unfallrisiko (z. B. Krananlagen) ist verboten!
• Die Fernsteuerung ist nur für Geräte und Anlagen zulässig, bei
denen eine Funktionsstörung im Sender oder dem Funkempfänger
keine Gefahr für Personen, Tiere oder Sachen ergibt oder dieses
Risiko durch andere Sicherheitseinrichtungen abgedeckt ist.
• Der Betreiber genießt keinerlei Schutz vor Störungen durch
andere Fernmeldeanlagen oder Geräte (z. B. Funkanlagen, die
ordnungsgemäß im gleichen Frequenzbereich betrieben werden).
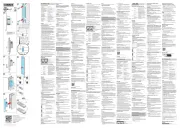
Mögliche LED-Zustände am Empfänger (A)
• Orange = Relais geschaltet
1. Netzstecker des elektrischen Gerätes ausstecken.(F)
2. Funkempfänger (D) (E) in Steckdose einstecken.
3. Netzstecker (F) (D)des elektrischen Gerätes in Funkempfänger
1. Taste (B) (A) ca. 2 Sekunden drücken bis LED grün leuchtet.
Wird innerhalb von weiteren 30 Sekunden kein Befehl
gesendet, schaltet der Funkempfänger in Normalbetrieb
Lernbetrieb unterbrechen: Taste erneut drücken, LED (B) (A)
3. Gewünschte Sendertaste (C) (A) so lange drücken, bis LED
schnell blinkt und erlischt.
Weitere Sender einlernen, die Punkte 1–3 wiederholen.
Max. 112 Speicherplätze stehen zur Verfügung.
Dieser Befehl schaltet das eingelernte Gerät nur aus.
1. Taste (B) (A)ca. 5 Sekunden drücken bis LED grün blitzt.
Wird innerhalb von 30 Sekunden kein Befehl gesendet, schaltet
der Funkempfänger in Normalbetrieb
Lernbetrieb unterbrechen: Taste erneut drücken, LED (B) (A)
3. Gewünschte Sendertaste (C) (A) so lange drücken, bis LED
schnell blinkt und erlischt
Dieser Befehl schaltet das eingelernte Gerät nur ein.
1. Taste (B) (A) ca. 10 Sekunden drücken bis LED grün blinkt.
Wird innerhalb von 30 Sekunden kein Befehl gesendet, schaltet
der Funkempfänger in Normalbetrieb.
Lernbetrieb unterbrechen: Taste erneut drücken, LED (B) (A)
3. Gewünschte Sendertaste (C) (A) so lange drücken, bis LED
schnell blinkt und erlischt.
Ein bereits eingelernter Handsender kann den Empfänger per
Funk in den Lernbetrieb versetzen. So können weitere Handsender
eingelernt werden, ohne dass die Taste am Empfänger betätigt (B)
Alle Informationen (Befehle und Tastenbelegung) des Handsenders
A, der den Empfänger aktiviert, werden dabei 1:1 auf die neuen
Einlernen per Funk ist nur bei identischen Handsendern
1. Taste (1+2) A des bereits eingelernten Handsenders für
3–5 Sekunden drücken bis LED am Empfänger grün invertiert (A)
2. Tasten (1+2) loslassen.
Wird innerhalb von weiteren 30 Sekunden kein Befehl
gesendet, schaltet der Funkempfänger in Normalbetrieb.
3. Beliebige Taste am neuen Handsender drückenB
LED am Empfänger blinkt schnell und erlischt.(A)
Befehle und Tastenbelegung von Handsender und B
Handsender sind jetzt identisch.A
1. Taste (B) kurz drücken.
Das angeschlossene Gerät wird eingeschaltet.
Bei erneuter Betätigung der Taste wird das Gerät
Schaltbetrieb über Handsendertaste
1. Sendertaste (C) kurz drücken.
Das angeschlossene Gerät wird eingeschaltet.
Bei erneuter Betätigung der Taste wird das Gerät
1. Sendertaste (C), die für das defi nierte Ausschalten eingelernt
Das angeschlossene Gerät wird ausgeschaltet.
1. Sendertaste (C), die für das defi nierte Einschalten eingelernt
Das angeschlossene Gerät wird eingeschaltet.
Sendertaste aus Funkempfänger löschen
1. Taste (B) (A) ca. 15 Sekunden drücken bis LED rot blitzt.
Löschbetrieb unterbrechen: Taste drücken, LED erlischt.(B) (A)
Wird innerhalb von 30 Sekunden kein Befehl gesendet, schaltet
der Funkempfänger in Normalbetrieb
3. Taste am Sender drücken, deren Befehl im Funkempfänger
LED blinkt schnell – Löschen beendet.(A)
Funkempfänger schaltet in Normalbetrieb – Löschen beendet.
Sender aus Funkempfänger löschen
1. Taste (B) (A) ca. 20 Sekunden drücken bis LED rot blinkt.
Löschbetrieb unterbrechen: Taste drücken, LED erlischt.(B) (A)
Wird innerhalb von 30 Sekunden kein Befehl gesendet, schaltet
der Funkempfänger in Normalbetrieb
3. BeliebigeTaste des Senders drücken, der aus dem Speicher des
Empfängers gelöscht werden soll.
Funkempfänger löscht den Sender LED blinkt schnell.(A)
Funkempfänger schaltet in Normalbetrieb – Löschen beendet.
Speicher des Funkempfängers löschen
Diese Aktion kann nicht abgebrochen werden!
1. Taste (B) (A) ca. 30 Sekunden drücken bis LED zuerst rot leuchtet
Funkempfänger löscht den Speicher.
Funkempfänger schaltet in Normalbetrieb – Löschen beendet.
Der Empfänger kann den aktuellen Status des Relais an den Sender
zurückmelden. Die LED des Senders gibt den Status dann wie folgt
Die Statusabfrage ist nur mit einem Sender möglich, der diese
Funktion ebenfalls unterstützt!
Leuchtet grün Gerät ausgeschaltet
Blinkt rot Gerät eingeschaltet
LED blinkt schnell orange:(A)
Es wird versucht mehr als 112 Speicherplätze auf dem
Funkempfänger zu belegen.
Die Sendertaste wir nicht eingelernt.
Funkempfänger schaltet in Normalbetrieb.
Vereinfachte Konformitätserklärung
Hiermit erklärt die , SOMMER Antriebs- und Funktechnik GmbH
dass der Funkanlagentyp SOMsocket der Richtlinie 2014/53/EU
entspricht. Der vollständige Text der EU-Konformitätserklärung ist
unter der folgenden Internetadresse verfügbar:
Die jeweiligen Ländervorschriften beachten.
Article no.: 21106V000, -V030
Radio frequency 868.95 MHz
Rated voltage range AC 100–240 V
Temperature range –25 °C to +65 °C
Memory slots 112 radio commands
Transmission power <10 mW
Area of application Dry rooms enclosed on all sides
Dimensions (housing) 138 x 54 x 40 mm
Operating mode Switching mode
• Switch lights, fountains etc. on and off .
The receiver is SOMlink-compatible!
• The radio receiver disconnects the connected device from the (F)
mains on only 1 pole. Disconnect the device plug or the radio (F)
receiver to disconnect all poles.(D)
• The current circuit is shut off with small contact opening.
• Opening the device is strictly prohibited and will cause loss of any
claims for warranty service.
• Systems should only be operated by remote control if they are
directly visible to the user.
• The local safety regulations for the system must be observed to
• Information is available from electrical utility companies, VDE
(Association for Electrical, Electronic &Information Technologies)
and professional associations.
• The radio receiver must be accessible at all times.
• Do not stack one behind the other
Observe maximum load current!
• Operate the radio receiver only at socket with an earth contact
using a fuse with the values noted above.
• Remote control of devices and systems with increased accident risk
(e.g. hoists) is prohibited.
• The remote control must only be used for devices and systems
in which radio interference in the transmitter or receiver will not
endanger people, animals or objects, or the risk is reduced by other
• The operator is not protected against interference caused by other
telecommunications equipment or devices (e.g. wireless systems
which are being operated properly in the same frequency range).
Possible LED states on the receiver (A)
Inverted fast fl ashes (HFL)
• Orange = relay switched
• Green = programming mode
Installation and connection
1. Disconnect mains plug of the electrical device .(F)
2. Plug radio receiver into socket .(D) (E)
3. Plug mains plug of the electrical device into radio receiver (F) (D)
Programming the transmitter
1. Press and hold button approx. 2 seconds until LED lights (B) (A)
If a command is not transmitted within another 30 seconds, the
radio receiver switches over to normal mode.
To interrupt teach-in mode: Press button again, LED (B) (A)
3. Press and hold the desired transmitter button until LED (C) (A)
fl ashes quickly and goes out.
Repeat steps 1 to 3 to program additional transmitters.
A maximum of 112 storage locations are available.
This command only switches the programmed device off .
1. Press and hold button approx. 5 seconds until LED (B) (A) fl ashes
If a command is not transmitted within 30 seconds, the radio
receiver switches over to normal mode.
To interrupt teach-in mode: Press button again, LED (B) (A)
3. Press and hold the desired transmitter button until LED (C) (A)
fl ashes quickly and goes out.
This command only switches the programmed device on.
1. Press and hold button approx. 10 seconds until LED (B) (A)
If a command is not transmitted within 30 seconds, the radio
receiver switches over to normal mode.
To interrupt teach-in mode: Press button again, LED (B) (A)
3. Press and hold the desired transmitter button until LED (C) (A)
fl ashes quickly and goes out.
Each transmitter that has already been programmed in can put
the radio receiver into programming mode by radio. This allows
additional transmitters to be programmed without requiring the button
(B) to be pressed on the receiver. All information (commands and
key assignment) of the transmitter that activates the receiver is A
transferred in full to the new transmitter .B
Only identical transmitters can be programmed by radio!
1. Press and hold buttons of the previously programmed (1+2)
transmitter for 3–5 seconds until LED on the receiver A (A) fl ashes
2. Release buttons (1+2).
If a command is not transmitted within another 30 seconds,
the radio receiver switches over to normal mode.
3. Press any button on the new transmitterB
LED on the receiver (A) fl ashes quickly and goes out.
Commands and key assignment on transmitter and B
transmitter are now identical.A
1. Press button (B) briefl y.
The connected device is switched on.
Pressing the button again switches the device off .
Switching mode via transmitter key
1. Press transmitter key brie(C) fl y.
The connected device is switched on.
Pressing the button again switches the device off .
1. Briefl y press transmitter key which was programmed (C),
for the defi ned shut down.
The connected device is switched on.
1. Briefl y press transmitter key which was programmed (C),
for the defi ned switch on.
The connected device is switched on.
Delete transmitter key from radio receiver
1. Press and hold button approx. 15 seconds until LED (B) (A)
Cancel delete mode: Press button again, LED goes out.(B) (A)
If a command is not transmitted within 30 seconds, the radio
receiver switches over to normal mode
3. Press button on transmitter for which the command should
be deleted in the radio receiver.
LED (A) fl ashes quickly – delete complete.
Radio receiver switches to normal mode – delete complete.
Delete transmitter from radio receiver
1. Press and hold button approx. 20 seconds until LED (B) (A)
Cancel delete mode: Press button again, LED goes out.(B) (A)
If a command is not transmitted within 30 seconds, the radio
receiver switches over to normal mode
3. Press the button on the transmitter corresponding to the receiver
memory slot that is to be deleted.
Radio receiver deletes the transmitter – LED (A) fl ashes
Radio receiver switches to normal mode – delete complete.
Deleting the radio receiver memory
This action cannot be interrupted!
1. Press and hold button approx. 30 seconds until LED (B) (A) fi rst
lights red and then fl ashes.
Radio receiver deletes the memory.
Radio receiver switches to normal mode – delete complete.
The receiver can report the current status of the relay to the
transmitter. The transmitter LED shows the status as follows:
Status query is only possible with a transmitter that supports
Lights green Device switched off
Flashes red Device switched on
LED (A) fl ashes orange quickly:
an attempt was made to set more than 112 memory slots on the
The transmitter button is not programmed.
Radio receiver switches to normal mode.
Simplifi ed Declaration of Conformity
SOMMER Antriebs- und Funktechnik GmbH hereby declares
that the radio system of type SOMsocket complies with Directive
2014/53/EU. The full text of the EU Declaration of Conformity
can be found at the following internet address:
Observe applicable national regulations.
Caractéristiques techniques
Fréquence radio 868,95 MHz
Plage de tension nominale CA 100–240 V
Fréquence nominale 50–60 Hz
Plage de températures –25 °C à +65 °C
Sortie de commutation 10 A
Emplacements de mémoire 112 commandes radio
Puissance d'émission <10 mW
Champ d'application locaux secs fermés de toutes parts
Indice de protection IP20
Dimensions (boîtier) 138 x 54 x 40 mm
Mode de fonctionnement Mode commutation
Domaine d’application / Usage prévu
• Mise en marche et arrêt de l’éclairage, des fontaines, etc.
Le récepteur est compatible avec SOMlink !
• Le récepteur radio coupe l’appareil raccordé de l’alimentation (F)
secteur uniquement à un pôle. Pour eff ectuer la coupure sur tous
les pôles, débrancher la fi che de l’appareil ou le récepteur (F)
• La coupure du circuit électrique s’eff ectue avec une petite ouverture
• L’ouverture de l’appareil est strictement interdite et annule la
• La télécommande des installations présentant un risque d’accident
est uniquement autorisée lorsqu’un contact visuel direct est
• Pour garantir le fonctionnement en toute sécurité, il convient de
respecter les dispositions relatives à la sécurité applicables à cette
• Pour en savoir plus, s’adresser aux centrales électriques, au VDE
et aux associations professionnelles.
• Le récepteur radio doit être à tout moment librement accessible.
• Ne pas brancher successivement
Tenir compte du courant de charge maximum !
• Utiliser le récepteur radio uniquement s’il est raccordé à une prise
reliée à la terre protégée selon les valeurs susmentionnées.
• La télécommande d’appareils et d’installations présentant un risque
d’accident élevé (par exemple grues) est interdite !
• L’utilisation de la télécommande est réservée aux appareils et
installations pour lesquels un dysfonctionnement de l’émetteur ou
du récepteur radio ne présente aucun danger pour les personnes,
les animaux et les équipements, ou pour lesquels ce risque est
couvert par d’autres dispositifs de sécurité.
• L’exploitant ne bénéfi cie d’aucune protection contre les perturbations
causées par d’autres appareils ou installations de télécommunication
(par ex. les installations radio qui émettent légalement sur la même
État possible des LED sur le récepteur (A)
Signifi cation des couleurs des LED
• Vert = mode programmation
• Rouge = mode suppression
1. Débrancher la fi che secteur de l’appareil électrique .(F)
2. Brancher le récepteur radio dans la prise .(D) (E)
3. Brancher la fi che secteur (F) de l’appareil électrique au récepteur
Programmation de l’émetteur
1. Appuyer sur le bouton pendant 2 secondes jusqu’à ce que (B)
2. Relâcher le bouton .(B)
Si aucune commande n’est envoyée au bout de 30 secondes
supplémentaires, le récepteur radio passe en mode de
Interrompre le mode programmation : Appuyer à nouveau sur le
bouton , la LED s’éteint.(B) (A)
3. Appuyer sur le bouton d’émetteur souhaité jusqu’à ce que la (C)
LED (A) clignote rapidement avant de s’éteindre.
La programmation est terminée.
Pour programmer d’autres récepteurs, répéter les points 1 à 3.
112 entrées en mémoire max. sont disponibles.
Cette commande désactive uniquement l’appareil programmé.
1. Appuyer sur le bouton pendant 5 secondes jusqu’à ce que la (B)
2. Relâcher le bouton .(B)
Si aucune commande n’est envoyée au bout de 30 secondes
supplémentaires, le récepteur radio passe en mode de
Interrompre le mode programmation : Appuyer à nouveau sur le
bouton , la LED s’éteint.(B) (A)
3. Appuyer sur le bouton d’émetteur souhaité jusqu’à ce que la (C)
LED (A) clignote rapidement avant de s’éteindre.
La programmation est terminée.
Cette commande active uniquement l’appareil programmé.
1. Appuyer sur le bouton pendant 10 secondes jusqu’à ce que la (B)
LED (A) clignote en vert.
2. Relâcher le bouton . (B)
Si aucune commande n’est envoyée au bout de 30 secondes,
le récepteur radio passe en mode de fonctionnement normal.
Interrompre le mode programmation : Appuyer à nouveau sur le
bouton , la LED s’éteint.(B) (A)
3. Appuyer sur le bouton d’émetteur souhaité jusqu’à ce que la (C)
LED clignote rapidement avant de s’éteindre.(A)
La programmation est terminée.
Programmation radio (HFL)
Un émetteur portatif déjà programmé peut commuter le récepteur
radio en mode programmation par radio. D’autres émetteurs portatifs
peuvent être programmés sans actionner le bouton du récepteur. (B)
Toutes les informations (commandes et aff ectation des boutons)
de l’émetteur portatif , qui active le récepteur, sont transférées A
à l’identique vers le nouvel émetteur portatif .B
La programmation par radio n’est possible qu’avec des
émetteurs portatifs identiques.
1. Actionner les boutons d’un émetteur portatif déjà programmé (1+2)
(A) (A) pendant 3 à 5 secondes jusqu’à ce que la LED du
récepteur fl ashe en vert de manière inversée.
2. Relâcher les boutons .(1+2)
Si aucune commande n’est envoyée au bout de 30 secondes
supplémentaires, le récepteur radio passe en mode de
3. Appuyer sur le bouton souhaité du nouvel émetteur portatif .B
La LED du récepteur clignote rapidement puis s’éteint.(A)
Les commandes et l’aff ectation des touches des émetteurs
portatifs et sont à présent identiques. B A
1. Appuyer rapidement sur le bouton .(B)
L’appareil raccordé s’active.
Appuyer à nouveau sur le bouton pour éteindre l’appareil.
Commutation par le bouton de l’émetteur portatif
1. Appuyer rapidement sur le bouton de l’émetteur.(C)
L’appareil raccordé s’active.
Appuyer à nouveau sur le bouton pour éteindre l’appareil.
1. Appuyer rapidement sur le bouton de l’émetteur programmé (C)
L’appareil raccordé s’éteint.
1. Appuyer rapidement sur le bouton de l’émetteur programmé (C)
pour la mise en marche défi nie.
La LED devient orange.(A)
L’appareil raccordé s’active.
Suppression du bouton de l’émetteur
1. Appuyer sur le bouton pendant 15 secondes jusqu’à ce que la (B)
2. Relâcher le bouton .(B)
Annuler la suppression : Appuyer sur le bouton , la LED (B) (A)
Si aucune commande n’est envoyée au bout de 30 secondes
supplémentaires, le récepteur radio passe en mode de
3. Appuyer sur le bouton de l’émetteur dont la commande doit être
supprimée dans le récepteur radio.
La LED clignote rapidement ; la suppression est terminée.(A)
Le récepteur radio passe en mode normal – suppression
Suppression de l’émetteur du récepteur
1. Appuyer sur le bouton pendant 20 secondes jusqu’à ce que la (B)
LED (A) clignote en rouge.
2. Relâcher le bouton .(B)
Annuler la suppression : Appuyer sur le bouton , la LED (B) (A)
Si aucune commande n’est envoyée au bout de 30 secondes
supplémentaires, le récepteur radio passe en mode de
3. Appuyer sur le bouton souhaité de l’émetteur qui doit être
supprimé de la mémoire du récepteur.
Le récepteur radio eff ace l’émetteur. La LED (A) clignote
Le récepteur radio passe en mode normal – suppression
Eff acement de la mémoire du récepteur radio
Cette action ne peut pas être annulée !
1. Appuyer sur le bouton pendant 30 secondes jusqu’à ce que la (B)
LED (A) devienne rouge puis clignote.
2. Relâcher le bouton .(B)
Le récepteur radio eff ace la mémoire.
Le récepteur radio passe en mode normal – suppression
Le récepteur peut signaler à l’émetteur l’état actuel du relais.
La LED de l’émetteur signale l’état comme suit :
La demande d’état n’est possible qu’avec un émetteur qui prend
en charge cette fonction !
LED s'allume en verte Appareil désactivé
Clignotement rouge Appareil activé
La LED clignote rapidement en orange : tentative de programma-(A)
tion de plus de 112 emplacements de mémoire sur le récepteur radio.
Le bouton de l’émetteur n’est pas programmé.
Le récepteur radio commute en mode normal.
Déclaration UE de conformité simplifi ée
Le soussigné, , SOMMER Antriebs- und Funktechnik GmbH
déclare que l’équipement radioélectrique du type SOMsocket
est conforme à la directive 2014/53/UE. Le texte complet de la
déclaration UE de conformité est disponible à l’adresse internet
Respecter la réglementation nationale en vigueur.
Cod. art.: 21106V000, -V030
Frequenza radio 868,95 MHz
Intervallo di tensione nominale AC 100–240 V
Frequenza nominale 50–60 Hz
Intervallo di temperatura da –25 °C a +65 °C
Posizioni di memoria 112 codici radio
Condizioni d'impiego ambienti asciutti, completamente chiusi
Classe di protezione IP20
Dimensioni (alloggiamento) 138 x 54 x 40 mm
Modalità di funzionamento Commutazione
Campo di utilizzo/applicazione
• Accensione/spegnimento di illuminazione, fontane ecc.
Il ricevitore è compatibile con SOMlink!
• Il radioricevitore separa il dispositivo collegato dalla rete solo con (F)
un polo. Per una separazione di tutti i poli scollegare la spina del
dispositivo o il radioricevitore (F) (D).
• La separazione dalla rete avviene con un piccolo contatto di
• È vietato aprire il dispositivo. L’apertura del dispositivo comporta
la decadenza della garanzia.
• Gli impianti ad eventuale rischio d’infortunio devono essere
telecomandati solo a diretto contatto visivo!
• Per la sicurezza di funzionamento dovranno essere rispettate
di sicurezza applicabili a questo impianto!
• Per informazioni in merito rivolgersi alle associazioni di categoria
• Il radioricevitore deve essere sempre accessibile.
• Non collegare in serie.
Osservare il carico di corrente massima!
• Collegare il radioricevitore solo ad una presa con contatto
di protezione avente i valori sopra riportati.
• È vietato l’utilizzo del dispositivo di comando a distanza
e impianti ad elevato rischio d’infortunio (p. es. impianti
• L’utilizzo di questo dispositivo di comando a distanza è consentito
esclusivamente per apparecchi ed impianti nei quali un eventuale
malfunzionamento del telecomando o del radioricevitore non
comporta rischi per persone, animali o cose, o nei quali tali rischi
sono annullati da altri dispositivi di sicurezza.
• L’operatore non è in alcun modo protetto dalle interferenze di altri
dispositivi o impianti di telecomunicazione (p. es. impianti radio
autorizzati ad operare sulla stessa gamma di frequenze).
Possibili stati del LED sul ricevitore (A)
Signifi cato dei colori del LED
• Arancione = il relè scatta
• Verde = modalità di programmazione
• Rosso = modalità di cancellazione
Installazione e collegamenti
1. Scollegare la presa del dispositivo elettrico .(F)
2. Inserire il radioricevitore nella presa .(D) (E)
3. Inserire la presa del dispositivo elettrico nel radioricevitore .(F) (D)
Programmazione trasmettitore
1. Premere il pulsante per circa 2 secondi (B) fi no a quando il LED
2. Rilasciare il tasto .(B)
Se entro i successivi 30 secondi non viene inviato alcun
comando, il radioricevitore si porta nella modalità di
Interrompere la modalità di programmazione: Premere
nuovamente il pulsante , il LED si spegne.(B) (A)
3. Tenere premuto il pulsante desiderato (C) fi no a quando il LED (A)
lampeggia velocemente e si spegne.
Termine della programmazione.
Per la programmazione di altri telecomandi, ripetere i punti da 1 a 3.
Sono disponibili al massimo 112 posizioni della memoria.
Questo comando spegne il dispositivo programmato.
1. Premere il pulsante per circa 5 secondi (B) fi no a quando il LED
(A) emette un fl ash verde.
2. Rilasciare il tasto .(B)
Se entro 30 secondi non viene inviato alcun comando, il radiori-
cevitore si porta nella modalità di funzionamento normale.
Interrompere la modalità di programmazione: Premere nuova-
mente il pulsante , il LED si spegne.(B) (A)
3. Tenere premuto il pulsante desiderato (C) fi no a quando il LED (A)
lampeggia velocemente e si spegne.
Termine della programmazione.
Questo comando accende il dispositivo programmato.
1. Premere il pulsante per circa 10 secondi (B) fi no a quando il LED
2. Rilasciare il tasto .(B)
Se entro 30 secondi non viene inviato alcun comando, il radiori-
cevitore si porta nella modalità di funzionamento normale.
Interrompere la modalità di programmazione: Premere
nuovamente il pulsante , il LED si spegne.(B) (A)
3. Tenere premuto il pulsante desiderato (C) fi no a quando il LED (A)
lampeggia velocemente e si spegne.
Termine della programmazione.
Programmazione via radio (HFL)
Un telecomando già programmato è in grado di far passare via radio
il radioricevitore nella modalità di programmazione. In questo modo
è possibile programmare altri telecomandi senza dover premere il
pulsante sul ricevitore. Tutte le informazioni (comandi e pulsanti) (B)
del telecomando , che attivano il ricevitore, vengono trasferite 1:1 A
La programmazione via radio è supportata solo con telecomandi
1. Premere i pulsanti del telecomando già programmato per (1+2) A
3–5 secondi fi no a quando il LED del ricevitore emette un LED (A)
2. Rilasciare i pulsanti .(1+2)
Se entro i successivi 30 secondi non viene inviato alcun
comando, il radioricevitore si porta nella modalità di
3. Premere un pulsante qualsiasi sul telecomando .B
Il LED sul radioricevitore lampeggia e si spegne.(A)
I comandi e i pulsanti del telecomando e del telecomando B A
Attraverso i pulsanti integrati
1. Premere brevemente il pulsante .(B)
Il dispositivo connesso viene acceso.
Premendo nuovamente il pulsante il dispositivo viene spento.
Commutazione attraverso i pulsanti del telecomando
1. Premere brevemente il pulsante .(C)
Il dispositivo connesso viene acceso.
Premendo nuovamente il pulsante il dispositivo viene spento.
1. Premere brevemente il pulsante che è stato impostato (C)
Il dispositivo connesso viene spento.
1. Premere brevemente il pulsante che è stato impostato (C)
Il LED si accende in arancione.(A)
Il dispositivo connesso viene acceso.
Cancellazione di un pulsante dal
1. Premere il pulsante per circa 15 secondi (B) fi no a quando il LED
(A) emette un fl ash rosso.
2. Rilasciare il tasto .(B)
Interrompere la cancellazione: Premere il pulsante , il LED (B)
Se entro 30 secondi non viene inviato alcun comando, il radiori-
cevitore si porta nella modalità di funzionamento normale.
3. Premere il tasto del telecomando di cui deve essere cancellato il
comando dal radioricevitore.
Il LED lampeggia velocemente; cancellazione terminata.(A)
Il radioricevitore passa alla modalità normale; cancellazione
Cancella il trasmettitore dal ricevitore
1. Premere il pulsante per circa 20 secondi (B) fi no a quando il LED
2. Rilasciare il tasto .(B)
Interrompere la cancellazione: Premere il pulsante , il LED (B)
Se entro 30 secondi non viene inviato alcun comando, il radiori-
cevitore si porta nella modalità di funzionamento normale.
3. Premere il pulsante del telecomando che si desidera cancellare
dalla memoria del ricevitore.
Il radioricevitore cancella il telecomando, il LED (A) lampeggia
Il radioricevitore passa alla modalità normale; cancellazione
Cancellazione della memoria del
Questa operazione non può venire interrotta!
1. Premere il pulsante per circa 30 secondi (B) fi no a quando il LED
(A) si accende in rosso e poi lampeggia.
2. Rilasciare il tasto .(B)
Il radioricevitore cancella la memoria.
Il radioricevitore passa alla modalità normale; cancellazione
Il ricevitore è in grado di leggere lo stato attuale del relè e inviarlo ai
telecomandi. Il LED del telecomando comunica lo stato come segue:
La lettura dello stato è possibile solo con un telecomando
che supporta questa funzione!
Acceso in verde Dispositivo spento
Lampeggia in rosso Dispositivo acceso
Il LED (A) lampeggia velocemente in arancione:
si sta cercando di occupare più di 112 posizioni di memoria sul
Il pulsante non viene programmato.
Il radioricevitore passa alla modalità normale.
Dichiarazione di conformità semplifi cata
Con la presente SOMMER Antriebs- und Funktechnik GmbH
attesta che il tipo di apparecchiatura a radiocomandi SOMsocket
è conforme della direttiva 2014/53/UE. Una copia della dichiarazione
di conformità UE è disponibile su Internet alla seguente pagina:
Osservare le norme locali in materia.
Schutzklasse I / Schutzleiter