ACアダプター/チャージャー
AC Adaptor/Charger
Adaptateur/Chargeur CA
取扱説明書/Operating Instructions/Mode d’emploi/
Manual de instrucciones
AC-VQ1051
©2021 Sony Corporation
Printed in China
https://www.sony.net/
5-038-031- (1)01
2
4
3
1
1
2
3
4
6
7
8
9
10
11
12
5
18
19
20
21
22
13
14
15
16
17
3
4
5
1 2
本書には、事故を防ぐための重要な注意事項と製品の取り扱いかたを
示しています。
本書をよくお読みのうえ、製品を安全にお使いください。お読みに
なったあとは、いつでも見られるところに必ず保管してください。
同梱物
ACアダプター/チャージャー(AC-VQ1051本体)(1)
電源コード(1)
接続コード(DK-215)( 1)
接続コード(DK-415 )(1)
印刷物一式
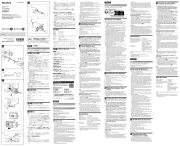
各部のなまえ
1 端子シャッター
2 スロット
3 DC入力
4 DC出力
5 充電ランプ
6 スロット
7 充電ランプ
8 出力切替スイッチ
9 充電モード切替スイッチ
10表示窓
11 スロット表示ランプ
12表示切替ボタン
表示窓の表示
13InfoLITHIUM(インフォリチウム)
表示
14WAITING表示
15WARNING表示
16TIMETOCHG(充電)表示
17時間/LOG表示
18BATTERYLIFE(使用可能時間)
表示
19VCR/CAMERA表示
20実用充電表示
21満充電表示
22バッテリーマーク
AC-VQ1051は次のようにお使いになれます
•付属の接続コードを使い、ソニー製機器(ビデオカメラなど)を動作
させる。
•ソニー製リチャージャブルバッテリーパック(Lシリーズ)の充電器
として使う。
‒ 充電終了を充電モード切替スイッチで「満充電」または「実用充
電」に設定できます。お急ぎのときは「実用充電」に設定して、各
バッテリーを実用充電で終了することができます。
•“インフォリチウム”バッテリーを装着した場合は、以下の機能が働
きます。
‒ 急速充電ができます。
(通常充電(ビデオカメラ本体を使った充電など)より早く充電す
ることができます。)
‒ “BATTERYLOG”と充電情報を表示できます。
バッテリーの使用履歴や、充電状況を表示します。
•総充電時間、充電回数、最終使用年月
•使用可能時間、充電終了までの時間
•本機は、リチウムイオンタイプのバッテリー用です。ニカドタイ
プ、ニッケル水素タイプのバッテリーの充電には使えません。
•機器(ビデオカメラなど)によっては使えないものもあります。
お使いになる前に、お手持ちの機器をお確かめください。
InfoLITHIUM(インフォリチウム)バッテリーとは
“インフォリチウム”バッテリーに対応した機器との間で、バッテリー
の使用状況に関するデータ通信をする機能を持った新しいタイプ
のリチウムイオンバッテリーです。本機は“インフォリチウム”バッ
テリー(Lシリーズ)対応です。“インフォリチウム”バッテリーには
ロゴが付いています。
“InfoLITHIUM”(“インフォリチウム”)はソニーグループ株式会社の商
標です。
“BATTERY LOG”(“バッテリーログ”)とは
バッテリーに記録されている使用履歴を表示します。
•総充電時間
•充電回数
•最終使用年月
(表示はあくまで目安です。バッテリーにより表示できる内容に制
限があります。)
使用可能時間表示についてのご注意(必ずお読みくだ
さい)
本機は充電器として使用中、以下の条件を満たせば、充電の状況確認
やバッテリーの情報の目安を表示します。
•“インフォリチウム”バッテリーを使用している。
•お手持ちのビデオカメラなどが“インフォリチウム”対応機種である。
お手持ちのバッテリーに ロゴが付いているかご確認くだ
さい。また、お手持ちのビデオカメラなどの取扱説明書で“インフォリ
チウム”対応機種かどうかご確認ください。
複数の“インフォリチウム”対応のビデオカメラなどをお使いの場合
は、最後にバッテリーを取り付けていた機器での情報を表示します。
“BATTERYLOG”(“バッテリーログ”)は、リチャージャブルバッテ
リーパックNP-F970、NP-F770、NP-F570が対象です。その他のバッ
テリーは対応していないなど、表示内容に制限があります。
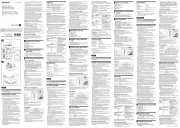
接続コードをつないで使う
ご使用の機器(ビデオカメラなど)の取扱説明書もあわせてご覧くだ
さい。
1 出力切替スイッチを「 VCR/CAMERA」にする。
2 電源コードを本体につなぐ。
3 コンセントへつなぐ。
「ピーッ」という音がして、表示窓に表示がでます。
4 接続コードをDC出力へつなぐ。
5 接続コードをビデオカメラへつなぐ。
接続コードの取り付け方向については、ビデオカメラなどの取扱
説明書をご覧ください。
接続コードDK-215での接続例
接続コードDK-415での接続例
ご注意
•ビデオカメラなどを使用中に、出力切替スイッチを「CHARGE」にす
ると、ビデオカメラなどへの電源の供給は中断されます。
•「 VCR/CAMERA」のモードでは、本機にバッテリーを取り付けても
充電することはできません。
•ビデオカメラなどの映像が乱れるときは、本機をお使いの機器から
離してください。
•接続コードDK-415は、リチャージャブルバッテリーパック(Lシリーズ)
対応機器のみ使用できます。お手持ちの機器をお確かめください。
•イラストは、デジタルHDビデオカメラレコーダーHDR-AX2000の
接続例です。
バッテリーを充電する
1 充電モード切替スイッチを「NORMAL CHARGE」または
「FULL CHARGE」に設定する。
満充電する場合は「FULLCHARGE」に設定してください。
実用充電で充電完了とする場合は「NORMALCHARGE」に設定し
てください。
詳しくは「充電モード切り替えについて」をご覧ください。
2 出力切替スイッチを「CHARGE」にする。
3 電源コードを本体につなぐ。
4 コンセントにつなぐ。
「ピーッ」という音がして、表示窓に表示がでます。
5 バッテリーを取り付ける。
「バッテリーの取り付けかた」を参照して取り付けてください。充
電が始まると、表示窓のバッテリーマークが順番に点滅し、充電ラ
ンプが点灯します。
6 充電終了後、バッテリーを取りはずす。
充電モード切替スイッチで設定した充電終了条件で充電を終了し
ます。充電ランプが消灯したら充電終了です。充電終了については
「充電モード切り替えについて」を参照してください。
「バッテリーの取りはずしかた」を参照して、取りはずしてくださ
い。
充電モード切り替えについて
充電の終了には、実用充電と満充電があります。充電モードは、本機の
充電モード切替スイッチで切り替えることができます。
•実用充電( NORMALCHARGE)
充電されるとバッテリーマークが右図の表示にな
ります。
満充電で終了するよりもバッテリーの状態をより
良く保つことが可能ですが、使用可能時間が若干短
くなります。
•満充電( FULLCHARGE)
満充電で充電を終了すると、バッテリーマークが右
図の表示になります。実用充電より使用可能時間が
若干長くなりますが、充電時間も長くなります。
2個のバッテリーを同時に取り付ける
本機は同時に2個のバッテリーを取り付けることができます。どちら
か1個でも充電できます。同時に取り付けた場合、スロット に取り付
けたバッテリーから充電されます。
また、同時に取り付けない場合は、スロット 、 に関わらず、先に取
り付けたバッテリーから充電されます。
ご注意
•2個のバッテリーを取り付けることができますが、同時に実用充電
することはできません。
•充電モード切替スイッチを「FULLCHARGE」に設定した場合、先に
取り付けたバッテリーから順に実用充電まで充電した後、2個の
バッテリーが同時に満充電まで充電されます。
バッテリーの取り付けかた
1本機の上にバッテリーを置く。 マーク側を端子シャッ
ター側にあわせる。
2矢印の方向にバッテリーをスライドさせる。
端子シャッターが完全に隠れるまでスライドしてください。
バッテリーの取りはずしかた
バッテリーを取り付けたときと反対の方向にスライドさせ、真上に持
ち上げる。
ご注意
•バッテリーをつかんで、本機を持ち上げないでください。
•端子シャッターには衝撃を与えないでください。バッテリーを取り
付けるときなどは、ぶつけないよう、特にご注意ください。
•バッテリーを取り付けるときや、取りはずすときに指をはさまない
ようご注意ください。
主なバッテリーの充電時間
急速充電
実用充電時間
満充電時間
NP-F970
約285分
約345分
NP-F770
約185分
約245分
NP-F570
約110分
約170分
•本機を使用し、使い切ったバッテリーを25℃の室温で充電したと
きの時間です。
•周囲の温度やバッテリーの状態によっては、上記の時間と異なる場
合があります。
急いで使いたいとき
バッテリーは、充電が完了する前でも必要なときに取りはずして使え
ます。ただし、充電時間によってお使いになれる時間が異なります。
ご注意
•充電中に出力切替スイッチを「 VCR/CAMERA」にすると、充電は中
断されます。
•充電ランプが点灯しなかったり点滅したときは、バッテリーがしっ
かり取り付けられているか確認してください。しっかり取り付けら
れていないと、充電されないことがあります。
•“インフォリチウム”バッテリー以外のバッテリーは、急速充電でき
ません。
•充電モード切替スイッチを「NORMALCHARGE」に設定した場合は、
実用充電で終了し、満充電までの充電は行いません。
•充電モードの切り替えは、各モードでの充電終了前であれば可能で
す。
•使用後は必ず電源コードをコンセントから抜いておいてください。
抜くときは電源プラグを持って抜いてください。
充電中に何か異常があると、充電ランプが点滅し、表示窓に
“WARNING”と表示されます。
詳しくは「故障かな?と思ったら」をお読みください。
充電の状況を確認する
充電を開始すると、表示窓に使用可能時間が表示されます。
使用可能時間はビデオカメラのビューファインダーを使って撮影し
た場合の使用可能時間の目安です。液晶画面を使うと、使用可能時間
は短くなります。
ご使用のビデオカメラによっては、使用可能時間が表示されないこと
があります。詳しくは、「使用可能時間表示についてのご注意」をお読
みください。
充電中の表示内容の切り替えには2通りの方法があります。
充電中の表示内容の切り替えには、自動的に切り替わる表示と、表示
切替ボタンを押すことで切り替わる表示の2通りがあります。スロッ
ト表示ランプの点灯は、表示しているバッテリー情報のスロット番号
を示しています。
ここではスロット に最初にバッテリーを取り付け、次にスロット
にバッテリーを取り付けた場合を例に示します。
充電中に表示内容が自動的に切り替わる。
使用可能時間
はじめに取り付けたバッテリーの使用可能時間です。
充電する前にお使いだった“インフォリチウム”対応のビデオカメ
ラなどに取り付けたときの使用可能時間です。
使用可能時間
あとから取り付けたバッテリーの使用可能時間です。
充電時間
スロット と のバッテリーの満充電が終了するまでのトータ
ル時間です。
充電モード切替スイッチが「NORMALCHARGE」の場合は、実用
充電が終了するまでの時間が表示されます。
充電中に表示切替ボタンを押す。
充電中に表示切替ボタンを押すと、“BATTERYLOG”を表示すること
ができます。表示切替ボタンを押すごとに、下記のように表示が切り
替わります。
表示切替ボタンを押してから約5秒が経過すると、バッテリーの使用
可能時間を表示し、使用可能時間と充電が終了するまでの時間の表示
を自動的に切り替えます。
総充電時間
はじめに取り付けたバッテリーの総充電時間です。
最初に充電してからのおおよその総充電時間を表示します。最小
単位は5時間です。
充電回数
はじめに取り付けたバッテリーの充電回数です。
最初に充電してからのおおよその充電回数を表示します。最小単
位は5回で、5の倍数で表示されます。継ぎ足し充電をしたときや
途中で充電を中止したときなどは、充電回数としてカウントされ
ない場合があります。
最終使用年月
はじめに取り付けたバッテリーの最終使用年月です。
「月」「年(西暦の下二桁)」の順に表示されます。カレンダー未設定
のビデオカメラで使用した場合は「----」として表示されます。
総充電時間
あとから取り付けたバッテリーの総充電時間です。
充電回数
あとから取り付けたバッテリーの充電回数です。
最終使用年月
あとから取り付けたバッテリーの最終使用年月です。
充電終了後に表示切替ボタンを押す。
充電終了後は表示内容が自動的に切り替わりません。表示切替ボタン
を押すごとに、下記のように表示が切り替わります。表示切替ボタン
を押してから約5秒が経過すると、 の状態に戻ります。
充電が終了した状態です。充電モード切り替えスイッチ
が「NORMAL CHARGE」の場合は、バッテリーマークに
「NORMAL」が表示されます。
使用可能時間
はじめに取り付けたバッテリーの使用可能時間です。
使用可能時間
あとから取り付けたバッテリーの使用可能時間です。
総充電時間
はじめに取り付けたバッテリーの総充電時間です。
充電回数
はじめに取り付けたバッテリーの充電回数です。
最終使用年月
はじめに取り付けたバッテリーの最終使用年月です。
総充電時間
あとから取り付けたバッテリーの総充電時間です。
充電回数
あとから取り付けたバッテリーの充電回数です。
最終使用年月
あとから取り付けたバッテリーの最終使用年月です。
ご注意
•表示時間は25℃の室温で充電したときの目安です。使用環境に
よって実際の時間と異なる場合があります。また、バッテリーの状
態によっては、時間が表示されない場合がありますが、故障ではあ
りません。
•充電を開始してから時間表示するまで、しばらく時間がかかること
があります。
•充電していない側のバッテリーは、時間やバッテリー残量表示まで
に時間のかかる場合があります。
•新品のバッテリーで使用可能時間を表示するには、お使いのビデオ
カメラなどにバッテリーを取り付け、20秒程度ご使用ください。そ
のあと、本機に取り付け、充電を開始してください。
•満充電済みのバッテリーを取り付けると「TIMETOCHGFULL1h」
(満充電終了まで1時間)の表示が出ることがありますが、故障では
ありません。
•以下のときは、時間/ LOG表示が「 ----」になったり、時間の表示に
ずれが生じることがありますが、故障ではありません。
‒ 表示時間と実際の充電時間にずれが生じたとき(そのまま満充電
まで充電を続けてください。)
‒ “インフォリチウム”バッテリーではないとき(使用可能時間表示
などの機能はありません。)
‒ 最終使用年月が不明のとき(バッテリーをビデオカメラへ取り付
けても電源を入れなかったり、ビデオカメラのカレンダーが未設
定の場合など)
‒ 実用充電終了から満充電終了までの間に、本機からバッテリーを
取りはずした場合
(実用充電終了から満充電終了までは約1時間です。)
‒ 長時間使用していないバッテリーを充電する場合(一度、満充電
まで充電してください。)
なお、バッテリーを2個取り付けた場合、どちらかのバッテリーが上
記の状態であれば同じ症状が生じることがあります。
•“BATTERYLOG”表示は、リチャージャブルバッテリーパックNP-
F970、NP-F770、NP-F570を対象としています。その他のバッテリー
では表示できる内容に制限があります。
海外へお持ちになる方へ
本機は100V-240Vのワールドワイド対応です。
本機を海外旅行者の電子式変圧器(トラベルコンバーター)に接続
しないでください。発熱や故障の原因となります。
故障かな?と思ったら
もう1度点検してみましょう。それでも正常に動作しないときは、ソ
ニーの相談窓口にご相談ください。
ビデオカメラなどが動作しない
•電源プラグがコンセントからはずれている。
コンセントに差し込む。
•接続コードを正しく接続していない。
正しくつなぐ。
•出力切替スイッチが「 CHARGE」になっている。
「VCR/CAMERA」にする。
バッテリーの充電が行われない
•出力切替スイッチが「 VCR/CAMERA」になっている。
「CHARGE」にする。
バッテリーの残量が充分あるのに電源がすぐ切れる、また
は残量表示時間とずれが生じる
•バッテリーを使いきってから、もう一度満充電する。
残量が正しく表示されます。
表示切り替えが行われない
「使用可能時間表示についてのご注意」をお読みください。
表示窓に“Lo”と表示される
•低温になっているバッテリーを装着したり、10℃~30℃の推奨充
電温度範囲より低い温度で充電すると、下記のように表示される場
合があります。この場合、充電は行われますが、このままの状態が続
くとバッテリー保護のために“充電待機”(下記参照)になったり、充
分な充電が行われないことがあります。10℃~30℃の推奨充電温
度範囲で充電することをおすすめします。
本機の充電ランプには以下の2つの点滅パターンがあり
ます。
速い点滅・・・・・・約0.15秒の点灯と消灯を繰り返す
遅い点滅・・・・・・約1.5秒の点灯と消灯を繰り返す
充電ランプが点滅した場合は、以下の文章を確認して、適切に対処し
てください。点滅のパターンによって対処の方法が異なります。
充電ランプが遅い点滅を繰り返し、表示窓に“WAITING”
と表示される
充電が一時停止した待機状態になっています。
室温やバッテリーの温度が充電に適した温度範囲外のとき、自動的に
充電が一時停止されます。
充電に適切な温度の範囲内に戻ると、充電ランプが点灯し充電が再開
されます。
バッテリーの充電は、周囲温度が10℃~30℃の環境で行うことをお
すすめします。
充電ランプが速い点滅をして、表示窓に“WARNING”
と表示される
以下のような場合、1度目の充電では“WARNING”が表示される場
合があります。その場合は1度本機からバッテリーをはずし、再度
充電を行ってください。
長時間バッテリーを放置した場合
長時間バッテリーをビデオカメラ本体に取り付けたまま放置
した場合
バッテリーをお買い上げ直後
それでも“WARNING”が表示される場合、以下の手順に従って確認し
てください。
充電中のバッテリーを取りはずし、もう1度、同じバッテリーを取り付
ける。
異常があると思われる商品について、ソニーの相談窓口にご相談くだ
さい。
再び点滅した場合
別の“インフォリチウム”バッテ
リーを取り付ける。
点灯後、再び点滅しなかった場合
充電時間が過ぎて充電ランプが
消えていれば、異常はありません。
再び点滅した場合
本機に異常があると思われ
ます。
点灯後、再び点滅しなかった場合
充電時間が過ぎて充電ランプが
消えていれば、はじめに取り付け
たバッテリーに異常があると思わ
れます。
保証書とアフターサービス
保証書について
•この製品には保証書が添付されていますので、お買い上げの際、お
受け取りください。
•所定事項の記入および記載内容をお確かめのうえ、大切に保存して
ください。
•保証期間は、お買い上げ日より1年間です。
アフターサービスについて
調子が悪いときはまずチェックを
この取扱説明書をもう一度ご覧になってお調べください。
それでも具合の悪いときは
ソニーの相談窓口にご相談ください。
ご相談になるときは、次のことをお知らせください。
●型名:AC-VQ1051
●故障の状態:できるだけ詳しく
●お買い上げ日
保証期間中の修理は
保証書の記載内容に基づいて修理させていただきます。詳しくは保証
書をご覧ください。
記録内容の補償はできません
万一、本機の不具合により記録や再生がされなかった場合、画像や音
声などの記録内容の補償については、ご容赦ください。
主な仕様
定格入力 AC100V-240V 50Hz/60Hz 22W
DC12V/24V
定格出力 DC8.4V2.0A( VCR/CAMERA)
DC8.4V1.6A(CHARGE)
動作温度 0℃~40℃
保存温度 -20℃~+60℃
外形寸法(約)123mm×53mm×135mm
(幅/高さ/奥行き)(最大突起物を除く)
質量 約400g
仕様および外観は、改良のため予告なく変更することがありますが、
ご了承ください。
Included items
AC Adaptor/Charger (AC-VQ1051) (1)
AC Power cord (1)
Connecting cord (DK-215) (1)
Connecting cord (DK-415) (1)
Set of printed documentation
Identifying the parts
1 Terminal shutter
2 Slot
3 DC IN connector
4 DC OUT connector
5 CHARGE lamp
6 Slot
7 CHARGE lamp
8 Output change switch
9 Charging mode change
switch
10 Display window
11 Slot indicator lamp
12 DISPLAY change button
Display window
13 “InfoLITHIUM” indicator
14 WAITING indicator
15 WARNING indicator
16 TIME TO CHG (charge)
indicator
17 Time/LOG indicator
18 BATTERY LIFE indicator
19 VCR/CAMERA indicator
20 Normal charge indicator
21 Full charge indicator
22 Battery life indicator
Battery to be recharged for this product is follows
Brand Name Sony
Battery Type NP-F570 NP-F770 NP-F970
The AC-VQ1051 AC Adaptor/
Charger can be used as follows
• For operating Sony equipment (video cameras, etc.,) use the
connecting cords included with this unit.
• For charging Sony rechargeable battery packs (L series).
‒You can set the level of charge completion to “Full charge”
or “Normal charge” with the charging mode change
switch. If you want to use the battery pack quickly, set
to “Normal charge” to complete charging in the normal
charged state.
• When “InfoLITHIUM” battery packs are attached to this unit,
the following functions are available.
‒Quick charging
(Faster than charging with your video camera, etc.)
‒“BATTERY LOG” and charging information can be
displayed.
Usage history and charging status of the battery pack is
displayed.
• Total charging time, charge count, last use year and
month
• Battery life, remaining time until charging is complete
• This unit is for charging lithium ion battery packs. It cannot
be used to recharge Ni-Cd or Ni-MH batteries.
• This unit cannot be used with some model video cameras
or other equipment. Confirm the compatibility of your
equipment before use.
What is “InfoLITHIUM”?
“InfoLITHIUM” is a lithium ion battery pack which can
exchange data on battery consumption with compatible
electronic equipment. We recommend that you use an
“InfoLITHIUM” battery pack (L series) with electronic
equipment that has the mark.
“InfoLITHIUM” is a trademark of Sony Group Corporation.
What is “BATTERY LOG”?
“BATTERY LOG” displays the usage history it recorded in the
battery pack.
• Total charging time
• Charge count
• Last use year and month
(Displays are approximate. Depending on the battery pack,
the contents of the display are limited.)
Notes on the BATTERY LIFE indicator
(Read carefully before use)
While charging the battery pack, this unit shows the status of
charging and information of the battery pack so long as the
following conditions are met.
• You are using an “InfoLITHIUM” battery pack.
• Your video camera, etc. is compatible with “InfoLITHIUM”.
Check that your battery pack has the mark.
Check in the operating instructions supplied with your video
equipment whether it is “InfoLITHIUM” compatible.
If you use the battery pack with more than one video camera,
etc. that is compatible with “InfoLITHIUM”, information is
shown for the equipment last attached to the battery pack.
“BATTERY LOG” is available with the rechargeable battery
packs NP-F970, NP-F770 and NP-F570. Other battery packs
may not be compatible or may display limited information.
To Operate Video Equipment
For details of connection, refer to the operating instructions of
the video camera etc.
1 Set the output change switch to VCR/CAMERA.
2 Connect the AC power cord to this unit.
3 Connect the AC power cord to a wall outlet.
There is a beep and the display window comes on.
4 Connect the connecting cord to the DC OUT connector
of this unit.
5 Connect the connecting cord to the video camera.
For the direction in which to fit the connecting cord,
refer to the operating instructions of video camera, etc.
When using the connecting cord DK-215
When using the connecting cord DK-415
Notes
• Setting the output change switch to CHARGE while
operating the video camera, etc. cuts the power supply to
the video camera.
• You cannot charge a battery pack attached to this unit when
this unit is in VCR/CAMERA mode.
• Move this unit away from your video camera, etc. if the
image is distorted.
• The connecting cord DK-415 can be used with equipment
compatible with the rechargeable battery pack (L series).
Confirm the compatibility of your equipment before use.
• The illustration shows connection to an HDR-AX2000 digital
HD video camera recorder.
To Charge the Battery Pack
1 Set the charging mode change switch to “NORMAL
CHARGE” or “FULL CHARGE”.
If you want to charge the battery pack until full charging is
complete, set the charging mode change switch to “FULL
CHARGE”.
If you want to finish charging when normal charging is
complete, set it to “NORMAL CHARGE”.
For details, refer to “Switching the charging mode”.
2 Set the output change switch to CHARGE.
3 Connect the AC power cord to this unit.
4 Connect the AC power cord to a wall outlet.
There is a beep and the display window comes on.
5 Attach the battery pack.
Refer to “To attach the battery pack”. When charging starts,
the battery life indicator in the display window blinks in
sequence and the CHARGE lamp lights up.
6 When charging is complete, remove the battery pack.
This unit finishes charging on the charging level that you
set with the charging mode change switch. When the
CHARGE lamp turns off, charging is complete. For details
about charge completion, refer to “Switching the charging
mode”.
Refer to “To remove the battery pack” when removing the
battery pack.
Switching the charging mode
There are two levels of charge completion: “Normal charge”
and “Full charge”. You can change the charging mode with the
charging mode change switch on this unit.
• NORMAL CHARGE
When charge is completed, the battery life
indicator is displayed as illustrated on the
right.
The condition of the battery pack can be
better maintained, but the battery life will
be slightly shorter than when in the full
charged state.
• FULL CHARGE
When charging is complete in the full
charged state, the battery life indicator is
displayed as illustrated on the right.
The battery life will be slightly longer than
when in the normal charged state, but the
charging time will also be longer.
Attaching two battery packs
simultaneously
You can attach two battery packs in this unit at the same time.
You can charge just one battery pack as well. Charging starts
with the battery pack installed in Slot .
When two battery packs are attached but not simultaneously,
charging starts with the battery pack attached first regardless
of whether it is in Slot or .
Notes
• Two battery backs can be attached, but they cannot be
charged at normal charging simultaneously.
• When the charging mode change switch is set to “FULL
CHARGE”, this unit completes normal charging in the order
that the battery packs were attached and then completes
full charging for both battery packs simultaneously.
To attach the battery pack
1 Place the battery pack on this unit with the mark
facing the terminal shutter.
2 Slide the battery pack in the direction of the arrow.
Press the battery pack until the terminal shutter is
completely concealed.
To remove the battery pack
Slide the battery pack in the direction of the arrow and
lift it straight out.
Notes
• Do not pick this unit up by holding the battery pack.
• Be sure not to hit the terminal shutter. When attaching the
battery pack, be particularly careful not to hit the battery
pack against it.
• Be careful not to pinch your fingers while attaching or
removing the battery pack.
Charging time
Quick Charge
Normal charge
Full charge
NP-F970
285 min
345 min
NP-F770
185 min
245 min
NP-F570
110 min
170 min
• The times shown are for charging an empty battery pack,
using this unit at an ambient temperature of 25 °C (77 °F).
• The charging time may differ depending on the condition of
the battery pack and the ambient temperature.
To use the battery pack quickly
You can use the battery pack even if you remove it from
this unit before charging is completed. However, a shorter
charging time means a shorter useable time.
Notes
• If the output change switch is set to VCR/CAMERA during
charging, charging stops.
• If the CHARGE lamp does not light up or blink, check that
the battery pack is correctly attached to this unit. If it is not
correctly attached, it will not be charged.
• Quick charging is only performed with “InfoLITHIUM” battery
packs.
• When the charging mode change switch is set to “NORMAL
CHARGE”, this unit finishes charging when normal charging
is complete.
• You can change the charging mode before each charging is
complete.
• Unplug this unit from the wall outlet after use. To disconnect
the cord, pull it out by the plug. Never pull the cord itself.
If anything goes wrong during charging, the CHARGE lamp
blinks and “WARNING” appears on the display. For details, see
“Troubleshooting”.
To Check Charging
When charging starts, the battery life lights up in the display
window.
The battery life displayed is the approximate time remaining
for recording images using the viewfinder. The battery life is
shorter if the LCD display is used.
The battery life may not be displayed with certain video
cameras. For details, refer to “Notes on the BATTERY LIFE
indicator”.
There are two methods of switching the contents of the
display window during charging.
There are two methods of switching the contents of the
display window: display changing automatically and display
changing each time you press the DISPLAY change button.
The slot indicator lamp corresponds to the slot number.
Following is an example of installing a battery pack in Slot
followed by another in Slot .
Changing the contents of the display
window automatically during charging
Battery life
The battery life of the first attached battery pack.
This is the battery life when attached to the “InfoLITHIUM”
compatible video camera, etc. last used.
Battery life
The battery life of the subsequently attached battery pack.
Charging time
The total remaining time until full charging of the battery
packs installed in Slot and Slot is complete.
When the charging mode change switch is set to “NORMAL
CHARGE”, the remaining time until normal charging is
complete is displayed.
Press the DISPLAY change button during
charging.
During charging, “BATTERY LOG” can be displayed by pressing
the DISPLAY change button.
The contents of the display window change each time you
press the DISPLAY change button as follows.
About five seconds after pressing the DISPLAY change
button, battery life is displayed and then this automatically
switches between the battery life and the remaining time until
charging is complete.
Total charging time
The total charging time of the first attached battery pack.
Displays the approximate total charging time from first
charging. The minimum displayed is 5 hours.
Total charge count
The number of times the first attached battery pack has
been charged.
Displays the approximate number of times the battery
pack has been charged since its first charging. The
minimum displayed is 5 times, and the count is displayed
in multiples of five. Top-up charges and suspended
charges may not be counted.
Year and month of last use
The year and month when the first attached battery pack
was last used.
Displays “Month” followed by “Year” (last two digits of the
year). If used with a video camera that has no calendar set,
“-- --” is displayed.
Total charging time
The total charging time of the subsequently attached
battery pack.
Total charge count
The number of times the subsequently attached battery
pack has been charged.
Year and month of last use
The year and month when the subsequently attached
battery pack was last used.
Press the DISPLAY change button after
charging is complete.
After charging is complete, the display does not change
automatically. The contents of the display window change
each time you press the DISPLAY change button as follows.
About five seconds after pressing the DISPLAY change button,
returns to the display shown in .
Charging is complete. When the charging mode
change switch is set to “NORMAL CHARGE”, the
battery life indicator shows “NORMAL”.
Battery life
The battery life of the first attached battery pack.
Battery life
The battery life of the subsequently attached battery pack.
Total charging time
The total charging time of the first attached battery pack.
Total charge count
The number of times the first attached battery pack has
been charged.
Year and month of last use
The year and month when the first attached battery pack
was last used.
Total charging time
The total charging time of the subsequently attached
battery pack.
Total charge count
The number of times the subsequently attached battery
pack has been charged.
Year and month of last use
The year and month when the subsequently attached
battery pack was last used.
Notes
• The time display is an approximate time when charging at
25 °C (77 °F). It may differ from the actual time depending
on the environment. Also, depending on the condition
of the battery, a time may not be displayed. This is not a
malfunction.
• It may take some time for the time to be displayed after
starting the charging.
• The time display and remaining battery life of the battery
pack on the side not being charged may take some time to
appear.
• To display the battery life of a new battery pack, first attach
it to your video camera and use it for about 20 seconds, and
then charge it with this unit.
• If you attach a fully charged battery pack to this unit, “TIME
TO CHG FULL 1h” may appear on the display. This is not a
malfunction.
• In the following cases, the time/LOG display may show
“-- --” or the time display may be out. This is not a
malfunction.
‒
There is a difference between the time display and actual
charging time. (Even if this happens, continue charging
until fully charged.)
‒
When charging a battery other than an “InfoLITHIUM”
battery pack (Battery life display and other functions are
not available.)
‒
When last use year and month are unclear. (When you
attach the battery pack to a video camera but do not
turn on the power of the video camera, or the calendar
function of the video camera is not setup, etc.)
‒
If the battery pack is removed from this unit after normal
charging is complete but before full charging is complete.
(It takes about one hour from when normal charging is
complete to when full charging is complete.)
‒
When charging a battery pack that has not been used for
a long time. (Fully charge once first.)
When two battery packs are attached to this unit, similar
symptoms may appear if either one of the batteries is in the
above condition.
• “BATTERY LOG” display is available with the rechargeable
battery packs NP-F970, NP-F770 and NP-F570. With other
battery packs, the contents of the display are limited.
Specifications
Input 100 V - 240 V AC 50 Hz/60 Hz 22 W
12 V/24 V DC
Output 8.4 V DC 2.0 A (VCR/CAMERA)
8.4 V DC 1.6 A (CHARGE)
Operating temperature 0 °C to 40 °C (32 °F to 104 °F)
Storage temperature –20 °C to +60 °C (–4 °F to +140 °F)
Dimensions (Approx.) 123 mm × 53 mm × 135 mm (w/h/d)
(4 7/8 in. × 2 1/8 in. × 5 3/8 in.)
(excluding the projecting parts)
Mass Approx. 400 g (14.1 oz.)
Design and specifications are subject to change without
notice.
Note
This unit supports worldwide voltages 100 V to 240 V.
Do not use an electronic voltage transformer, as this may
cause a malfunction.
NOT FOR RESIDENTIAL OR CONSUMER USE
Troubleshooting
Video equipment does not work.
• The power plug is disconnected from the wall outlet (wall
socket).
Insert into a wall outlet.
• The connector cable is not properly connected.
Connect properly.
• The output change switch is set to CHARGE.
Set the output change switch to VCR/CAMERA.
The battery pack does not charge.
• The output change switch is set to VCR/CAMERA.
Set the output change switch to CHARGE.
Power immediately turns off even though there is
sufficient battery life remaining, or the displayed
battery life differs from the actual battery life.
• Run down the battery pack and then fully charge it again.
The battery life will be correctly displayed.
The display does not change.
Refer to “Notes on the BATTERY LIFE indicator”.
“Lo” is displayed in the display window.
• The temperature of the battery pack is too low.
• Charging is performed at lower temperature than the
recommended charging temperature range.
The display shown below may appear if a battery
pack with a low temperature is attached, or if charging
is performed at a lower temperature than the
recommended charging temperature range. Although
charging can still be performed in these cases, if this
situation continues, this unit will switch to the standby
state (refer to the following item) or charging will be not
performed properly in order to protect the battery pack.
We recommend charging the battery pack at 10 ºC to
30 ºC (50 ºF to 86 ºF).
The CHARGE lamp blinks in the following two ways.
Blinks quickly: Turns on and off repeatedly every 0.15 seconds
Blinks slowly: Turns on and off repeatedly every 1.5 seconds
When the CHARGE lamp blinks, read the following and take
suitable action depending on how the CHARGE lamp blinks.
When the CHARGE lamp keeps blinking slowly and
“WAITING” is displayed in the display window.
Charging is temporarily stopped. This unit is in the standby
state.
If the room temperature or the battery temperature is
out of the appropriate temperature range, charging stops
automatically.
When the room temperature returns to the appropriate range,
the CHARGE lamp lights up and charging restarts.
We recommend charging the battery pack at 10 °C to 30 °C
(50 °F to 86 °F).
When the CHARGE lamp keeps blinking quickly and
“WARNING” is displayed in the display window.
When charging the battery pack for the first time in one
of the following situations, the CHARGE lamp may blink
quickly. If this happens, remove the battery pack from this
unit, reattach it and charge it again.
When the battery pack has been left for a long time
When the battery pack has been left attached to the
camera for a long time
Immediately after purchase
If “WARNING” is still displayed, check by following the steps
below.