Remarque : pour configurer votre système Home Security, vous devez avoir accès
à un réseau sans fil (Wifi*/WLAN) et en connaître le mot de passe. Le terminal
(smartphone ou tablette) à partir duquel vous souhaitez contrôler le système de
vidéosurveillance doit être connecté au même réseau Wifi* que la caméra lors de
la configuration initiale ; par la suite, il est possible de contrôler le système via
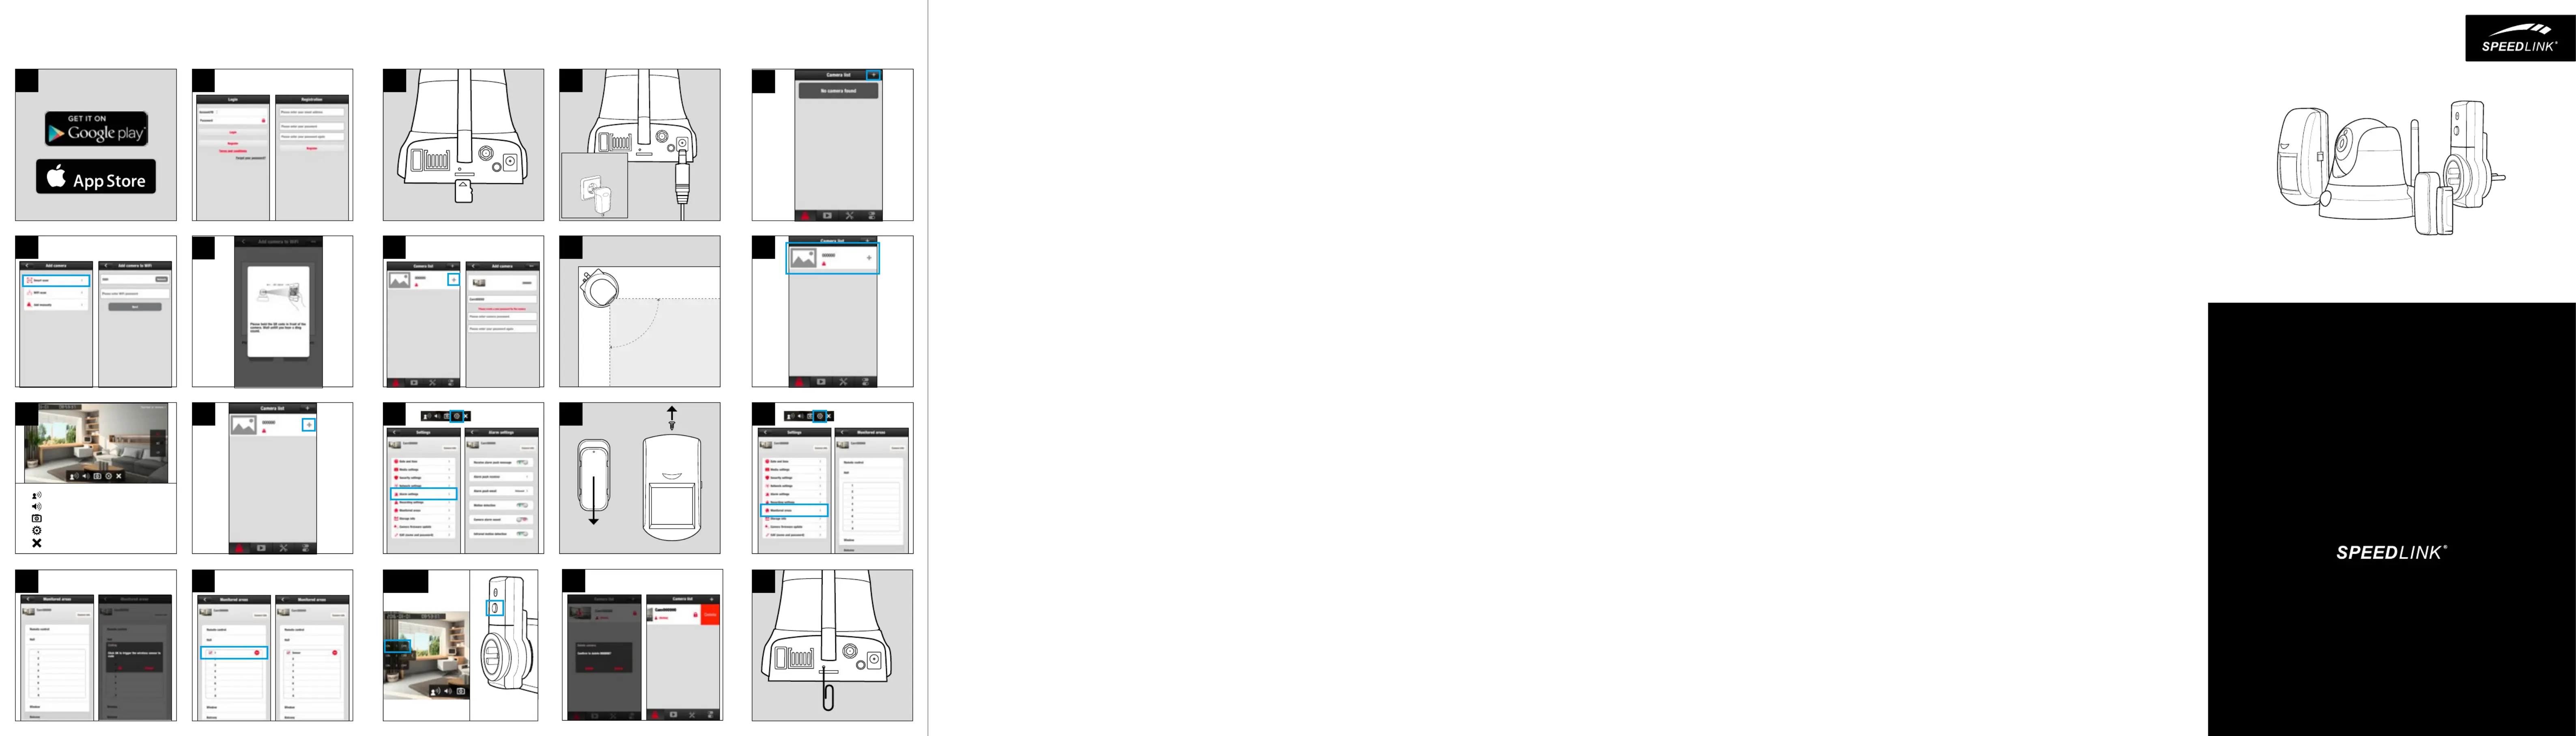
1. Installez sur votre smartphone ou votre tablette l’application gratuite « SL-
HOMECON » disponible dans l’Apple Store* ou le Google Play Store*.
2. Lancez l’application et suivez les instructions qui s’achent à l’écran. Créez
un compte utilisateur gratuit en indiquant une adresse e-mail de votre choix
et un mot de passe. Ce compte vous servira à l’avenir pour contrôler à
distance votre caméra de surveillance.
3. Si vous souhaitez enregistrer les vidéos, insérez une carte mémoire dans la
caméra (carte micro-SD formatée en FAT, 32 Go max., non fournie).
4. Reliez la caméra à une prise de courant (100-240 V CA, 50/60 Hz) à l’aide du
bloc d’alimentation. Au bout d’une demi-minute environ, vous entendez un bip
répété indiquant que la caméra est prête à être connectée au réseau Wifi*.
5. Allez dans l’application et appuyez sur le symbole « + » dans la liste des
caméras afin d’ajouter votre caméra.
6. Sélectionnez l’option « Smart Scan ». Entrez ensuite le mot de passe du
réseau Wifi* et confirmez la saisie.
7. Pour transmettre à la caméra le mot de passe Wifi* saisi, placez le code QR
qui est aché à l’écran face à la lentille de la caméra à une distance de 20
cm environ. Attendez le signal sonore confirmant que le mot de passe a bien
été transmis, puis appuyez sur « OK ». La caméra est à présent connectée au
8. La caméra que vous venez d’ajouter apparaît maintenant dans la liste des
caméras. Appuyez sur le petit « + » à côté de la caméra en question. Entrez
un nom pour cette caméra (par exemple « Caméra couloir ») et définissez un
mot de passe. Sauvegardez les données saisies. La caméra est à présent
9. Positionnez la caméra dans la pièce de manière à couvrir une zone aussi
étendue que possible. Vous pouvez aussi la monter au plafond en sens
inverse. L’orientation des images et la position de la caméra (pivotement et
inclinaison) pourront ensuite être rectifiées par le biais de l’application.
Nous attirons votre attention sur le fait que la caméra est uniquement
destinée à une utilisation dans des locaux fermés.
10. Pour lancer la transmission des images, appuyez sur la caméra dans la liste
11. Pour faire pivoter ou incliner la caméra, décalez la section d’image achée
à l’écran. Vous voyez sur le bord inférieur de l’image une barre de symboles
donnant accès à des fonctions importantes :
• Le premier symbole vous permet d’établir une liaison vocale.
• Le haut-parleur coupe et rétablit le son.
• L’appareil photo vous permet de prendre une image arrêtée de la vidéo en
cours et de l’enregistrer sur votre smartphone ou votre tablette.
• La roue dentée vous donne accès aux paramètres avancés de la caméra.
• Le symbole « x » permet d’arrêter la transmission.
12. Pour amener la caméra en mode Alarme, arrêtez la transmission et appuyez
dans la liste des caméras sur le cadenas à droite de la caméra en question.
Lorsque le cadenas est en position fermée, cela signifie que la fonction de
surveillance de la caméra est activée. Vous pouvez alors demander à ce que
l’application vous alerte quand la caméra ou l’un des capteurs connectés (voir
ci-dessous) donne l’alarme.
13. Pour activer et configurer la réception des notifications d’alarme, allez
dans les Paramètres de la caméra (accessibles en appuyant, en cours de
transmission, sur le symbole représentant une roue dentée). Allez dans le
sous-menu « Paramètres alarme ». Activez l’option « Recevoir message
d’alarme » pour recevoir sur votre smartphone ou votre tablette les
notifications envoyées par le biais de l’application. Vous avez également
la possibilité d’entrer, dans la case « Message d’alarme push », une
adresse e-mail à laquelle vous souhaitez recevoir des messages avec les
enregistrements de la caméra en cas d’alarme. Le sous-menu « Paramètres
alarme » vous permet également d’activer la fonction de détection de
Pour désactiver le mode Alarme, appuyez à nouveau sur le cadenas dans la
14. Pour relier la caméra aux capteurs et aux prises de courant télécommandées
supplémentaires, commencez par insérer les piles adéquates dans les
capteurs pour portes & fenêtres (A23, 12 V) et dans les détecteurs de
15. Durant la transmission des images, appuyez sur le symbole représentant une
roue dentée et ouvrez le menu « Zones surveillées ».
16. Pour les capteurs de portes & fenêtres et les détecteurs de mouvement,
vous avez le choix entre huit espaces virtuels – appuyez sur la catégorie
correspondant à la zone surveillée par le capteur (par exemple « Chambre »).
Appuyez alors sur l’une des huit lignes de la zone sélectionnée pour
connecter l’appareil. Lorsque vous appuyez sur « OK », la caméra attend
durant quelques secondes de recevoir un signal envoyé par cet appareil. Pour
déclencher les signaux en question, procédez comme suit :
• Pour déclencher le signal envoyé par un détecteur de mouvement, allumez le
détecteur en amenant l’interrupteur sur « ON ».
• Pour déclencher le signal envoyé par un capteur de porte ou de fenêtre,
séparez le capteur de l’aimant.
17. Une fois la liaison établie, le capteur apparaît dans la zone qui lui a été
aectée. Pour donner un nom personnalisé à un capteur, appuyez sur la ligne
correspondant à l’appareil connecté.
18. Pour relier une prise de courant télécommandée, commencez par la brancher
sur une prise de courant CA (230 V, 50 Hz). Lancez la transmission des
images filmées par la caméra et appuyez sur la flèche sur le bord gauche de
l’image. Maintenez alors le bouton « On/O » enfoncé sur la prise de courant
télécommandée jusqu’à ce que le voyant rouge se mette à clignoter. Vous
voyez trois chires sur le bord gauche de l’image. Appuyez sur le bouton
« On » en face de l’un de ces chires pour aecter la prise de courant
télécommandée au numéro en question.
19. Pour allumer ou éteindre les prises de courant connectées, appuyez, durant la
transmission des images, sur la flèche située sur le bord gauche de l’image et
sélectionnez l’état souhaité (« On » / « O »).
20. Pour supprimer une caméra dans la liste, appuyez dans Android* durant
quelques secondes sur l’entrée correspondante dans la liste et confirmez
l’opération ; dans iOS*, faites un mouvement de balayage vers la gauche au
niveau de l’entrée en question, puis appuyez sur le bouton qui s’ache à
21. Pour réinitialiser tous les paramètres de la caméra (données du réseau Wifi*,
mot de passe de la caméra), appuyez avec un objet pointu sur le bouton Reset
au dos de la caméra et maintenez-le enfoncé deux secondes environ jusqu’à
ce que vous entendiez un bip.
22. Votre système de surveillance est à présent prêt à l’emploi. Vous trouverez de
plus amples informations dans le manuel d’utilisation détaillé disponible en
téléchargement sur le site www.speedlink.com.
Nota: Se necesita acceso a una red inalámbrica (WiFi*/WLAN) y la
correspondiente contraseña para poder instalar el kit Home Security. Durante
la primera instalación, el dispositivo que será utilizado para el control del kit
(smartphone o tablet) tiene que estar conectado al mismo WLAN que la cámara,
para que sea posible, después, el control a través de Internet.
1. Instala en tu smartphone o tablet la app „SL-HOMECON“ que puedes obtener
en Apple Store* o Google Play* Store.
2. Inicia la app y a continuación sigue las instrucciones que aparecen en
pantalla: Crea una cuenta de usuario gratuita con una dirección de e-mail
y una contraseña que utilizarás en el futuro para registrarte y también para
tener acceso remoto a la cámara de vigilancia de tu hogar.
3. Si lo deseas, inserta una tarjeta de memoria en la cámara para la grabación
de videos (Micro-SD, formato FAT, máx. 32GB; no incluida en el suministro).
4. Enchufa la cámara con la fuente de alimentación a una base de enchufe con
corriente (100-240V AC, 50/60Hz). Después de medio minuto se oirá un aviso
sonoro repetitivo que indica que la cámara está lista para la conexión de
5. En la lista de cámaras de la app, clica en el símbolo „+“ para seleccionar tu
6. Selecciona la opción „Smart Scan“. Introduce la contraseña del WLAN,
7. Para pasar la contraseña del WLAN a la cámara, mantén el código QR que
aparece en la pantalla a una distancia de 20 centímetros de la lente de la
cámara. Espera hasta oír una señal acústica confirmando la transferencia de
datos y clica en el botón „OK“. La cámara p1-ya está conectada al WLAN.
8. Ahora la cámara añadida aparece en la lista de cámaras. Clica en el pequeño
símbolo de „+“ que se muestra al lado del registro de la cámara. Asigna un
nombre descriptivo a la cámara (por ejemplo, „cámara del pasillo“) y defina
una contraseña. Guarda los datos introducidos. La cámara está lista para
9. Instala la cámara en el espacio a vigilar de modo que acapare el mayor área
posible. Se puede fijar también boca abajo en el techo. La posición de la
imagen, como también el giro y la inclinación de la cámara, se puede regular
Ten en cuenta que la cámara sólo se puede utilizar en espacios cerrados.
10. Para empezar a transmitir la imagen, clica en la lista de cámaras del dispositivo.
11. Desplaza la sección de la imagen para girar o inclinar la cámara. En la parte
inferior de la imagen se tiene acceso a las funciones más importantes:
• Con el primer símbolo se establece una primera conexión de voz.
• El símbolo de altavoz sirve para activar/desactivar la reproducción de audio.
• Con el símbolo de cámara se puede hacer una foto de la transmisión de video
actual, que es almacenada en tu smartphone o tablet.
• El símbolo de rueda dentada permite el acceso a otros ajustes de la cámara.
• Clicando en el símbolo „x“ se desconecta la transmisión.
12. Para pasar la cámara al modo de alarma, finaliza la transmisión y, en la
lista de cámaras, clica en el símbolo de cortina a la derecha del registro de
dispositivos. Si el candado está cerrado, la función de vigilancia de la cámara
estará activada. Ahora serás avisado a través de la app cuando la cámara o
uno de los sensores conectados (ver abajo) disparare una alarma.
13. Cómo vas a recibir notificaciones de alarma puedes configurar en los ajustes
de la cámara que están disponibles en el símbolo de rueda dentada mientras
la imagen está siendo transmitida. Selecciona el submenú „Ajustes del
alarma“. Activa „Recibir mensaje de alarma“ para recibir notificaciones a
través de la app en el smartphone o tablet. Además, en la opción „E-mail
de la alarma push“ puedes configurar también una dirección de e-mail, al
cual se puedan enviar mensajes en caso de alarma con informaciones de la
cámara. En „Ajustes del alarma“, puedes activar adicionalmente la detección
de movimiento de la cámara.
La disponibilidad de alarmas se finaliza haciendo clic nuevamente en el
símbolo de candado en la lista de cámaras.
14. Para conectar la cámara a los sensores adicionales y enchufes RF hay que
colocar primero las pilas en los sensores de ventana/puerta (A23, 12V) y en
los detectores de movimiento (E-Block, 9V).
15. Clica en el símbolo de rueda dentada mientras se transmite la imagen y
accede al menú „Área vigilada“.
16. Para los sensores de ventana/puerta y los detectores de movimiento hay
disponibles ocho espacios virtuales como áreas de vigilancia - clica en cada
área en la que el sensor será utilizado (por ej., „Dormitorio“).
Clica en una de las ocho líneas del área seleccionado para conectar el
aparato. Después de confirmar con „OK“, la cámara espera durante unos
segundos a que el aparato emita una señal de detección. Esas señales se
emiten de la siguiente manera:
• Activa el detector de movimiento (botón en „ON“) para que emita una señal.
• Para que un sensor de ventana/puerta dispare, hay que separar la conexión
entre el sensor y el imán.
17. Después de conectado, el sensor es llevado al área asignada. Clica en la línea
del aparato conectado para dar un nombre descriptivo al sensor.
18. Para conectar un enchufe RF hay que conectarlo primero a un enchufe CA
(230V, 50Hz). Accede a la transmisión de imagen de la cámara y clica en la
flecha en el margen izquierdo de la pantalla. Mantén pulsado el botón „On/
O“ del enchufe RF hasta que el LED rojo empiece a parpadear. Clica en el
área de conexión „Activar“ al lado de uno de los tres números en el margen
izquierdo para asignar ese número al enchufe RF.
19. Para activar o desactivar los enchufes conectados, durante la transmisión de
imagen clica en el símbolo de flecha en el margen izquierdo y selecciona el
estado que desees („On“/“O“).
20. Para quitar una cámara de la lista, en el Android* clica durante unos segundos
el registro en la lista de cámaras y confirma la pregunta de seguridad; en
iOS* borra el registro hacia la izquierda y a continuación clica en el botón que
21. Si deseas restaurar todos los ajustes de la cámara (datos WLAN guardados,
contraseña de la cámara), mantén pulsada durante unos segundos el botón
de reset en la parte posterior de la cámara con un objeto puntiagudo hasta oír
22. Ahora el sistema de vigilancia está listo para ser usado. Para más información
consulta el manual de instrucciones completo disponible online en
www.speedlink.com que se puede descargar.
two-way audio communication
additional camera settings