StarTech.com 4K7012IC-EXTEND-HDMI Manual

StarTech.com AV forlænger 4K7012IC-EXTEND-HDMI

Læs gratis den danske manual til StarTech.com 4K7012IC-EXTEND-HDMI (2 sider) i kategorien AV forlænger. Denne vejledning er vurderet som hjælpsom af 4 personer og har en gennemsnitlig bedømmelse på 4.4 stjerner ud af 2.5 anmeldelser. Har du et spørgsmål om StarTech.com 4K7012IC-EXTEND-HDMI, eller vil du spørge andre brugere om produktet?

Side 1/2
For additional self-service support options and community forums, please visit: www.StarTech.com/support
Revision: June 3, 2025
Quick-Start Guide
Product ID
4K7012IC-EXTEND-HDMI
4K7014IC-EXTEND-HDMI
Transmitter
Receiver
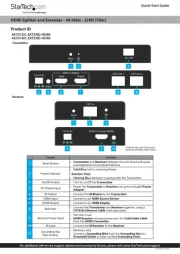
Feature Function
1
Reset Button
Transmitter and Receiver: Reboots the unit which will cause
a renegotiation of connected devices
2
Power Indicator
Solid Blue: Unit is receiving Power
Receiver Only:
Flashing Blue: Receiver is pairing with the Transmitter
3
On/O Switch Turn On or O the Transmitter
4
DC Power Input
Power the Transmitter or Receiver using the included Power
Adapter
5
IR Output Connect the IR Blaster to the Transmitter
6
HDMI Input Connect to an HDMI Source Device
7
HDMI Output Connect to an HDMI Display
8
RJ45 Port
Connect the Transmitter and Receiver together, using a
CAT6/6a Ethernet Cable (sold separately)
9
Receiver Power Input
Port not in use
HDMI Receiver receives power over the Cat6/Cat6a Cable
from the HDMI Transmitter
10
IR Input Connect the IR Receiver to the Receiver
11
Grounding Nut
(Not Shown)
Receivers only
Connect a Grounding Wire from the Grounding Nut to a
Grounded Outlet or other veried Grounding Point
HDMI Splitter and Extender - 4K 60Hz - 230ft (70m)
1
*Product may vary from image
4K7012IC-EXTEND-HDMI shown
2 3
4 5 6 7 8 8
1
8
2
9 7
10
Quick-Start Guide
FR: startech.com/fr
DE: startech.com/de
ES: startech.com/es
NL: startech.com/nl
IT: startech.com/it
JP: startech.com/jp
StarTech.com Ltd.
45 Artisans Crescent
London, Ontario
N5V 5E9
Canada
StarTech.com Ltd.
Unit B, Pinnacle 15
Gowerton Road
Brackmills,
Northampton
NN4 7BW
United Kingdom
StarTech.com LLP
4490 South Hamilton
Road
Groveport, Ohio
43125
U.S.A.
StarTech.com Ltd.
Siriusdreef 17-27
2132 WT Hoofddorp
The Netherlands
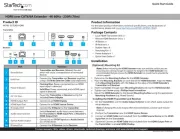
Package Contents
4K7012IC-EXTEND-HDMI
HDMI Transmier x 1
HDMI Receiver x 2
IR Blaster x 1
IR Receiver x 2
Mounng Kit x 3
Universal Power Adapter x 1
Quick-Start Guide x 1
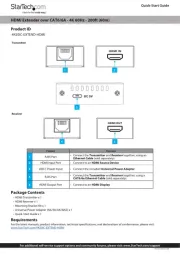
Requirements
For the latest manuals, product information, technical specications, and declarations of conformance, please visit:
www.StarTech.com/4K7012IC-EXTEND-HDMI
www.StarTech.com/4K7014IC-EXTEND-HDMI
Installation
(Optional) Mounting Kit
Note: Before mounting the HDMI Extender make sure that the surface you are mounting to is strong enough to support the
weight of the HDMI Extender. It is recommended that you mount the HDMI Extender on a wall stud to provide the correct
support.
1. Determine the Mounting Surface for the HDMI Transmitter.
2. Place the Mounting Brackets on each side of the HDMI Transmitter. Align the Holes in the Mounting Brackets with the
Holes on the sides of the HDMI Transmitter.
3. Insert two of the included Screws through each Mounting Bracket and into the HDMI Transmitter.
4. Tighten each Screw using a Phillips Head Screwdriver.
5. Mount the HDMI Transmitter to the desired Mounting Surface using the appropriate Mounting Hardware (e.g. Wood
Screws).
6. (Optional) Repeat Steps 1 to 5 for the HDMI Receivers.
Installing the HDMI Transmitter and Receiver
1. Position the Transmitter near the HDMI Source Device.
2. Connect an HDMI Cable (not included) from the HDMI Source Device to the HDMI Input Port on the Transmitter.
3. (Optional) Connect an HDMI Cable (not included) from the HDMI Output Port on the Transmitter, to a Local HDMI
Display.
4. Position the HDMI Receiver near the HDMI Display Device.
5. Connect a CAT6/6a Cable (not included) from the RJ45 Port on the Transmitter to the RJ45 Port on the Receiver.
6. Note: The cabling cannot go through any networking equipment (e.g. router, switch, etc.).
7. Connect an HDMI Cable (not included) to the HDMI Output Port on the Receiver and to the HDMI Display Device.
8. Repeat Steps 4 to 7 for the remaining HDMI Receivers.
9. Connect the included Universal Power Adapter to the DC 12V Port on the Transmitter and to an Electrical Outlet.
Installing the IR Blaster and IR Receiver
Control the HDMI Source Device from the Receiver’s location
1. Connect the IR Blaster (Labelled “IR Out”) to the IR Output Port on the HDMI Transmitter.
2. Peel the Film o of the Adhesive Pad that is located on the IR Blaster. Position the IR Blaster so that it is pointing
directly at the IR Sensor on the HDMI Source Device.
Note: Consult the HDMI Source Device’s manual to determine the location of the IR Sensor.
3. Connect the IR Receiver (Labelled “IR In”) to the IR Input Port on the Receiver.
4. Peel the Film o of the Adhesive Pad that is located on the IR Receiver. Position the IR Receiver in a location where
there is a clear path to the Remote Control.
5. Use the Remote Control for the HDMI Source Device to control the HDMI Source Device from the Receiver’s location.
4K7014IC-EXTEND-HDMI
HDMI Transmier x 1
HDMI Receiver x 4
IR Blaster x
IR Receiver x 4
Mounng Kit x 5
Universal Power Adapter x 1
Quick-Start Guide x 1


Produkt Specifikationer

Mærke: StarTech.com
Kategori: AV forlænger
Model: 4K7012IC-EXTEND-HDMI

Har du brug for hjælp?

Hvis du har brug for hjælp til StarTech.com 4K7012IC-EXTEND-HDMI stil et spørgsmål nedenfor, og andre brugere vil svare dig