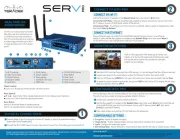
Teradek Serv Pro Manual


Læs gratis den danske manual til Teradek Serv Pro (1 sider) i kategorien Hi-Fi system. Denne vejledning er vurderet som hjælpsom af 3 personer og har en gennemsnitlig bedømmelse på 4.8 stjerner ud af 2 anmeldelser. Har du et spørgsmål om Teradek Serv Pro, eller vil du spørge andre brugere om produktet?

Side 1/1
MONITOR WITH VUER
Connect power to Serv Pro using the included A/C adapter, or one of the available accessory
power cables (see Teradek.com).
Access Point (AP) Mode - AP mode is automatically enabled by default. Connect your device to Serv Pro’s
Wi−Fi network: Teranet−XXXXX (serial number of the device).
Connect the SDI or HDMI output from your video source to one of Serv Pro’s video input connectors (I, J).
Plug an Ethernet cable into VidiU Pro’s 10/100/1000 Ethernet port and connect it to an Ethernet
switch or router. Use the Menu joystick to navigate to the Network Setup menu, then select Wired to
verify that Ethernet is set to DHCP and to view Serv Pro’s IP address.
Open a web browser and enter Serv Pro’s IP address in the address bar.
PHYSICAL CONNECTIONS
1
3
1
2
3
CONNECT VIA WIFI
CONNECT VIA ETHERNET
NEED MORE HELP?
1. Support: http://support.teradek.com Contains tips, information and all the latest firmware & software updates.
TERADEK SUPPORT STAFF: support@teradek.com or call 8889412111 ext.2 (MonFri 6am to 6pm PST)
Stream Joystick:
(button press): Access quick menu actions, exit menu screens
Menu Joystick:
,,
,
: Select menu items, change status screen on main display, select characters
(button press): Confirm selection, open selected menu
Reset Button:
Hold for 3−6 seconds: Reset all network settings
Hold for 10+ seconds: Perform complete factory reset
A: Wi−Fi antenna
B: Video input status
C: Encoder status
D: Broadcast status
E: Fault/Error
F: OLED display
G: Stream joystick
H: Menu joystick
I: SD/HD/3G−SDI input
J: HDMI input
K: 10/100/1000 Ethernet
L: Reset button
M: Power input
N: Power switch
O: Mic/Line stereo input
A
B
F
Download VUER from the iTunes App Store (iOS devices), or from the Google Play Store (Android devices).
Connect your device to the same network as Serv Pro (Ethernet or WiFi), then launch VUER.
From the VUER app, tap CAMERA on the upper, left-hand corner, choose your device(s), then tap Done.
1
2
3
H
C
D
E
G
Serv Pro is a wireless video transmitter
that offers real-time monitoring on up
to 10 iOS devices at very low latency.
Serv Pro can be mounted on a camera or
at video village, and offers up to 300 ft
of range using its built-in Wi-Fi access
points.
REAL-TIME IOS
MONITORING
VUER is a free application that allows you to monitor and
analyze up to four live HD video feeds simultaneously, each
with its own set of tools to help you and your crew gain
insights into your footage.
To adjust the stream resolution and bitrate, long-press VIDEO on the Tool bar (F) to display the full menu.
Make your selection, then tap APPLY.
4
J
N
M
L
K
I
O
CONFIGURE SERV PRO
4
Serv Pro also has a web user interface (web UI) for configuring stream and network settings.
The web UI can be accessed by using any available network interface.
Connect your computer to the same network as Serv Pro.
1
Encryption - Enable or disable encryption.
Image Overlay - Overlay imported images onto your video stream and adjust their placement.
Audio - Configure the audio input source.
SDI Ancillary Data - Extract timecode or closed captions data from the SDI input to embed into your stream.
CONFIGURABLE SETTINGS
Use the Menu joystick to navigate to the Network Setup menu, then select Wired to verify that Ethernet
is set to DHCP and to view Serv Pro’s IP address. If using a Wi-Fi network, select WiFi, then select
[Status] to view the IP address.
2
CONNECT TO SERV PRO
2
Infrastructure Mode - To configure Serv Pro to connect to a different network, switch to Infrastructure mode,
then select Scan for Network.
Use the Menu joystick to navigate to the Network Setup menu, then select a Wi-Fi mode.
Teradek regularly releases new firmware versions to improve performance, add new features, or to fix vulnerabilities.
Visit https://www.teradek.com to update your device with the latest firmware.


Produkt Specifikationer

Mærke: Teradek
Kategori: Hi-Fi system
Model: Serv Pro
Type: AV sender
Tænd-/slukkontakt: Ja
Bredde: 120.7 mm
Dybde: 76.2 mm
Højde: 27.9 mm
Vægt: 328.9 g
Produktfarve: Blå
Wi-Fi: Ja
Understøttede videotilstande: 480i, 480p, 576i, 576p, 720p, 1080i, 1080p
Ethernet LAN: Ja
Understøttede lydformater: AAC
Strømforbrug (typisk): 7 W
Maksimal opløsning: 1920 x 1080 pixel
Hurtig start guide: Ja
Kabler inkluderet: BNC, HDMI, LAN (RJ-45)
Understøttede grafikopløsninger: 960 x 540,1280 x 720 (HD 720),1920 x 1080 (HD 1080)
Materiale: Aluminium
Forbindelsesteknologi: Kabel & trådløs
Strømforbrug (maks.): 8 W
Netværksstandarder: IEEE 802.11a, IEEE 802.11ac, IEEE 802.11b, IEEE 802.11g, IEEE 802.11n
Understøttede netværksprotokoller: TCP/IP, UDP, HTTP, DHCP, NTP, SSL, IGMP
Antenner, antal: 2
AC-adapter inkluderet: Ja
Video komprimeringsformater: H.264
Indgangstype: HDMI
HSMI-indgang: 1
RJ-45 indgangs-porte: 1
BNC-indgangsporte: 1
Antenneforstærkning (2,4 GHz): 2 dBi
Antenneforstærkning (5 GHz): 2 dBi

Har du brug for hjælp?

Hvis du har brug for hjælp til Teradek Serv Pro stil et spørgsmål nedenfor, og andre brugere vil svare dig