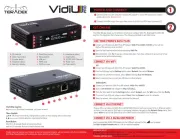
Teradek VidiU Pro Manual
Læs gratis den danske manual til Teradek VidiU Pro (2 sider) i kategorien Server. Denne vejledning er vurderet som hjælpsom af 47 personer og har en gennemsnitlig bedømmelse på 4.8 stjerner ud af 24 anmeldelser.
Har du et spørgsmål om Teradek VidiU Pro, eller vil du spørge andre brugere om produktet?

Produkt Specifikationer
| Mærke: | Teradek |
| Kategori: | Server |
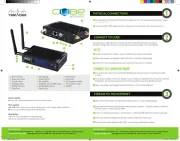
| Model: | VidiU Pro |
| Bredde: | 119.38 mm |
| Dybde: | 76.2 mm |
| Højde: | 30.48 mm |
| Vægt: | 198 g |
| Kompatible hukommelseskort: | SD, SDHC |
| Wi-Fi: | Ja |
| Antal USB 2.0-porte: | 1 |
| Strømforbrug (typisk): | 4.5 W |
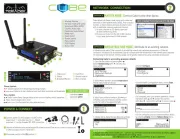
| Netværksstandarder: | IEEE 802.11a, IEEE 802.11b, IEEE 802.11g, IEEE 802.11n |
| Understøttede netværksprotokoller: | TCP/IP, UDP, HTTP, DHCP, NTP, SSL, IGMP |
| Webbaseret administration: | Ja |
| Indbygget kortlæser: | Ja |
| Video komprimeringsformater: | H.264 |
| Effektkrav: | 6 - 18 V DC |
| Mikrofonindgang: | Ja |
| Maksimal videoopløsning: | - pixel |
| Maksimum billedhastighed: | - fps |
| Kobber ethernet kabelteknologi: | 10BASE-T, 100BASE-T |
| Antal HDMI-indgangsporte: | 1 |
| Bithastighed ved en maksimal videoopløsning: | 5.2 Mbit/s |
Har du brug for hjælp?
Hvis du har brug for hjælp til Teradek VidiU Pro stil et spørgsmål nedenfor, og andre brugere vil svare dig
Server Teradek Manualer
Server Manualer
- Atlantis Land
- Maxdata
- Raritan
- Geovision
- Chenbro Micom
- LevelOne
- IoSafe
- StarTech.com
- Medion
- IStarUSA
- Ibm
- NETSCOUT
- Hanwha
- Acer
- AMX
Nyeste Server Manualer