TFA 30.1061.01 Manual

TFA Termometer 30.1061.01

Læs gratis den danske manual til TFA 30.1061.01 (4 sider) i kategorien Termometer. Denne vejledning er vurderet som hjælpsom af 109 personer og har en gennemsnitlig bedømmelse på 3.5 stjerner ud af 55 anmeldelser. Har du et spørgsmål om TFA 30.1061.01, eller vil du spørge andre brugere om produktet?

Side 1/4
Küchenthermometer-Fleischthermometer Küchenthermometer-Fleischthermometer
Vielen Dank, dass Sie sich für dieses Gerät aus dem Hause TFA entschieden haben.
1. Bevor Sie mit dem Gerät arbeiten
Lesen Sie sich bitte die Bedienungsanleitung genau durch.
Durch die Beachtung der Bedienungsanleitung vermeiden Sie auch Beschädigungen des Gerätes und die Gefährdung
Ihrer gesetzlichen Mängelrechte durch Fehlgebrauch. Für Schäden, die aus Nichtbeachtung dieser Bedienungsanleitung
verursacht werden, übernehmen wir keine Haftung.
Ebenso haften wir nicht für inkorrekte Messwerte und Folgen, die sich aus solchen ergeben können.
Beachten Sie besonders die Sicherheitshinweise!
Bewahren Sie diese Bedienungsanleitung gut auf!
2. Einsatzbereich und alle Vorteile Ihres neuen Gerätes auf einen Blick
Zur Temperaturkontrolle von Speisen und Getränken
Klappthermometer im Taschenformat
Edelstahl-Einstechfühler 110 mm
Schnelle und genaue Messung
MAX/MIN- und HOLD-Funktion
• Hintergrundbeleuchtung
Vielseitig einsetzbar, ideal für Lebensmittel gemäß HACCP
Integrierter Flaschenöffner als Aufhänger
• Magnethalterung
3. Zu Ihrer Sicherheit
Das Produkt ist ausschließlich für den oben beschriebenen Einsatzbereich geeignet. Verwenden Sie das Produkt nicht
anders, als in dieser Anleitung beschrieben wird.
Das eigenmächtige Reparieren, Umbauen oder Verändern des Gerätes ist nicht gestattet.
Dieses Gerät ist nicht für medizinische Zwecke bestimmt.
Vorsicht!
Verletzungsgefahr!
Bewahren Sie das Gerät und die Batterie außerhalb der Reichweite von Kindern auf.
Batterien enthalten gesundheitsschädliche uren und nnen bei Verschlucken lebensgefährlich sein. Wurde eine Batterie
verschluckt, kann dies innerhalb von 2 Stunden zu schweren inneren Verätzungen und zum Tode führen. Wenn Sie vermuten,
eine Batterie nnte verschluckt oder anderweitig in den Körper gelangt sein, nehmen Sie sofort medizinische Hilfe in
Anspruch.
Batterien nicht ins Feuer werfen, kurzschließen, auseinandernehmen oder aufladen. Explosionsgefahr!
Um ein Auslaufen der Batterien zu vermeiden, sollten schwache Batterien möglichst schnell ausgetauscht werden.
Beim Hantieren mit ausgelaufenen Batterien chemikalienbeständige Schutzhandschuhe und Schutzbrille tragen!
Vorsicht beim Umgang mit der Einstichsonde. Das Thermometer nur eingeklappt aufbewahren.
Wichtige Hinweise zur Produktsicherheit!
Setzen Sie das Gerät nicht extremen Temperaturen, Vibrationen und Erschütterungen aus.
Nur der Edelstahl-Einstechfühler ist hitzebeständig bis 300°C.
Benutzen Sie das Get nicht in der Mikrowelle, im Backofen oder Grill.
Halten Sie niemals den Fühler direkt über Feuer.
Tauchen Sie das Anzeigeelement nicht in Wasser, sonst kann Feuchtigkeit eindringen und zu Fehlfunktionen führen. Nicht in
der Spülmaschine reinigen.
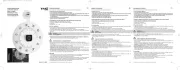
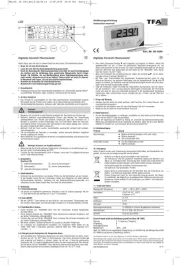
4. Bestandteile (Fig. 1 + 2)
A 1: A 2:Einstichsonde Display
A 3: °C/°F Taste TasteA 4: HOLD/MAX MIN
A 5: LICHT Taste Flaschenöffner als AufhängerA 6:
A 7: Batteriefach
5. Inbetriebnahme und Temperaturmessung
Entfernen Sie die Schutzfolie vom Display.
Öffnen Sie das Batteriefach, indem Sie den Deckel mithilfe der beiliegenden Plastikscheibe in Pfeilrichtung (OPEN) drehen und
entfernen Sie den Batterieunterbrechungsstreifen. Schließen Sie das Batteriefach wieder. Achten Sie dabei auf den Dichtungsring.
Das Gerät schaltet sich automatisch bei einem Ausklappwinkel von 45° an. Die Sonde hat einen Ausklappwinkel bis 180°.
Das Gerät ist jetzt betriebsbereit und die Temperatur wird angezeigt.
Der Sensor befindet sich in der Sondenspitze.
Zum Messen der Kerntemperatur von Fleisch: Stecken Sie den Fühler mindestens 2 cm tief in die Mitte des dicksten Braten-
teils, bei Geflügel zwischen Rumpf und Schenkel; er sollte weder Knochen noch Knorpel berühren und nicht aus dem Braten
herausragen.
Schalten Sie das Get aus, indem Sie die Einstichsonde einklappen und mit leichtem Druck in die dar vorgesehene Aus-
sparung einführen. Ein Klicken ist zu hören.
6. Bedienung
6.1 Hintergrundbeleuchtung
Drücken Sie die Taste, um die Hintergrundbeleuchtung für 5 Sekunden zu aktivieren.LICHT
6.2 Hold-Funktion
Drücken Sie die Taste. Es wird die gemessene Temperatur festgehalten.HOLD/MAX MIN
Drücken Sie die Taste noch einmal, gelangen Sie in den Normalmodus zurück.HOLD/MAX MIN
6.3 MAX/MIN-Funktion
Halten Sie die Taste gedrückt. Das Gerät befindet sich im MAX/MIN-Modus.HOLD/MAX MIN
Im Display erscheint MAX. Es wird der höchste Temperaturwert angezeigt seit dem Einschalten des Gerätes.
Drücken Sie die Taste noch einmal. Im Display erscheint MIN. Es wird der tiefste Temperaturwert angezeigtHOLD/MAX MIN
seit dem Einschalten des Gerätes.
Um die MAX/MIN-Werte zurückzusetzen, halten Sie die HOLD/MAX MIN Taste im MAX/MIN-Modus gedrückt.
Drücken Sie noch einmal die Taste, um den MAX/MIN Modus zu verlassen.HOLD/MAX MIN
Cooking thermometer-meat thermometer
Thank you for choosing this product from TFA.
1. Before you use this product
Please make sure you read the instruction manual carefully.
Following and respecting the instructions in your manual will prevent damage to your instrument and loss of your statu-
tory rights arising from defects due to incorrect use. We shall not be liable for any damage occurring as a result of non
following of these instructions.
Likewise, we take no responsibility for any incorrect readings or for any consequences resulting from them.
Please take particular note of the safety advice!
Please keep this instruction manual safe for future reference.
2. Range of application and all the benefits of your new instrument at a glance
For temperature control of food and drinks
Pocket-sized fold-out thermometer
110 mm stainless steel probe
Fast and accurate measurement
MAX/MIN and HOLD functions
• Backlight
For universal use, ideal for food checks, according to HACCP
Integrated bottle opener as a hanging hole
Magnetic attachment
3. For your safety
This product is exclusively intended for the range of application described above. It should only be used as described within
these instructions.
Unauthorized repairs, alterations or changes to the product are prohibited.
This product is not be used for medical purpose.
Caution!
Risk of injury!
Keep this device and the battery out of reach of children.
Batteries contain harmful acids and may be hazardous if swallowed. If a battery is swallowed, this can lead to serious inter-
nal burns and death within two hours. If you suspect a battery could have been swallowed or otherwise caught in the body,
seek medical help immediately.
Batteries must not be thrown into a fire, short-circuited, taken apart or recharged. Risk of explosion!
Low batteries should be changed as soon as possible to prevent damage caused by leaking.
Wear chemical-resistant protective gloves and safety glasses when handling leaking batteries.
Be careful when handling the sharp probe. Always store the instrument folded in.
Important information on product safety!
Do not expose the device to extreme temperatures, vibrations or shocks.
Only the stainless steel probe is heat resistant up to 300 °C.
Do not use the instrument in the microwave, oven or grill.
Never hold the probe directly over a fire.
Do not immerse the display unit in water. Water can penetrate and cause malfunction. Not suitable for dishwasher.
4. Elements (Fig. 1 + 2)
A 1: A 2:Insertion probe Display
A 3: A 4:°C/°F button HOLD/MAX MIN button
A 5: A 6:LIGHT button Bottle opener as a hanging hole
A 7: Battery compartment
5. Getting started and measuring temperature
Remove the protective film from the display.
Open the battery compartment by turning the lid in direction of the arrow (OPEN) using the enclosed plastic disc and remove
the battery insulation strip. Close the battery compartment again. Pay attention to the sealing ring.
The instrument automatically turns on at an angle of 45°. The instrument has a total angle of 180°.
The device is ready for use and the temperature is displayed.
The sensor is located at the probe tip.
For measuring the core temperature of meat: Plunge the probe at least 2.5 cm into the middle of the thickest part of the
meat; for poultry, between the torso and the thigh - it should not touch bones or cartilage and it should not protrude from the
meat.
Turn off the instrument by retracting the probe. Insert the probe with a slight pressure into the provided slot. A click is heard.
6. Operation
6.1 Backlight
Press the light button to activate the backlight for 5 seconds.
6.2 HOLD function
Press the button. The hold-function for the current temperature is activated.HOLD/MAX MIN
Press the button again and you will return to normal mode.HOLD/MAX MIN
6.3 MAX/MIN function
Press and hold the button. The instrument is now in the MAX/MIN mode.HOLD/MAX MIN
MAX appears on the display. The highest temperature is displayed since the instrument is switched on.
Press the button again. MIN appears on the display. The lowest temperature is displayed since the instru-HOLD/MAX MIN
ment is switched on.
Press and hold the button in the MAX/MIN mode to clear the recorded reading. HOLD/MAX MIN
Press the button again to exit the MAX/MIN mode.HOLD/MAX MIN
6.4 °C/°F display change
Press the button, to change between °C (default) or °F as temperature unit. °C/°F
6.4 °C/°F Umstellung
Drücken Sie die Taste, um die Temperaturanzeige von °C (Voreinstellung) auf °F zu ändern. °C/°F
6.5 Energiesparmodus
Bei Nichtbenutzung in ausgeklapptem Zustand wird nach ca. 10 Minuten der Energiesparmodus aktiviert. Das Get schaltet
sich automatisch aus. Drücken Sie eine beliebige Taste und auf dem Display erscheint die Temperatur wieder.
7. Pflege und Wartung
Reinigen Sie das Gerät mit einem weichen, leicht feuchten Tuch. Keine Scheuer- oder Lösungsmittel verwenden! Das Gerät
ist abwaschbar unter fließendem Wasser.
Entfernen Sie die Batterie, wenn Sie das Gerät längere Zeit nicht verwenden.
Bewahren Sie Ihr Gerät an einem trockenen Platz auf.
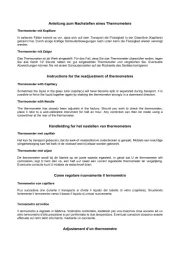
7.1 Batteriewechsel
Wenn das Display schwächer wird, wechseln Sie bitte die Batterie.
Öffnen Sie das Batteriefach, indem Sie mithilfe der beiliegenden Plastikscheibe den Batteriefachdeckel nach links drehen
(Pfeilrichtung) und legen Sie eine neue Batterie (CR2032) ein (+ Pol nach oben).
Schließen Sie das Batteriefach wieder, indem Sie den Batteriefachdeckel nach rechts drehen.
Hinweis: Vor dem Batteriewechsel muss das Gerät ausgeschaltet sein (Temperaturfühler einklappen).
8. Kalibrierung der Temperaturanzeige
Das Thermometer ist ab Werk eingestellt. Diese Funktion erlaubt es dem Anwender, die Anzeige der Temperaturmesswerte
mithilfe einer Referenzquelle (Eiswasser) neu zu kalibrieren.
Klappen Sie die Einstichsonde aus.
Stecken Sie den Einstechfühler für 3 Minuten in ein Gefäß mit Eiswasser, bis die Temperatur sich nicht mehr verändert.
Beachten Sie dabei, dass der Fühler mindestens zu zwei Drittel seinernge eingetaucht ist.
Halten Sie die Taste gedrückt (ca. 5 Sek), um in den Kalibrierungsmodus zu gelangen.°C/°F
CAL blinkt auf dem Display und kurz danach 0°C /32°F.
Optional: Sie nnen während dieser Zeit mit der + oder - Taste einen anderen Wert einstellen (VoraussetzungLICHT HOLD
ist ein zuverlässiger Messwert).
Bestigen Sie mit der Taste. PASS erscheint auf dem Display.°C/°F
Das Gerät ist nun kalibriert.
Herstellung von Eiswasser: Thermoskanne mit klein gestoßenem Eis komplett füllen. Danach die Thermoskanne mit kaltem
Wasser auffüllen, so dass keine Luft mehr in den Zwischenräumen ist. Nach ca. 30 Minuten hat sich eine Temperatur von
0°C (+0,1°C) im Eiswasser der Thermoskanne gebildet.
9. Fehlerbeseitigung
Problem Fehlerbeseitigung
Keine Anzeige Einstichsonde ausklappen (erst einklappen)
Batterie polrichtig einlegen (+Pol nach oben)
Batterie wechseln
Schwache Anzeige Batterie wechseln
Unkorrekte Anzeige Sitz des Messfühlers prüfen
Batterie wechseln
Wenn Ihr Gerät trotz dieser Maßnahmen immer noch nicht funktioniert, wenden Sie sich an den ndler, bei dem Sie das Pro-
dukt gekauft haben.
10. Entsorgung
Dieses Produkt wurde unter Verwendung hochwertiger Materialien und Bestandteile hergestellt, die recycelt und wiederverwendet
werden können.
Batterien und Akkus dürfen keinesfalls in den Hausmüll!
Als Verbraucher sind Sie gesetzlich verpflichtet, gebrauchte Batterien und Akkus zur umweltgerechten Entsorgung
beim Handel oder entsprechenden Sammelstellen gemäß nationalen oder lokalen Bestimmungen abzugeben.
Die Bezeichnungen für enthaltene Schwermetalle sind: Cd=Cadmium, Hg=Quecksilber, Pb=Blei
Dieses Gerät ist entsprechend der EU-Richtlinie über die Entsorgung von Elektro- und Elektronik-Altgeräten
(WEEE) gekennzeichnet.
Dieses Produkt darf nicht mit dem Hausmüll entsorgt werden. Der Nutzer ist verpflichtet, das Altgerät zur umwelt-
gerechten Entsorgung bei einer ausgewiesenen Annahmestelle für die Entsorgung von Elektro- und Elektronikge-
ten abzugeben.
11. Technische Daten
Messbereich Temperatur -50 °C… 300 °C/-58°F…+572°F
Aufsung 0,1 °C/0,2 °F
Genauigkeit ±1°C von -20 °C…150°C, ±2°F von -4 °F…302°F
Reaktionszeit 3…4 sec.
Schutzart Wasserdicht IP 67
Spannungsversorgung 1x CR2032 Knopfzell-Batterie
Größe 160 (275) x 48 x 20 mm
Gewicht 79 g (nur das Gerät)
TFA Dostmann GmbH & Co. KG, Zum Ottersberg 12, D-97877 Wertheim, Deutschland
Diese Anleitung oder Auszüge daraus dürfen nur mit Zustimmung von TFA Dostmann veröffentlicht werden. Die technischen Daten entsprechen
dem Stand bei Drucklegung undnnen ohne vorherige Benachrichtigung geändert werden. Die neuesten technischen Daten und Informationen zu
Ihrem Produkt finden Sie auf unserer Homepage unter Eingabe der Artikel-Nummer in das Suchfeld.
www.tfa-dostmann.de 10/20
Bedienungsanleitung
Instruction manual
Mode d’emploi
Kat. Nr. 30.1061
A 1 A 2 A 3
A 4
A 5
Kat. Nr. 30.1061 Kat. Nr. 30.1061
A 6 A 7
Fig. 1 Fig. 2
TFA_No_30.1061_Anl_D_GB_F_10_20 13.10.2020 15:20 Uhr Seite 1
Cooking thermometer-meat thermometer Thermotre de cuisine - thermomètre de viande
6.5 Sleep mode
The sleep mode is activated when the instrument is not in use (approx. 10 minutes) and the probe is unfolded. The instru-
ment will turn off automatically. Press any button and the temperature reappears again on the display.
7. Care and maintenance
Clean the device with a soft damp cloth. Do not use solvents or scouring agents. The device is washable under running
water.
Remove the battery if you do not use the device for a long period of time.
Keep the device in a dry place.
7.1 Battery replacement
Change the battery when the display starts to fade.
Open the battery compartment by turning the lid to the left (in the arrow direction) using the enclosed plastic disc and insert
a new CR 2032 battery (+pole above).
Close the battery compartment by turning the lid to the right.
Note: The instrument must be switched off before changing the battery (the temperature probe should be folded).
8. Calibration of the temperature display
The thermometer has been adjusted in the factory. This function allows the user to recalibrate the temperature measure-
ments with a reference source (ice water).
Fold out the probe.
Put the instrument for 3 minutes into a bowl with ice water until the temperature does not change anymore. Note that the
probe is immersed at least two-thirds of its length.
Press and hold the button (5 sec.) to get into the calibration mode.°C/°F
CAL and shortly after 0°C/32°F flash on the display.
Optional: You can enter a different value by pressing the + or - button (assuming a reliable measured value). LIGHT HOLD
Confirm with the button. PASS appears on the display.°C/°F
The device is now calibrated.
Producing of ice water: Fill up a thermos bottle with crushed ice. Then fill cold water into the thermos bottle until the air
comes out of the bottle. After approximately 30 minutes the ice water has a temperature of 0°C (+0,1°C).
9. Troubleshooting
Problem Solution
No display Fold the probe first, then fold it out again.
Ensure that the battery polarity is correct (+pole above)
Change the battery
Weak display Change the battery
Incorrect indication Check the position of the sensor
Change the battery
If your device fails to work despite these measures, contact the retailer where you purchased the product.
10. Waste disposal
This product has been manufactured using high-grade materials and components which can be recycled and reused.
Never dispose of empty batteries and rechargeable batteries in ordinary household waste. As a consumer, you are
required by law to take them to your retail store or to an appropriate collection site depending on national or local
regulations in order to protect the environment.
The symbols for the contained heavy metals are: Cd = cadmium, Hg = mercury, Pb = lead
This product is labelled in accordance with the EU Waste Electrical and Electronic Equipment Directive (WEEE).
Please do not dispose of this product in ordinary household waste. As a consumer, you are required to take end-
of-life devices to a designated collection point for the disposal of electrical and electronic equipment, in order to
ensure environmentally-compatible disposal.
11. Specifications
Measuring range
Temperature -50 °C… 300 °C /-58 °F…+572 °F
Resolution 0,1°C/0,F
Accuracy ±1°C from -20 °C…150°C, ±2°F from -4 °F…302°F
Reaction time 3…4 sec.
Protection class Waterproof IP 67
Power consumption Button cell battery CR2032
Dimensions 160 (275) x 44 x 21 mm
Weight 70 g (device only)
TFA Dostmann GmbH & Co. KG, Zum Ottersberg 12, D-97877 Wertheim, Germany
No part of this manual may be reproduced without written consent of TFA Dostmann. The technical data are correct at the time of going to print and
may change without prior notice. The latest technical data and information about this product can be found in our homepage by simply entering the
product number in the search box.
www.tfa-dostmann.de 10/20
Thermotre de cuisine - thermomètre de viande
Maintenez la touche appuyée en mode MAX/MIN pour effacer les valeurs MAX/MIN. HOLD/MAX MIN
Appuyez une nouvelle fois sur la touche pour quitter le mode MAX/MIN.HOLD/MAX MIN
6.4 Commutation °C/°F
Appuyez sur la touche °C/°F, pour passer de l’affichage de la température en degrés °C (par défaut) à l’affichage en degrés °F.
6.5 Mode économie d’énergie
Lorsque l'appareil est déplié et qu’il n'est pas utilisé, le mode économie d’énergie est activé après 10 minutes. L'appareil
s'arrête automatiquement. Appuyez sur une touche de votre choix et l'écran affiche à nouveau la température.
7. Entretien et maintenance
Pour le nettoyage de votre appareil, utilisez un chiffon doux et humide. N’utilisez pas de solvants ou d'agents abrasifs !
L'appareil doit être lavé à l'eau courante.
Retirez la pile si vous n'utilisez pas votre appareil pendant une durée prolongée.
Conservez votre appareil dans un endroit sec.
7.1 Remplacement de la pile
Remplacez la pile si l’affichage s’affaiblit.
Ouvrez le compartiment à pile en tournant le couvercle vers la gauche en direction de la flèche (en utilisant le disque en plas-
tique fourni) et insérez une nouvelle pile CR 2032 (polarité + vers le haut).
Refermez le compartiment à pile en tournant le couvercle vers la droite.
Remarque : Veuillez-vous assurer que votre appareil est éteint avant de changer la pile (la sonde de température doit être
reple.)
8. Étalonnage de l'affichage de la température
Le thermomètre est réglé en usine. Cette fonction permet à l'utilisateur d'étalonner l'affichage de la température avec une
source de référence (eau glacée).
Dépliez la sonde.
Insérez la sonde pendant 3 minutes dans un récipient contenant de l'eau glacée, jusqu'à ce que la température reste constante.
Si vous maintenez la touche appuyée (pendant 5 secondes), vous passez en mode d’étalonnage.°C/°F
Sur l'écran clignote CAL et 0°C /32°F peu de temps après.
Optionnel : Vous pouvez alors changer la valeur avec la touche + ou ECLAIRAGE HOLD - (sous réserve d'une valeur fiable).
Validez au moyen de la touche . PASS appart sur lcran.°C/°F
L'appareil est maintenant calibré.
Fabrication d'eau glae : remplir complètement une bouteille thermos de glace pilée. Remplir ensuite la bouteille thermos
d'eau froide, de sorte qu'il ne reste plus d'air dans les interstices. Après environ 30 minutes de l'eau glacée s'est formée
dans la bouteille thermos et possède une température de 0°C (+0,1°C).
9. Dépannage
Probme Solution
Aucun affichage Dépliez la sonde (la plier avant)
Contrôlez la bonne polari de la pile (polarité + vers le haut)
Changez la pile
Affichage faible Changez la pile
Affichage incorrect Vérifiez l'emplacement de la sonde de mesure
Changez la pile
Si votre appareil ne fonctionne toujours pas malgré ces mesures, adressez-vous au vendeur chez qui vous l'avez acheté.
10. Traitement des déchets
Ce produit a été fabriqué avec des matériaux de haute qualité qui peuvent être recyclés et réutilisés.
Les piles usagées ne doivent pas être jetées dans les détritus ménagers.
En tant qu'utilisateur, vous avez l'obligation légale de rapporter les piles et piles rechargeables usagées à votre
revendeur ou de les poser dans une déchetterie proche de votre domicile conformément à la glementation
nationale et locale.
Les métaux lourds sont désignés comme suit : Cd = cadmium, Hg = mercure, Pb = plomb.
Cet appareil est conforme aux normes de l'UE relatives au traitement des déchets électriques et électroniques
(WEEE).
L'appareil usagé ne doit pas être jeté dans les ordures ménagères. L’utilisateur s’engage, pour le respect de l’environ-
nement, à déposer l’appareil usagé dans un centre de traitement agréé pour les déchets électriques et électroniques.
11. Caractéristiques techniques
Plage de mesure
Température de -50 °C à 300 °C (de -58 °F à +572 °F)
Résolution 0,1°C/0,F
Précision ±1°C de -20°C…150°C, ±2°F de -4 °F…302°F
Temps de réponse 3…4 sec.
Classe Étanche selon IP 67
Alimentation Pile bouton 1 x CR2032
Dimensions du boîtier 160 (275) x 44 x 21 mm
Poids 70g (appareil seulement)
TFA Dostmann GmbH & Co. KG, Zum Ottersberg 12, D-97877 Wertheim, Allemagne
La reproduction, même partielle, du présent mode d'emploi est strictement interdite sans l'accord explicite de TFA Dostmann. Les caractéristiques
techniques de ce produit ont été actualisées au moment de l'impression et peuvent être modifiées sans avis préalable. Les dernières données tech-
niques et les informations concernant votre produit peuvent être consultées en entrant le numéro de l'article sur notre site Internet.
www.tfa-dostmann.de 10/20
Nous vous remercions d'avoir choisi l'appareil de la société TFA.
1. Avant d'utiliser votre appareil
Veuillez lire attentivement le mode d'emploi.
En respectant ce mode d'emploi, vous éviterez d'endommager votre appareil et de perdre vos droits légaux en cas de
défaut si celui-ci sulte d’une utilisation non-conforme. Nous n'assumons aucune responsabili pour des dommages
qui auraient é causés par le non-respect du présent mode d'emploi.
De me, nous n’assumons aucune responsabilité pour des reles incorrects et les conséquences qu’ils pourraient
engendrer.
Suivez bien toutes les consignes de sécurité !
Conservez soigneusement le mode d'emploi !
2. Aperçu du domaine d'utilisation et de tous les avantages de votre nouvel appareil
Pour le contrôle de la température des aliments et des boissons
Thermomètre de poche pliable
Sonde en acier inoxydable 110 mm
Mesure rapide et précise
Fonction MIN/MAX et HOLD
Éclairage de fond
Utilisation universelle, idéal pour des aliments, selon HACCP
Ouvre-bouteille intégré sert également à accrocher
Support magnétique
3. Pour votre sécurité
Le produit est destiné uniquement à l'utilisation décrite ci-dessus. N'utilisez jamais l’appareil à d'autres fins que celles décri-
tes dans le présent mode d'emploi.
Vous ne devez en aucun cas réparer, démonter ou modifier l'appareil par vous-même.
Cet appareil ne convient pas à une utilisation médicale.
Attention !
Danger de blessure !
Gardez votre appareil et la pile hors de la portée des enfants.
Les piles contiennent des acides nocifs pour la santé et peuvent être mortelles dans le cas d’une ingestion. Si une pile a été
avalée, elle peut entraîner des brûlures internes graves ainsi que la mort dans l’espace de 2 heures. Si vous craignez qu’une
pile ait pu être avalée ou ingérée d’une autre manière, quelle qu’elle soit, contactez immédiatement un médecin d’urgence.
Ne jetez jamais de piles dans le feu, ne les court-circuitez pas, ne les démontez pas et ne les rechargez pas. Risque d'explosion !
Une pile faible doit être remplacée le plus rapidement possible afin d'éviter toute fuite.
Pour manipuler des piles qui ont coulé, utilisez des gants de protection chimique spécialement adaptés et portez des lunettes
de protection !
Soyez prudent en utilisant la sonde ! Assurez-vous toujours que le thermomètre est pl lorsqu’il n’est pas utilisé.
Conseils importants de sécurité du produit !
Évitez d’exposer l’appareil à des températures extrêmes, à des vibrations ou à des chocs.
Seule la sonde en acier inoxydable est résistante à une chaleur de 300 °C.
N'utilisez jamais votre appareil dans un four à micro-ondes, un four ou un grill.
Ne placez jamais la sonde directement sur le feu.
N'immergez pas l'appareil d'affichage dans l'eau car l'humidité pourrait pénétrer et causer un dysfonctionnement. Votre in-
strument ne peut pas être lavé au lave-vaisselle.
4. Composants (Fig. 1 + 2)
A 1 : A 2 :Sonde Affichage
A 3 : Touche Touche °C/°F A 4 : HOLD/MAX MIN
A 5 : Touche Ouvre-bouteilles pour l'accrocherECLAIRAGE A 6 :
A 7 : Compartiment à pile
5. Mise en service et mesure de la température
Retirez le film de protection de l'affichage.
Ouvrez le compartiment à pile en tournant le couvercle dans le sens contraire des aiguilles d'une montre (en utilisant le dis-
que en plastique fourni) et enlevez le film de protection de pile. Refermez le compartiment à pile. Ce faisant faites attention à
l'anneau de protection en caoutchouc.
L'appareil se met automatiquement sur un angle de 45°. La sonde dispose d'un angle total de 180°.
Votre appareil est maintenant prêt à fonctionner et la température est affichée sur l'écran.
Le palpeur se trouve à la pointe de la sonde.
Pour la mesure de la température à cœur de la viande : insérez la sonde au minimum à 2 cm de profondeur dans la partie la
plus épaisse de la viande, pour les volailles entre la carcasse et la cuisse ; la pointe ne doit pas être en contact avec les os ou
avec le cartilage. Elle ne doit pas dépasser du morceau de viande.
Éteignez l’appareil en repliant la sonde. Pousser la sonde avec une légère pression dans l’espace prévu à cet effet. Un clic se
fait entendre.
6. Utilisation
6.1 Éclairage de fond
Appuyez sur la touche pour activer l'éclairage de fond pendant 5 secondes.ECLAIRAGE
6.2 Fonction HOLD
Appuyez sur la touche . La température mesurée est retenue.HOLD/MAX MIN
Appuyez encore une fois sur la touche afin de retourner au mode normal.HOLD/MAX MIN
6.3 Fonction MAX/MIN
Maintenez la touche appuyée. L'appareil passe en mode MAX/MIN.HOLD/MAX MIN
MAX appart sur lcran. La température maximale appart sur lcran dès l'allumage de l'appareil.
Appuyez une nouvelle fois sur la touche . MIN apparaît sur l'écran. La température minimale appart surHOLD/MAX MIN
l'écran dès l'allumage de l'appareil.
Bedienungsanleitung
Instruction manual
Mode d’emploi
Kat. Nr. 30.1061
A 1 A 2 A 3
A 4
A 5
Kat. Nr. 30.1061 Kat. Nr. 30.1061
A 6 A 7
Fig. 1 Fig. 2
TFA_No_30.1061_Anl_D_GB_F_10_20 13.10.2020 15:20 Uhr Seite 2


Produkt Specifikationer

Mærke: TFA
Kategori: Termometer
Model: 30.1061.01

Har du brug for hjælp?

Hvis du har brug for hjælp til TFA 30.1061.01 stil et spørgsmål nedenfor, og andre brugere vil svare dig


Termometer TFA Manualer

TFA

TFA 14.1028 Manual

1 April 2025
TFA

TFA 12.5002.01 Manual

1 April 2025
TFA

TFA 30.1044 Manual

4 Marts 2025
TFA

TFA 30.1029 Manual

4 Marts 2025
TFA

TFA HIPPO 30.2034 Manual

5 Februar 2025
TFA

TFA 12.1004 Manual

21 December 2024
TFA

TFA 30.1000 Manual

17 December 2024

Termometer Manualer

Nyeste Termometer Manualer

SOENS

SOENS 186012 Manual

17 Juni 2025
CDN

CDN DTP392 Manual

15 Juni 2025
CDN

CDN DTL572 Manual

14 Juni 2025
CDN

CDN TCF400 Manual

14 Juni 2025
CDN

CDN IN1022 Manual

14 Juni 2025
CDN

CDN IN482 Manual

14 Juni 2025
CDN

CDN DTC450 Manual

14 Juni 2025
Comark

Comark N9002 Manual

13 Juni 2025
CDN

CDN TCG400 Manual

13 Juni 2025