V-TAC VT-543 Manual

V-TAC Lettelse VT-543

Læs gratis den danske manual til V-TAC VT-543 (26 sider) i kategorien Lettelse. Denne vejledning er vurderet som hjælpsom af 19 personer og har en gennemsnitlig bedømmelse på 4.9 stjerner ud af 10 anmeldelser. Har du et spørgsmål om V-TAC VT-543, eller vil du spørge andre brugere om produktet?

Side 1/26
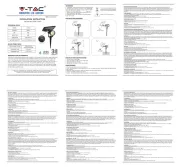
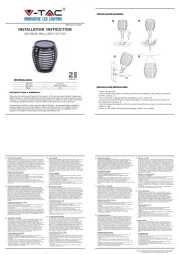
INSTALLATION INSTRUCTION
EMERGENCY LIGHTS (VT-543)
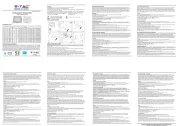
OPERATION DIAGRAM
INTRODUCTION & WARRANTY
Thank you for selecting and buying V-TAC product. V-TAC will serve you the best. Please read these instruc-
tions carefully before starting the installing and keep this manual handy for future reference. If you have any
another query, please contact our dealer or local vendor from whom you have purchased the product. They
are trained and ready to serve you at the best.
The warranty is valid for 2 years from the date of purchase. The warranty does not apply to damage caused
by incorrect installation or abnormal wear and tear. The company gives no warranty against damage to any
surface due to incorrect removal and installation of the product. This product is warranted for manufacturing
defects only. The products are suitable for 10-12 Hours Daily operation. Usage of product for 24 Hours a day
would void the warranty. This product is warranted for manufacturing defects only.
Our products are designed to comply with the recommendations of BS EN 60598-1:2008 code of practice for
emergency lighting and should be installed by a competent person in accordance with the relevant regula-
tions. Before installation of any type of emergency lighting always seek the advice of the local fire prevention
officer (or equivalent authority).
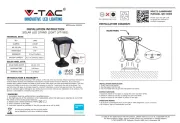
Multi-Language Manual QR CODE
WEEE Number: 80133970
LUMINAIRE INFORMATION
• Watts: 3W
• Lamp Type: 16 SMD LEDs, Wall-Bulkhead
• Lumens: 140 LM
• Input Power: AC: 220-240V, 50/60Hz
• Protection Rating: IP65
• Operation Tine: >3 Hours
• Charging Current: 70~150mA
• Discharging Current: 100~450mA
• Battery type: Ni-Cd 3.6V 1200mAh
• Recharge time: 12 hours (Initial charge: 36 hrs)
• Indicator: Green Light Indicator
• Material: PC Cover
• Product size: 346x107x60 mm (LxWxH)
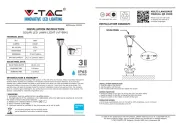
For Maintained Operation - Maintained operation, link L
(Switched Live) to terminal Ls (permanent Live). If ‘Ls’ is not
connected, the fitting works as non-maintained
All self-contained emergency lighting luminaires require a
continuous (un-switched) 220V-240V single phase 50hz (L)
supply to keep the inbuilt batteries charged.
Note: the LEDs contained in this fitting are not designed to be
replaced.
MAINTAINED
Ls N L
NON-MAINTAINED
Ls N L
Please scan the QR code to access the
manual in multiple languages.
ENGLISH
INSTALLATION OF THE FITTING
Installation should only be carried out in accordance with the current edition of the “Regulations for Electrical
Installations” EN61547 and with the requirements of BS EN 60598-1.
Don’t do a high voltage insulation test on the luminaire as this may damage the control gear.
Before starting the installation ensure that the electricity supply is isolated and that it cannot be reenergized
accidentally.
1) Remove the front diffuser from the body by removing the 2 fixing screws.
2) Release the gear tray by easing the plastic clips away from the tray and by lifting the tray away from the
base.
3) There are four cable entry holes on this fitting. One on the rear and one on each side of the plastic body.
Drill out the intended cable entry hole suitable for your installation.
4) Drill out the two fixing holes located on the back of the luminaire, hold the luminaire in the required
location and use these holes as a template mark on the location of the fixing holes on the wall/ceiling (Please
note when drilling fixing holes in the wall/ceiling be careful not to damage concealed wires or pipes.)
5) Fix the luminaire to the wall/ceiling using suitable screws and fixings (not supplied).
7) For component protection in transit and user safety the luminaire battery fuse is supplied in the
fitting.
8) When all connections have been made reassemble the fitting completely.
9) Restore the supply and check that the Green LED indicator illuminates to confirm the batteries are
charging. There are three possible reasons when the green LED indicator does not light up:
1) there is no power supply AC220-240V,
2) the batteries are not properly connected to the PCB,3) the batteries are not being charged.
10) Allow a short period for partly charging the batteries and then isolate the mains supply to the fitting
in order to check the correct operation of the fitting in emergency mode. After 36 hours on continuous
charge (and only at a safe time) a mains failure should be simulated to ensure that the fitting
illuminates for its rated emergency duration.
The luminaire will have a 1-hour backup after 14 hours charging and will be fully charged after 24 hours
(first charge 36 hours)
MAINTENANCE
Once the luminaire no longer meets the rated emergency operation the batteries must be replaced. AND
batteries must be replaced after a maximum of 4 years in service.
Repairs should only be carried out by a qualified person. Please recycle disposal of replaced components
where facilities exist. Special care should be taken if its required to open the fitting as the fitting may
still be “live” even though the mains supply has been isolated. In these circumstances immediately
disconnect the battery supply.
Servicing and cleaning should only be carried out after the fitting has been made electrically safe.
Cleaning of luminaires should be carried out at regular intervals not only to ensure good optical
performance but also ensure that dirt does not accumulate to such an extent as to impair the electrical
or thermal safety of the fitting.
(N) Blue
(L) Brown
6) Connect the mains supply
wiring as follows.
ENGLISH


Produkt Specifikationer

Mærke: V-TAC
Kategori: Lettelse
Model: VT-543

Har du brug for hjælp?

Hvis du har brug for hjælp til V-TAC VT-543 stil et spørgsmål nedenfor, og andre brugere vil svare dig


Lettelse V-TAC Manualer

V-TAC

V-TAC VT-411CCT Manual

5 Februar 2025
V-TAC

V-TAC VT-952 Manual

5 Januar 2025
V-TAC

V-TAC VT-983 Manual

5 Januar 2025
V-TAC

V-TAC VT-719 Manual

5 Januar 2025
V-TAC

V-TAC VT-984 Manual

5 Januar 2025
V-TAC

V-TAC VT-969 Manual

5 Januar 2025
V-TAC

V-TAC VT-75001 Manual

4 Januar 2025
V-TAC

V-TAC VT-75002 Manual

4 Januar 2025
V-TAC

V-TAC VT-1253S Manual

6 September 2024
V-TAC

V-TAC VT-1253 Manual

6 September 2024

Lettelse Manualer

Nyeste Lettelse Manualer