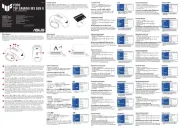
b. Nano USB 2.4GHz receiver (stored inside the mouse)
Mouse: 118.9mm (L) x 66.5mm (W) x 42mm (H)
Dongle: 19.9mm (L) x 14mm (W) x 6.6mm (H)
Mouse: 69g (without battery)
Mouse: 2.4GHz mode: 1.5V/30mA
Bluetooth 5.0 mode: 1.5V/30mA
Mouse: GFSK / Bluetooth: V05
Mouse: GFSK / Bluetooth: V5.9
Windows 10 or above / Chrome OS
(The Radio Equipment Regulations 2017)
Mouse: 2.4GHz mode: 2403-2480 MHz
Bluetooth mode: 2402-2480 MHz
Maximum output power(EIRP)
Mouse: 2.4GHz mode: <5 dBm
CE RED RF Output table (Directive 2014/53/EU)
Mouse: 2.4GHz mode: 2403-2480 MHz
Bluetooth mode: 2402-2480 MHz
Maximum output power(EIRP)
Mouse: 2.4GHz mode: <5 dBm
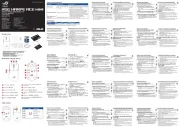
1. Slide the power switch to 2.4GHz Mode.
2. Insert the Nano USB receiver into an available USB port on your PC.
3. When successfully paired to your PC, the Connection channel
indicator will light up green and then turn o.
1. Slide the switch to Bluetooth Mode.
2. Press the pair button for over 3 seconds to activate the Bluetooth
pairing mode. (The indicator will ash blue rapidly)
3. On Windows, right-click the Bluetooth icon on the right of the task bar
(or double-click the Bluetooth icon in the Control Panel), then click Add
a device ASUS MD102 Finish> > .
4. When successfully connected, the indicator will stop ashing and
remain in blue light for several seconds before it fades o. Once the
mouse is set up on your PC, it will automatically connect to your PC the
next time you turn to Bluetooth mode.
NOTE: The mouse supports Bluetooth 5.0.
Adjusting DPI and Understanding LED Indications
To adjust the DPI setting, hold down the left button and the scroll wheel for
more than three seconds. Please refer to the following table for LED indications.
Awaiting dongle connection
Awaiting Bluetooth connection
Bluetooth pairing mode on
Replace the battery when the indicator ashes red, indicating that the mouse’s battery level is below 20%.
CAUTION: RISK OF EXPLOSION IF BATTERY IS REPLACED BY AN INCORRECT TYPE. DISPOSE OF USED BATTERIES ACCORDING TO THE INSTRUCTIONS.
Q23563 / First Edition / June 2024
Mouse Model Name: MD102 /
: MD102 (SC) / Modellname der Maus: MD102 (DE) / Nome modello mouse: MD102 (IT) / Modèle de souris : MD102 (FR)/ Модель мыши: MD102 (RU) /Naam muismodel: MD102 (NL) /
/ / Nombre del modelo de ratón: MD200 (ES) Denumire model mouse: MD102 (RO) /
: MD102 (TH) / Ime modela miške: MD102 (SL) / Egér típusnév: MD102 (HU) / Назва моделі миші: MD102 (UA) /
: MD102 (HB) Mouse Model Adı: MD102 (TR) Názov modelu myši: D102-D (SK) / Nazwa modelu myszy: MD102 (PL) / Nome de modelo do rato: MD102 (PT) / Název modelu myši: MD102 (CZ) / /
Dongle Model Name: MD102-D /
: MD102-D (SC) / Modellname der Maus: MD102 (DE)/ Nome modello dongle: MD102-D (IT) / Modèle de dongle : MW102-D (FR) / Модель приемника: MD102-D (RU) / Naam dongle-model: MD102 -D (NL) /
/ Nombre del modelo de la llave: MD200-D (ES) / Denumire model dongle: MD102-D (RO) /
: MD102-D (TH) Ime modela zaščitnega ključa: MD102-D (SL) / Dongle típusnév: MD102-D (HU) / Назва моделі ключа: MD102-D (UA) / /
: MD102-D (HB) /Dongle Model Adı: MD102-D (TR) / Názov modelu pamäťového kľúča: MD102-D (SK) / Nazwa modelu klucza sprzętowego: MD102-D (PL) /
Nome de modelo do adaptador: MD102-D (PT) / Název modelu adaptéru dongle: MD102-D (CZ)
b. Nano USB 2.4GHz 接收器(收納於鼠標內)
鼠標: 118.9mm(長)x 66.5mm(寬)x 42mm(高)
接收器: 19.9mm(長)x 14mm(寬)x 6.6mm(高)
Windows 10 操作系統及以上版本 / Chrome OS®
2. 將 Nano USB 接收器連接到電腦上一個可用的 USB 接口。
3. 當與電腦成功配對後, 連接頻道指示燈將先亮起綠光然後熄滅。
2. 長按配對按鈕超過 3 秒鐘, 以開啟藍牙配對模式 (指示燈會快
3. 在 W indow s 系統中, 右鍵點選任務欄中的藍牙圖標 (或在
控制台中雙擊藍牙圖標 點擊【新增藍牙或其他設備】), 然後 >
4. 完成後, 指示燈將停止閃爍並亮起藍光, 數秒後熄滅。 在鼠標
首次連接到電腦後,下次當您開啟藍牙模式時, 鼠標將自動連接
如需調整 DPI 設置, 請按下鼠標左鍵與滾輪並保持三秒以上。 關於 LED
當指示燈閃爍紅光時, 說明鼠標電量已低於 20%, 請及時更換電池。
警告: 若更換了不正確電池可能會有爆炸的危險。 請依照說明處
b. Nano USB 2.4GHz 接收器(收納於滑鼠內)
滑鼠: 118.9mm(長)x 66.5mm(寬)x 42mm(高)
接收器: 19.9mm(長)x 14mm(寬)x 6.6mm(高)
Windows 10 作業系統及以上版本 / Chrome OS®
2. 將 Nano USB 接收器連接到電腦上一個可用的 USB 連接埠。
3. 當與電腦成功配對後, 連線頻道指示燈將先亮起綠光然後熄滅。
2. 長按配對按鈕超過 3 秒鐘 以開啟藍牙配對模式 (指示燈會快,
3. 在 Windows 系統中, 右鍵點選工具列中的藍牙圖示 (或在控制
台中雙點擊藍牙圖示), 然後點選 > 新增藍牙或其他裝置 ASUS
4. 完成後, 指示燈將停止閃爍並亮起藍光, 數秒後熄滅。 在滑鼠
首次連線到電腦後, 下次當您開啟藍牙模式時, 滑鼠將自動連
若需調整 DPI 設定, 請按下滑鼠左鍵與滾輪並保持三秒以上。 關於 LED
當指示燈閃爍紅光時,說明滑鼠電量已低於 20%, 請及時更換電池。
小心: 電池型號不正確可能會導致爆炸。 請 依照說明處理使用過
b. Récepteur Nano USB 2,4 GHz (stocké à l’intérieur de la souris)
d. Guide de démarrage rapide
Souris : 118,9 mm (L) x 66,5 mm (l) x 42 mm (H)
Dongle : 19,9 mm (L) x 14 mm (l) x 6,6 mm (H)
Souris : 69 g (sans batterie)
Souris : Mode 2,4 GHz : 1,5V/30mA
Mode Bluetooth 5.0 : 1,5V/30mA
Souris : GFSK / Bluetooth : V05
Souris : GFSK / Bluetooth : V5.9
Windows® 10 ou supérieur / Chrome OS
Température de fonctionnement
Humidité de fonctionnement
Connexion à un ordinateur
1. Déplacez l'interrupteur d'alimentation sur le mode 2,4 GHz.
2. Insérez le récepteur USB nano dans un port USB disponible sur votre
3. Après un appairage réussi à votre ordinateur, le voyant lumineux du
canal de connexion s'allumera brièvement (vert) avant de s'éteindre.
1. Déplacez l'interrupteur sur le mode Bluetooth.
2. Appuyez sur le bouton d'appairage pendant plus de 3 secondes
pour activer le mode d'appairage Bluetooth. (Le voyant lumineux
clignotera rapidement en bleu)
3. Sous Windows, faites un clic droit sur l'icône Bluetooth situé dans
la partie droite de la barre des tâches (ou double-cliquez sur l'icône
Bluetooth du panneau de conguration), puis cliquez sur Ajouter un
périphérique MD102 Mouse (Souris MD102) Terminé > > .
4. Une fois la connexion établie, le voyant lumineux cessera de clignoter
et restera allumé en bleu pendant plusieurs secondes avant de
s'éteindre. Une fois la souris congurée sur votre ordinateur, elle s'y
connectera automatiquement la prochaine fois que vous passerez en
REMARQUE : La souris prend en charge la norme Bluetooth 5.0.
Ajuster le DPI et comprendre les
indications du voyant LED
Pour régler le paramètre DPI, maintenez enfoncés le bouton gauche et la
molette de délement pendant plus de trois secondes. Veuillez vous référer au
tableau ci-dessous pour les indications du voyant LED.
Flash lent En attente de connexion du dongle
Toujours allumé Dongle connecté
Flash lent En attente de connexion Bluetooth
Clignotement rapide Mode appairage Bluetooth activé
Toujours allumé Bluetooth connecté
Rouge Clignotement continu
Niveau de batterie inférieur à 20%
Clignote une fois DPI réglé sur 800
Clignote deux fois DPI réglé sur 1200
Clignote trois fois DPI réglé sur 1600
Remplacez la pile lorsque le voyant lumineux clignote en rouge, ce qui indique
que le niveau de batterie est inférieur à 20%.
ATTENTION : RISQUE D'EXPLOSION SI LA PILE N'EST PAS CORRECTEMENT
REMPLACÉE. JE TEZ LES PILES USAGÉES CONFORMÉMENT AUX
INSTRUCTIONS DU FABRICANT.
Contenuto della confezione:
b. Ricevitore Nano USB 2.4GHz (memorizzato all’interno del mouse)
e. Certicato di garanzia
Temperatura di non utilizzo
1. Far scorrere l’interruttore di alimentazione sulla modalità 2,4 GHz.
2. Inserite il ricevitore Nano USB in una porta USB disponibile del PC.
3. Ad associazione al PC avvenuta L’indicatore del canale di connessione
si accende in verde e poi si spegne.
1. Far scorrere l’interruttore sulla modalità Bluetooth.
2. Premere il tasto di associazione per oltre 3 secondi per attivare
la modalità di associazione Bluetooth. (L’indicatore lampeggia
3. In Windows cliccate con il tasto destro sull’icona Bluetooth nella parte
destra della barra delle applicazioni (o fate doppio click sull’icona
Bluetooth nel Pannello di controllo) con un mouse collegato al PC,
quindi cliccate su Add a device (Aggiungi un dispositivo) ASUS >
4. Una volta eettuata la connessione corretta, l’indicatore cessa di
lampeggiare e rimane illuminato in blu per diversi secondi prima di
scomparire. Una volta che il mouse è congurato sul PC, si connette
automaticamente al PC la prossima volta che si passa alla modalità
NOTA: Il mouse supporta gli standard Bluetooth 5.0.
Regolazione DPI e comprensione delle
Per regolare l’impostazione DPI, tenere premuto il tasto sinistro e la rotellina di
scorrimento per oltre tre secondi. Fare riferimento alla tabella di seguito per i
Lampeggio lento In attesa di connessione del dongle
Costantemente acceso Dongle collegato
Lampeggio lento In attesa di connessione del Bluetooth
Modalità di associazione Bluetooth
Costantemente acceso Bluetooth collegato
Livello batteria inferiore al 20%
Lampeggia tre volte DPI impostato su 1600
Sostituzione della batteria
Sostituire la batteria quando l’indicatore lampeggia in rosso,
che il livello della batteria del mouse è inferiore al 20%.
ATTENZIONE: RISCHIO DI ESPLOSIONE SE LA BATTERIA È SOSTITUITA CON
UNA DI UN ALTRO TIPO NON COMPATIBILE. SMALTITE LE
BATTERIE USATE ATTENENDOVI ALLE ISTRUZIONI FORNITE DAL
b. Nano usb 2,4 GHz-ontvanger (in de muis opgeborgen)
Muis: 118.9mm (L) x 66.5mm (W) x 42mm (H)
Dongle: 19.9mm (L) x 14mm (W) x 6.6mm (H)
Muis: 69g (zonder batterij)
Muis: 2.4GHz-modus: 1.5V/30mA
Bluetooth 5.0-modus: 1.5V/30mA
Muis: GFSK / Bluetooth: V05
Muis: GFSK / Bluetooth: V5.9
Windows 10 of hoger / Chrome OS
Verbinding maken met de pc
1. Schuif de voedingsschakelaar naar de 2.4 GHz-modus.
2. Steek de Nano usb-ontvanger in een beschikbare usb-aansluiting.
3. Als de muis met de pc gepaard is, de indicator van het
verbindingskanaal zal groen oplichten en dan doven.
1. Schuif de schakelaar naar de Bluetooth-modus.
2. Druk op de koppelingsknop langer dan 3 seconden ingedrukt om
de Bluetooth-koppelingsmodus te activeren. (De indicator zal snel
3. Onder Windows klikt u op het Bluetooth-pictogram aan de
rechterkant van de taakbalk. (of op het Bluetooth-pictogram in
het Conguratiescherm), klik daarna op Add a device (Apparaat
toevoegen) ASUS MD102 Finish (Voltooien)> > .
4. ij een gelukte verbinding, de indicator zal stoppen met knipperen en
blauw opgelicht blijven gedurende meerdere seconden voordat het
vervaagt. Zodra de muis is ingesteld op uw pc, zal deze automatisch
verbinding maken met uw pc wanneer u de Bluetooth-modus de
volgende keer inschakelt.
OPMERKING: De muis ondersteunt zowel Bluetooth 5.0.
DPI aanpassen en LED-indicators
Om de DPI-instelling aan te passen, houdt u de linkerknop en het scrollwiel
langer dan drie seconden ingedrukt. Raadpleeg de volgende tabel voor LED-
Langzaam knipperend Wachten op dongle-verbinding
Altijd aan Dongle aangesloten
Langzaam knipperend Wachten op Bluetooth-verbinding
Snel knipperen Bluetooth-koppelingsmodus aan
Altijd aan Bluetooth aangesloten
Batterijniveau lager dan 20%
Knippert driemaal DPI ingesteld op 1600
Vervang de batterij wanneer de indicator rood knippert,
het batterijniveau van de muis lager is dan 20%.
VOORZICHTIG: EXPLOSIEGEVAAR ALS DE BATTERJI VERVANGEN WORDT DOOR
EEN ONJUIST TYPE. VERWIJDER LEGE BATTERIJEN VOLGENS DE
b. USB приемник 2,4 ГГц (хранится внутри мыши)
c. 1 элемент питания типа АА
Мышь: 118,9 мм (Д) x 66,5 мм (Ш) x 42 мм (В)
Приемник: 19,9 мм (Д) x 14 мм (Ш) x 6,6 мм (В)
Мышь: режим 2,4 ГГц: 1,5 В / 30 мА
Режим Bluetooth 5.0: 1,5 В / 30 мА
Мышь: GFSK / Bluetooth: V05
Мышь: GFSK / Bluetooth: V5.9
Windows 10 или выше / ОС Chrome
1. Переместите тумблер питания в режим 2,4 ГГц.
2. Подключите USB-приемник к свободному порту USB компьютера.
3. После успешного сопряжения с компьютером индикатор режима
подключения загорится зеленым, затем погаснет.
1. Установите переключатель в режим Bluetooth.
2. Нажмите и удерживайте кнопку сопряжения более 3 секунд для
активации режима сопряжения Bluetooth. (Индикатор будет
быстро мигать синим цветом)
3. В Windows щелкните правой кнопкой по иконке Bluetooth справа
от панели задач (или дважды щелкните по иконке Bluetooth в
панели управления), затем нажмите Добавить устройство >
4. После успешного подключения индикатор перестанет мигать
и загорится синим цветом на несколько секунд, затем погаснет.
После подключения мыши к компьютеру она автоматически
подключится к нему при переключении в режим Bluetooth.
ПРИМЕЧАНИЕ: Мышь поддерживает Bluetooth 5.0.
Настройка DPI и индикация
Для настройки DPI нажмите и удерживайте левую кнопку и колесо
прокрутки более трех секунд. Информация об индикации приведена в
Продолжительность Описание
Медленно мигает Ожидание подключения приемника
Медленно мигает Ожидание подключения Bluetooth
Горит Bluetooth подключен
Батарея разряжена ниже 20%
Мигает один раз DPI установлено на 800.
Мигает дважды DPI установлено на 1200.
Мигает трижды DPI установлено на 1600.
Замените батарею, когда индикатор начнет мигать красным, указывая на то,
что батарея разряжена ниже 20%.
ВНИМАНИЕ: ПРИ УСТАНОВКЕ АККУМУЛЯТОРА НЕСООТВЕТСТВУЮЩЕГО ТИПА
ВОЗМОЖЕН ВЗРЫВ. Утилизируйте использованный аккумулятор в
соответствии с инструкциями производителя.
E1DQR86%*+]
ܹ
ݦցࡉݛΰ
ٕ߾ؿ˗ଡ
ցࡉݛPP/[PP:[PP+
ѰPP/[PP:[PP+
ցࡉݛ*+]
ֻ
Җ9P$
ࡤѦࡉӖЕ
ۘ
ࢇ&KURPH26
ࢷࡕݛࡢձ*+]
ֻ
ҖԻТЬ
1DQR86%
ܹ
ݦձ3&ࢂیࡈɼМଞ86%૦ઝ߾ΗࡐТЬ
3&߾۽˓ࢶࡳԻ
߭
րѺˁࡉࠉʼσݤҟࢇϡ
ۛࡳԻ
ٴՔઆݛ
߭
ր
ֻ
Җձ۽ଜԮ
ִ
߭
ր؟ટࡶট
ۘ
ࢇ
ϼծݫࠝ
ݤݤҟࢇળԄ
ۛ
ࡳԻڃծʯࢎ
߾۰3&߾ࠉʼѹցࡉݛձیࡈଜࠆցࡉݛԻ߶ࣲ
ݤࢂ
ࠝհ߾ЕٴՔઆݛ߅ࢇࡶ
ࠝ
հպଢТЬӖЕ
߭
ࢿશ߾۰ٴՔઆݛ߅ࢇࡶѿءպଢТЬԞ
#FFCFGXKEG
࢝
ɹ #575/& վৗծ
۽˓ࢶࡳԻࠉʼѸ
ִ
ݤҟࢇࢎࡶ
֣
ˈ
ֹ
টѰ߇
ળԄ
ۛ
ࡳԻࣇЬɼࢺஜଥТЬցࡉݛɼ3&߾
۶ࢽѹˁࡉЬࡸ߾ٴՔઆݛ
ֻ
ҖԻࢷଜִցࡉݛɼ3&߾
'3,۶ࢽࡶ
࣏
ࢽଜԮ
ִ
࠻؟ટ˕ݛԾࡶট
ۘ
ࢇʯ
ϼծݫࠝ
ݤ/('ࢂЕЬࡸձ
࣏ଜݫࠝ
ݤ
ݤҟࢇچɾ
ۛ
ࡳԻ
ִ
ࢇࢇЕցࡉݛ
ؑ
չԛࢇփࢎࡶ
ࣗզɼЬհ
ؑ
չԻˬଟˁࡉ૧؈ࡢଵࢇݡТЬیࡈଞ
b. Receptor Nano USB de 2.4 GHz
(stocat în interiorul mouse-ului)
d. Ghid de pornire rapidă
Mouse: 118.9mm (L) x 66.5mm (W) x 42mm (H)
Receptor USB: 19.9mm (L) x 14mm (W) x 6.6mm (H)
Mouse: 69g (fara baterie)
Mouse: Modul 2.4GHz: 1.5V/30mA
Modul Bluetooth 5.0: 1.5V/30mA
Mouse: GFSK / Bluetooth: V05
Mouse: GFSK / Bluetooth: V5.9
Receptor USB: GFSK: V6.95
Windows 10 sau o versiune ulterioară / Chrome OS
Temperatură de funcţionare
Umiditatea de funcționare
Temperatură de depozitare
Prin conexiunea de 2,4 GHz:
1. Glisați întrerupătorul de alimentare la modul 2,4 GHz.
2. Inseraţi receptorul Nano USB într-un port USB disponibil.
3. După conectarea cu succes la PC-ul dvs, Indicatorul canalului de
conexiune se va aprinde verde și apoi se va stinge.
Prin conexiunea Bluetooth:
1. Glisați comutatorul la modul Bluetooth.
2. Apăsați butonul de asociere timp cel puțin 3 secunde pentru a activa
modul de asociere Bluetooth. (indicatorul se va aprinde intermitent
3. În Windows, faceţi clic dreapta pe pictograma Bluetooth din dreapta
barei de activităţi (sau faceţi dublu clic pe pictograma Bluetooth
din Panou de control), faceţi clic pe Add a device (Adăugaţi un
dispozitiv) ASUS MD102 Finish (Termina)> > .
4. Când este conectat cu succes, indicatorul nu va mai clipi și va rămâne
aprins albastru timp de câteva secunde înainte de a se opri. Odată ce
mouse-ul este congurat pe computer, acesta se va conecta automat
la computer următoarea dată când activați modul Bluetooth.
NOTĂ: Mouse-ul acceptă Bluetooth 5.0.
Reglarea DPI și înțelegerea indicațiilor
Pentru a regla setarea DPI, țineți apăsat butonul din stânga și rotița de derulare
timp de minim trei secunde. Consultați tabelul următor pentru indicații LED.
Clipire lentă Se așteaptă conectarea unității dongle
În mod constant pornit Unitate dongle conectată
Clipire lentă Se așteaptă conectarea Bluetooth
Clipire rapidă Mod asociere Bluetooth activat
În mod constant pornit Bluetooth conectată
Clipește o dată DPI setat la 800
Clipește de două ori DPI setat la 1200
Clipește de trei ori DPI setat la 1600
Înlocuiți bateria atunci când indicatorul luminează intermitent în roșu, indicând
faptul că nivelul bateriei mouse-ului este sub 20%.
ATENŢIE: RISC DE EXPLOZIE DACĂ BATERIA ESTE ÎNLOCUITĂ CU UNA DE
TIP INCORECT. ARUNCAŢI BATERIILE UZATE ÎN CONFORMITATE CU
b. Receptor Nano USB de 2,4 GHz
(guardado dentro del ratón)
: 118.9mm (LA) x 66.5mm (AN) x 42mm (AL)
: 19.9mm (LA) x 14mm (AN) x 6.6mm (AL)
Windows 10 o superior / Chrome OS
Temperatura de funcionamiento
Humedad de funcionamiento
Temperatura de almacenamiento
Humedad de almacenamiento
1. Desplazar el conmutador de alimentación al modo 2,4 GHz.
2. Inserte el nanorreceptor USB en un puerto USB disponible de su PC.
Cuando la asociación se realiza correctamente con su PC
del canal de conexión se iluminará en verde y luego se apagará.
1. Desplazar el conmutador al modo 2,4 GHz.
2. Presione el botón Asociar durante 3 segundos para activar el modo
de asociación Bluetooth. (El indicador parpadeará rápidamente en
En Windows, haga clic con el botón derecho en el icono Bluetooth
situado a la derecha de la barra de tareas (o haga doble clic en el icono
Bluetooth en el Panel de control) con un mouse conectado a su PC. A
continuación, haga clic en
4. Cuando se conecte correctamente, el indicador dejará de parpadear
y permanecerá en luz azul durante varios segundos antes de que se
apague. Una vez que el ratón esté congurado en su PC, se conectará
automáticamente a su PC la próxima vez que cambie al modo
: El ratón es compatible las tecnologías Bluetooth 5.0.
Ajuste de PPP y comprensión de las
Para ajustar la conguración de PPP, mantenga presionado el botón izquierdo y
la rueda de desplazamiento durante más de tres segundos. Consulte la siguiente
tabla para obtener información sobre las indicaciones LED.
Parpadeo lento Esperando conexión de la llave
Parpadeo lento Esperando conexión de la Bluetooth
Modo de emparejamiento Bluetooth
Nivel de batería inferior al 20 %
Parpadea una vez PPP establecido en 800
Parpadea dos veces PPP establecido en 1200
Tres parpadeos PPP establecido en 1600
Reemplace la pila cuando el indicador parpadee en rojo, indicando que el nivel
de batería del ratón está por debajo del 20%.
PRECAUCIÓN: HAY RIESGO DE EXPLOSIÓN SI LAS PILAS SE CAMBIAN POR OTRAS
DE TIPO INADECUADO. DESHÁGASE DE LAS PILAS USADAS DE
ACUERDO CON LAS INSTRUCCIONES.
E˩˻˷ˮ˾ˡˡ˧˭˭86%*+]˕ˮ˻˭˵˾
G˘˵˷˵˩˭˶˛˷˻
˵˾PP/[PP:[PP+
˨˛˕˹PP/[PP:[PP+
˵˾˕˵˵ˮ˩˩˷
˵˾˿˵˨*+]9P$
%OXHWRRWK˿˵˨9P$
˵˾*)6.ˮ˹˫ˬ9
˵˾*)6.%OXHWRRWK9
:LQGRZVɥɮɲɬɤ&KURPH26
˹˭˾˻˩˞˲˻˷˯˫˿˵˨*+]
˾˩˻˷ˮ˾ˡˡ˧1DQR86%˹˛˭˲˷˩86%˫˻˛
˵˜ˮ˘˕ˮ3&˖˛˘˧˷˶ˮ˷˶˹˻˳˾˨˛
˾˪˭˞˛˾ˡˡ˧˕˷˞˵˩˜˾˻˛
˹˭˾˻˩˞˲˻˷˯˫˿˵˨ˮ˹˫ˬ
˕˨˯˵˜ˮ˘˭˭˕˻˻˭˫˲˯˨
˞˛˭˿˵˨˕˷˜ˮ˘ˮ˹˫ˬ˳˾˨˛˾˪˭˜˕˲˷ˮ
˯˭˾˭˛˭˶˛˷˻˨˷˻
˭˿˭˩˛˘˹˕˖˻˫˘˭ˮ˹˫ˬ˫˛˨˭˖˻˖˛˪ˮ
˿˷˨ˮˮ˹˘˹˕˫˘˭ˮ˹˫ˬˮ˭˰˛˘˻ˮ˘˵˜˕˭˭˘˹˕
$GGDGHYLFH˲˵˯˕˷˧ $6860' )LQLVK˾ ˷˜ > >
˵˞˵˩˾˷˜˳˾˨˛˾˪˭˜˿˶˨˕˲˷
ˮ˹˶˛˘˛˾˻˛˯˭˾˛˾˭˛˭˯˭˻˹˿˹˶˻˭
˫˕˭˫˜˜˛˿˶˯˵˩˛˘˵˾ˮ˭˘˷˛
3&˹˻˵˾˜˞˵˩˕ˮ˘˷˛3&˨˶˩
˭˵˩˭˘˷˛˩˯˫˘˧˯˹˶˭˯˭˿˵˨ˮ˹˫ˬ
˿˵˶˿˩˵˾˷˛˷ˮ%OXHWRRWK
˕˷˯˷ˮ'3,˹˕˷˫˘˻˵˖˜
˿˕˩˛˕˷˯˷ˮ˕˷˩˛˘'3,˿˕˨˯˵˟˶˹˹˹˭˘˛˻˭˭˕˻˾˵˻˭˫
˯˷˨˨˩˷˛˩˯˭˾˿˷ˮ˕˷˾˨˛˾˪˭˖˛/('
˾/(' ˷˶˻˹ ˘ˬˮ˶
˩˨˕˲˷ˮ˞ ˕˹˛˷˕˷˞˵˩˨˛˕˹
˩˨˶˛˩˭˛ ˞˵˩˨˛˕˹˹˻
˩˨˕˲˷ˮ˞ ˕˹˛˷˕˷˞˵˩ˮ˹˫ˬ
˩˨˕˲˷ˮ˷˻˨˷˻ ˯˨˿˵˨˕˷˜ˮ˘ˮ˹˫ˬ
˷˨ˮˮ˩˩˷˩˕˻
˕˲˷ˮ˿˭˛˘˷˛ '3,˩˛˻˫
˕˲˷ˮ˾˛˘˷˛ '3,˩˛˻˫
˩˨˕˲˷ˮ˾˵˘˷˛ '3,˩˛˻˫
˯˷˨˯˹˶˭ˮ˩˩˷˵˳˾˨˛˾˪˭˕˲˷ˮ˯˭˾˨˛
˟˛˾˨˛˻˷˨ˮˮ˩˩˷˖˛˵˾˩˕˻
˿˵˶˿˩˵˘˻˵˾˶˛˜˕˕˷˷ˮ˨˪˾ˮ˩˩˷˞˭˨˫
˵˪˕˩˛˫˛ˮ˩˩˷˫˞˹˻˩˵˫˷ˮ˭˘˭˭
Im Lieferumfang sind enthalten:
b. Nano-USB-2,4-GHz-Empfänger (in der Maus verstaut)
Maus: 118,9 mm (L) x 66,5 mm (B) x 42 mm (H)
Dongle: 19,9 mm (L) x 14 mm (B) x 6,6 mm (H)
Maus: 69,0 g (ohne Batterie)
Maus: 2,4-GHz-Modus: 1,5 V / 30 mA
Maus: GFSK / Bluetooth: V05
Maus: GFSK / Bluetooth: V5.9
Windows 10 oder höher / Chrome OS
1. Schieben Sie den Ein-/Ausschalter in den 2,4-GHz-Modus.
2. Stecken Sie den Nano-USB-Empfänger in einen verfügbaren USB-
3. Wenn die Kopplung mit Ihrem PC erfolgreich verlief, leuchtet die
Anzeige des Verbindungskanals grün auf und schaltet sich dann ab.
1. Schieben Sie den Schalter in den Bluetooth-Modus.
2. Drücken Sie die Koppeln-Taste länger als 3 Sekunden, um den
Bluetooth-Kopplungsmodus zu aktivieren. (Die Anzeige blinkt schnell
3. Rechtslicken Sie unter Windows auf das Bluetooth-Symbol rechts
in der Taskleiste (oder doppelklicken Sie auf das Bluetooth-Symbol
in der Systemsteuerung). Klicken Sie dann auf Add a device (Gerät
hinzufügen) ASUS MD102 Finish (Fertigstellen) > > .
4. Bei erfolgreicher Verbindung hört die Anzeige auf zu blinken und
bleibt einige Sekunden blau, bevor sie verblasst. Sobald die Maus
auf Ihrem PC eingerichtet ist, stellt sie automatisch eine Verbindung
zu Ihrem PC her, wenn Sie das nächste Mal in den Bluetooth-Modus
HINWEIS: Die Maus unterstützt Bluetooth 5.0.
DPI-Anpassung und Bedeutung der LED-
Um die DPI-Einstellung anzupassen, halten Sie die linke Taste und das Scrollrad
länger als drei Sekunden gedrückt. In der folgenden Tabelle nden Sie die
Beschreibungen der LED-Anzeige.
LED-Farbe Dauer Beschreibung
Blinkt langsam Warten auf Dongle-Verbindung
Leuchtet dauerhaft Dongle ist verbunden
Blinkt langsam Warten auf Bluetooth-Verbindung
Blinkt schnell Bluetooth-Kopplungsmodus ist aktiviert
Leuchtet dauerhaft Bluetooth-Verbindung ist hergestellt
Batteriestand liegt unter 20%
Blinkt einmal DPI ist auf 800 eingestellt
Blinkt zweimal DPI ist auf 1200 eingestellt
Blinkt dreimal DPI ist auf 1600 eingestellt
Bitte ersetzen Sie die Batterie, wenn die Anzeige rot blinkt, was darauf hinweist,
dass der Batteriestand der Maus unter 20% liegt.
ACHTUNG: FALLS DIE BATTERIE DURCH EINEN FALSCHEN TYP ERSETZT WIRD,
BESTEHT EXPLOSIONSGEFAHR. ENTSORGEN SIE GEBR AUCHTE
BATTERIEN ENTSPRECHEND DEN ANGABEN DES HERSTELLERS.
Bluetooth-5.0-Modus: 1,5 V / 30 mA
Q23563a_MD102_QSG.indd 1 2024/7/18 14:07:08