Q15074 / First Edition / February 2019
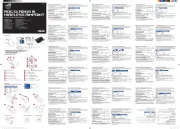
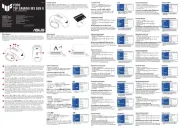
a. Mysz bezprzewodowa BT i 2,4 GHz
b. Odbiornik Nano USB 2.4 GHz
d. Instrukcja szybkiego uruchomienia
2. Włóż do gniazda baterie, sprawdzając prawidłowy
3. Załóż z powrotem pokrywę.
• Dostarczonych baterii nie można ładować.
• Jeśli mysz nie będzie długo używana należy wyjąć
• Należy użyć baterie nowe i podobnego typu.
1. Włóż odbiornik USB do wolnego portu USB.
2. Włącz przełącznik 2,4 GHz.
3. Po pomyślnym sparowaniu z komputerem wskaźnik
LED zamiga szybko na czerwono 10 razy.
Jeśli parowanie 2,4 GHz zakończy się niepowodzeniem:
1. Odłącz odbiornik USB i podłącz go ponownie.
2. Wyłącz przełącznik i ustaw go ponownie w pozycji 2,4
3. Ustaw mysz blisko odbiornika USB i naciśnij przycisk
parowania na trzy sekundy. Po pomyślnym sparowaniu z
komputerem wskaźnik LED zamiga szybko na czerwono
1. Włącz przełącznik Bluetooth.
2. Naciśnij przycisk parowania na trzy sekundy
do momentu zaświecenia się wskaźnika LED.
Skanowanie rozpocznie się wraz z miganiem
3. W systemie Windows kliknij prawym przyciskiem
myszy ikonę Bluetooth na pasku zadań po prawej
stronie (lub kliknij dwukrotnie ikonę Bluetooth w
Panelu sterowania), używając myszy podłączonej do
komputera. Następnie kliknij kolejno pozycje Add a
device (Dodaj urządzenie) > ASUS MW201C Dual
Mode Mouse (Dwutrybowa mysz ASUS MW201C)
4. Po zakończeniu wskaźnik LED zamiga szybko
na niebiesko 10 razy. Włączenie w późniejszym
czasie funkcji Bluetooth komputera oraz myszy
bezprzewodowej MW201C BT i 2,4 GHz spowoduje
automatyczne połączenie tych urządzeń.
Aby usunąć parowanie myszy z komputerem w
ramach połączenia Bluetooth, wyświetl panel Bluetooth i
usuń ikonę sparowanej myszy.
Produkt ten obsługuje tylko standard Bluetooth 4.0 lub
M : ysz 110.0mm ((D) x 60.7mm (S) x 30.7mm(W)
Klucz: 18.65mm ((D) x 14.80mm (S) x 6.30mm (W)
M : ysz: 82.0g (z baterią) Klucz 2.0g
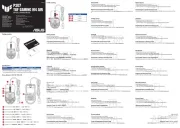
1 Lewy przycisk: Kliknięcie lewym przyciskiem
2 Prawy przycisk: Kliknięcie prawym przyciskiem
3 Kółko: Przewijanie do góry/do dołu i kliknięcie
4 Przełącznik trybu połączenia
5 Przycisk parowania/przełączania DPI
a. Bezdrátová myš BT a 2,4 GHz
b. Přijímač Nano USB 2,4 GHz
2. Vložte baterie do přihrádky tak, aby byla
dodržena správná polarita.
• Přiložené baterie nejsou nabíjecí.
• Nebudete-li myš delší dobu používat, vyjměte baterie.
• Použijte nové baterie a baterie stejného typu.
1. Zasuňte přijímač USB do volného portu USB.
2. Zapněte vypínač 2,4 GHz.
3. Po úspěšném spárování s vaším počítačem
indikátor LED rychle 10krát červeně blikne.
Pokud se párování 2,4 GHz nezdaří:
1. Odpojte a znovu připojte USB přijímač.
2. Přepněte vypínač do vypnuté polohy a zpět do polohy 2,4
3. Přemístěte myš do blízkosti USB přijímače a stiskněte
a podržte párovací tlačítko tři sekundy. Po úspěšném
spárování s počítačem indikátor LED rychle 10krát
Prostřednictvím Bluetooth:
1. Zapněte vypínač Bluetooth.
2. Stiskněte a podržte párovací tlačítko tři sekundy,
dokud se nerozsvítí indikátor LED. Když
indikátor LED bliká, začíná vyhledávání.
3. V operačním systému Windows klepněte
pravým tlačítkem na ikonu Bluetooth na pravé
straně hlavního panelu (nebo klikněte dvakrát
na ikonu Bluetooth v části Ovládací panely)
pomocí dostupné myši, která je připojena k
počítači. Potom klikněte na Add a device (Přidat
zařízení) > ASUS MW201C Dual Mode (ASUS
MW201C dvourežimová myš) > Next (Další).
4. Po dokončení indikátor LED rychle 10krát
modře blikne. Po aktivaci funkce Bluetooth
v bezdrátové myši MW201C BT a 2,4 GHz a
v počítači se v budoucnosti bude vaše myš
automaticky připojovat k vašemu počítači.
: Chcete-li zrušit Bluetooth spárování myši se
svým počítačem, otevřete Panel Bluetooth a odstraňte ikonu
Chcete-li zrušit Bluetooth spárování myši se svým
počítačem, otevřete Panel Bluetooth a odstraňte ikonu
M : yš 110.0mm ( D ) x 60.7mm (Š) x 30.7mm(V)
Modul dongle: 18.65mm (D) x 14.80mm (Š) x 6.30mm (V)
M : g : yš 82.0 (s baterií) Modul dongle 2.0g
1 Levé tlačítko: klepnutí levým tlačítkem
2 Pravé tlačítko: klepnutí pravým tlačítkem
3 Kolečko: posouvání nahoru/dolů a klepnutí
4 Přepínač režimu připojení
5 Tlačítko párování/přepínání DPI
a. BT & 2,4 GHz draadloze muis
b. Nano usb 2,4 GHz-ontvanger
1. Open het dekseltje onderaan.
2. Leg de batterij in de gleuf en let daarbij op de
3. Doe het dekseltje weer dicht.
• De meegeleverde batterij kan niet opgeladen worden.
• Wordt de muis langere tijd niet gebruikt, verwijder dan de
• Gebruik nieuwe en gelijkwaardige batterijen.
Verbinding maken met de pc.
1. Steek de usb-ontvanger in een beschikbare usb-
2. .Zet de 2,4 GHz-schakelaar aan
3. Als de muis met de pc gepaard is, zal de led snel
Als het paren met 2,4 GHz niet lukt:
1. Haal de usb-ontvanger eruit en steek hem weer terug.
2. Zet de schaklaar uit en weer op 2,4 GHz.
3. Beweeg de muis dicht bij de usb-ontvanger en houd
de paarknop drie seconden ingedrukt. De led moet
tien keer rood knipperen als het paren met de pc
1. Zet de Bluetooth-schakelaar aan.
2. Houd de paarknop drie seconden ingedrukt tot
de led gaat branden. begint als de Het scannen
3. Onder Windows klikt u op het Bluetooth-
pictogram aan de rechterkant van de taakbalk.
(of op het Bluetooth-pictogram in het
Conguratiescherm) met een beschikbare muis
die aan de pc aangesloten is. Klik daarna op
Apparaat toevoegen > ASUS MW201C Dual
4. Is het voltooid, dan zal de led snel 10 keer
knipperen. Is Bluetooth ingeschakeld op de
MW201C BT & 2,4GHz draadloze muis en de
pc, dan zal de muis voortaan automatisch
verbinding maken met de pc.
OPMERKING: Wilt u de paring met Bluetooth verbreken,
start dan het venster Bluetooth en verwijder het
pictogram van de gepaarde muis.
Om DPI te veranderen, drukt u op de DPI-knop.
Zie het volgende voor de DPI-indicatoren:
800 dpi: De led onder het scrolwieltje zal snel een
1200 dpi (standaard): De led onder het
scrolwieltje zal snel twee keer knipperen.
1600 dpi: De led onder het scrolwieltje zal snel
• U kunt de usb-ontvanger in de muis bewaren.
• Om de batterij te sparen, schakelt u de muis uit als u
• Vervang de batterij als de muis te weinig energie heft,
zoals blijkt uit een tien keer knipperend rood licht onder
het scrolwieltje als u het wieltje niet gebruikt voor een
VOORZICHTIG: EXPLOSIEGEVAAR ALS DE BATTERJI
VERVANGEN WORDT DOOR EEN ONJUIST TYPE. VERWIJDER
LEGE BATTERIJEN VOLGENS DE INSTRUCTIES.
Dit product ondersteunt alleen Bluetooth 4.0 of latere
Muis: 110.0mm (L) x 60.7mm (B) x 30.7mm(H)
Dongle: 18.65mm (L) x 14.80mm (B) x
Muis: 82.0g (inclusief batterij)
1 Linker knop: linksklikken
2 Rechter knop: rechtsklikken
3 Wiel: op en neer scrollen en middenklikken
4 Schakelaar voor verbinding
5 Knop Koppelen/DPI-switch
Im Lieferumfang sind enthalten:
a. Bluetooth & 2,4 GHz Kabellose Maus
b. Nano USB 2,4 GHz Empfänger
1. Entfernen Sie die untere Abdeckung.
2. Legen Sie die Batterie in das Fach und achten
Sie dabei auf die richtige Polung.
3. Setzen Sie die Abdeckung wieder ein.
• Die mitgelieferte Batterie ist nicht wiederauadbar.
• Wenn Sie die Maus für längere Zeit nicht verwenden,
entfernen Sie die Batterie.
• Verwenden Sie eine neue Batterie ähnlichen Typs.
1. Stecken Sie den USB-Empfänger in einen freien USB-
2. Schalten Sie den 2,4-GHz-Schalter ein.
3. Bei erfolgreicher Kopplung mit Ihrem PC blinkt die
LED-Anzeige schnell zehnmal rot.
Falls die 2,4-GHz-Kopplung fehlschlägt:
1. Trennen Sie den USB-Empfänger und stecken Sie ihn wieder
2. Stellen Sie den Schalter auf ‘AUS’ und wieder auf
3. Rücken Sie die Maus nahe an den USB-Empfänger und
drücken Sie die Kopplungstaste drei Sekunden lang.
Die LED-Anzeige blinkt schnell zehnmal rot, sobald die
Kopplung mit Ihrem PC erfolgreich ist.
1. Schalten Sie den Bluetooth-Schalter ein.
2. Drücken Sie die Kopplungstaste drei Sekunden lang,
bis die LED-Anzeige leuchtet. Der Suchvorgang
beginnt, wenn die LED-Anzeige blinkt.
3. Rechtsklicken Sie unter Windows auf das
Bluetooth-Symbol rechts in der Taskleiste (oder
doppelklicken Sie auf das Bluetooth-Symbol in der
Systemsteuerung), und zwar mit der verfügbaren
Maus, die schon mit Ihrem PC verbunden ist. Klicken
Sie dann auf Add a device (Gerät hinzufügen)
>ASUS MW201C Dual Mode Mouse (ASUS
MW201C Dualmodus Maus) Next (Weiter)> .
4. Danach blinkt die LED-Anzeige schnell zehnmal blau.
Sobald die Bluetooth-Funktion aktiviert wurde auf
Ihrer MW201C Bluetooth & 2,4 GHz Kabellosen Maus
und Ihrem PC, werden sich beide in Zukunft immer
HINWEIS: Falls Sie die Kopplung Ihrer Maus mit Ihrem PC über
Bluetooth aufheben möchten, önen Sie das Bluetooth-Feld
und entfernen Sie das Symbol Ihrer gekoppelten Maus.
Dieses Produkt unterstützt nur Bluetooth 4.0-Geräte oder
Maus: 110,0 mm (L) x 60,7 mm (B) x 30,7 mm (H)
Dongle: 18,65 mm (L) x 14,80 mm (B) x 6,30 mm (H)
Maus: 82,0 g (mit Batterie) Dongle: 2.0 g
1 Linke Taste: Linksklick
2 Rechte Taste: Rechtsklick
3 Scroll-Rad: Hoch-/Herunterscrollen und Mittelklick
4 Schalter für den Verbindungsmodus
5 Kopplungstaste/DPI-Umschalttaste
Contenuto della confezione:
a. Mouse senza li BT & 2.4GHz
b. Ricevitore nano USB 2.4 GHz
e. Certicato di garanzia
Installazione della batteria
1. Rimuovete la cover inferiore.
2. Inserite la batteria nello slot assicurandovi che la
3. Riposizionate la cover.
• La batteria in dotazione non è ricaricabile.
• Se pensate di non usare il mouse per lungo tempo
• Usate una batteria nuova ed equivalente.
1. Inserite il ricevitore USB in una porta USB
2. Spostate il selettore su 2.4GHz.
3. Quando l’associazione col PC è completata
l’indicatore LED lampeggerà di rosso per 10 volte.
Se l’associazione 2.4GHz fallisse:
1. Scollegate il ricevitore USB e ricollegatelo.
2. Spostate il selettore su OFF e poi nuovamente su 2.4GHz.
3. Spostate il mouse vicino al ricevitore USB e premete il
pulsante di accoppiamento per tre secondi. L’indicatore
LED lampeggerà velocemente per 10 volte ad
1. Spostate il selettore su Bluetooth.
2. Premete il pulsante di accoppiamento per tre
secondi no a quando l’indicatore LED si accende.
La scansione inizia quando l’indicatore LED
3. Nel sistema operativo Windows cliccate con il
tasto destro sull’icona Bluetooth che trovate nella
barra delle applicazioni (in alternativa potete fare
doppio click sull’icona Bluetooth nel Pannello
di controllo) usando un mouse già collegato al
PC in precedenza. Ora cliccate su Aggiungi un
dispositivo > ASUS MW201C Dual Mode Mouse
4. L’indicatore LED lampeggerà per 10 volte di colore
blu per indicare che il processo è completato. Dopo
aver completato la prima associazione Bluetooth
tra il mouse senza li MW201C BT & 2.4GHz e
il vostro PC non sarà più necessario ripeterla, il
mouse e il PC si connetteranno in automatico.
NOTA: Se volete rimuovere l’associazione Bluetooth tra il
mouse e il PC avviate il pannello Bluetooth e rimuovete il
Questo prodotto supporta solamente dispositivi
compatibili Bluetooth versione 4.0 o successive.
Mouse: 110.0mm (L) x 60.7mm (P) x 30.7mm(A)
Dongle: 18.65mm (L) x 14.80mm (P) x 6.30mm (A)
Mouse: 82.0g (con batteria) Dongle: 2.0g
1 Tasto sinistro: Click con il tasto sinistro
2 Tasto destro: Click con il tasto destro
3 Rotellina: Scorrimento verticale e click centrale
4 Selettore modalità di connessione
5 Pulsante di accoppiamento / selezione DPI
Per regolare il DPI premete il pulsante DPI.
Fate riferimento ai seguenti indicatori DPI:
800 dpi: Il LED che sta sotto la rotellina di scorrimento
lampeggerà rapidamente una volta.
1200 dpi (predenito): Il LED che sta sotto la rotellina
di scorrimento lampeggerà rapidamente due volte.
1600 dpi: Il LED che sta sotto la rotellina di scorrimento
lampeggerà rapidamente tre volte.
• Il ricevitore USB può essere riposto all’interno del
• Per risparmiare energia spegnete il dispositivo quando
• Se non state utilizzando la regolazione DPI e la luce
sotto alla rotellina di scorrimento lampeggia dieci volte
con colore rosso è necessario sostituire la batteria del
ATTENZIONE: Rischio di esplosione se la batteria è
sostituita con una di un altro tipo non compatibile.
Smaltite le batterie usate attenendovi alle istruzioni fornite
Aby zmienić rozdzielczość DPI, naciśnij przycisk DPI.
Sprawdź następujące wskaźniki DPI:
: Wskaźnik LED pod kółkiem przewijania
: Wskaźnik LED pod kółkiem
przewijania zamiga szybko dwa razy.
: Wskaźnik LED pod kółkiem przewijania
• Możesz przechowywać odbiornik USB wewnątrz myszy.
• Aby zaoszczędzić energię, wyłącz zasilanie, kiedy nie
• Baterie myszy należy wymienić, gdy ich niski poziom
naładowania zostanie wskazany za pomocą czerwony
wskaźnika pod kółkiem myszy, który zamiga 10 razy i
który nie będzie akurat wskazywać dokonanej przed
chwilą zmiany rozdzielczości DPI.
PRZESTROGA: RYZYKO WYBUCHU W PRZYPADKU
WYMIANY BATERII NA BATERIĘ NIEPRAWIDŁOWEGO
TYPU. ZUŻYTE BATERIE NALEŻY UTYLIZOWAĆ ZGODNIE Z
Chcete-li změnit DPI, stiskněte tlačítko DPI. Viz následující
informace o indikátorech DPI:
800 dpi : Indikátor LED pod rolovacím kolečkem
: Indikátor LED pod rolovacím
kolečkem dvakrát rychle blikne.
1600 dpi : Indikátor LED pod rolovacím kolečkem
• Přijímač USB můžete uchovávat uvnitř myši.
• Jestliže myš nepoužíváte, vypněte napájení, aby se šetřila
• Pokud indikátor pod kolečkem myši desetkrát červeně
blikne, aniž byste jej používali pro nastavení DPI, je třeba
vyměnit vybité baterie myši.
POZOR: NEBEZPEČÍ VÝBUCHU BATERIE V PŘÍPADĚ VÝMĚNY
ZA NESPRÁVNÝ TYP. POUŽITÉ BATERIE ZLIKVIDUJTE PODLE
Um den DPI-Wert zu ändern, drücken Sie die DPI-Taste.
Beachten Sie das Folgende zur DPI-Anzeige:
800 dpi: Die LED unter dem Scrollrad blinkt
1200 dpi (Standard): Die LED unter dem
Scrollrad blinkt schnell zweimal.
1600 dpi: Die LED unter dem Scrollrad blinkt
• Sie können den USB-Empfänger in der Maus verstauen.
• Um Strom zu sparen, schalten Sie die Maus aus, wenn
• Ersetzen Sie die Batterie, wenn die Maus nur noch mit
wenig Batteriestrom arbeitet. Dies wird angezeigt durch
zehnmaliges rotes Blinken unter dem Scrollrad, wenn
Sie dieses nicht für DPI-Einstellungen verwenden.
ACHTUNG: FALLS DIE BATTERIE DURCH EINEN FALSCHEN TYP
ERSETZT WIRD, BESTEHT EXPLOSIONSGEFAHR. ENTSORGEN SIE
GEBRAUCHTE BATTERIEN ENTSPRECHEND DEN ANGABEN DES
1200dpi(預設值): 滾 輪 下 方 快 速 閃 爍 兩
• 您可以將 Nano USB 訊號接收器存放在滑鼠內。
• 當使用時滾輪下方紅光閃爍 10 次,且此時您沒有
110.0mm(長)x 60.7mm(寬)x 30.7mm(高)
18.65mm(長)x 14.80mm(寬)x 6.30mm(高)
滑鼠(2.4GHz 無線模式):1.5V/10mA
1. 將 Nano USB 訊號接收器插入電腦上的 USB
2. 將連線模式切換開關推至 2.4GHz 開啟位
1. 先將 Nano USB 訊號接收器從電腦上拔下,然
3. 將滑鼠放置在靠近 Nano USB 訊號接收器的位
後,滑鼠上的 LED 指示燈將持續 10 秒顯示為
2. 按下配對按鈕 3 秒,直至 LED 指示燈亮
電 腦 的 滑 鼠 右 鍵 點 選 工 具 列 右 側 的 藍
牙 圖 示( 或 按 兩 下 控 制 台 中 的 藍 牙 圖
ASUS MW201C Dual Mode Mouse > 完
MW201C 藍牙 & 2.4GHz 無線光學滑鼠與
MW201C BT & 2.4GHz Wireless Mouse
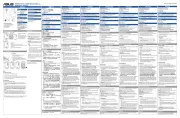
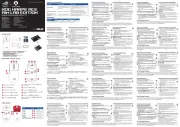
1. Insert the USB receiver into an
2. Turn on the 2.4 GHz switch.
3. When successfully paired to your PC,
the LED indicator will quickly ash red
a. BT & 2.4GHz Wireless Mouse
b. Nano USB 2.4 GHz receiver
1 Left button: Left-click
2 Right button: Right-click
3 Wheel: Scroll up/down and
2. Insert the battery into
• The bundled battery is not chargeable.
• If you do not use the mouse for a long time, remove
• Use new and similar-type batteries.
If 2.4 GHz pairing fails:
1. Unplug the USB receiver and plug it back in.
2. Turn the switch to OFF and back to 2.4GHz.
3. Move the mouse close to the USB receiver and press the pairing button
for three seconds. The LED indicator will quickly ash red 10 times once
successfully paired to your PC.
Mouse: 110.0mm (L) x 60.7mm
Mouse: 82.0g (with battery)
1. Turn on the Bluetooth switch.
2. Press the paring button for three seconds until the LED
indicator lights up. starts when the LED indicator Scanning
3. On windows, right click the bluetooth icon on the right of
the task bar (Or double click the bluetooth icon on Control
Panel) via your available mouse connected to your PC. Then
Click Add a device ASUSMW201C Dual Mode Mouse > >
4. When done, the LED indicator will quickly ash blue 10
times. Once the Bluetooth feature has been enabled on your
MW201C BT & 2.4GHz Wireless Mouse and your PC, your
mouse will automatically connect to your PC in the future.
NOTE: If you want to unpair your mouse to your PC via bluetooth, launch
the Bluetooth Panel and remove your paired mouse icon.
To change the DPI, press the DPI button.
Refer to the following for DPI indicators:
800 dpi: The LED beneath the scroll
wheel will quickly ash once.
1200 dpi (default): The LED beneath
the scroll wheel will quickly ash
1600 dpi: The LED beneath the scroll
wheel will quickly ash three times.
• You can store the USB receiver inside the
• To save power, turn o the power when
you are not using the mouse.
• Replace the battery when the mouse
runs low on power indicated by ashing
red 10 times under the scroll wheel while
you are not using it for DPI adjustments.
CAUTION: RISK OF EXPLOSION IF BATTERY
IS REPLACED BY AN INCORRECT T YPE.
DISPOSE OF USED BATTERIES ACCORDING
This product only supports
Bluetooth 4.0 or later devices.
Mouse & Dongle: (FSK) 2408~ 2474MHz
Mouse: (BT) 2402~ 2480MHz
Mouse: FSK: 0 dbm / BT: 0 dbm
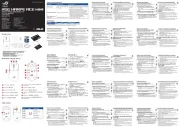
a. Souris sans l BT et 2,4 GHz
b. Récepteur nano USB 2,4 GHz
d. Guide de démarrage rapide
1. Retirez le couvercle du dessous.
2. Insérez la pile en prenant garde à bien respecter la
3. Replacez le couvercle.
• La pile incluse n’est pas rechargeable.
• Lors d’une inutilisation prolongée, retirez la pile.
• Utilisez uniquement des piles neuves et de même type.
Connexion à un ordinateur
1. Insérez le récepteur USB dans l’un des ports USB de
2. Activez l’interrupteur 2,4 GHz.
3. Une fois l’association à votre ordinateur terminée,
le voyant clignote rapidement 10 fois en rouge.
Si l’association 2,4 GHz échoue :
1. Débranchez le récepteur USB et rebranchez-le.
2. Réglez l’interrupteur sur OFF puis de nouveau sur 2,4
3. Rapprochez la souris du récepteur USB et appuyez sur
le bouton d’association pendant trois secondes. Le
voyant clignote rapidement 10 fois en rouge une fois
l’association avec votre ordinateur terminée.
1. Activez l’interrupteur Bluetooth.
2. Appuyez sur le bouton d’association pendant trois
secondes jusqu’à ce que le voyant s’allume. La
recherche commence lorsque le voyant clignote.
3. Sous Windows, cliquez avec le bouton droit de
la souris sur l’icône Bluetooth située à droite
de la barre des tâches (ou double-cliquez sur
l’icône Bluetooth du Panneau de conguration)
à l’aide de votre souris disponible connectée à
votre ordinateur. Puis cliquez sur Ajouter un
périphérique Souris double mode ASUS >
4. Une fois terminé, le voyant clignotera rapidement
10 fois en bleu. Une fois la fonction Bluetooth
activée sur votre souris sans l BT et 2,4 GHz
MW201C et votre ordinateur, votre souris se
connectera désormais automatiquement à votre
REMARQUE : Si vous souhaitez dissocier votre souris
de votre ordinateur via le Bluetooth, lancez le panneau
Bluetooth et supprimez l’icône de la souris associée.
Ce produit ne prend en charge que les périphériques
Bluetooth 4.0 ou ultérieurs.
Souris :110.0mm (L) x 60.7mm (l) x 30.7mm(H)
Dongle : 18.65mm (L) x 14.80mm (l) x 6.30mm (H)
Souris : 82.0g (avec batterie) Dongle : 2.0g
1 Bouton gauche : Clic gauche
2 Bouton droit : Clic droit
3 Molette : Délement haut/bas et clic central
4 Interrupteur de mode de connexion
5 Bouton d'association / DPI
Pour modier les réglages DPI, appuyez sur le bouton DPI.
Reportez-vous aux indicateurs DPI suivants :
800 dpi : Le voyant situé sous la molette de
délement clignotera rapidement une fois.
1200 dpi (par défaut) : Le voyant situé sous la
molette de délement clignotera rapidement deux
1600 dpi : Le voyant situé sous la molette de
délement clignotera rapidement trois fois.
• Vous pouvez ranger le récepteur USB à l’intérieur de la
• Pour économiser de l’énergie, éteignez la souris si elle
• Remplacez la pile lorsque le voyant de la molette se met
à clignoter 10 fois consécutives de couleur rouge pour
indiquer que l’alimentation de la souris est faible lorsque
vous n’utilisez pas la souris pour les réglages DPI.
ATTENTION : RISQUE D’EXPLOSION SI LA PILE N’EST PAS
CORRECTEMENT REMPLACÉE. JETEZ LES PILES USAGÉES
CONFORMÉMENT AUX INSTRUCTIONS DU FABRICANT.