USED OIL IS CLASSIFIED AS HAZARDOUS WASTE AND MUST BE RECYCLED
PROPERLY. LAW PROHIBITS DUMPING USED OIL INTO HOUSEHOLD GARBAGE,
COMMERCIAL DUMPSTERS, SEWERS OR ONTO GROUND.
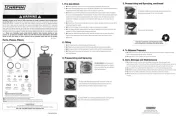
1. Make sure large cap (A) is tight.
2. Remove vent plug (B) to allow air to escape as container fills (Figure 1).
Important: Oil container will not fill correctly if vent is not open.
3. Remove center plug (C).
4. Slide drain container into place aligning motor’s drain plug with the center of the
oil drain container. Make sure oil container is on a level surface before use.
5. Remove the oil pan’s plug from the motor to start draining (be sure to have
vented the motor to allow oil to freely flow from motor (Be sure to always follow
your vehicle’s manufacturer’s instructions) Adjust location of pan to minimize any
splashing. The pan can collect up to 12 quarts of oil.
6. When replacing the motor’s oil filter- Once oil has stopped draining from motors
oil pan, replace the oil pan plug and tighten. Then slide the Oil Drain container under
the old oil filter. Remove the old oil filter from the motor. It can be placed on the Oil
Drain Container (D) allowing it to drain and empty the old oil. NOTE: Check to be sure
the rubber gasket is on the old filter and is not remaining in the motor.
7. Once oil has finished draining, replace the drain plug and the vent plug to the
respective threaded holes to seal the container.
8. Be sure to tighten all caps/plugs before turning upright to carry or store.
Do not over tighten.
9. Installing the new filter: First apply a small amount of oil all around the face of
the rubber gasket and on the threads for easier assembling. Securely tighten filter
into the motor to ensure no leakage before adding new oil to your motor.
(Be sure to follow your vehicles manufacturing instructions)
EL ACEITE USADO SE CLASIFICA COMO UN DESECHO PELIGROSO Y DEBE RECICLARSE
CORRECTAMENTE. LA LEY PROHÍBE DESECHAR EL ACEITE CON LA BASURA DOMÉSTICA,
EN DEPÓSITOS DE BASURA COMERCIAL, EN DRENAJES O SOBRE EL SUELO.
Instrucciones de uso:
(Use la ilustración de la portada como referencia)
1. Asegúrese de que la tapa grande (A) está apretada.
2. Retire el tapón del respiradero (B) para permitir
que el aire escape cuando la bandeja se llene (Figura 1). Importante: La bandeja de aceite
no se llenará correctamente si el respiradero no está abierto.
3. Quite el tapón central (C).
4. Deslice la bandeja de drenaje a su lugar, alineando el tapón de drenado del motor
con el centro de la bandeja deaceite de desecho. Asegúrese de que la bandeja de
aceite está en una superficie nivelada antes de usarla.
5. Quite el tapón de la bandeja de aceite del motor para empezar a drenarlo (asegúrese de
abrir el respiradero del motor para permitir que el aceite fluya libremente del motor)
(Siempre siga las instrucciones del fabricante de su vehículo) Ajuste la ubicación de la
bandeja para minimizar las salpicaduras. La bandeja puede recolectar hasta 12 cuartos de
galón de aceite.
6. Para cambiar el filtro de aceite del motor- Después de que termine de drenar el aceite del
motor, vuelva a colocar el tapón de la bandeja de aceite y apriételo. Después deslice el
recipiente con el aceite drenado debajo del filtro de aceite usado. Quite el filtro de aceite
usado del motor. Puede colocarlo en el recipiente de aceite drenado (D) para dejar que se
drene y se vacíe de aceite usado. NOTA: Revise que la junta de goma esté en el filtro
usado y que no se haya quedado en el motor.
7. Después de que el aceite termine de drenarse, vuelva a poner el tapón del drenaje y el
tapón del respiradero en sus respectivos agujeros roscados para sellar el depósito.
8. Asegúrese de apretar todas las tapas y tapones antes de levantarlo para cargarlo o
almacenarlo. No apriete demasiado.
9. Instalación del filtro nuevo: Primero aplique una pequeña cantidad de aceite alrededor de
la junta de goma y en las roscas para facilitar el ensamblaje. Apriete bien el filtro en el
motor para asegurarse de que no tenga fugas antes de añadir aceite nuevo a su motor.
(Recuerde seguir las instrucciones del fabricante de su vehículo).
(figure 1) (figura 1)
ALWAYS USE SAFETY JACKS WHEN WORKING
UNDER ANY VEHICLE
How to use:
(Use cover illustration for reference)
SIEMPRE USE GATOS DE SEGURIDAD CUANDO
TRABAJE DEBAJO DE CUALQUIER VEHÍCULO