PT GB/MTPT GB/MTPT GB/MT
3. Remova cuidadosamente a lâmina (6) do elemento
de corte (3b).
4. Encaixe a lâmina (6) na ranhura do elemento de
corte, tal como indicado na figura D.
5. Monte novamente o elemento de corte, o apoio (5) e
o regulador deslizante (3) tal como indicado na
figura C.
Nota: Certifique-se de que os dentes da roda do
elemento de corte ficam virados para a extremidade do
braço oscilante (2).
Dica: A lâmina (6) está afiada dos dois lados. Vire a
lâmina de lado quando estiver gasta.
Limpeza e conservação
Limpe o artigo com um pano húmido e um produto de
limpeza suave.
Instruções para a eliminação
Por favor elimine a embalagem e o artigo de forma
amiga do ambiente e genuína!
Elimine o artigo através de uma central de eliminação
de resíduos certificada ou através da administração
do seu município. Tome em atenção os protocolos em
vigor.
IAN: 110416
Assistência Portugal
Tel.: 70778 0005
(0,12 EUR/Min.)
E-Mail: deltasport@lidl.pt
Poderá ainda encomendar diretamente todos os artigos na nossa loja
online: www.delta-sport.info
Note: Please ensure that the small wheels on the cutting
element are facing towards the end of the swivel arm
(2).
Tip: The blade (6) is sharpened on both sides.
Turn the blade around if the blade is blunt.
Cleaning and care
Clean the article with a damp cloth and a mild cleaning
agent.
Disposal
Please dispose of the product and packaging in an
environmentally friendly manner, separating different
materials for recycling as required!
Dispose of this item through an authorised disposal com-
pany or through your local waste disposal facilities - ask
your local authority for information if further guidance is
required.
Ensure that you comply with all regulations currently in
force.
IAN: 110416
Service Great Britain
Tel.: 0871 5000 720
(£ 0.10/Min.)
E-Mail: deltasport@lidl.co.uk
Service Malta
Tel.: 80062230
E-Mail: deltasport@lidl.com.mt
All items are also available for purchase directly from our online shop:
www.delta-sport.info
• Quando utilizar o artigo, coloque sempre uma base
resistente ao corte para proteger a mobília.
• Não deixe o artigo colocado demasiado tempo com
a base de borracha (5) sobre a mobília, pois algu-
mas tintas, plásticos ou conservantes de móveis
podem corroer ou alterar o material da superfície de
borracha (5).
Armazenamento de lâminas
Na parte inferior do artigo encontra-se um compar-
timento (4) onde se encontra guardada a lâmina de
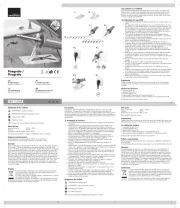
substituição (6) (fig. B)
1. Gire o apoio em borracha (5), até chegar ao com-
partimento de armazenamento (4).
2. Abra a tampa (4a) do compartimento de armazena-
mento e remova uma lâmina de substituição (6).
Utilização
Dica: Fixe o papel a ser cortado, para que não escor-
regue.
1. Remova a tampa de proteção (3c) do elemento de
corte (3b) (fig. C).
2. Coloque o centro do apoio em borracha (5) no
centro do círculo a ser cortado.
3. Solte o regulador deslizante (3), girando-o e ajuste-o
ao diâmetro desejado. Utilize, para isso, a escala
(2).
4. Fixe novamente o regulador deslizante (3), rodan-
do-o.
Nota: A escala não é o raio.
5. Com a mão, pressione o apoio para pulso (1) e puxe
o braço oscilante (2) com um movimento uniforme e
circular.
Nota: Mova o braço oscilante (2) num movimento cir-
cular, exercendo apenas a força necessária para fazer
um corte limpo no papel.
6. Após a utilização, coloque a tampa de proteção (3c)
no artigo.
Trocar a lâmina
Atenção: Antes de trocar a lâmina (6), é necessário
encaixar a tampa de proteção (3c) no artigo.
1. Gire e solte o regulador deslizante (3).
2. Remova o regulador deslizante, o apoio que se
encontra por debaixo (3a) e os elementos de corte
(3b) do braço oscilante (2) (fig. C).
• Always use a protective underlay when using the
article in order to protect your furniture.
• Do not leave the article with the rubber rest (5) on
furniture for too long because some varnishes,
plastics, or furniture care products can corrode or
alter the material of the rubber rest (5).
Blade storage
There is a storage compartment (4) with replacement
blades (6) under the article (fig. B)
1. Turn the rubber rest (5) until you can access the
storage compartment (4).
2. Open the lid (4a) on the storage compartment and
take a replacement blade out (6).
Use
Tip: Fix the paper you wish to cut in place so that it
cannot slip out of position.
1. Remove the protective cap (3c) from the cutting
element (3b) (fig. C).
2. Place the centre of the rubber rest (5) on the centre of
the circle to be cut.
3. Release the slide regulator (3) by turning it and adjust
it to the desired diameter. Use the scales (2) to do
this.
4. Tighten the slide regulator (3) again.
Note: The scales do not represent the radius.
5. Press the wrist rest (1) down with your hand and pull
the swivel arm (2) around the circle in a smooth
motion.
Note: Only move the swivel arm (2) in a circle with
sufficient pressure to cut the paper cleanly.
6. Put the protective cap (3c) on the article after use.
Changing the blade
Caution: The protective cap (3c) must be put on the
article before changing the blade (6).
1. Turn and release the slide regulator (3).
2. Remove the slide regulator, the support unit (3a)
under it and the cutting elements (3b) from the swivel
arm (2) (fig C).
3. Carefully remove the blade (6) from the cutting ele-
ment (3b).
4. Insert the blade (6) into the slot on the cutting element
as shown in fig. D.
5. Put the cutting element, the support unit (5) and the
slide regulator (3) back together as shown in fig. C.
Muitos Parabéns!
Com a sua compra optou por um produto de alta quali-
dade. Antes de o utilizar pela primeira vez, familiarize-
se o com o produto. Para o efeito leia com atenção o
seguinte manual de instruções. Utilize o produto apenas
conforme descrito e para as aplicações indicadas.
Guarda estas instruções em lugar seguro.
No caso de transferir o produto para terceiros, faço-a
acompanhar de todos os documentos.
Conteúdo / Designação de peças
(fig. A)
1 x cortador de círculos
1 x descanso do pulso (1)
1 x braço oscilante com escala (2)
1 x regulador deslizante, ajustável (3)
1 x compartimento de armazenamento (4)
1 x apoio em borracha (5)
3 x lâmina de substituição (6)
1 x manual de instruções
Especificações técnicas
Diâmetro: aprox. 10 - 32 cm
Utilização indicada
Este artigo permite-lhe cortar papel e fotos em círculos.
O raio é regulável e pode ser ajustado para pessoas
destras e esquerdinas.
Indicações de segurança
Importante: Leia este manual de instruções
com atenção e conserve-o para consulta
futura!
Perigo de morte!
• Não permita que as crianças manuseiem o material
da embalagem sem vigilância. Há risco de asfixia!
Perigo de ferimentos!
• O artigo não é um brinquedo. As crianças apenas
podem usar este artigo sob vigilância de adultos.
• O artigo tem componentes afiados. Preste atenção
para não se ferir!
• Antes de qualquer utilização, verifique se o artigo
apresenta danos ou desgaste.
• Quando não estiver a ser usado, coloque a tampa
de proteção (3c) no artigo.
Congratulations!
With your purchase you have decided on a high-quality
product. Get to know the product before you start to use
it. Carefully read the following instructions for use.
Use the product only as described and only for the
given areas of application. Keep these instructions safe.
When passing the product on to a third party, always
make sure that the documentation is included.
Scope of delivery / part names
(fig. A)
1 x Circle cutter
1 x Wrist rest (1)
1 x Swivel arm with scaling (2)
1 x Slide regulator, lockable (3)
1 x Storage compartment (4)
1 x Rubber rest (5)
3 x Replacement blades (6)
1 x Instructions for use
Technical data
Diameter: approx. 10 - 32cm
Correct use
This article is used to cut paper and photos in a circular
shape. The radius can be adjusted and it is suitable for
right-handed and left-handed users.
Safety notes
Important: Read these instructions for use
through carefully and keep them for future
reference.
Risk of death!
• Do not leave children with the packaging materials
unsupervised. There is a risk of suffocation!
Risk of injury!
• This article is not a toy. Children may only use it with
adult supervision.
• The article contains sharp components. Make sure
you do not injure yourself.
• Check the article for damage or wear before each
use.
• Place the protective cap (3c) on the article when it is
not in use.
DE/AT/CHDE/AT/CH
3. Entfernen Sie vorsichtig die Klinge (6) aus dem
Schneideelement (3b).
4. Stecken Sie die Klinge (6) wie in Abbildung D in den
Schlitz des Schneideelements.
5. Setzen Sie das Schneidelement, die Auflage (5) und
den Schieberegler (3) wie in Abbildung C wieder
zusammen.
Hinweis: Achten Sie darauf, dass die kleinen Rädchen
vom Schneideelement zum Ende des Schwenkarmes (2)
zeigen.
Tipp: Die Klinge (6) ist beidseitig geschliffen.
Drehen Sie die Klingenseite um, wenn die Klinge stumpf
ist.
Reinigung und Pflege
Reinigen Sie den Artikel mit einem feuchten Tuch und mit
einem milden Reinigungsmittel.
Hinweise zur Entsorgung
Verpackung und Artikel bitte umweltgerecht und sorten-
rein entsorgen! Entsorgen Sie den Artikel über einen zu-
gelassenen Entsorgungsbetrieb oder über Ihre kommu-
nale Gemeindeverwaltung. Beachten Sie die aktuell
geltenden Vorschriften.
IAN: 110416
Service Deutschland
Tel.: 0800-5435111
E-Mail: deltasport@lidl.de
Service Österreich
Tel.: 0820 201 222
(0,15 EUR/Min.)
E-Mail: deltasport@lidl.at
Service Schweiz
Tel.: 0842 665566
(0,08 CHF/Min.,
Mobilfunk max. 0,40 CHF/Min.)
E-Mail: deltasport@lidl.ch
Sie können alle Artikel auch direkt in unserem Online-Shop bestellen:
www.delta-sport.info
• Setzen Sie bei Nichtgebrauch die Schutzkappe (3c)
auf den Artikel.
• Beim Benutzen des Artikels immer eine schneidfeste
Unterlage zum Schutz der Möbel unterlegen.
• Lassen Sie den Artikel nicht zu lange mit der Gum-
miauflage (5) auf den Möbeln liegen, da manche
Lacke, Kunststoffe oder Möbelpflegemittel das Mate-
rial der Gummiauflage (5) angreifen oder verändern
können.
Klingenaufbewahrung
Auf der Unterseite des Artikels befindet sich ein Aufbe-
wahrungsfach (4) mit den Ersatzklingen (6) (Abb. B)
1. Drehen Sie die gummierte Auflage (5), bis Sie an das
Aufbewahrungsfach (4) kommen.
2. Öffnen Sie den Deckel (4a) des Aufbewahrungs-
faches und entnehmen Sie eine Ersatzklinge (6).
Anwendung
Tipp: Befestigen Sie das zu schneidende Papier, damit
es nicht verrutschen kann.
1. Nehmen Sie die Schutzkappe (3c) von dem Schnei-
deelement (3b) ab (Abb. C).
2. Setzen Sie die Mitte der gummierten Auflage (5) auf
den Mittelpunkt des zu schneidenden Kreises.
3. Lösen Sie den Schieberegler (3) durch Drehen und
verstellen Sie ihn auf den gewünschten Durchmesser.
Benutzen Sie dazu die Skalierung (2).
4. Drehen Sie den Schieberegler (3) wieder fest.
Hinweis: Die Skalierung ist nicht der Radius.
5. Drücken Sie mit Ihrer Hand die Handballenauflage
(1) runter und ziehen Sie den Schwenkarm (2) mit
einer gleichmäßigen Bewegung im Kreis herum.
Hinweis: Bewegen Sie den Schwenkarm nur mit so viel
Druck im Kreis, dass das Papier sauber geschnitten wird.
6. Setzen Sie die Schutzkappe (3c) nach Gebrauch
wieder auf den Artikel.
Klingenwechsel
Achtung: Bevor Sie die Klinge (6) wechseln, muss die
Schutzkappe (3c) auf den Artikel gesteckt werden.
1. Drehen und lösen Sie den Schieberegler (3).
2. Entfernen Sie den Schieberegler, die darunter
liegende Auflage (3a) und die Schneideelemente
(3b) vom Schwenkarm (2) (Abb. C).
Herzlichen Glückwunsch!
Mit Ihrem Kauf haben Sie sich für einen hochwertigen
Artikel entschieden. Machen Sie sich vor der ersten
Verwendung mit dem Artikel vertraut. Lesen Sie hierzu
aufmerksam die Gebrauchsanweisung. Benutzen Sie
den Artikel nur wie beschrieben und für die angege-
benen Einsatzbereiche. Bewahren Sie diese Gebrauchs-
anleitung gut auf. Händigen Sie alle Unterlagen bei
Weitergabe des Artikels an Dritte ebenfalls mit aus.
Lieferumfang / Teilebezeichnung
(Abb. A)
1 x Kreisschneider
1 x Handballenauflage (1)
1 x Schwenkarm mit Skalierung (2)
1 x Schieberegler, feststellbar (3)
1 x Aufbewahrungsfach (4)
1 x Gummierte Auflage (5)
3 x Ersatzklinge (6)
1 x Gebrauchsanweisung
Technische Daten
Durchmesser: ca. 10 - 32 cm
Bestimmungsgemäße
Verwendung
Mit diesem Artikel schneiden Sie Papier und Fotos kreis-
förmig aus. Der Radius ist verstellbar und für Links- und
Rechtshänder geeignet.
Sicherheitshinweise
Wichtig: Lesen Sie diese Gebrauchsanweisung
sorgfältig und bewahren Sie sie unbedingt
auf!
Lebensgefahr!
• Lassen Sie Kinder nie unbeaufsichtigt mit dem
Verpackungsmaterial. Es besteht Erstickungsgefahr!
Verletzungsgefahr!
• Der Artikel ist kein Spielzeug. Kinder dürfen ihn nur
unter Aufsicht von Erwachsenen benutzen.
• Der Artikel enthält scharfe Komponenten. Achten Sie
darauf, sich nicht zu verletzen!
• Prüfen Sie den Artikel vor jedem Gebrauch auf
Beschädigungen oder Abnutzungen.
DE/AT/CH