EasyLink Pro MP Hardened Wireless
Bridge
Installation Guide
1 Unpacking
Open the carton and unpack the items. Your package should include:
• 1 x EasyLink Pro outdoor-rated wireless bridge Base Unit
• 2 to 6 x EasyLink Pro outdoor-rated wireless bridge Remote Units
• Passive PoE Injectors/Converters
• Power Supplies (for use with passive PoE injectors when connected to a
non-PoE source)
• Wall and Pole mounting kits
2 Supplying Power
All EasyLink Pro series models are passive PoE powered with no AC or DC
power socket. Power is supplied through an Ethernet cable plugged into
the RJ45 port (shown in the figure below). The cable must be connected to
the included PoE injector/converter. The converter can be used with a
power supply to connect to a non-PoE source or connected directly to an
active PoE source such as a standard PoE switch. The maximum power
consumption is 12 watts. The power supplies that come with the EasyLink
Pro series are rated 24VDC, 36W. The injectors themselves support a DC
input of 24VDC for customer supplied power options.
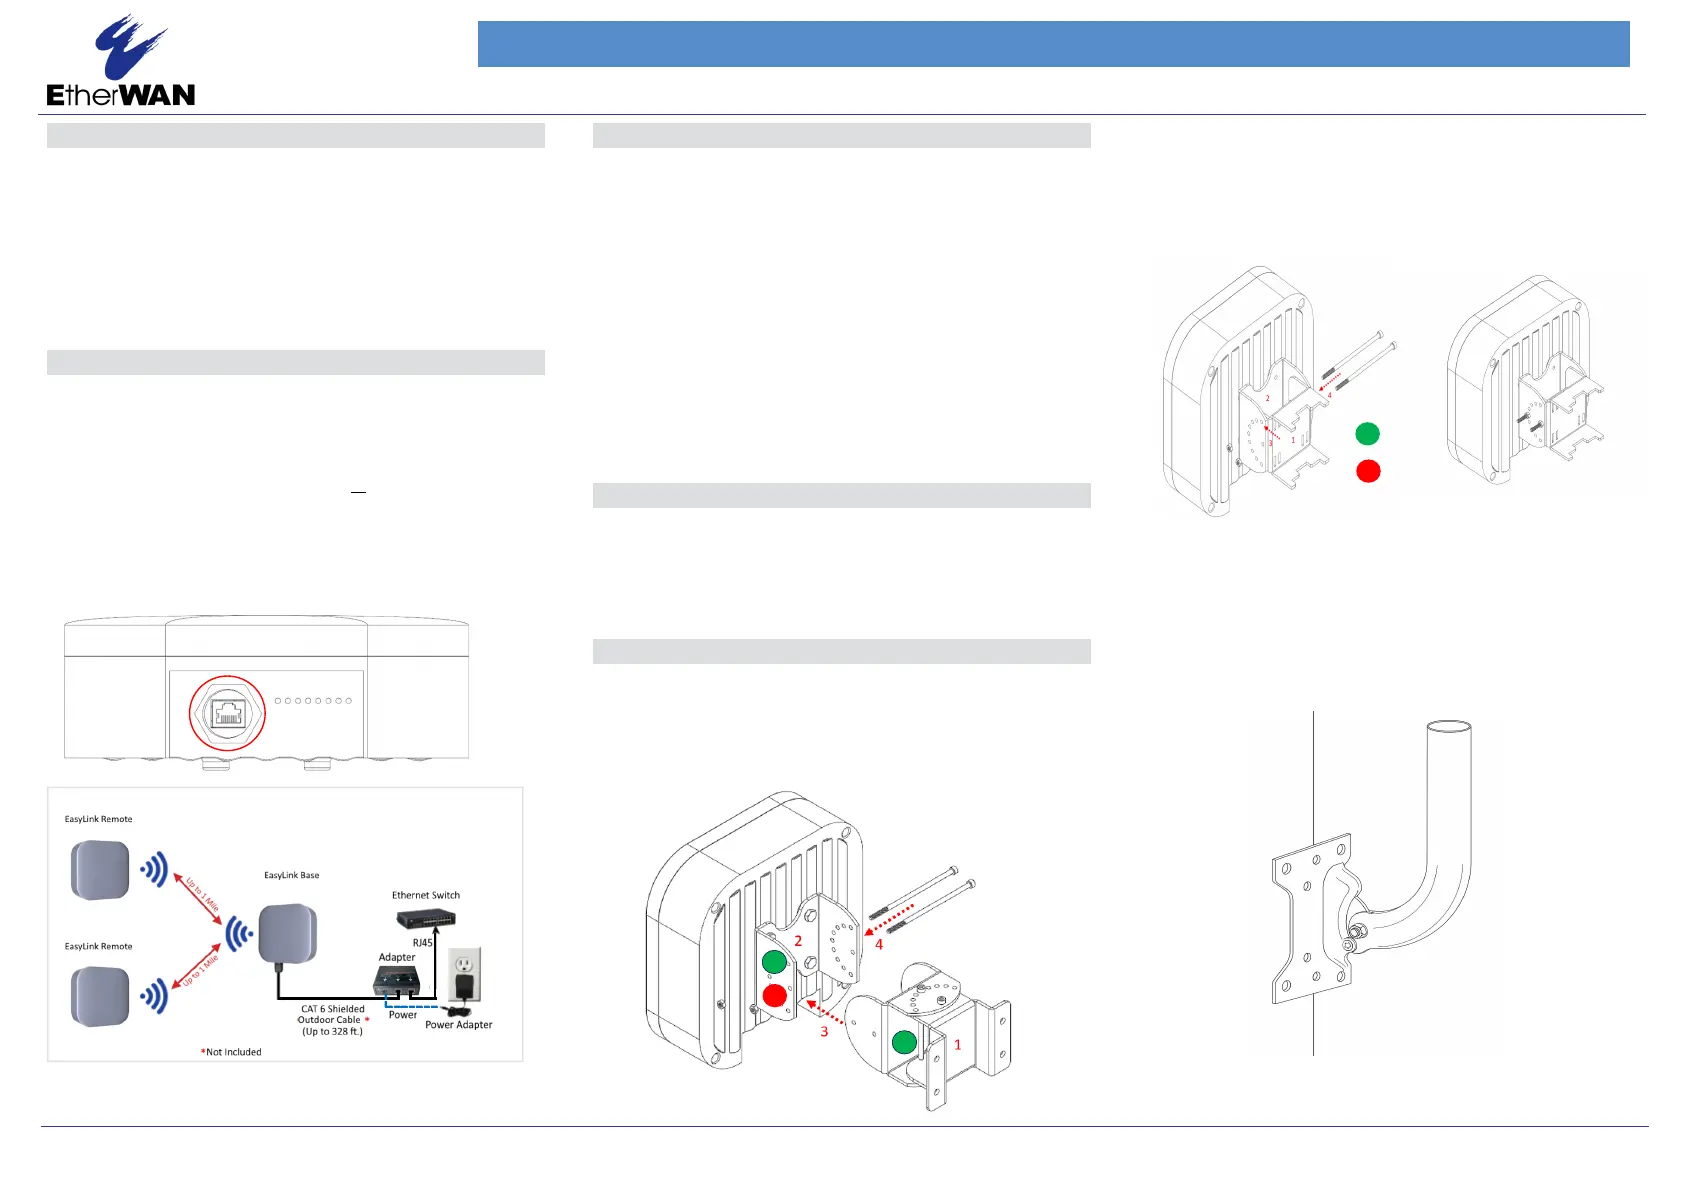
RJ-45 PoE Port
3
Physical Installation
NOTE: It is recommended to test all wireless devices before the final
installation. This includes bench testing and signal testing of the EasyLink
unit in the positions where they will be mounted. Loosely mount EasyLink
units in the intended installation spots and ensure that the transmission
signal is strong enough for the intended application.
The minimum and maximum recommended distance between the base
and a remote unit are 100 feet minimum to 1.5 miles maximum.
This product is designed for outdoor installation on a pole or wall. It is
recommended to install the device at a height of at least 15 feet. A higher
mounting position will result in a stronger signal, especially at longer dis-
tances. If there are obstacles between the devices, mount them at a
higher height to avoid the obstacles. Mount the device with the ethernet
port and LEDs facing down.
The EasyLink Pro MP Kit comes with two mounting options - pole mount
and wall mount.
Wall Mounting
Mount (1) to the surface. Attach (2) to the device using included hardware.
Align (1) and (2) at the desired angle and secure with the included hardware
(4). For easier identification, the components are color coded as per below.
Pole Mounting
Mount (1) to the pole/mast using the included hose clamps or other clamps
with 7/16" or less width. Attach (2) to the device using included hardware.
Align (1) and (2) at the desired angle and secure with the included hardware
(4). For easier identification, the components are color coded below.
See below for the assembled view
EasyLink Pro MP Series
12/12/2024
Copyright 2024 EtherWAN Systems, Inc.
All Rights Reserved.
Page 1
4
Plug and Play
The EasyLink Pro MP kits contain a base unit and 2 to 6 client units
that are pre-configured to connect to each other. Note that there is no
configuration needed to get the devices working.
5
Mounting
Pole Mounting with JPOLE 18 (optional)
Step 1 Follow all the Pole Mounting steps
Step 2 Mount the JPOLE 18 on the wall at the proper height on the wall
Step 3 Feed hose clamps through bracket slots to secure bracket to JPOLE 18