676T / 676R Quick Start Guide
This guide helps you install and use your 676T / 676R for the rst time.
Go to www.kramerav.com/downloads/676T or www.kramerav.com/downloads/676R to download the latest
user manual and check if rmware upgrades are available.
Step 1: Check what’s in the b ox
676T HDMI Optical Transmitter or
676R HDMI Optical Receiver
1 OSP-MM1 Fiber Optic SFP+ Transceiver
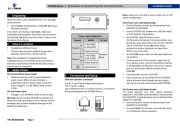
Step 2: Get to know your 676T and 676R
676T can be connected to a single 676R device or to multiple devices via optical splitters. When multiple devices are connected, a
receiver device is dened as primary when its Tx (SFP+ OUT) optical ber is connected directly to the 676T Rx optical fiber (SFP+ IN).
Lights green when a connected source device (with an active HDMI signal) is detected. ™
Flashes 4 times green when resetting the device.
O when active signal is detected on the connected HDMI source device. no
Lights green when an HDMI acceptor device (with an active HDMI signal) detected. is
O when no active signal is detected on the connected acceptor.
Lights green when OUT IN SFP+ is connected, and an active Tx optical link is detected.
Lights red when OUT IN SFP+ is connected, and a fault is detected on the single/primary
676R receiving optical link.
O when the OUT IN SFP+ is disconnected.
Lights green when OUT IN SFP+ is connected, and an active optical link is detected. Rx
Lights red when OUT IN SFP+ is connected, and a fault is detected on the incoming optical
O when OUT IN SFP+ is disconnected.
Lights green when the device receives power.
Connect to an HDMI source.
RS- (Tx, Tr, G) 3-pin 232
Connect to a serial controller to communicate serial with all the connected receivers. ly
Receives -232 communication only from a single/primary receiver. RS
Connect the ber optic cable to the plugged- SFP+ optical module connectors. in
Sets the device behavior.
Press and hold for 5 seconds or less to reset the device.
Press and hold for over 5 seconds to reset the device to factory default values.
Connect to a PC to perform rmware upgrade (via K-Upload).
12V DC connector for powering the unit.