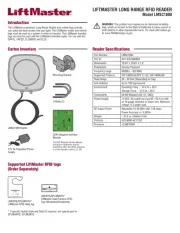
LiftMaster 878MAX Manual


Læs gratis den danske manual til LiftMaster 878MAX (8 sider) i kategorien Ikke kategoriseret. Denne vejledning er vurderet som hjælpsom af 29 personer og har en gennemsnitlig bedømmelse på 4.4 stjerner ud af 15 anmeldelser. Har du et spørgsmål om LiftMaster 878MAX, eller vil du spørge andre brugere om produktet?

Side 1/8
WIRELESS KEYLESS ENTRY MODEL 878MAX
Your wireless keyless entry is compatible with 315 MHz or 390 MHz garage door
openers manufactured starting January 1, 1993 and have a LEARN button.
BEFORE YOU START
Read instructions thoroughly BEFORE beginning. If you are using this product
with residential door openers, this product must be used only with door openers
manufactured starting January 1, 1993 that use photoelectric sensors located near
the bottom of the door track.
IMPORTANT: The keypad will activate your door or gate during programming. Be
sure the door is clear of ALL obstructions. Start with the garage door closed. Make
sure the garage door opener has a working light because it is a programming
indicator.
Install the battery and program the wireless keyless entry prior to installation.
WARNING: This product can expose you to chemicals including lead,
which are knownto the State of California to cause cancer or birth defects
or other reproductive harm. For more information go to
www.P65Warnings.ca.gov
To prevent possible SERIOUS INJURY or DEATH from a moving gate or
garage door:
InstallWirelss Keyless Entry within sight of the garage door, out of reach of
children at a minimum height of 5 feet (1.5 m), and away from ALL moving
parts of door.
ALWAYS keep remote controls out of reach of children. NEVER permit
children to operate, or play with remote controls.
Activate gate or door ONLY when it can be seen clearly, is properly
adjusted, and there are no obstructions to door travel.
ALWAYS keep gate or garage door in sight until completely closed. NEVER
permit anyone to cross path of moving gate or door.
INSTALLATION
1. Select a location to mount the
wireless keyless entry at a
minimum height of 5' (1.5 m)
out of the reach of children.
2. Remove the battery cover
and battery to show mounting
holes.
3. Mark the top mounting hole
and drill 1/8" (3.2mm) pilot
hole.
4. Install the top screw, allowing 1/8" (3.2mm) to protrude above the surface.
Position the wireless keyless entry over the topscrew.
5. Mark the bottom hole and drill 1/8" (3.2 mm) pilot hole. Install the bottom
screw. Do not overtighten to avoid cracking the plastic housing.
6. Reinstall the battery and replace the cover.
PROGRAM THE INITIAL PIN
The wireless keyless entry is pre-programmed to work with a LiftMaster garage door
opener with a yellow LEARN button. Locate the LEARN button on the garage door
opener. If the LEARN button is YELLOW, see MethodA. Otherwise, see MethodB for
other colored LEARN buttons.
Learn
LED
Learn
LED
Learn
LED
Green or
Red/Orange
LEARN
Button
Yellow
LEARN
Button
Purple
LEARN
Button
Locate the
LEARN button on
the garage door
opener.
Method A - Yellow LEARN Button
1. Press and release the LEARN button on the garage door opener. The learn LED
will light.
2. Enter a 4-digit personal identification number (PIN) of your choice.
3. Press the ENTER button until the opener light bulb blinks or two clicks are heard.
4. Test by pressing in the PIN you just programmed, and then press the ENTER
button. The garage door opener will activate.
Method B - Yellow LEARN/Security+ 2.0
®and Other LEARN Buttons
1. Press and hold the * and # buttons until the lights on the keypad stop blinking.
2. Enter a 4-digit personal identification number (PIN) of your choice. Then press
the # button. You will use this PIN in step 6.
3. Press and release the ENTER button the number of times that corresponds with
the garage door opener type:
# of Presses Garage Door Opener Type
1 Yellow LEARN Button (Security+ 2.0
®)
2 Purple LEARN Button (315 MHz Security+
®)
3 Red/Orange LEARN Button (390 MHz Security+
®)
4 Green LEARN (390MHz Billion Code)
“click”
“click”
4. Press and release the 0 button.
5. Press and release the LEARN button one time on the
garage door opener. The Learn LED will light.
6. Enter the 4-digit PIN from step 2, then press and
release the ENTER button until the garage door opener
lights flash or two clicks are heard.
7. Test by pressing in the PIN you just programmed, and
then press the ENTER button. The garage door opener
will activate. Add more openers by repeating steps 1 through 7 using a new PIN
for each.
HOW TO USE THE WIRELESS KEYLESS ENTRY
The garage door opener activates when you press the personal identification
number (PIN) and ENTER button. The keypad will blink for 15 seconds. During that
time the ENTER button can be used to stop, start or reverse the door.
If the wrong PIN number is accidentally pressed, press the correct PIN then ENTER
button. The wireless keyless entry will transmit only the last four digits that were
pressed before the ENTER button.
ONE BUTTON CLOSE FEATURE: This feature allows you to CLOSE your garage door
by pressing just the ENTER button instead ofyour 4-digit PIN.
NOTE: This feature ONLY closes and is not available on garage door openers
manufactured prior to 2006 or an external receiver.
To deactivate the one button close feature:
1. Press and hold the 1 and 9 buttons for 10 seconds. The keypad will blink four
times when the one button close feature is deactivated.
To activate the one button close feature:
1. Press and hold the 1 and 9 buttons for 10 seconds. The keypad will blink twice
when the one button close feature is activated.
PROGRAM A TEMPORARY PIN
NOTE: This feature is not available on garage door openers that have a green LEARN
button or an external receiver.
A temporary 4-digit personal identification number (PIN) can be programmed to
allow access to visitors. Each programmed PIN can program one temporary PIN.
The temporary PIN can be set for a number of hours or a number of door openings.
The temporary PIN cannot be the same as any previously programmed PIN.
1. Press any programmed PIN, then press and hold the * button until the garage
door opener light blinks three times.
2. Press the temporary 4-digit PIN of your choice, then press the ENTER button.
The light blinks 4 times.
3. Enter the temporary PIN limit of use by:
Number of Hours PIN Will Work Number of Openings PIN Will
Work
Press the number of hours the
temporary PIN will work (up to
255), then press the * button. The
opener light blinks once.
OR
Press the number of openings the
temporary PIN will work (up to
255), then press the # button. The
opener light blinks once.
4. Test by pressing in the temporary PIN you just programmed, and then press
the ENTER button. The garage door opener activates. The test uses up one
opening.
Clear the temporary PIN by repeating steps 1 through 4, and set the number of
hours or openings to 0 at step 3.
CHANGE AN EXISTING PIN*
1. Enter the programmed PIN you want to change.
2. Press and hold the # button until the garage door opener light blinks twice.
3. Enter the new 4-digit PIN of your choice and press the ENTER button. The
opener light will blink once.
4. Test by entering the PIN you just programmed, and then press the ENTER
button. The garage door opener will activate.
*You cannot change an existing PIN for an opener with a green LEARN button or an
external receiver. You MUST repeat "Program the Initial PIN" to change the PIN
number.
ERASE ALL REMOTE CONTROL AND KEYLESS ENTRY PROGRAMMING
FROM THE OPENER
The following steps will erase ALL remote controls and any keyless entries from
your opener.
1. Press and hold the LEARN button on the garage door opener until the Learn LED
turns off (approximately 6 seconds).
2. Test by pressing the buttons on the remote control and keyless entry to ensure
they no longer activate the opener.
3. Follow programming steps to reprogrameach remote control and keyless
entry you wish to use.
For more information and support, go to: support.chamberlaingroup.com.
REPLACE THE BATTERY
To prevent possible SERIOUS INJURY or DEATH:
NEVER allow small children near batteries.
If battery is swallowed, immediately notify doctor.
Replace the battery when the keypad becomes dim or does not light after a button is
pressed.
Slide the cover up, remove the battery cover, and replace the battery. Dispose of
the old battery properly.
ONE YEAR LIMITED WARRANTY
The Chamberlain Group, Inc. warrants to the first consumer purchaser of this
product that it is free from defect in materials and/or workmanship for a period of 1
year from the date of purchase.
NOTICE: This device complies with part 15 of the FCC rules and Innovation, Science and Economic
Development Canada license-exempt RSSs. Operation is subject to the following two conditions: (1)
this device may not cause harmful interference, and (2) this device must accept any interference
received, including i nterference that may cause undesired operation.
Any changes or modifications not expressly approved by the party responsible for compliance could
void the user’s authority to operate the equipment.
This device must be instal led to ensure a minimum 20 cm (8 in.) distance is maintained between
users/bystanders and device.
This device has been tested and found to comply with the limits for a Class B digital devi ce, pursuant
to part 15 of the FCC rules and Industry Canada ICES standard. These limits are designed to provide
reasonable protection against harmful interference in a residential installation. This equipment
generates, uses and can radiate radio frequency energy and, if not installed and used in accordance
with the instructions, may cause harmful interference to radio communications. However, there is no
guarantee that interference will not occur in a particul ar installation. If this equipment does cause
harmful interference to radio or television reception, which can be determined by turning the
equipment off and on, the user is encouraged to try to correct the interference by one or more of the
following measures:
Reorient or relocate the receiving antenna.
Increase the separation between the equipment and receiver.
Connect the equipment into an outlet on a circui t different from that to which the receiver is
connected.
Consult the dealer or an experienced radio/TV technician for help.


Produkt Specifikationer

Mærke: LiftMaster
Kategori: Ikke kategoriseret
Model: 878MAX

Har du brug for hjælp?

Hvis du har brug for hjælp til LiftMaster 878MAX stil et spørgsmål nedenfor, og andre brugere vil svare dig


Ikke kategoriseret LiftMaster Manualer

Ikke kategoriseret Manualer

Nyeste Ikke kategoriseret Manualer