Monogram ZKPN Manual


Læs gratis den danske manual til Monogram ZKPN (12 sider) i kategorien Ikke kategoriseret. Denne vejledning er vurderet som hjælpsom af 62 personer og har en gennemsnitlig bedømmelse på 4.9 stjerner ud af 31.5 anmeldelser. Har du et spørgsmål om Monogram ZKPN, eller vil du spørge andre brugere om produktet?

Side 1/12
This kit contains the required parts to attach
a total of three handles.
Handle Mounting Fastener insert assembly:
Assemble part A, B and C as illustrated
and create assembly E
31-1000561 Rev. 2 08-21 GEA
Printed in United States
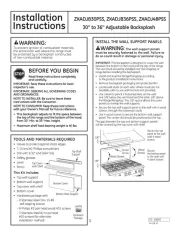
Installation
Instructions
ZKPN
Handle Mounting Fastener
Kit For Custom Panels
Before you begin - Read these instructions completely and carefully.
Note to Installer: Be sure to leave these instructions with the Consumer.
Note to Consumer: Keep these instructions with your Installation Instructions for future reference.
Pour obtenir une version française de ce manuel d'instructions, visitez notre site monogram.com
Para consultar una versión en español de este manual de instrucciones, visite nuestro sitio de internet monogram.com
This kit allows for the attachment of up to three Monogram Minimalist or Statement collection handles on custom panels.
Parts List:
A - Spacer (Qty 6)
B - Threaded bracket (Qty 6)
C - Handle Mounting Fastener (Qty 6)
D - 5/16 countersunk screw (Qty 6)
Tools and Materials Required:
Allen Key (Provided with the kit)
Drill, 1/2” and 11/32” drill bit and 1” router bit
Custom door panel
Safety glasses
Center punch
Hammer
Pencil
Measuring tape or scale
Monogram Statement or Minimalist handle collection
WARNING To reduce the risk associated with choking, do not allow children under 3 years of age to have access
to small parts during the installation of this product.
Handle Type Handle Orientation
Center to center
distance (L)
Statement/Minimalist Vertical 32-1/32" (81.36 cm)
Statement/Minimalist Horizontal 27-1/8" (68.88 cm)
Center to Center Dislance (L)
Table 1
A B C D
E
C
A
B
Center to Center Dislance (L)
3RXUUpGXLUHOHULVTXHGpWRXႇHPHQWSHQGDQWOLQVWDOODWLRQGHFHSURGXLWQHODLVVH]SDVOHVSHWLWHV
pièces à la portée des enfants âgés de moins de 3 ans.
AVERTISSEMENT
$¿QGHUHGXFLUHOULHVJRDVRFLDGRFRQGHVFDUJDVQRSHUPLWDTXHORVQLxRVPHQRUHV
de 3 años de edad tengan acceso a las partes pequeñas durante la instalación de este producto.
ADVERTENCIA
NOTE: 36" wide built-in bottom freezer applications require specific
handle kits for drawer panel applications on both Standard Case Flush
and Flush Inset installations.
All other platforms are recommended to follow comparable stainless
steel models for Minimalist and Statement handles.
Application Statement Minimalist
ZIP360NN ZKGC3H3PNSS
ZKSP1H1PNSS
ZKGC3H3CNSS
ZKSP1H1CNSS
ZIC360NN ZKGC3H3PNSS ZKGC3H3CNSS
231-1000561 Rev. 2
Installation Instructions
This instruction provides for the installation of a Statement or Minimalist
handle collection on a 3/4” standard or ush inset custom panel.
DRILL PILOT HOLES
Measure, mark and draw a line 1-1/4” (3.18 cm) from
the handle side edge, top to bottom.
Please refer to Table 1 in page 1 for1/2” (1.27cm) hole
center to center distance (L)
Center punch to mark hole locations.
Drill 1/2” (1.27cm) pilot holes from the appearance side
and through the entire panel thickness.
Drill 11/32(0.87cm) pilot holes from the appearance
side and through the entire panel thickness. (On
vertical handle panels, drill hole 0.720” (1.83cm) below
the 1/2(1.27cm) hole on top side of the door panel
and 0.720(1.83cm) above the 1/2” (1.27cm) hole on
bottom side of the door panel. On Horizontal handle
panels, drill hole 0.720” (1.83cm) towards the center of
the door from 1/2” (1.27cm) hole.)
Use a 1” (2.54cm) router bit to route 1/4” (0.64 cm)
deep on a 3/4” (1.91 cm) panel. See illustration.
NOTE: The routing counter bore in the rear of the
decorative panel must ensure 1/2” (1.27 cm) material
thickness remains for handle support.
HANDLE ASSEMBLY
Insert Handle Mounting Fastener assembly E from the
nonappearance side of the panel.
Place the handle caps over the insert Handle Mounting
Fastener on the door. Take care to support the handle
so it doesn’t fall and scratch the appliance finish.
Make sure both handle caps are resting on the face
of the door.
Lock one end of the handle into position by tightening the
countersunk screw D with the Allen wrench provided.
Keep supporting the handle as you lock the other end of
the handle into position by tightening the countersunk
screw D.
Finally tighten the set screw in the handle caps using the
Allen wrench provided in the handle kit. DO NOT over
tighten the set screw using a power tool.
NOTE: Set screw location
in end cap will vary by
model.
When installing horizontal
handles, position the handle
so that the set screws are
facing downward.
1-1/4"
(3.18cm)
1-1/4"
(3.18cm)
1/2"
(1.27cm)
11/32"
(0.87cm)
.720"
(1.83cm)
3"
(7.62cm)
1-1/4"
(3.18cm)
1"
(2.54cm)
.720"
(1.83cm)
3"
(7.62cm)
1-1/4"
(3.18cm)
1"
(2.54cm)
center to center distance (L)
1/2"
(1.27cm)
11/32"
(0.87cm)
Hinge side
or Drawer Bottom
Handle side
View from
Nonappearance side
Detail Top Side
Detail Bottom Side
1/4"
(0.64cm)
1/2"
(1.27cm)
3/4"
(1.91cm)
D
Allen wrench
provided in
the kit
Insert Assembly E
Allen Key provided
with handle kit
Tighten the set screw in the
handle cap after tightening
screw D


Produkt Specifikationer

Mærke: Monogram
Kategori: Ikke kategoriseret
Model: ZKPN

Har du brug for hjælp?

Hvis du har brug for hjælp til Monogram ZKPN stil et spørgsmål nedenfor, og andre brugere vil svare dig


Ikke kategoriseret Monogram Manualer

Monogram

Monogram ZKPN Manual

24 December 2024
Monogram

Monogram Forge Manual

17 Oktober 2024
Monogram

Monogram ZKSB3H3PNSS Manual

16 Oktober 2024
Monogram

Monogram ZKR36R Manual

16 Oktober 2024
Monogram

Monogram ZKR72R Manual

16 Oktober 2024
Monogram

Monogram ZWL1126SR Manual

16 Oktober 2024
Monogram

Monogram ZK1SN249NLH Manual

26 September 2024
Monogram

Monogram ZK1SN244NRH Manual

26 September 2024
Monogram

Monogram JXFLUSH1 Manual

5 September 2024

Ikke kategoriseret Manualer

Nyeste Ikke kategoriseret Manualer

Rival

Rival CN753-W Manual

15 Juni 2025
Acopa

Acopa 553WSMKE Manual

15 Juni 2025
Atosa

Atosa RDCS-35 Manual

15 Juni 2025
Gourmia

Gourmia GAF692 Manual

15 Juni 2025
Taylor

Taylor 5315856 Manual

15 Juni 2025
Watts

Watts LF8B Manual

15 Juni 2025
Watts

Watts PLT-5 Manual

15 Juni 2025
ToiToiKids

ToiToiKids Fay Manual

15 Juni 2025
Aiphone

Aiphone JP-8Z Manual

15 Juni 2025