Bayco Products Inc. (BPI)
640 South Sanden Blvd. • Wylie, TX 75098 • USA
1-800-233-2155 • 1-469-326-9400
www.nightstick.com
XPP-5454GC
Instruction Manual
EN
WARNINGS
y Use only the approved Energizer E92 or EN92 batteries.
y Do not use other brands of batteries or mix new with used batteries.
y Do not use rechargeable batteries with this light.
y Do not exchange batteries or open the lens bezel in a hazardous
environment.
y Substitution of components may impair intrinsic safety.
y Always conrm the rating of any known hazardous or potentially
hazardous location where the light is to be used.
y Keep out of the reach of children.
BATTERY INSTALLATION
y Loosen the locking screw on the back of the battery compartment door.
(Do not fully remove the screw to avoid damage.)
y Insert 3 AAA Energizer E92 or EN92 batteries, ensuring proper polarity
as indicated inside the compartment.
y Close the battery compartment door and tighten the locking screw. (Do
not over-tighten to prevent damage.)
OPERATION
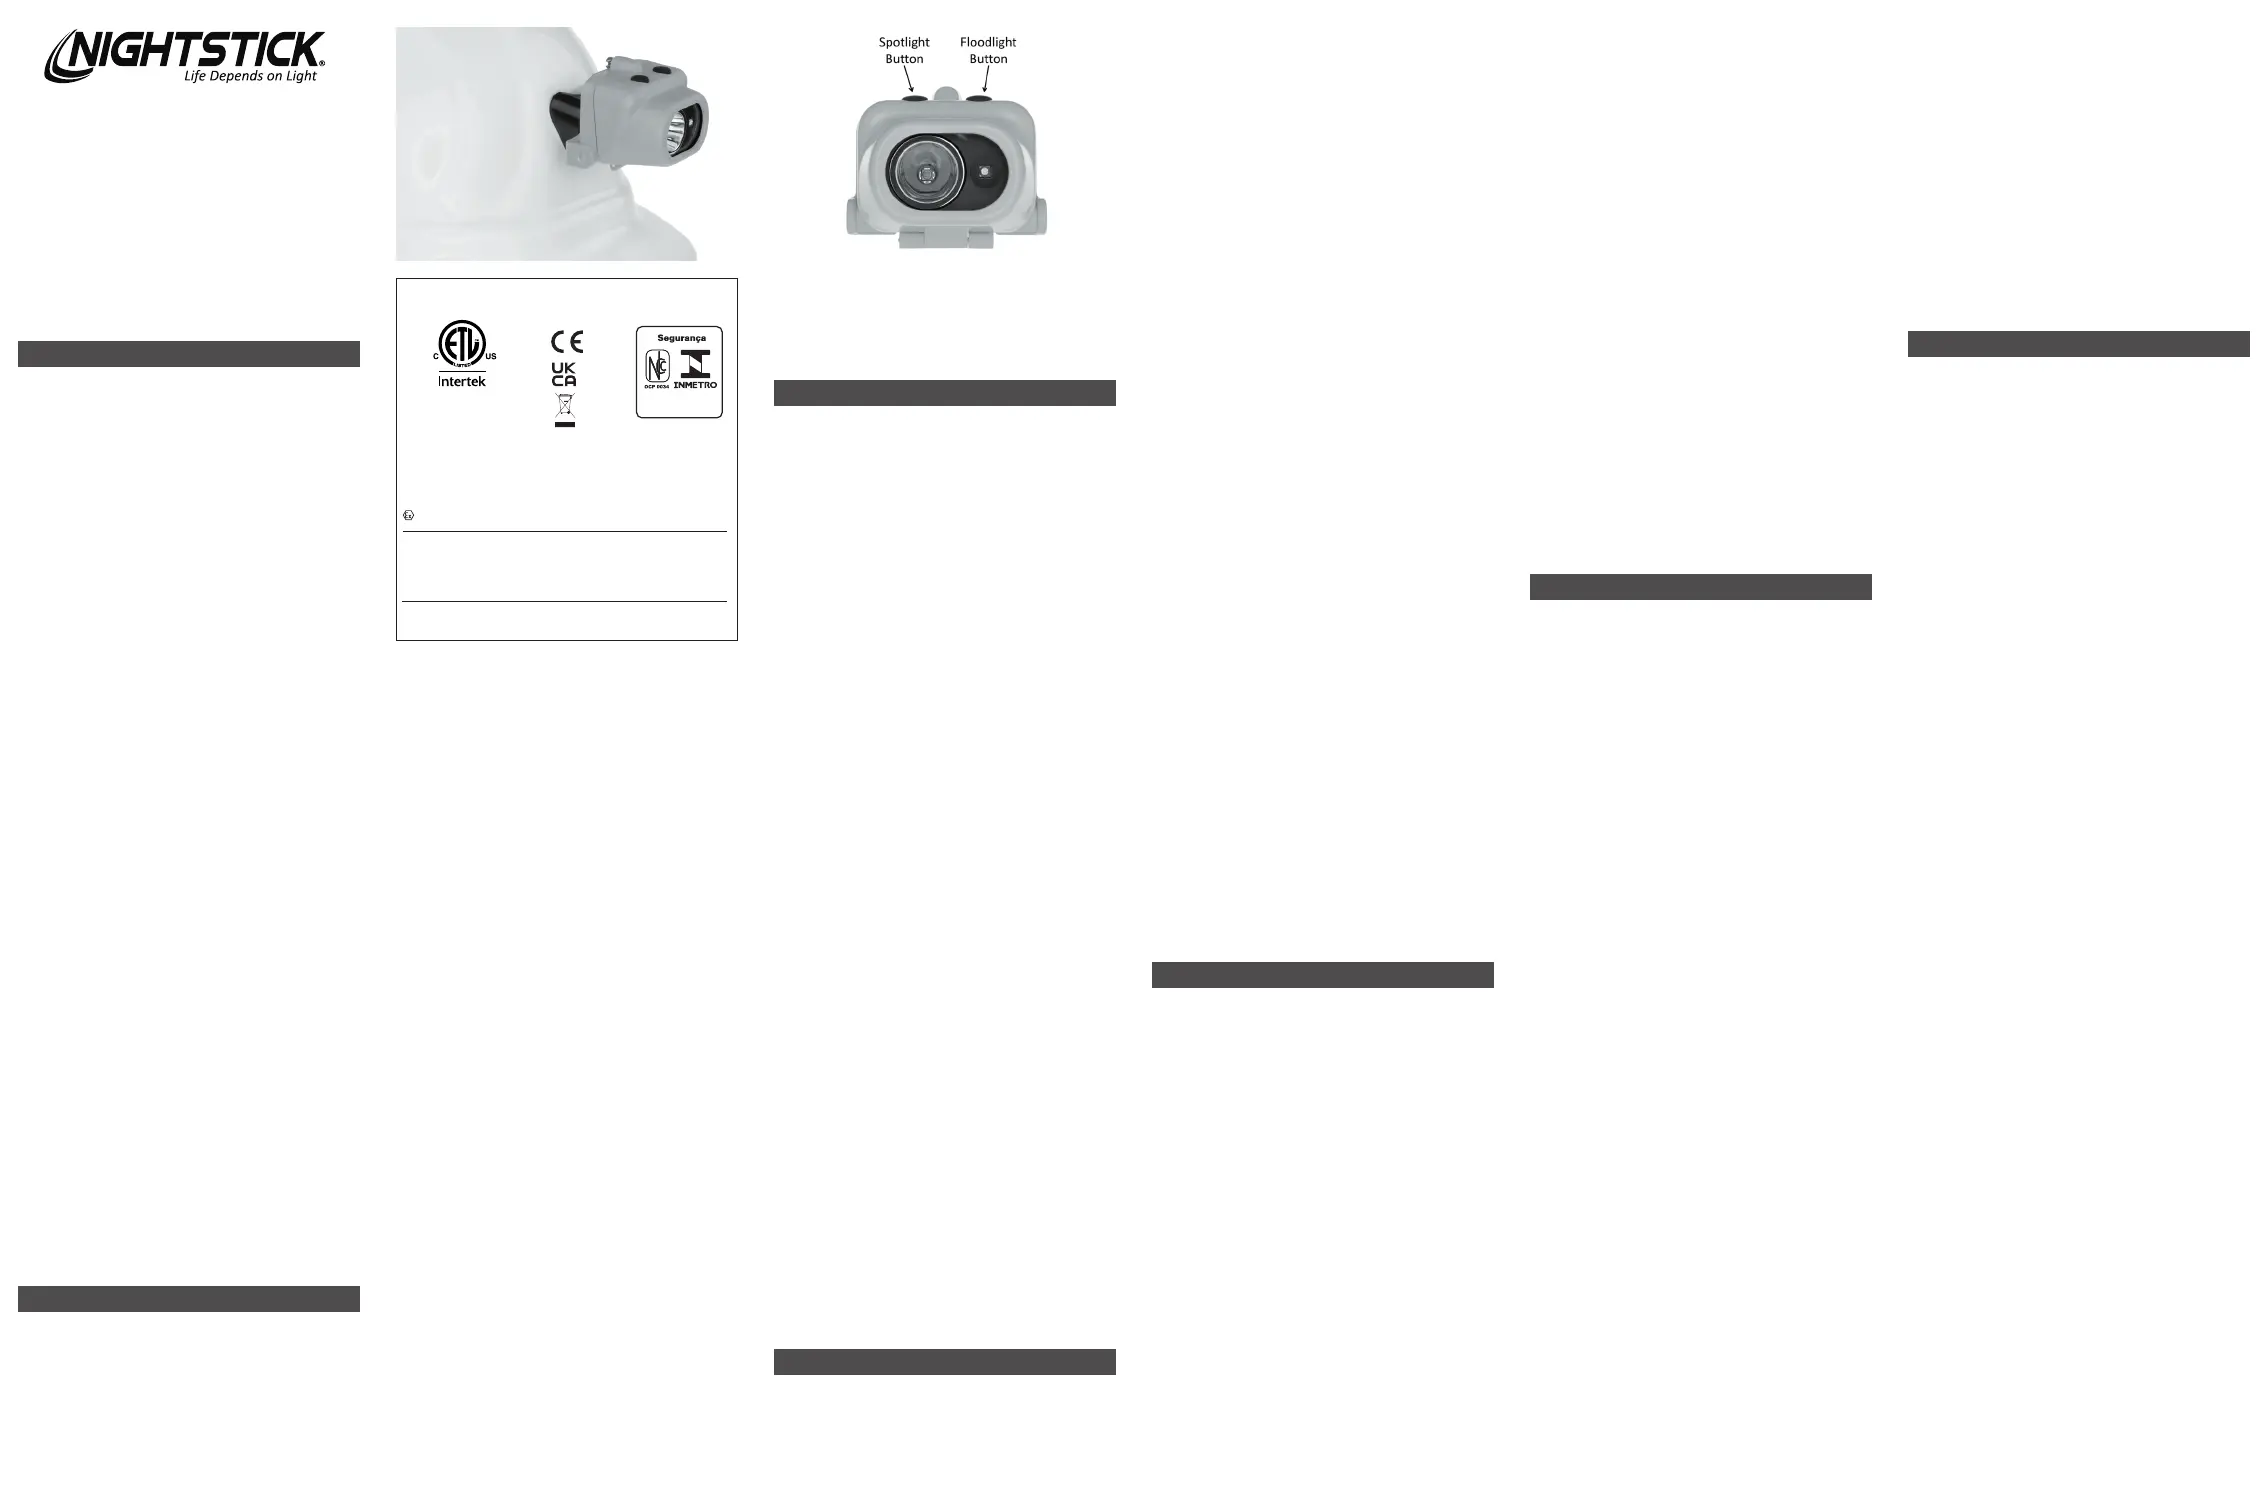
LIGHTING MODES:
y High-Brightness Mode: Press the button once.
y Low-Brightness Mode: Press the button twice.
y Turn Off: Press the button a third time.
y Dual-Light – Spotlight and Floodlight: Turn on both the spotlight and the
oodlight at the same time.
MOUNTING TO A HARD HAT
The XPP-5454GC ts on any hard hat that has a lamp bracket attached.
INSTRUCTIONS FOR ATTACHING THE NIGHTSTICK MOUNT TO A
HARD HAT:
y Use the included alcohol wipe to ensure mounting surface is clean and
oil-free.
y Determine best location that does not interfere with brim.
y Remove adhesive backing.
y Firmly press mount into place and hold for 30-60 seconds. Important:
Allow 24 hours for adhesive to reach maximum strength.
TO ATTACH THE HEADLAMP TO THE HARD HAT LAMP BRACKET:
y Slide the clip on the back of the light into the slot on the top of the mount
and press down rmly until the clip is fully engaged.
y To remove, grasp the headlamp and pull up until the clip slides out of
the mount.
TILT ADJUSTMENT:
Adjust the tilt angle to direct light where needed.
LIMITED LIFETIME WARRANTY
BPI warrants this product to be free from defects in workmanship and
materials for the original purchaser’s lifetime. The Limited Lifetime Warranty
includes the LEDs, housing and lenses. Rechargeable batteries, chargers,
switches, electronics and included accessories are warranted for a period of two
years with proof of purchase. Normal wear and failures which are caused by
accidents, misuse, abuse, faulty installation and lightning damage are excluded.
We will repair or replace this product should we determine it to be defective.
This is the only warranty, expressed or implied, including any warranty of
merchantability or tness for a particular purpose.
For a complete copy of the warranty, go to www.nightstick.com/pages/
warranties. Retain your receipt for proof of purchase.
FR
AVERTISSEMENTS
y Utilisez uniquement les piles Energizer E92 ou EN92 approuvées.
y N’utilisez pas d’autres marques de piles et ne mélangez pas des piles
neuves avec des piles usagées.
y N’utilisez pas de piles rechargeables avec cette lampe.
y Ne remplacez pas les piles et n’ouvrez pas le cadre de l’objectif dans un
environnement dangereux.
INS-XPP-5454GC-LG-25_081325
y La substitution des composants peut compromettre la sécurité
intrinsèque.
y Vériez toujours la classication de tout endroit dangereux ou
potentiellement dangereux connu où la lampe doit être utilisée.
y Tenir hors de portée des enfants.
INSTALLATION DE LA BATTERIE
y Desserrez la vis de verrouillage à l’arrière du couvercle du compartiment
à piles. (Ne retirez pas complètement la vis pour éviter tout dommage.)
y Insérez 3 piles AAA Energizer E92 ou EN92 en veillant à respecter la
polarité indiquée à l’intérieur du compartiment.
y Fermez le compartiment à piles et serrez la vis de verrouillage. (Ne pas
trop serrer pour éviter tout dommage.)
UTILISATION
MODES D’ÉCLAIRAGE :
y Mode haute luminosité : appuyez une fois sur le bouton supérieur.
y Mode faible luminosité : appuyez deux fois sur le bouton.
y Éteindre : Appuyez une troisième fois sur le bouton.
y Double éclairage – Projecteur et éclairage - Allume le projecteur et
l’éclairage en même temps.
INSTALLATION SUR UN CASQUE DE SÉCURITÉ
Le XPP-5454GC s’adapte à n’importe quel casque de sécurité équipé d’un
support de lampe.
INSTRUCTIONS POUR FIXER LE SUPPORT NIGHTSTICK À UN CASQUE
DE SÉCURITÉ :
y Utilisez la lingette imbibée d’alcool fournie pour vous assurer que la
surface d’installation est propre et sans huile.
y Déterminez le meilleur emplacement qui n’interfère pas avec le bord.
y Retirez le support adhésif.
y Appuyez fermement sur le support pour le mettre en place et maintenez-
le pendant 30 à 60 secondes. Important : Attendez 24 heures pour que
l’adhésif atteigne sa force maximale.
POUR FIXER LA LAMPE FRONTALE AU SUPPORT DE LAMPE DU
CASQUE DE SÉCURITÉ :
y Faites glisser le clip à l’arrière de la lampe dans la fente située sur
le dessus du support et appuyez fermement jusqu’à ce que le clip soit
complètement engagé.
y Pour le retirer, saisissez la lampe frontale et tirez vers le haut jusqu’à ce
que le clip glisse hors du support.
RÉGLAGE DE L’INCLINAISON :
Ajustez l’angle d’inclinaison pour diriger la lumière là où vous le souhaitez.
GARANTIE À VIE LIMITÉE
BPI garantit que ce produit est exempt de défauts de matériaux et de
fabrication à l’acheteur original durant toute sa vie. La garantie à vie limitée
inclut les DEL, les boîtiers et les lentilles. Les batteries rechargeables, les
chargeurs, les interrupteurs, les électroniques et les accessoires compris
sont garantis pour une période de deux ans avec une preuve d’achat. L’usure
normal et les défaillances qui sont causés par des accidents, une mauvaise
utilisation, un abus, une installation défectueuse et un système d’éclairage
endommagé sont exclus.
CLASS I DIV 1 GRPS A-D T3
CLASS II & III GRPS E-G T135ºC
CLASS I ZONE 0 AEx ia IIC T3 Ga
Ex ia IIC T3 Ga
II 1 G Ex ia op is IIC T3 Ga
Ex ia op is IIC T3 Ga
Intertek ITS 13 ATEX27928X
ITS21UKEX0266X
IECEx ITS 18.0030X
-20ºC ≤ Tamb ≤ +40ºC
1.5V/Cell E92 or EN92
ID 5012927
INTRINSICALLY SAFE
SECURITE INTRINSEQUE
Bayco Products, Inc. XPP-5454GC
640 S. Sanden Blvd., Wylie, TX 75098
Conforms to:
ANSI/UL STD 913, ANSI/UL
60079-0, ANSI/UL 60079-11
Ex ia op is IIC T3 Ga
(-20ºC ≤ Tamb ≤ +40ºC)
NCC 15.0296 X
Certified to:
CAN/CSA STD C22.2 No 60079-0
CAN/CSA STD C22.2 No 60079-11
CSA STD C22.2 No 25
EN IEC 60079-0:2018, EN 60079-11:2012 and EN 60079-28:2015
IEC 60079-0:2017, IEC 60079-11:2011, IEC 60079-28:2018
2575
0359
Ce produit sera réparé ou remplacé si nous déterminons qu’il est
défectueux. Ceci est la seule garantie explicite ou implicite, y compris toute
garantie de qualité marchande ou d’adéquation à un usage particulier.
Pour une copie détaillée de la garantie, vous rendre sur le site www.
nightstick.com/pages/warranties. Gardez ce reçu comme preuve d’achat.
ES
ADVERTENCIAS - INTRÍNSICAMENTE SEGURAS
y Utilice únicamente baterías Energizer E92 o E92 aprobadas.
y No utilice otras marcas de baterías ni mezcle baterías nuevas con usadas.
y No utilice pilas recargables con esta luz.
y No cambie las baterías ni abra el marco de la lente en un entorno
peligroso.
y La sustitución de componentes puede perjudicar la seguridad intrínseca.
y Conrme siempre la clasicación de cualquier ubicación conocida como
peligrosa o potencialmente peligrosa donde se utilizará la luz.
y Mantener fuera del alcance de los niños.
INSTALACIÓN DE LA BATERÍA
y Aoje el tornillo en la parte posterior de la puerta del compartimiento de
la batería. (No retire completamente el tornillo para evitar daños).
y Inserte 3 baterías AAA Energizer E92 o EN92, asegurándose de la
polaridad correcta como se indica dentro del compartimiento.
y Cierre la puerta del compartimiento de la batería y apriete el tornillo. (No
apriete demasiado para evitar daños).
OPERACIÓN
MODOS DE ILUMINACIÓN:
y Modo de alto brillo: presione el botón superior una vez.
y Modo de bajo brillo: presione el botón dos veces.
y Apagar: presione el botón una tercera vez.
y Luz dual: foco y reector - Encienda el foco y el reector al mismo
tiempo.
MONTAJE EN UN CASCO DE SEGURIDAD
El XPP-5454GC se adapta a cualquier casco que tenga un soporte de
lámpara adjunto.
INSTRUCCIONES PARA FIJAR EL SOPORTE NIGHTSTICK A UN CASCO:
y Utilice la toallita con alcohol incluida para asegurarse de que la
supercie de montaje esté limpia y sin aceite.
y Determine la mejor ubicación que no interera con el borde.
y Retire la cubierta del adhesivo.
y Presione rmemente el soporte en su lugar y manténgalo así durante 30
a 60 segundos. Importante: deje pasar 24 horas para que el adhesivo
alcance su máxima resistencia.
PARA FIJAR LA LÁMPARA AL SOPORTE DEL CASCO:
y Deslice el clip de la parte posterior de la luz en la ranura de la parte
superior del soporte y presione rmemente hasta que el clip quede
completamente acoplado.
Para quitarlo, sujete el faro y tire hacia arriba hasta que el clip se deslice fuera
del soporte. AJUSTE DE INCLINACIÓN:
Ajuste el ángulo de inclinación para dirigir la luz a donde sea necesario.
GARANTIA LIMITADA DE POR VIDA
BPI garantiza que este producto está libre de defectos de mano de obra
y materiales durante la vida del comprador original. La garantía de por vida
limitada incluye los LED, la carcasa y los lentes. Las pilas recargables, los
cargadores, los interruptores, la electrónica y los accesorios incluidos están
garantizados por un período de dos años con un comprobante de compra. Se
excluyen el desgaste y los fallos normales, que son causados por accidentes,
mal uso, abuso, instalación defectuosa y daños por rayos.
Repararemos o reemplazaremos este producto si lo determinamos como
defectuoso. Esta es la única garantía, expresa o implícita, incluyendo
cualquier garantía de comerciabilidad o idoneidad para un propósito particular.
Para obtener una copia completa de la garantía, visite www.nightstick.com/
pages/warranties. Conserve su recibo para comprobar la compra.
PT
ATENÇÃO – INTRINSECAMENTE SEGURO
y Utilizar apenas as pilhas Energizer EN92 ou E92 aprovadas.
y Não utilizar outras marcas de pilhas nem misturar pilhas novas com usadas.
y Não utilizar pilhas recarregáveis com esta lanterna.
y Não trocar as pilhas nem abrir a moldura da lente em ambientes perigosos.
y A substituição de componentes pode prejudicar a segurança intrínseca.
y Conrmar sempre a classicação de qualquer local considerado
perigoso ou potencialmente perigoso onde a lanterna será usada.
y Manter fora do alcance das crianças.
INSTALAÇÃO DAS PILHAS
y Desapertar parcialmente o parafuso de xação na parte traseira da
entrada do compartimento das pilhas. (Não remover totalmente o parafuso
para não danicar.)
y Inserir 3 pilhas AAA Energizer E92 ou EN92, certicando-se de que a
polaridade está correta, conforme indicado dentro do compartimento.
y Fechar a entrada do compartimento das pilhas e apertar o parafuso de
xação. (Não apertar demais para não danicar.)
FUNCIONAMENTO
MODOS DE ILUMINAÇÃO:
y Modo de alta intensidade de brilho: pressionar o botão superior uma vez.
y Modo de baixa intensidade de brilho: pressionar o botão duas vezes.
y Desligar: Pressione o botão uma terceira vez.
y Luz Dupla: Foco de luz e holofote - Ligar o foco de luz e o holofote ao
mesmo tempo.
MONTAR NUM CHAPÉU FEITO DE MATERIAIS RÍGIDOS/
CAPACETE
O XPP-5454GC é compatível com qualquer chapéu feito de materiais
rígidos/capacete que tenha um suporte para lanterna.
INSTRUÇÕES PARA FIXAR O SUPORTE NIGHTSTICK NUM CHAPÉU
FEITO DE MATERIAIS RÍGIDOS/CAPACETE:
y Usar o toalhete com álcool incluído para garantir que a superfície de
montagem está limpa e sem oleosidade.
y Determinar o melhor local para não interferir com a aba.
y Remover a parte adesiva.
y Pressionar rmemente o suporte no sítio e segurar durante 30 a 60
segundos. Importante: aguardar 24 horas para que o adesivo atinja a
resistência máxima.
FIXAR A LANTERNA PARA A CABEÇA AO SUPORTE DO CHAPÉU FEITO
DE MATERIAIS RÍGIDOS/CAPACETE:
y Deslizar o grampo na parte de trás da lanterna no encaixe na parte
superior do suporte e pressionar rmemente até o grampo estar totalmente
encaixado.
Para remover, segurar a lanterna para a cabeça e puxar para cima para que o
grampo deslize para fora do suporte.
AJUSTE DA INCLINAÇÃO:
Ajustar o ângulo de inclinação para direcionar a luz para onde é necessária.
GARANTIA VITALÍCIA LIMITADA
BPI garante que este produto está livre de defeitos de fabricação e
materiais por tempo indeterminado ao comprador original. A Garantia Vitalícia
Limitada inclui os LEDs, a caixa e as lentes. As baterias recarregáveis,
carregadores, interruptores, componentes eletrônicos e acessórios incluídos
são garantidos por um período de dois anos com comprovante de compra.
O desgaste e falhas normais causados por acidentes, maus-tratos, abuso,
instalação defeituosa e danos por raio são excluídos.
Repararemos ou substituiremos este produto se o determinarmos ser
defeituoso. Esta é a única garantia, expressa ou implícita, incluindo qualquer
garantia de comercialização ou adaptação para um propósito especíco.
Para obter uma cópia completa da garantia, acesse www.nightstick.com/
pages/warranties. Retenha o seu recibo como comprovante de compra.
IT
AVVERTENZE
y Utilizzare solo batterie Energizer EN92 o E92 approvate.
y Non utilizzare batterie di altre marche né mischiare batterie nuove con
batterie usate.
y Non utilizzare batterie ricaricabili per questa lampada.
y Non sostituire le batterie né aprire la ghiera dell’obiettivo in un ambiente
pericoloso.
y La sostituzione dei componenti può compromettere la sicurezza intrinseca.
y Confermare sempre la classicazione di qualsiasi luogo potenzialmente
o notoriamente pericoloso in cui verrà utilizzata la lampada.
y Tenere fuori dalla portata dei bambini.
INSTALLAZIONE DELLA BATTERIA
y Allentare la vite di bloccaggio sulla parte posteriore dello sportello del
vano batterie. (Non rimuovere completamente la vite per evitare danni.)
y Inserire 3 batterie AAA Energizer E92 o EN92, prestando attenzione alla
corretta polarità indicata all’interno del vano.
y Chiudere lo sportello del vano batterie e serrare la vite di bloccaggio.
(Non stringere eccessivamente per evitare danni.)
FUNZIONAMENTO
MODALITÀ DI ILLUMINAZIONE:
y Modalità alta luminosità: premere una volta il pulsante superiore.
y Modalità bassa luminosità: premere due volte il pulsante.
y Spegnimento: premere il pulsante una terza volta.
y Luce doppia - Faro e proiettore - Accendere il faro e il proiettore
contemporaneamente.
MONTAGGIO SU CASCO
Il modello XPP-5454GC si adatta a qualsiasi casco dotato di supporto per
lampada.
ISTRUZIONI PER IL MONTAGGIO DELLA LAMPADA NIGHTSTICK SU
UN CASCO:
y Utilizzare la salvietta imbevuta di soluzione alcolica inclusa per accertarsi
che la supercie di montaggio sia pulita e priva di grasso.
y Scegliere la posizione migliore che non interferisca con la tesa.
y Rimuovere la pellicola adesiva.
y Tenere premuto con forza il supporto in posizione per 30-60 secondi.
Importante: attendere 24 ore per lo sviluppo completo della resistenza
adesiva.
PER FISSARE LA LAMPADA FRONTALE ALLA STAFFA DELLA LAMPADA
DEL CASCO:
y Far scorrere la clip sul retro della lampada nella fessura sulla parte
superiore del supporto e premere con forza no a quando la clip è
completamente inserita.
Per rimuover la lampada, afferrarla e tirare verso l’alto nché la clip non si
sla dal supporto.
REGOLAZIONE DELL’INCLINAZIONE:
Regolare l’angolo di inclinazione per dirigere la luce dove necessario.
GARANZIA A VITA LIMITATA
BPI garantisce che questo prodotto è privo di difetti di fabbricazione o
dei materiali per la durata di vita dell’acquirente originale. La garanzia a
vita limitata include i LED, l’alloggiamento e le lenti. Le batterie ricaricabili,
i caricabatterie, gli interruttori, i dispositivi elettronici e gli accessori inclusi
sono garantiti per un periodo di due anni, previa presentazione della prova
d’acquisto. Sono esclusi la normale usura e i guasti causati da incidenti, uso
improprio, abuso, installazione errata e danni provocati da fulmini.
Qualora ne accertassimo un difetto, ripareremo o sostituiremo il prodotto. Si
tratta dell’unica garanzia, espressa o implicita, comprese eventuali garanzie di
commerciabilità o idoneità per uno scopo particolare.
Per consultare una copia completa della garanzia, visitare www.nightstick.
com/pages/warranties. Conservare la ricevuta come prova d’acquisto.
DE
WARNHINWEWARNHINWEISE - EIGENSICHERHEIT
GEWÄHRLEISTET
y Es dürfen nur die zugelassenen Energizer EN92 oder E92 Batterien
verwendet werden.
y Es dürfen keine Batterien anderer Marken verwendet oder neue mit
gebrauchten Batterien gemischt werden.
y Wiederauadbare Batterien dürfen nicht mit dieser Leuchte verwendet
werden.
y In gefährlichen Umgebungen dürfen Sie weder die Batterien
austauschen noch die Linsenblende öffnen.
y Der Austausch von Komponenten kann die Eigensicherheit
beeinträchtigen.
y Stellen Sie immer sicher, dass alle bekannten gefährlichen oder
potenziell gefährlichen Orte, an denen die Leuchte verwendet werden soll,
den Anforderungen entsprechen.
y Außerhalb der Reichweite von Kindern aufbewahren.
EINSETZEN DER BATTERIE
y Lösen Sie die Sicherungsschraube auf der Rückseite der
Batteriefachabdeckung. (Entfernen Sie die Schraube nicht vollständig, um
Beschädigungen zu vermeiden).
y Legen Sie 3 AAA-Batterien Energizer E92 oder EN92 ein und beachten
Sie dabei die im Batteriefach gekennzeichnete Polarität.
y Schließen Sie die Klappe des Batteriefachs und ziehen Sie die
Sicherungsschraube fest. (Nicht zu fest anziehen, um Beschädigungen zu
vermeiden.)
BETRIEB
BELEUCHTUNGSMODI:
y Hohe Helligkeit: Drücken Sie einmal auf die obere Taste.
y Niedrige Helligkeit: Drücken Sie die Taste zweimal.
y Ausschalten: Drücken Sie die Taste ein drittes Mal.
y Doppellicht – Strahler und Flutlicht - Schalten Sie den Strahler und das
Flutlicht gleichzeitig ein.
BEFESTIGUNG AN EINEM SCHUTZHELM
XPP-5454GC passt auf jeden Schutzhelm, an dem eine Lampenhalterung
angebracht ist.
ANLEITUNG ZUM BEFESTIGEN DER NIGHTSTICK-HALTERUNG AN
EINEM SCHUTZHELM:
y Verwenden Sie das mitgelieferte alkoholhaltige Reinigungstuch, um
sicherzustellen, dass die Befestigungsäche sauber und ölfrei ist.
y Entscheiden Sie sich für den passenden Befestigungsort. Dieser sollte
nicht mit der Krempe Ihres Schutzhelms kollidieren.
y Entfernen Sie die Klebefolie.
y Drücken Sie die Halterung fest an und halten Sie sie für 30–60
Sekunden gedrückt. Wichtig: Lassen Sie den Kleber 24 Stunden
trocknen, damit er seine maximale Festigkeit erreicht.
ZUM BEFESTIGEN DER STIRNLEUCHTE AN DER LAMPENHALTERUNG:
y Schieben Sie die Klemme auf der Rückseite der Lampe in den Schlitz an
der Oberseite der Halterung und drücken Sie sie fest nach unten, bis die
Klemme vollständig eingerastet ist.
Zum Entfernen fassen Sie die Stirnlampe und ziehen sie nach oben, bis die
Klemme aus der Halterung gleitet.
NEIGUNGSEINSTELLUNG:
Der Neigungswinkel kann so eingestellt werden, dass das Licht auf die
gewünschte Stelle gerichtet wird.
BEFRISTETE LEBENSLÄNGLICHE GARANTIE
BPI gewährleistet dem Erstkäufer eine lebenslängliche Garantie dafür,
dass dieses Product keinerlei Bearbeitungs- oder Materialienschäden
aufweist. Die befristete lebenslängliche Garantie beinhaltet LEDs
(Leuchtdioden), Gehäuse und Lichtscheiben. Wiederauadbare Batterien,
Ladegeräte, Schalter, Elektronik und enthaltene Zubehör haben eine
Garantie von 2 Jahren mit Kaufbeleg.
Normaler Verschleiß und Fehlfunktionen, die durch Unfälle,
Zweckentfremdung, Missbrauch, fehlerhafte Installation und Blitzschäden
verursacht wurden sind hiervon ausgeschlossen. Wir reparieren oder
ersetzen das Produkt sofern ein Defekt festgestellt wird. Dies ist die einzige
Gewährleistung, inklusive jeglicher Gewährleistung der allgemeinen
Gebrauchstauglichkeit und Eignung für den bestimmten Zweck dieses
Produktes.
Eine vollständige Kopie der Garantie ist auf www.nightstick.com/pages/
warranties ersichtbar. Bewahren Sie den Kassenzettel zum Kaufnachweis auf.
NL
WAARSCHUWINGEN - INTRINSIEK VEILIG
y Gebruik uitsluitend goedgekeurde Energizer EN92 of E92 batterijen.
y Gebruik geen batterijen van een ander merk en combineer geen nieuwe
met gebruikte batterijen.
y Gebruik geen oplaadbare batterijen in deze lamp.
y Vervang geen batterijen en open de lensring niet in een gevaarlijke
omgeving.
y Vervanging van componenten kan de intrinsieke veiligheid in gevaar
brengen.
y Controleer altijd de classicatie van elke bekende gevaarlijke of
potentieel gevaarlijke locatie waar de lamp wordt gebruikt
y Buiten bereik van kinderen houden.
INSTALLATIE VAN DE BATTERIJ
y Draai de borgschroef aan de achterkant van het batterijvak los.
(Verwijder de schroef niet volledig om schade te voorkomen).
y Plaats 3 AAA Energizer E92- of EN92- batterijen en zorg ervoor dat de
polariteit overeenkomt met de aanwijzingen in het batterijvak.
y Sluit het batterijvak en draai de borgschroef vast. (Draai de moer niet te
strak aan om schade te voorkomen.)
WERKING
VERLICHTINGSMODI:
y Hoge helderheidsmodus: Druk eenmaal op de bovenste knop.
y Lage helderheidsmodus: Druk tweemaal op de knop.
y Uitschakelen: Druk een derde keer op de knop
y Dubbel licht: spotlight en schijnwerper - Zet de spotlight en de
schijnwerper tegelijkertijd aan.
MONTAGE OP EEN VEILIGHEIDSHELM
De XPP-5454GC past op elke veiligheidshelm waaraan een lampenbeugel
is bevestigd.
INSTRUCTIES VOOR HET BEVESTIGEN VAN DE NIGHTSTICK-HOUDER
AAN EEN VEILIGHEIDSHELM:
y Gebruik het meegeleverde alcoholdoekje om ervoor te zorgen dat het
montageoppervlak schoon en olievrij is.
y Bepaal de beste locatie die niet in de weg zit van de rand.
y Verwijder de kleeaag.
y Druk de houder stevig op zijn plaats en houd hem 30-60 seconden vast.
Belangrijk: Wacht 24 uur voordat de lijm de maximale sterkte heeft
bereikt.
DE KOPLAMP AAN DE LAMPENBEUGEL VAN DE VEILIGHEIDSHELM
BEVESTIGEN:
y Schuif de clip aan de achterkant van de lamp in de gleuf bovenop de
houder en druk hem stevig aan totdat de clip volledig vastzit.
Pak de koplamp vast om deze te verwijderen en trek hem omhoog totdat de
clip uit de houder glijdt.
KANTELVERSTELLING:
Pas de kantelhoek aan om het licht te richten waar nodig.
BEPERKTE LEEFTIJD GARANTIE
BPI garandeert dat dit product vrij is van defecten in vakmanschap en
materialen voor de originele koper gedurende zijn levensduur. De beperkte
levenslange garantie omvat de LED’s, behuizing en lenzen. Oplaadbare
batterijen, opladers, schakelaars, elektronica en meegeleverde accessoires
worden gedurende een periode van twee jaar gedekt met bewijs van aankoop.
Normale slijtage en defecten veroorzaakt door ongevallen, misbruik, slechte
installatie en blikseminslag zijn uitgesloten.
Wij zullen dit product repareren of vervangen als wij bepalen dat het defect
is. Dit is de enige garantie, expliciet of impliciet, inclusief enige garantie van
verhandelbaarheid of geschiktheid voor een speciek doel.
Voor een volledige kopie van de garantie, ga naar www.nightstick.com/
pages/warranties. Bewaar uw ontvangstbewijs als aankoopbewijs.