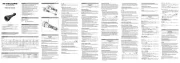
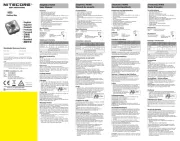
High Performance
SmartRing Tactical Flashlight
SRT6i
Accessories
Battery Options
Technical Data
Specifications
Warranty Service
Features
(English)
Charging Function
Brightness Level or Mode
Selection
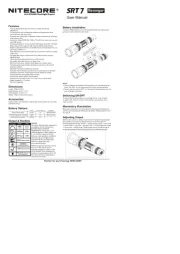
Battery Installation / Removal
(Deutsch)
(Español)
(Francais)
Length: 163mm (6.42")
Head Diameter: 40mm (1.57")
Tube Diameter: 25.8mm (1.02")
Tail Diameter: 31mm (1.22")
Weight: 167g (5.89 oz)
(Battery Not Included)
NITECORE 21700i Rechargeable Li-ion Battery
(NL2150HPi 5,000mAh), CR123 Battery Magazine,
Holster, Clip, Lanyard, Spare O-ring, USB-C
Charging Cable
FL1
STANDARD
TURBO (3) MID (2) LOW (1) STROBE
2,100
Lumens
300
Lumens
30
Lumens
2,100
Lumens
*30min
7h
30min
70h ─
510m 175m 56m ─
65,200cd 7,700cd 800cd ─
2m (Impact Resistance)
IP68, 2m (Waterproof and Submersible)
Note: The stated data is measured in accordance
with the international ashlight testing standard
ANSI/PLATO FL 1-2019, using 1 x 21700i Li-ion
battery (5,000mAh) under laboratory conditions.
The data may vary in real world use due to
dierent battery usage or environmental
conditions.
* The runtime of TURBO is tested without the
temperature regulation.
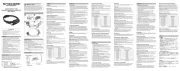
Charging Function
The SRT6i is equipped with an intelligent charging
system. As illustrated, after opening the USB cover,
use the USB cable to connect an external power
supply (e.g. a USB adapter or other USB charging
devices) to the charging port to begin the charging
process.
•
During the charging process, the power
indicator on the side of the ashlight will ash
slowly to inform the user.
•
When the battery is fully charged, the SRT6i
will cease the charging process and the power
indicator will become steadily turned on to
inform the user.
•
The charging time for a 21700i Li-ion battery
(5,000mAh) is approx. 3 hours 15 minutes.
(Charged via the 5V/2A adapter)
Operating Instructions
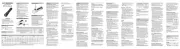
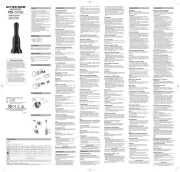
Battery Installation / Removal
As illustrated, after unscrewing the battery cap,
insert / remove the battery and screw to tighten
the tail cap.
Warnings:
1. Ensure the battery(s) is/are inserted with the
positive end towards the head. The product
will not work if the battery(s) is/are incorrectly
inserted.
2. The product will not work when there is an
abnormal situation (e.g. the battery is broken/
inserted incorrectly).
Ladefunktion
Die SRT6i ist mit einem intelligenten Ladesystem
ausgestattet. Nachdem Sie den Akku eingesetzt
und die USB-Abdeckung geönet haben verbinden
Sie ein externes Netzteil und den Ladeanschluss
der Lampe (z.B. einen USB-Adapter oder andere
USB-Ladegeräte) mit dem USB-Kabel, um den
Ladevorgang zu starten.
• Während des Ladevorgangs blinkt die Anzeige
an der Seite des Gehäuses der SRT6i langsam.
• Wenn der Akku vollständig aufgeladen ist,
beendet die SRT6i den Ladevorgang und die
Betriebsanzeige leuchtet konstant.
• Die Ladezeit für einen 21700 Li-Ionen-Akku
(5000mAh) beträgt ca. 3Std 15min (aufgeladen
mit einem 5V/2A-Adapter).
Bedienungsanleitung
Einsetzen/Entnehmen des Akkus
Legen Sie - wie dargestellt – nach Abschrauben der
Heckkappe den Akku ein bzw. nehmen sie ihn heraus
und schrauben sie die Heckkappe wieder fest.
HINWEIS:
Vor dem Einlegen des Akkus bitte den Silikat-
Beutel entnehmen!
Nach dem Einsetzen zeigt die Betriebsanzeige die
verbleibende Akkuleistung an.
Lesen Sie dazu den Abschnitt "Leistungsanzeige".
Fonction de charge
La SRT6i est équipée d’un système de charge
intelligent. Comme illustré, après avoir ouvert la
protection du port USB, utilisez le câble USB pour
connecter une alimentation externe (par exemple,
un adaptateur USB ou d’autres périphériques
de chargement USB) au port de charge pour
commencer le processus de charge.
• Pendant le processus de charge, l’indicateur
d’alimentation sur le côté de la lampe clignotera
lentement pour informer l’utilisateur.
• Lorsque la batterie est complètement chargée,
la SRT6i arrête le processus de charge et l’in-
dicateur d’alimentation s’allume régulièrement
pour informer l’utilisateur.
• Le temps de charge d’une batterie Li-ion 21700i
(5 000 mAh) est d’environ 3 heures 15 minutes.
(Chargé via l’adaptateur 5V/2A)
Mode d’emploi
Installation/Retrait de la batterie
Comme illustré, après avoir dévissé le capuchon
de la batterie, insérez / retirez la batterie et vissez
pour serrer le capuchon arrière.
Avertissements :
1. Assurez-vous que la ou les piles sont insérées
avec l’extrémité positive vers la tête. Le produit
ne fonctionnera pas si la ou les batteries sont
mal insérées.
2. Le produit ne fonctionnera pas en cas de
situation anormale (par exemple, la batterie est
cassée / insérée de manière incorrecte).
3. Veuillez utiliser l’adaptateur pour piles lorsque
vous utilisez 2 piles CR123.
4. ATTENTION ! Radiations dangereuses possibles
! Ne regardez pas la lumière directement dans
les yeux ! Peut causer des troubles oculaires.
5. Lorsque le niveau de puissance est trop faible,
veuillez cesser d’utiliser le produit et remplacer ou
recharger la batterie pour éviter de l’endommager.
SYSMAX Innovations Co., Ltd.
TEL: +86-20-83862000
FAX: +86-20-83882723
E-mail: info@nitecore.com
Web: www.nitecore.com
Address
:
Unit 6355, 5/F,
No.1021 Gaopu Road,
Tianhe District, Guangzhou,
510653 Guangdong, China
Please nd us on facebook :
NITECORE Flashlight
Thanks for purchasing NITECORE!
Made in China
SRT08126i22
• Powered by a 21700i Battery
• Lockout Mode Available
• 4
th
Generation Smart Selector Ring
The SRT6i is only compatible with NITECORE
21700 i Series batteries with an output over 15A
and CR123/RCR123 batteries.
Note:
1. DO NOT attempt to use the SRT6i to charge
CR123/RCR123 batteries.
2. The SRT6i is NOT compatible with conventional
21700/18650 batteries.
3. The brightness of the TURBO Level will reduce
when using CR123/RCR123 batteries.
All NITECORE
®
products are warranted for quality.
Any DOA / defective product can be exchanged for
a replacement through a local distributor/dealer
within 15 days of purchase. After that, all defective
/ malfunctioning NITECORE
®
products can be
repaired free of charge within 60 months from the
date of purchase. Beyond 60 months, a limited
warranty applies, covering the cost of labor and
maintenance, but not the cost of accessories or
replacement parts.
The warranty will be nullied if
1. the product(s) is/are broken down,
reconstructed and/or modied by unauthorized
parties.
2. the product(s) is/are damaged due to improper
use. (e.g. reversed polarity installation)
3. the product(s) is/are damaged due to battery
leakage.
For the latest information on NITECORE
®
products and services, please contact a local
NITECORE
®
distributor or send an email to
service@nitecore.com
※ All images, text and statements specied herein
this user manual are for reference purpose
only. Should any discrepancy occur between
this manual and information specied on www.
nitecore.com, Sysmax Innovations Co., Ltd.
reserves the rights to interpret and amend the
content of this document at any time without
prior notice.
Power Button
MODE Button
Rotate Clockwise
3. Please use the battery magazine when using 2 x
CR123 batteries.
4. CAUTION! Possible dangerous radiation! Don't look
into the light! May be dangerous for your eyes.
5. When the power level is low, please stop using
the product and replace or recharge the battery
to prevent damage to the battery.
6. When the product is kept in a backpack or left
unused for prolonged time, please remove all
batteries to prevent accidental activation or
battery leakage.
Tactical Momentary Illumination
Brightness Level 1-3: When the light is o, half
press and hold the Power Button to turn on the
light momentarily. Release to turn it o.
TAC Mode:
•
Half press and hold the Power Button to access
LOW Level momentarily. Release to turn it o.
•
Full press and hold the Power Button to access
TURBO Level momentarily. Release to turn it o.
On / Off
Brightness Level 1-3:
• When the light is o, full press the Power Button
to turn it on.
• When the light is on, full press the Power Button
to turn it o.
Brightness Level or Mode Selection
When the light is on, rotate the Smart Selector
Ring at the end of the ashlight to select a
brightness level / mode.
•
Rotate the Smart Selector Ring clockwise from the
far right to the left to cycle through the following
brightness levels / modes: TAC – TURBO (3) –
MID (2) – LOW (1) – Lockout Mode.
•
These brightness levels / modes can be cycled
through in reverse by rotating the Smart
Selector Ring counterclockwise.
•
When rotating the Smart Selector Ring to the
Lockout Mode, both buttons will be locked and
unavailable to turn on the ashlight.
Direct Access to TURBO
•
When the light is o, half press and hold the
MODE Button (STROBE READY™) to access
TURBO. Release to turn it o.
•
Brightness Level 1-2: When the light is on,
half press and hold the MODE Button (STROBE
READY™) to access TURBO. Release to return
to the previous status.
Note: The TURBO Level will produce massive heat
when activating for extended periods, and the
ashlight will automatically step down a few lumens
to prevent overheating and prolong battery life.
STROBE READY™
•
When the light is o, full press and hold the
MODE Button (STROBE READY™) to access the
STROBE Mode. Release to turn it o.
•
Brightness Level 1-3: When the light is on,
full press the MODE Button (STROBE READY™)
to access the STROBE Mode. Short pressing
the MODE Button (STROBE READY™) again to
return to the previous status or turning o the
ashlight can exit the STROBE Mode.
Power Indication
•
When the light is on and the remaining battery
power is approx. 50%, the power indicator will
ash once every 2 seconds to inform the user.
•
When the light is on and the remaining battery
power is nearly depleted, the power indicator will
ash quickly and continuously to inform the user.
Battery Replacement
The battery should be replaced when the power
indicator ashes quickly and continuously and the
output appears to be dim or the ashlight becomes
unresponsive due to low power.
ATR (Advanced Temperature
Regulation)
The integrated ATR technology regulates the
output of the SRT6i according to the working
condition and ambient environment to maintain
the optimal performance.
Maintenance
Every 6 months, threads should be wiped with a
clean cloth followed by a thin coating of silicon-
based lubricant.
Warnings
1. Please recharge the product every 3 months
when left unused for a prolonged time.
2. When the ashlight is kept in the backpack or
the holster, please select the Lockout Mode to
prevent accidental activation.
3. Dispose of the device/batteries in accordance
with applicable local laws and regulations.
WARNUNG:
1. Legen Sie den Akku mit dem positiven (+)
Ende in Richtung des Lampenkopfes ein. Mit
falsch eingesetztem Akku wird die SRT6i nicht
funktionieren!
2. Das Produkt funktioniert nicht, wenn eine
abnormale Situation vorliegt (z. B. wenn
der Akku/die Batterie kaputt ist oder falsch
eingelegt wurde).
3. Bitte verwenden Sie das Batteriemagazin, wenn
Sie 2 x CR123-Batterien/Akkus verwenden.
4. VORSICHT! Mögliche gefährliche Strahlung!
Nicht in das Licht schauen! Dies kann gefährlich
für Ihre Augen sein.
5. Wenn der Ladestand niedrig ist, verwenden
Sie bitte die Taschenlampe nicht weiter und
ersetzen oder laden Sie den Akku, um eine
Beschädigung des Akkus zu vermeiden.
6. Wenn Sie die Taschenlampe in einem Rucksack
aufbewahren oder für längere Zeit nicht
benutzten, entfernen Sie bitte den Akku, um
eine versehentliche Aktivierung der Lampe oder
ein Auslaufen des Akkus zu vermeiden.
Taktisches Momentlicht
Helligkeitsstufen 1-3:
Wenn das Licht ausgeschaltet ist, halten Sie
die EIN-AUS-Taste halb gedrückt, um das Licht
kurzzeitig einzuschalten. Lassen Sie los, um es
auszuschalten.
TAC-Mode:
•
Halten Sie die EIN-/AUS-Taste halb gedrückt,
um kurzzeitig auf die Stufe „LOW“ zuzugreifen.
Lassen Sie los, um es auszuschalten.
•
Halten Sie den EIN-/AUS-Taste ganz gedrückt,
um kurzzeitig auf die TURBO-Stufe zuzugreifen.
Lassen Sie los, um es auszuschalten.
Ein-/Ausschalten
Helligkeitsstufe 1-3:
•
Wenn das Licht ausgeschaltet ist, drücken Sie die
Ein/Aus-Taste ganz durch, um es einzuschalten.
•
Wenn das Licht eingeschaltet ist, drücken Sie die
Ein/Aus-Taste ganz durch, um es auszuschalten.
Auswahl der Helligkeitsstufe oder
des Modes
Wenn die Lampe eingeschaltet ist, drehen Sie den
Smart Selector Ring am Ende der Lampe, um eine
Helligkeitsstufe/einen Mode auszuwählen.
•
Drehen Sie den Smart Selector Ring im
Uhrzeigersinn von ganz rechts nach links, um
zwischen den folgenden Helligkeitsstufen/Modi
zu wechseln: TAC: TURBO (3) - MID (2) - LOW (1)
– Sperr-Mode.
•
Durch Drehen des Smart Selector Rings
gegen den Uhrzeigersinn können diese
Helligkeitsstufen/Modi in umgekehrter
Reihenfolge durchlaufen werden.
•
Wenn Sie den Smart Selector Ring in den
Sperr-Mode drehen, sind beide Tasten gesperrt
und können nicht mehr zum Einschalten der
Taschenlampe verwendet werden.
Direkter Zugriff auf den „TURBO“-
Mode
•
Wenn das Licht aus ist, halten Sie die MODE-
Taste (STROBE READY™) halb gedrückt, um
auf TURBO zuzugreifen. Lassen Sie los, um sie
auszuschalten.
• Helligkeitsstufe 1-2: Wenn das Licht
eingeschaltet ist, halten Sie die MODE-Taste
(STROBE READY™) halb gedrückt, um auf
TURBO zuzugreifen. Loslassen, um zum
vorherigen Status zurückzukehren.
Hinweis: Die TURBO-Stufe erzeugt bei längerer
Aktivierung eine starke Hitze, und die Taschenlampe
schaltet automatisch ein paar Lumen herunter,
um eine Überhitzung zu vermeiden und die
Lebensdauer der Akkus/Batterien zu verlängern.
STROBE READY™
• Wenn das Licht aus ist, halten Sie die MODE-
Taste (STROBE READY™) ganz gedrückt, um
den STROBE-Mode aufzurufen. Lassen Sie sie
los, um sie auszuschalten.
• Helligkeitsstufe 1-3: Wenn die Lampe
eingeschaltet ist, drücken Sie die MODE-
Taste (STROBE READY™) ganz durch, um den
STROBE-Mode zu aktivieren. Durch erneutes
kurzes Drücken der MODE-Taste (STROBE
READY™) kehren Sie zum vorherigen Status
zurück oder schalten die Taschenlampe aus, um
den STROBE-Mode zu verlassen.
• Dual tail switches enable intuitive operations,
specially designed for law enforcement, hunting
and tactical applications
• 4
th
generation of the world’s rst SSR (Smart
Selector Ring) Technology for smoothly and
rapidly selecting brightness levels and modes
• Utilizes a high performance LED with a max
output of 2,100 lumens
• An optical system combined with crystal coating
and “Precision Digital Optics Technology”
(PDOT)
• Max peak beam intensity of 65,200cd and max
throw of 510 meters
• Max runtime of 70 hours
• 3 brightness levels, lockout mode and TAC
mode available
• STROBE READY™ Technology to enable a quick
access to STROBE Mode
(Patent No. ZL201320545349.4)
• Equipped with a power indicator
• Intelligent Li-ion battery charging circuit with a
USB-C port
• NITECORE 21700i Li-ion battery included
(NL2150HPi 5,000mAh)
• Highly ecient constant current circuit provides
a stable output
• Incorporated Advanced Temperature Regulation
(ATR) module (Patent No. ZL201510534543.6)
• Strike bezel uses high strength silicon nitride
ceramics to enable excellent glass breaking
performance
• Optical lenses with double-sided scratch
resistant coating
• Constructed from aero grade aluminum alloy
• HA III military grade hard-anodized nish
• Waterproof and dustproof rating in accordance
with IP68 (2 meters submersible)
• Impact resistant to 2 meters
6. Lorsque le produit est conservé dans un sac à
dos ou laissé inutilisé pendant une période pro-
longée, veuillez retirer toutes les piles pour éviter
toute activation accidentelle ou fuite de batterie.
Eclairage tactique momentané
Niveau de luminosité 1-3 : Lorsque la lumière
est éteinte, exercez une demi-pression sur le bouton
d’alimentation et maintenez-le pour allumer la
lumière momentanément. Relâchez pour l’éteindre.
Mode TAC :
• Exercez une demi-pression sur le bouton d’alimen-
tation et maintenez-le pour accéder momentané-
ment au niveau LOW. Relâchez pour l’éteindre.
• Appuyez sur le bouton d’alimentation et main-
tenez-le enfoncé pour accéder momentanément
au niveau TURBO. Relâchez pour l’éteindre.
ON / OFF
Niveau de luminosité 1-3 :
• Lorsque la lampe est éteinte, appuyez sur le
bouton d’alimentation pour l’allumer.
• Lorsque la lampe est allumée, appuyez sur le
bouton d’alimentation pour l’éteindre.
Niveau de luminosité ou sélection
du mode
Lorsque la lampe est allumée, faites pivoter la
bague de sélection intelligente à l’extrémité de
la lampe pour sélectionner un niveau / mode de
luminosité.
• Faites pivoter la bague de sélection intelligente
dans le sens des aiguilles d’une montre de la
droite vers la gauche pour parcourir les niveaux /
modes de luminosité suivants: TAC – TURBO (3)
– MID (2) – LOW (1) – Mode de verrouillage.
• Ces niveaux / modes de luminosité peuvent être
parcourus en sens inverse en faisant pivoter
l’anneau de sélection intelligent dans le sens
inverse des aiguilles d’une montre.
• Lors de la rotation de la bague de sélection
intelligente jusqu’au mode de verrouillage, les
deux boutons seront verrouillés et inutilisables
pour allumer la lampe.
Accès direct au mode TURBO
• Lorsque la lampe est éteinte, exercez une
demi-pression sur le bouton MODE (STROBE
READY)™ et maintenez-le pour accéder à
TURBO. Relâchez pour l’éteindre.
• Niveau de luminosité 1-2 : Lorsque la lampe
est allumée, exercez une demi-pression sur le
bouton MODE (STROBE READY)™ et mainte-
nez-le pour accéder à TURBO. Relâcher pour
revenir à l’état précédent.
Remarque : Le niveau TURBO produira une chaleur
massive lors d’une activation pendant de longues
périodes, et la lampe diminuera automatiquement
de quelques lumens pour éviter la surchaue et
prolonger la durée de vie de la batterie.
STROBE READY™
• Lorsque la lampe est éteinte, maintenez enfoncé
le bouton MODE (STROBE READY)™ pour accé-
der au mode STROBE. Relâchez pour l’éteindre.
• Niveau de luminosité 1-3 : Lorsque la lampe
est allumée, appuyez sur le bouton MODE
(STROBE READY)™ pour accéder au mode
STROBE. Appuyez brièvement sur le bouton
MODE (STROBE READY)™ pour revenir à l’état
précédent ou éteignez la lampe pour quitter le
mode STROBE.
Indication de puissance
• Lorsque la lampe est allumée et que la puis-
sance de la batterie est d’environ 50%, l’indica-
teur d’alimentation clignote une fois toutes les 2
secondes pour informer l’utilisateur.
• Lorsque la lampe est allumée et que la batterie
restante est presque épuisée, l’indicateur
d’alimentation clignote rapidement et en continu
pour informer l’utilisateur.
Remplacement de la batterie
La batterie doit être remplacée lorsque le
voyant d’alimentation clignote rapidement et
continuellement et que la sortie semble être faible
ou que la lampe ne répond plus en raison d’une
faible puissance.
ATR (régulation avancée de la
température)
La technologie ATR intégrée régule la puissance
de la SRT6i en fonction des conditions d’utilisation
et de l’environnement ambiant pour maintenir des
performances optimales.
Entretien
Tous les 6 mois, les letages doivent être essuyés
avec un chion propre, suivi d’une application
d’une ne couche de lubriant à base de silicium.
Avertissements
1. Veuillez recharger le produit tous les 3 mois
lorsqu’il n’est pas utilisé pendant une période
prolongée.
2. Lorsque la lampe est conservée dans le sac à dos
ou l’étui, veuillez activer le mode de verrouillage
pour éviter toute activation accidentelle.
3. Jetez l’appareil/les piles conformément aux lois
et réglementations locales applicables.
Función de carga
La SRT6i está equipada con un circuito de carga
inteligente. Como se muestra en la imagen,
después de abrir la cubierta del puerto USB,
utilice el cable USB para conectar a una fuente de
alimentación externa (por ejemplo, un adaptador
USB u otros dispositivos de carga USB) al puerto
de carga para empezar el proceso de carga.
•
Durante el proceso de carga, el indicador de
carga a un costado de la linterna parpadeará
lentamente para informar al usuario.
•
Cuando la batería esté completamente cargada,
la SRT6i detendrá el proceso de carga y el
indicador de carga se mantendrá encendido
para informar al usuario.
•
El tiempo de carga para una batería Li-ion
21700i (5,000mAh) es de aproximadamente 3
horas 15 minutos. (Crgando con un adaptador
5V/2A)
Instrucciones de operación
Instalación/remoción de baterías
Como se muestra en la imagen, después de
desenroscar la tapa trasera, inserte/remueva la
batería y enrosque la tapa trasera nuevamente.
Advertencias:
1. Asegúrese que la(s) batería(s) está(n)
insertada(s) con el polo negativo hacia la
cabeza de la linterna. El producto no funcionará
si la(s) batería(s) está(n) incorrectamente
insertada(s).
2. El producto no funcionará cuando exista alguna
situación anormal (Por ejemplo, la batería está
rota / insertada incorrectamente).
3. Por favor utilice el adaptador de baterías cuando
utilice 2 baterías CR123.
4. ¡PRECAUCIÓN! ¡Posible radiación peligrosa! ¡No
mire directamente a la luz! Puede ser peligroso
para sus ojos.
5. Cuando el nivel de batería sea bajo, por favor
deje de utilizar el producto y reemplace o
recargue la batería para evitar daños a la
misma.
6. Cuando deje el producto en una mochila o
se deje de usar por periodos prolongados de
tiempo, por favor remueva todas las baterías
para prevenir activación accidental o fugas en
las baterías.
Iluminación táctica momentanea
Nivel de intensidad 1-3: Cuando la luz está
apagada, presione ligeramente y mantenga
presionado el botón de encendido para encender la
luz momentáneamente. Suelte para apagar.
Modo TAC:
•
Presione ligeramente y mantenga presionado el
botón de encendido para acceder al nivel BAJO
momentáneamente. Suelte para apagar.
•
Presione y mantenga presionado a fondo el
botón de encendido para acceder al nivel
TURBO momentáneamente. Suelte para apagar.
Encendido / Apagado
Nivel de intensidad 1-3:
•
Cuando la luz está apagada, presione el botón
de encendido a fondo para encender.
•
Cuando la luz está encendida, presione el botón
de encendido a fondo para apagar.
Nivel de intensidad o selección de
Modos
Cuando la luz está encendida, gire el Anillo
Selector Inteligente (SSR) situado en el extremo
trasero de la linterna para seleccionar un nivel de
intensidad / modo.
•
Gire el Anillo Selector Inteligente (SSR) en
sentido de las manecillas del reloj desde
el extremo derecho hacia la izquierda para
cambiar entre los siguientes niveles de
intensidad / modos: TAC – TURBO (3) – MED
(2) – BAJO (1) – Modo de bloqueo.
•
Estos niveles de intensidad / modos pueden
cambiarse en sentido inverso rotando el Anillo
Selector Inteligente (SSR) en contra de las
manecillas del reloj.
•
Al rotar el Anillo Selector Inteligente (SSR)
al modo de bloqueo, ambos botones se
bloquearán y no estarán disponibles para
encender la linterna.
Acceso directo a TURBO
•
Cuando la luz está apagada, presione y
mantenga presionado ligeramente el botón
MODE (STROBE READY™) para acceder al
modo TURBO. Suelte para apagar.
•
Nivel de intensidad 1-2: Cuando la luz está
encendida, presione y mantenga presionado
ligeramente el botón MODE (STROBE READY™)
para acceder al modo TURBO. Suelte para
volver al estado anterior.
Nota: El nivel TURBO producirá calor excesivo
al activarlo por periodos largos, y la linterna
automáticamente bajará la intensidad algunos
lúmenes para evitar sobrecalentamiento y
prolongar la vida útil de la batería.
STROBE READY™
•
Cuando la linterna está apagada, presione y
mantenga presionado el botón MODE (STROBE
READY™) para acceder al modo ESTROBO.
Suelte para apagar.
•
Nivel de intensidad 1-3: Cuando la luz está
encendida, presione el botón MODE (STROBE
READY™) para acceder al modo ESTROBO.
Presione ligeramente el botón MODE (STROBE
READY™) nuevamente para regresar al estado
anterior, o apagando la linterna puede salir del
modo ESTROBO.
Indicador de carga
•
Cuando la linterna está encendida y el nivel
de batería es de aproximadamente el 50%, el
indicador parpadeará una vez cada 2 segundos
para informar al usuario.
•
Cuando la linterna está encendida y el nivel de
batería restante está casi agotado, el indicador
de carga parpadeará rápida y continuamente
para informar al usuario.
Sustitución de la batería
La batería debe ser reemplazada cuando
el indicador de carga parpadee rápida y
continuamente y la intensidad de la luz sea tenue
o la linterna deje de responder debido al nivel
bajo de carga.
ATR (Regulación Avanzada de
Temperatura)
La tecnología ATR integrada regula la intensidad
de la SRT6i de acuerdo a las condiciones de
trabajo y medio ambiente para mantener un
rendimiento óptimo.
Mantenimiento
Cada 6 meses se deberán limpiar las roscas con
un paño limpio, seguido a esto, debe aplicarse una
na capa de lubricante a base de silicón.
Advertencias
1. Por favor recargue el producto cada 3 meses
cuando no se utilice por periodos prolongados
de tiempo.
2. Cuando deje el producto en una mochila o la
funda, por favor seleccione el Modo de bloqueo
para prevenir activación accidental.
3. Desheche el dispositivo/baterías de acuerdo con
las leyes y normativas locales aplicables.
Leistungsanzeige – Anzeige der
Restenergie
• Wenn das Licht eingeschaltet ist und die
verbleibende Akkuleistung ca. 50 % beträgt,
blinkt die Betriebsanzeige einmal alle 2 Sek..
• Wenn das Licht eingeschaltet ist und die
verbleibende Akkuleistung fast erschöpft ist,
blinkt die Betriebsanzeige dauerhaft schnell.
Auswechseln des Akkus/der Batterie
Die Batterie/der Akku sollte ausgetauscht werden,
wenn die Betriebsanzeige dauerhaft schnell blinkt
und die Leistung schwach erscheint oder die
Taschenlampe aufgrund der geringen Leistung
nicht mehr reagiert.
ATR (Automatische Temperatur-
Regulierung)
Die automatische Temperaturregulierung
(ATR) steuert die Ausgangsleistung der SRT6i
entsprechend den Bedingungen der Umgebung,
um eine optimale Leistung zu gewährleisten.
Wartung
Alle 6 Monate sollte das Gewinde mit einem
sauberen Tuch abgewischt und anschließend mit
einer dünnen Schicht Silikonfett geschmiert werden.
Warnungen
1. Bitte laden Sie das Produkt alle 3 Monate auf,
wenn es längere Zeit nicht benutzt wird.
2. Wenn die Taschenlampe im Rucksack oder im
Holster aufbewahrt wird, wählen Sie bitte den
Sperr-Mode, um eine versehentliche Aktivierung
zu verhindern.
3. Entsorgen Sie das Gerät/die Akkus in
Übereinstimmung mit den geltenden örtlichen
Gesetzen und Vorschriften.
Entsorgung von Elektro- und
Elektronikgeräten
Die durchgestrichene Mülltonne bedeutet,
dass Sie gesetzlich verpichtet sind,
diese Geräte einer vom unsortierten
Siedlungsabfall getrennten Erfassung zuzuführen.
Die Entsorgung über die Restmülltonne oder die
gelbe Tonne ist untersagt. Enthalten die Produkte
Batterien oder Akkus, die nicht fest verbaut sind,
müssen diese vor der Entsorgung entnommen und
getrennt als Batterie entsorgt werden.
(Italiano)
Funzione di Ricarica
La SRT6i è dotata di un sistema di ricarica
intelligente. Come illustrato, dopo aver aperto il
coperchio USB, utilizzare il cavo USB per collegare
un alimentatore esterno (ad esempio un adattatore
USB o altri dispositivi di ricarica USB) alla porta di
ricarica per avviare il processo di ricarica.
•
Durante il processo di ricarica, l'indicatore di
alimentazione sul lato della torcia lampeggia
lentamente per informare l'utente.
•
Quando la batteria è completamente carica, la
SRT6i interrompe il processo di carica e l'indica-
tore di alimentazione si accende costantemente
per informare l'utente.
•
Il tempo di ricarica di una batteria agli ioni
di litio 21700i (5.000 mAh) è di circa 3 ore e
15 minuti (caricandola tramite un adattatore
5V/2A fornito separatamente).
Istruzioni per L’uso
Installazione e rimozione della batteria
Come illustrato, dopo aver svitato il tappo della
batteria, inserire/rimuovere la batteria ed avvitare
per stringere il tappo di coda.
Avvertenze:
1. Assicurarsi che le batterie siano inserite con
l'estremità positiva rivolta verso la testa. Il
prodotto non funziona se la batteria o le batterie
non sono inserite correttamente.
2. Il prodotto non funziona in presenza di una
situazione anomala (ad esempio, la batteria è
danneggiata o inserita in modo errato).
3. Utilizzare il caricatore di batterie esterno o
separato quando si utilizzano 2 batterie CR123.
4. ATTENZIONE! Possibili radiazioni pericolose!
Non guardare la luce! Può essere pericoloso per
gli occhi.
5. Quando il livello di potenza è basso, interrompe-
re l'uso del prodotto e sostituire o ricaricare la
batteria per evitare di danneggiarla.
6. Quando il prodotto viene conservato in uno
zaino o lasciato inutilizzato per un periodo pro-
lungato, si prega di rimuovere tutte le batterie
per evitare l'attivazione accidentale o la perdita
della batteria.
Illuminazione tattica momentanea
Livello di luminosità 1-3: quando la
luce è spenta, tenere premuto a metà il
pulsante di accensione per accenderla
momentaneamente. Rilasciare per spegnerla.
Modalità TAC:
•
Tenere premuto a metà il pulsante di accensione
per accedere momentaneamente al livello
LOW. Rilasciare per spegnerlo.
•
Tenere premuto per intero il pulsante di accen-
sione per accedere momentaneamente al livel-
lo TURBO. Rilasciare per spegnerlo.
Accensione e Spegnimento
Livello di luminosità 1-3:
•
Quando la luce è spenta, premere completa-
mente il pulsante di accensione per accenderla.
•
Quando la luce è accesa, premere completa-
mente il pulsante di accensione per spegnerla.
Selezione del livello di luminosità
o della modalità
Quando la luce è accesa, ruotare l'anello di
selezione intelligente all'estremità della torcia per
selezionare un livello di luminosità/modalità.
•
Ruotare il selettore intelligente in senso orario
dall'estrema destra verso sinistra per scorrere
i seguenti livelli/modalità di luminosità: TAC -
TURBO (3) - MID (2) - LOW (1) - Modalità di
blocco.
•
Questi livelli/modalità di luminosità possono
essere utilizzati in senso inverso ruotando la
ghiera Smart Selector in senso antiorario.