(English) (Deutsch)Features
Specications
Accessories
Technical Data
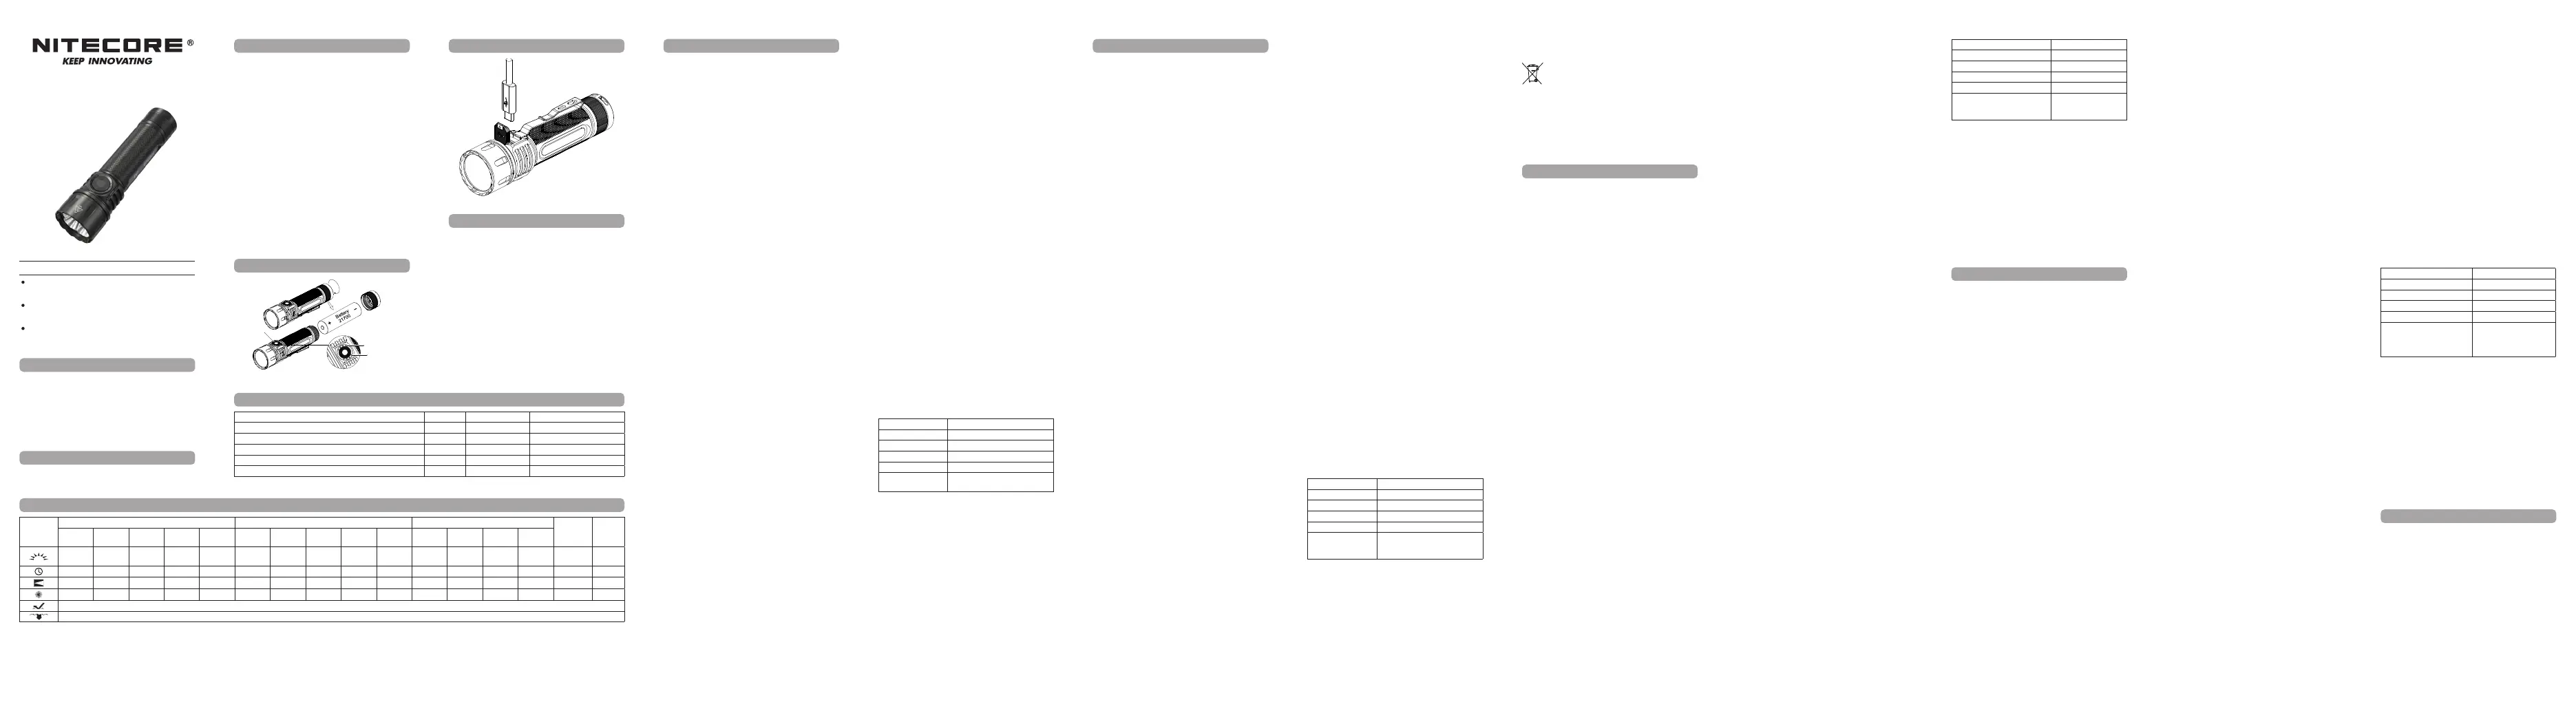
Battery Installation / Removal
Charging Function
Battery Options
(Francais)
• Utilizes 4 x 5-core M515S LEDs, providing a max
output of 6,000 lumens
• Peak beam intensity of 63,470cd and max throw of
500 meters
• A side button for easy one-handed operation
• Max runtime up to 570 hours
• Customizable beam pattern function enables users to
set dierent beam patterns to meet various lighting
needs
• Intelligent Li-ion battery charging circuit with a USB-C
charging port
• Level indicators and power indicators available for
indicating the current brightness level and remaining
battery power
• Highly ecient constant current circuit provides a
stable output
• Incorporated Advanced Temperature Regulation (ATR)
module (Patent No. ZL201510534543.6)
• Stainless steel two-way clip included
• Optical lens with double-sided scratch resistant coating
• Constructed from aero grade aluminum alloy
• HA III military grade hard-anodized nish
• Features a magnetic tail with tail stand capability
• Rating in accordance with IP68 (2 meters submersible)
• 2 meters impact resistance
Length: 130mm / 5.12"
Head Diameter: 35mm / 1.38"
Tube Diameter: 28mm / 1.10" (Clip Not Included)
34mm / 1.34" (Clip Included)
Tail Diameter: 28mm / 1.10"
Weight: 140g / 4.94 oz
(Battery and Accessories Not Included)
USB-C Charging Cable, Spare O-ring, Lanyard
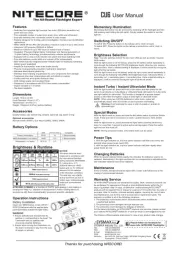
FL1
STANDARD
Mixed Light Spotlight Floodlight
ULTRALOW STROBE
LUMIN
SHIELD
®
TURBO HIGH MID LOW SEARCH TURBO HIGH MID LOW TURBO HIGH MID LOW
*6,000
Lumens
1,500
Lumens
600
Lumens
180
Lumens
30
Lumens
*3,000
Lumens
1,500
Lumens
600
Lumens
180
Lumens
30
Lumens
1,500
Lumens
600
Lumens
180
Lumens
30
Lumens
1 Lumen
*3,500
Lumens
*2h 2h 30min 5h 30min 15h 80h *2h 15min 2h 30min 5h 30min 15h 80h 2h 30min 5h 30min 15h 80h 570h -
400m 280m 170m 100m 38m 500m 350m 230m 130m 50m 200m 115m 60m 22m 5m —
40,300cd 20,270cd 7,580cd 2,510cd 370cd 63,470cd 30,746cd 13,288cd 4,570cd 636cd 10,200cd 3,240cd 950cd 130cd 6cd —
2m (Impact Resistance)
IP68, 2m (Waterproof and Submersible)
Note: The stated data is measured by using 1 x 21700 rechargeable Li-ion battery (5,500mAh), in accordance with the international ashlight testing standards ANSI/PLATO FL 1-2019, at an ambient
temperature of 26°C (79°F) from the NITECORE Lab. The data may vary in real world use due to dierent battery usage or environmental conditions.
* The LUMIN SHIELD
®
, SEARCH and STROBE are only accessible when using a 21700 rechargeable Li-ion battery with a discharge current of at least 20A.
* The data is tested without the temperature regulation.
Einsetzen / Entnehmen der Batterie/
des Akkus
Schrauben Sie – wie abgebildet - zunächst die Heckkappe
ab, legen Sie den Akku ein oder entfernen Sie ihn und
schrauben Sie die Heckkappe wieder fest. Sobald der
Akku eingesetzt ist, leuchten alle Anzeigen nacheinander
auf um die Funktion anzuzeigen.
Warnung: Achten Sie darauf, dass der Akku mit dem
Pluspol zum Lampenkopf hin, eingesetzt wird. Das Produkt
funktioniert nicht, wenn der Akku falsch eingesetzt ist.
Ladefunktion
Das Produkt ist mit einem intelligenten Ladesystem
ausgestattet. Wie abgebildet, schließen Sie das Ladekabel
an ein USB-Ladegerät (z. B. einen Adapter oder eine
Powerbank) an den USB-C-Ladeanschluss an, um den
Ladevorgang zu starten.
• Während des Ladevorgangs wechseln die grünen
LED-Anzeigen allmählich von blinkend zu dauerhaft
leuchtend, um den Ladestand anzuzeigen.
• Wenn der Akku vollständig geladen ist, wird der
Ladevorgang automatisch beendet und die LED-
Anzeige leuchten dauerhaft grün.
• Die Beleuchtungsfunktion ist während des
Ladevorgangs verfügbar, mit Ausnahme von SEARCH,
LUMIN SHIELD
®
und STROBE.
• Die Ladezeit für einen 21700 Li-Ionen-Akku
(5500mAh) beträgt ca. 2 Stunden und 50 Minuten
(aufgeladen über einen 5V/2A-Adapter).
EIN/AUS
EIN:
• Wenn das Licht ausgeschaltet ist, drücken Sie kurz
die Seitentaste, um den LOW-Mode aufzurufen. Die
entsprechende blaue LED-Anzeige leuchtet auf und
schaltet sich nach 5 Sekunden automatisch aus.
• Wenn das Licht ausgeschaltet ist, drücken Sie lange
auf die Seitentaste, um den ULTRALOW- Mode
aufzurufen.
Umschalten: Nach dem Einschalten der Lampe drücken
Sie innerhalb von 3 Sek. kurz auf die Seitentaste, um die
folgende Reihenfolge durchzulaufen: LOW – MID – HIGH
– TURBO – AUS
AUS: Wenn nach dem Einschalten der Lampe innerhalb
von 3 Sekunden keine Bedienung erfolgt, drücken Sie
kurz auf die Seitentaste, um sie auszuschalten.
BEAM vorkonfigurieren
Das Produkt verfügt über eine Funktion zur Anpassung
des BEAMs, mit dem der Benutzer das Lichtbild für
LOW/MID/HIGH/TURBO voreinstellen kann. Werkseitig
voreingestellt: Spotlight.
• Wenn LOW/MID/HIGH/TURBO eingeschaltet ist,
halten Sie die Seitentaste gedrückt, um die folgende
Reihenfolge durchzulaufen: Spotlicht – MIX – Flutlicht.
Lassen Sie die Taste los, um das Lichtbild auszuwählen
und zu speichern. Der ausgewählte BEAM wird
automatisch auf andere Helligkeitsstufen angewendet.
Bei erneuter Aktivierung greift das Produkt automatisch
auf das zuvor gespeicherte Lichtbild zu. Die anpassbare
• BEAM-Funktion ist in den Modi ULTRALOW, SEARCH,
LUMIN SHIELD
®
und STROBE nicht verfügbar.
SEARCH / LUMIN SHIELD
®
EIN: Wenn ULTRALOW/LOW/MID/HIGH/TURBO
eingeschaltet ist, drücken Sie zweimal die Seitentaste,
um auf SEARCH oder LUMIN SHIELD
®
zuzugreifen
(Standardeinstellung). Drücken Sie die Seitentaste
erneut zweimal, um zur vorherigen Helligkeitsstufe
zurückzukehren. Wenn das Licht ausgeschaltet ist,
drücken Sie zweimal die Seitentaste, um auf SEARCH
oder LUMIN SHIELD
®
(Standardeinstellung) zuzugreifen.
(
Русский
)
⚠ IMPORTANT
Thanks for purchasing NITECORE!
Please read this manual carefully before using the
product and follow the instructions.
This manual contains important safety information
and operating instructions. Please keep it for future
reference.
In case of updates, please refer to the latest version
available on the ocial website.
EX7 User Manual
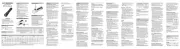
Battery Installation / Removal
As illustrated, after unscrewing the battery cap, insert or
remove the battery and screw to tighten the battery cap.
Once the battery is installed, all indicators will turn on in
sequence to indicate successful installation.
Warning: Ensure the battery is inserted with the positive
end facing towards the head. The product will not work if
the battery is incorrectly inserted.
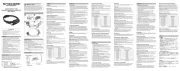
Charging Function
The product is equipped with an intelligent charging
system. As illustrated, use the charging cable to connect a
USB charging device (e.g. an adapter or a power bank) to
the USB-C charging port to begin the charging process.
• During charging, the green power indicators will
gradually transition from ashing to a steady light to
display the battery level.
• When the battery is fully charged, the product will
automatically cease the charging process and the
green power indicators will become steadily turned on
to inform the user.
• The lighting function is available during charging,
except for SEARCH, LUMIN SHIELD
®
and STROBE.
• The charging time for a 21700 Li-ion battery
(5,500mAh) is approx. 2 hours and 50 minutes
(charged via a 5V/2A adapter).
On / Off
On:
• When the light is o, short press the Side Button to
access LOW. The corresponding blue level indicator
will turn on and automatically turn o after 5 seconds.
• When the light is o, long press the Side Button to
access ULTRALOW.
Switching: After turning on the light, short press
the Side Button within 3 seconds to cycle through the
following sequence: LOW – MID – HIGH – TURBO – O.
O: After turning on the light, if there is no operation in
3 seconds, short press the Side Button to turn it o.
Customizable Beam Pattern
The product features a customizable beam pattern
function, allowing users to set the beam pattern for
LOW/MID/HIGH/TURBO. The factory default beam
pattern is Spotlight.
• When the LOW/MID/HIGH/TURBO is on, press and
hold the Side Button to cycle through the following
sequence: Spotlight – Mixed Light – Floodlight.
Release the button to select and memorize the beam
pattern. The selected beam pattern will automatically
apply to other brightness levels. When reactivated,
the product will automatically access the previous
memorized beam pattern.
• Customizable beam pattern function is unavailable in
ULTRALOW, SEARCH, LUMIN SHIELD
®
and STROBE.
SEARCH / LUMIN SHIELD
®
On:
• When the ULTRALOW/LOW/MID/HIGH/TURBO is on,
double press the Side Button to access the SEARCH or
LUMIN SHIELD
®
(Default Setting). Double press the
Side Button again to return to the previous brightness
level.
• When the light is o, double press the Side Button
to access the SEARCH or LUMIN SHIELD
®
(Default
Setting). Double press the Side Button again to access
LOW.
Setting: When the SEARCH / LUMIN SHIELD
®
is on,
press and hold the Side Button to switch between
SEARCH and LUMIN SHIELD
®
. Release the button to
select and memorize the setting.
O: When the SEARCH / LUMIN SHIELD
®
is on, short
press the Side Button to turn o the light.
STROBE
On:
• When the light is on, quickly short press the Side
Button 3 times to access STROBE. At this point,
double press the Side Button to return to the previous
brightness level.
• When the light is o, quickly short press the Side
Button 3 times to access STROBE. At this point,
double press the Side Button to access LOW.
O: When the STROBE is on, short press the Side Button
to turn o the light.
Lockout / Unlock
Lockout (Default Setting): When the light is o,
press and hold the Side Button even after accessing
ULTRALOW, until the ashlight and all indicators ash 3
times to indicate that Lockout Mode is activated. Then
release the button. In Lockout Mode, a short press of the
Side Button will trigger all indicators to ash three times,
indicating the lockout status.
Note: When the product is left unused for an extended
period, it is recommended to loosen the battery cap to
prevent accidental activation.
Unlock: In Lockout Mode, short press and then long
press the Side Button until all indicators light up in
turn and the ULTRALOW is activated. The light is now
unlocked.
Note: The product will be automatically unlocked when
charging or replacing the battery in Lockout Mode.
Power Indication
After the light is on, the green power indicators will
display the remaining battery power and automatically go
o after 5 seconds.
Low Power Indication: When the battery power
is below 5%, a power indicator will ash red, while
the output may dim or the ashlight may become
unresponsive. Please recharge or replace the battery as
soon as possible.
Status of Indicators Power Level
4 Green Constant-on 75% – 100%
3 Green Constant-on 50% – 75%
2 Green Constant-on 25% – 50%
1 Green Constant-on 5% – 25%
1 Red Flashing
<5% (Please recharge or replace
the battery as soon as possible)
ATR (Advanced Temperature Regulation)
The integrated ATR technology regulates the output of the
product according to the working condition and ambient
environment to maintain the optimal performance.
Maintenance
Every 6 months, threads should be wiped with a clean
cloth followed by a thin coating of silicon-based lubricant.
Installation/retrait de la batterie
Comme illustré, après avoir dévissé le capuchon de
la batterie, insérez ou retirez la batterie et revissez le
capuchon pour le serrer. Une fois la batterie installée,
tous les indicateurs s'allument séquentiellement pour
indiquer que l'installation a réussi.
Avertissement : assurez-vous que la batterie est
insérée avec le pôle positif vers la tête. Le produit ne
fonctionnera pas si la batterie est mal insérée.
Fonction de charge
Le produit est équipé d'un système de charge intelligent.
Comme illustré, utilisez le câble de charge pour connecter
un dispositif de charge USB (par exemple, un adaptateur
ou une batterie externe) au port de charge USB-C an de
lancer le processus de charge.
• Pendant la charge, les voyants verts passeront
progressivement d'un clignotement à une lumière xe
pour indiquer le niveau de la batterie.
• Lorsque la batterie est complètement chargée, le
produit arrête automatiquement le processus de
charge et les voyants verts s'allument en continu pour
informer l'utilisateur.
• La fonction d'éclairage est disponible pendant le
chargement, à l'exception des modes SEARCH, LUMIN
SHIELD
®
et STROBE.
• Le temps de charge d'une batterie Li-ion 21700 (5 500
mAh) est d'environ 2 heures et 50 minutes (chargée
via un adaptateur 5 V/2 A)
Marche / Arrêt
Marche :
• Lorsque la lampe est éteinte, appuyez brièvement
sur le bouton latéral pour accéder au mode FAIBLE.
L'indicateur de niveau bleu correspondant s'allume et
s'éteint automatiquement après 5 secondes.
• Lorsque la lampe est éteinte, appuyez longuement sur
le bouton latéral pour accéder au mode TRÈS FAIBLE.
Commutation : après avoir allumé la lampe, appuyez
brièvement sur le bouton latéral dans les 3 secondes
pour passer par la séquence suivante : FAIBLE – MOYEN
– FORT – TURBO – Éteint.
Éteint : après avoir allumé la lampe, si aucune opération
n'est eectuée dans les 3 secondes, appuyez brièvement
sur le bouton latéral pour l'éteindre.
Faisceau personnalisable
Le produit dispose d'une fonction de faisceau
personnalisable, permettant aux utilisateurs de régler le
faisceau sur FAIBLE/MOYEN/ÉLEVÉ/TURBO. Le faisceau
par défaut est le faisceau spot.
• Lorsque le mode FAIBLE/MOYEN/ÉLEVÉ/TURBO est
activé, appuyez sur le bouton latéral et maintenez-le
enfoncé pour passer par la séquence suivante : faisceau
spot – lumière mixte – faisceau large. Relâchez le
bouton pour sélectionner et mémoriser le faisceau. Le
faisceau sélectionné s'appliquera automatiquement aux
Warranty Details
All NITECORE
®
products are warranted for quality.
Any DOA / defective product can be exchanged for
a replacement through a local distributor/dealer
within 15 days of purchase. After that, all defective /
malfunctioning NITECORE
®
products can be repaired free
of charge within 60 months from the date of purchase.
Beyond 60 months, a limited warranty applies, covering
the cost of labor and maintenance, but not the cost of
accessories or replacement parts.
The warranty will be nullied if
1. the product(s) is/are broken down, reconstructed and/or
modied by unauthorized parties;
2. the product(s) is/are damaged due to improper use (e.g.
reversed polarity installation);
For the latest information on NITECORE
®
products and
services, please contact a local NITECORE
®
distributor or
send an email to service@nitecore.com.
Установка / Извлечение аккумулятора
Открутите крышку аккумулятора, после чего вставьте
или извлеките аккумулятор, как это показано на
иллюстрации, и затем закрутите заднюю крышку
обратно. После установки все индикаторы по очереди
загорятся, подтверждая успешное подключение.
Меры предосторожности: Убедитесь, что
аккумулятор установлен положительным полюсом
к головной части фонаря. Устройство не будет
работать, если аккумулятор установлен неправильно.
Зарядка
Устройство оснащено интеллектуальной системой
зарядки. Для начала зарядки выполните следующее:
подключите USB-кабель к внешнему источнику
питания (например, адаптеру, пауэрбанку или другому
устройству, поддерживающему зарядку по USB) и
разъёму USB-C на фонаре. См. иллюстрацию ниже.
• Во время зарядки зелёные индикаторы питания
постепенно переходят от мигания к постоянному
свечению, показывая уровень заряда аккумулятора.
• По завершении зарядки аккумулятора устройство
автоматически прекращает подачу тока, а зелёные
индикаторы питания начинают постоянно светиться,
сообщая таким образом о полной зарядке.
• В процессе зарядки доступны все режимы, кроме
SEARCH, LUMIN SHIELD
®
и STROBE.
• Время зарядки литий-ионного аккумулятора 21700
(5 500 мА·ч) составляет приблизительно 2 часа 50
минут (при использовании адаптера 5 В/2 А).
Включение / Выключение
Включение:
• В выключенном состоянии кратковременное
нажатие на боковую кнопку активирует устройство
на НИЗКОМ уровне яркости. Соответствующий
синий индикатор уровня загорается и
автоматически гаснет через 5 секунд.
• В выключенном состоянии длительное нажатие
на боковую кнопку активирует устройство на
СВЕРХНИЗКОМ уровне яркости.
Переключение между режимами: После активации
фонаря кратковременно нажимайте на боковую кнопку
Type Nominal Voltage Compatibility
NITECORE NL2155HP Rechargeable Li-ion Battery (5,500mAh)
21700 3.6V Y (Recommended)
21700 Rechargeable Li-ion Battery (Discharge Current ≥ 20A)
21700 3.6V/3.7V Y (Compatible)
21700 Rechargeable Li-ion Battery (Discharge Current < 20A)
21700 3.6V/3.7V Y (Not Recommended)
Primary Lithium Battery
CR123 3.6V N (Incompatible)
Rechargeable Li-ion Battery
RCR123 3.6V/3.7V N (Incompatible)
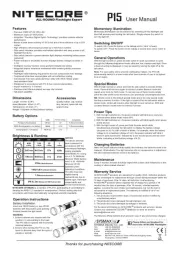
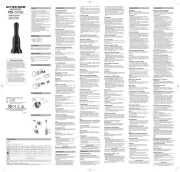
Side Button
Power Indicators
Level Indicators
Drücken Sie die Seitentaste erneut zweimal, um auf LOW
zuzugreifen.
Einstellungen: Wenn SEARCH / LUMIN SHIELD
®
eingeschaltet ist, halten Sie die Seitentaste gedrückt,
um zwischen SEARCH und LUMIN SHIELD
®
zu wechseln.
Lassen Sie die Taste los, um die Einstellung auszuwählen
und zu speichern.
AUS: Wenn SEARCH / LUMIN SHIELD
®
eingeschaltet
ist, drücken Sie kurz die Seitentaste, um die Lampe
auszuschalten.
STROBE
EIN:
• Wenn die Lampe eingeschaltet ist, drücken Sie schnell
dreimal kurz die Seitentaste, um STROBE aufzurufen.
Drücken Sie nun zweimal die Seitentaste, um zur
vorherigen Helligkeitsstufe zurückzukehren.
• Wenn die Lampe ausgeschaltet ist, drücken Sie
dreimal kurz auf die Seitentaste, um STROBE
aufzurufen. Drücken Sie nun zweimal auf die
Seitentaste, um den LOW-Mode aufzurufen.
AUS: Wenn der STROBE-Mode aktiviert ist, drücken Sie
kurz auf die Seitentaste, um die Lampe auszuschalten.
Sperren/Entsperren
Sperren (Standardeinstellung): Wenn das Licht
ausgeschaltet ist, halten Sie die Seitentaste auch
nach dem Aufrufen von ULTRALOW gedrückt, bis die
Taschenlampe und alle Anzeigen dreimal blinken, um
anzuzeigen, dass der Sperr-Mode aktiviert ist. Lassen
Sie dann die Taste los. Im Sperr-Mode führt ein kurzes
Drücken der Seitentaste dazu, dass alle Anzeigen dreimal
blinken, um den Sperrstatus anzuzeigen.
Entsperren: Im Sperr-Mode drücken Sie erst kurz
und dann lange auf die Seitentaste, bis alle Anzeigen
nacheinander aueuchten und ULTRALOW aktiviert ist.
Die Lampe ist nun entsperrt.
Hinweis: Das Produkt wird automatisch entsperrt,
wenn es aufgeladen wird oder der Akku im Sperr-Mode
ausgetauscht wird.
Restenergie-Anzeige
Nachdem das Licht eingeschaltet wurde, zeigen die
grünen LEDs die verbleibende Energie an und erlöschen
nach 5 Sekunden automatisch.
Anzeige für niedrigen Ladezustand: Wenn die
Batterieleistung unter 5% liegt, blinkt eine Anzeige rot,
während die Leistung möglicherweise nachlässt oder die
Taschenlampe nicht mehr reagiert. Bitte laden Sie den
Akku so schnell wie möglich auf oder ersetzen Sie ihn.
Status der Anzeige Energie-Level
4 grün konstant an 75% – 100%
3 grün konstant an 50% – 75%
2 grün konstant an 25% – 50%
1 grün konstant an 5% – 25%
1 rot blinkend
<5% (Bitte laden Sie den Akku
so schnell wie möglich auf oder
ersetzen Sie ihn.)
ATR (Advanced Temperature Regulation)
Die integrierte ATR-Technologie reguliert die Leistung des
Produkts entsprechend den Arbeitsbedingungen und der
Umgebung, um eine optimale Leistung zu gewährleisten.
Wartung
Alle 6 Monate sollten die Gewinde mit einem sauberen
Tuch abgewischt und anschließend mit einer dünnen
Schicht Silikon-Schmiermittel behandelt werden.
Entsorgung von Elektro- und
Elektronikgeräten
Die durchgestrichene Mülltonne bedeutet, dass Sie
gesetzlich verpichtet sind, diese Geräte einer vom
unsortierten Siedlungsabfall getrennten Erfassung
zuzuführen. Die Entsorgung über die Restmülltonne oder
die gelbe Tonne ist untersagt. Enthalten die Produkte
Batterien oder Akkus, die nicht fest verbaut sind, müssen
diese vor der Entsorgung entnommen und getrennt als
Batterie entsorgt werden.
autres niveaux de luminosité. Lorsqu'il est réactivé, le
produit accède automatiquement au faisceau mémorisé
précédemment.
• La fonction de faisceau personnalisable n'est pas
disponible en mode ULTRALOW, SEARCH, LUMIN
SHIELD
®
et STROBE.
RECHERCHE / LUMIN SHIELD
®
Activé :
• Lorsque les modes ULTRALOW/LOW/MID/HIGH/
TURBO sont activés, appuyez deux fois sur le bouton
latéral pour accéder à la fonction RECHERCHE ou
LUMIN SHIELD
®
(réglage par défaut). Appuyez à
nouveau deux fois sur le bouton latéral pour revenir
au niveau de luminosité précédent.
• Lorsque la lampe est éteinte, appuyez deux fois sur le
bouton latéral pour accéder à la fonction RECHERCHE
ou LUMIN SHIELD
®
(réglage par défaut). Appuyez à
nouveau deux fois sur le bouton latéral pour accéder
au mode FAIBLE.
Réglage : lorsque la fonction RECHERCHE / LUMIN
SHIELD
®
est activée, maintenez le bouton latéral enfoncé
pour basculer entre les modes RECHERCHE et LUMIN
SHIELD
®
. Relâchez le bouton pour sélectionner et
mémoriser le réglage.
Éteint : lorsque la fonction SEARCH / LUMIN SHIELD
®
est activée, appuyez brièvement sur le bouton latéral
pour éteindre la lampe.
STROBE
Allumé :
• Lorsque la lampe est allumée, appuyez rapidement
trois fois sur le bouton latéral pour accéder au mode
STROBE. À ce stade, appuyez deux fois sur le bouton
latéral pour revenir au niveau de luminosité précédent.
• Lorsque la lampe est éteinte, appuyez rapidement
trois fois sur le bouton latéral pour accéder au mode
STROBE. À ce stade, appuyez deux fois sur le bouton
latéral pour accéder au mode LOW.
Éteint : lorsque le mode STROBE est activé, appuyez
brièvement sur le bouton latéral pour éteindre la lampe.
Verrouillage / Déverrouillage
Verrouillage (réglage par défaut) : lorsque la lampe
est éteinte, maintenez le bouton latéral enfoncé même
après avoir accédé au mode ULTRALOW, jusqu'à ce
que la lampe torche et tous les indicateurs clignotent
trois fois pour indiquer que le mode de verrouillage est
activé. Relâchez ensuite le bouton. En mode verrouillage,
une brève pression sur le bouton latéral déclenche le
clignotement de tous les indicateurs trois fois, indiquant
l'état de verrouillage.
Déverrouillage : en mode verrouillage, appuyez
brièvement puis longuement sur le bouton latéral jusqu'à
ce que tous les indicateurs s'allument tour à tour et que
le mode ULTRALOW soit activé. La lampe est désormais
déverrouillée.
Remarque : le produit se déverrouille automatiquement
lors du chargement ou du remplacement de la batterie en
mode verrouillage.
Indicateur d'alimentation
Une fois la lampe allumée, les indicateurs d'alimentation
verts achent la charge restante de la batterie et
s'éteignent automatiquement après 5 secondes.
Indicateur de faible charge : lorsque la charge de la
batterie est inférieure à 5 %, un indicateur d'alimentation
clignote en rouge, tandis que la puissance d'éclairage
peut diminuer ou que la lampe torche peut ne plus
répondre. Veuillez recharger ou remplacer la batterie dès
que possible.
État des indicateurs Niveau d'alimentation
4 verts allumés en permanence 75% – 100%
3 verts allumés en permanence 50% – 75%
2 verts allumés en permanence 25% – 50%
1 vert allumé en permanence 5% – 25%
1 rouge clignotant
<5% (veuillez recharger
ou remplacer la batterie
dès que possible)
ATR (régulation avancée de la
température)
La technologie ATR intégrée régule la puissance du produit
en fonction des conditions de travail et de l'environnement
ambiant an de maintenir des performances optimales.
Entretien
Tous les 6 mois, essuyez les letages à l'aide d'un chion
propre, puis appliquez une ne couche de lubriant à
base de silicone.
в течение 3 секунд для циклического переключения
режимов в следующем порядке: НИЗКИЙ → СРЕДНИЙ
→ ВЫСОКИЙ → ТУРБО → Выключение.
Выключение: При отсутствии команд в течение 3
секунд после активации фонаря кратковременное
нажатие на боковую кнопку выключает фонарь.
Настройка светового пучка
Фонарь оснащён функцией настройки светового
пучка, позволяющей пользователю выбирать форму
пучка для режимов НИЗКИЙ / СРЕДНИЙ / ВЫСОКИЙ
/ ТУРБО. По умолчанию форма светового пучка —
Точечный свет.
• В режимах НИЗКИЙ / СРЕДНИЙ / ВЫСОКИЙ /
ТУРБО зажмите и удерживайте боковую кнопку
для циклического переключения между формами
пучка: Точечный свет → Смешанный свет →
Заливающий свет. Отпустите кнопку, чтобы
остановить свой выбор и установить форму пучка.
Выбранная форма автоматически применяется ко
всем уровням яркости. При повторной активации
фонарь автоматически устанавливает выбранную в
последний раз форму светового пучка.
• Функция выбора формы пучка недоступна для
режимов СВЕРХНИЗКОГО уровня яркости, а также
SEARCH (ПОИСК), LUMIN SHIELD
®
(СВЕТОВОЙ
ЩИТ) и STROBE (СТРОБОСКОП).
Режимы SEARCH / LUMIN SHIELD
®
Включение:
• Во время работы на СВЕРХНИЗКОМ, НИЗКОМ,
СРЕДНЕМ и ВЫСОКОМ уровнях яркости, а также
в режиме работы ТУРБО двойное нажатие на
боковую кнопку переводит устройство в режим
SEARCH или LUMIN SHIELD
®
(по умолчанию).
Повторное двойное нажатие возвращает
устройство в прежний режим работы.
• В выключенном состоянии двойное нажатие
на боковую кнопку активирует режим SEARCH
или LUMIN SHIELD
®
(по умолчанию). Повторное
двойное нажатие переводит устройство в режим
работы на НИЗКОМ уровне яркости.
Настройка: Во время работы в режиме SEARCH /
LUMIN SHIELD
®
, удерживайте боковую кнопку для
переключения между ними. Отпустите кнопку, чтобы
выбрать нужный режим и установить его.
Выключение: Во время работы в режиме SEARCH
/ LUMIN SHIELD
®
, кратковременное нажатие на
боковую кнопку выключает фонарь.
Режим STROBE (СТРОБОСКОП)
Включение:
• В активированном состоянии быстро нажмите
на боковую кнопку 3 раза, чтобы перевести
устройство в режим СТРОБОСКОПА. При двойном
нажатии в этом режиме фонарь вернется в
прежний режим работы.
• В выключенном состоянии быстро нажмите
на боковую кнопку 3 раза, чтобы перевести
устройство в режим СТРОБОСКОПА. При двойном
нажатии в этом режиме фонарь будет переведён
на НИЗКИЙ уровень яркости.
Выключение: Во время работы фонаря в режиме
СТРОБОСКОПА кратковременное нажатие на боковую
кнопку выключает устройство.
Блокировка / Разблокировка
Блокировка (по умолчанию): В выключенном
состоянии зажмите боковую кнопку и продолжайте её
удерживать даже после перехода на СВЕРХНИЗКИЙ
уровень яркости. Когда фонарь и все индикаторы
(日本語)
電池の入れ方 / 外し方
図のように、テールキャップを外して電池を入れ / 外し
ます。その後テールキャップをしっかりと締めて下さい。
正しく電池を入れると、インジケーターが順番に点灯し
ます。
注意 : 電池はプラス極がヘッド側に来るよう正しく入れ
てください。逆向きに入れると作動しません。
充電機能
製品は充電機能を内蔵しています。図のように、充電ケ
ーブルを使って USB-C ポートから外部電源(アダプター
やモバイルバッテリーなど)に接続すると、自動的に充
電が始まります。
•
充電中は緑色のパワーインジケーターが充電容量に合
わせて点滅から点灯へゆっくりと変わっていきます。
мигнут 3 раза, устройство перейдет в режим
блокировки. Отпустите кнопку. В режиме блокировки
после кратковременного нажатия на боковую кнопку
все индикаторы трижды мигнут, сообщая таким
образом, что фонарь заблокирован.
Разблокировка: В режиме блокировки
кратковременно нажмите на боковую кнопку, после
чего зажмите и удерживайте её до тех пор, пока все
индикаторы по очереди не загорятся и фонарь не
перейдёт в режим СВЕРХНИЗКОГО уровня яркости,
что будет означать выход из режима блокировки.
Примечание: В режиме блокировки фонарь
автоматически разблокируется при зарядке или
замене аккумулятора.
Сообщение уровня заряда
После включения фонаря зелёные индикаторы питания
загораются, сообщая оставшийся заряд аккумулятора, и
автоматически гаснут по прошествии 5 секунд.
Сообщение низкого уровня заряда: Когда заряд
аккумулятора падает ниже 5%, индикатор питания
начинает мигать красным. При этом световой
поток может стать тусклым, а фонарь — перестать
реагировать на команды. В этом случае рекомендуется
как можно скорее подключить устройство к источнику
питания или заменить аккумулятор.
Состояние индикаторов Уровень заряда
4 зелёных постоянно горят 75% – 100%
3 зелёных постоянно горят 50% – 75%
2 зелёных постоянно горят 25% – 50%
1 зелёный постоянно горит 5% – 25%
1 красный мигает
<5% (Как можно скорее
подключите устройство
к источнику питания или
замените аккумулятор)
ATR (расширенный температурный
контроль)
Встроенная технология ATR регулирует световой
поток в соответствии с условиями работы, а также
условиями окружающей среды для поддержания
оптимальной производительности.
Обслуживание
Каждые 6 месяцев резьбу следует протирать чистой
тканью, а затем наносить тонкий слой силиконовой
смазки.