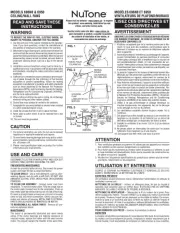
NuTone 769RFT Manual


Læs gratis den danske manual til NuTone 769RFT (6 sider) i kategorien Ventilator. Denne vejledning er vurderet som hjælpsom af 3 personer og har en gennemsnitlig bedømmelse på 4.3 stjerner ud af 2 anmeldelser. Har du et spørgsmål om NuTone 769RFT, eller vil du spørge andre brugere om produktet?

Side 1/6
Bathroom Exhaust Fan/Fluorescent Light Combination
MODEL: 769RFT
Ventilador de Escape/Luz fluorescente del baño
MODELO: 769RFT
FOR BEST RESULTS
When installing the Exhaust Fan/Light in a new construction
site, install housing during the rough-in construction of the
building. The blower unit and grille should be installed after the
finished ceiling is in place.
see instructions page 4.
IMPORTANT SAFETY INSTRUCTIONS
WARNING: TO REDUCE THE RISK OF FIRE.
ELECTRIC SHOCK, OR INJURY TO PERSONS,
OBSERVE THE FOLLOWING:
A. Use this unit only in the manner intended by the
manufacturer. If you have questions, contact the
manufacturer.
B. Before servicing or cleaning unit, switch power off
at service panel and lock service panel to prevent
power from being switched on accidentally.
When the service disconnecting means cannot be
locked, securely fasten a prominent warning device,
such as a tag, to the service panel.
CAUTION:
For general ventilating use only. Do not use to
exhaust hazardous or explosive materials and
vapors.
INSTALLATION INSTRUCTIONS
WARNING: TO REDUCE THE RISK OF FIRE,
ELECTRIC SHOCK, OR INJURY TO PERSONS,
OBSERVE THE FOLLOWING:
A. Installation work and electrical wiring must be
done by qualified person(s) in accordance with all
applicable codes and standards, including fire-
rated construction.
B. Sufficient air is needed for proper combustion and
exhausting of gases through the flue (chimney) of
fuel burning equipment to prevent back drafting.
Follow the heating equipment manufacturer's
guideline and safety standards such as those
published by the National Fire Protection
Association (NFPA), and the American Society for
Heating, Refrigeration and Air Conditioning
Engineers (ASHRAE), and the local code
authorities.
C. When cutting or drilling into wall or ceiling, do not
damage electrical wiring and other hidden utilities.
D. Ducted fans must always be vented to the
outdoors.
E. If this unit is to be installed over a tub or shower, it
must be marked as appropriate for the application.
F. NEVER place a switch where it can be reached
from a tub or shower.
WARNING: To reduce the risk of fire or electric
shock, do not use this fan with any solid-state
speed control device.
Not for use in kitchens.
For installation in sloped ceilings up to 12/12 pitch.
Ductwork must point up.
SUITABLE FOR USE OVER A TUB OR
SHOWER WHEN INSTALLED IN A G.F.C.I.
PROTECTED BRANCH CIRCUIT.
DO NOT INSTALL IN A CEILING INSULATED
TO A VALUE GREATER THAN R-40.
INSTALLATION INSTRUCTIONS
READ & SAVE THESE
INSTRUCTIONS!
INSTRUCCIONES DE INSTALACIÓN
¡LEA Y GUARDE ESTAS
INSTRUCCIONES!
PARA MEJORES RESULTADOS
Cuando es instalando el Ventilador Extractor/Luz en un sitio de
construccn nuevo, instale la cubierta durante la instalacn oculta del
inmueble. La unidad del ventilador y la rejilla deben ser instalados desps
de que el cielorraso sea acabado.
Para instalar el Ventilador Extractor/Luz en un inmueble acabado, vea las
instrucciones en la gina 4.
INSTRUCCIONES DE SEGURIDAD
IMPORTANTES
ADVERTENCIA: PARA REDUCIR EL RIESGO DE
INCENDIO, DESCARGA ELÉCTRICA, O HERIDAS A
PERSONAS, OBSERVE LO SIGUIENTE:
A. Use esta unidad como lo indica el fabricante. Si tiene
preguntas, contacte al fabricante.
B. Antes de hacer mantenimiento o de limpiar la
unidad, apague el interruptor en el panel de servicio
para prevenir que el interruptor se prenda por
casualidad. Cuando los medios para desconectar el
servicio no se puedan asegurar, sujete un emblema
de advertencia prominente, tal como una etiqueta, al
panel de servicio.
ATENCIÓN:
Para uso de ventilación general solamente. No usar
para extraer materiales o vapores peligrosos o
explosivos.
INSTRUCCIONES DE INSTALACIÓN
ADVERTENCIA: RARA REDUCIR EL RIESGO DE
INCENDIO, DESCARGA ELÉCTRICA, O HERIDAS A
PERSONAS, OBSERVE LO SIGUIENTE:
A. El trabajo de instalación e instalación eléctrica debe
ser hecho por persona(s) calificada(s) de acuerdo
con todos los códigos y normas aplicables,
incluyendo la construcción del índice de fuego.
B. Suficiente aire es necesario para la debida
combustión y extraccn de gases por el conducto
(chimenea) del equipo que quema combustible para
prevenir que se devuelva la corriente de aire. Siga la
ga y los digos de seguridad del fabricante de
equipos de calefaccn tales como las publicadas
por la Asociacn Nacional de Protección de Fuego
(NFPA), y la Asociación Americana para Ingenieros
de Calefacción, Refrigeración y Aire Acondicionado
(ASHRAE), y las autoridades locales.
C. Cuando este cortando o taladrando la pared o el
techo, no le haga daño a los cables eléctricos o a
otras utilidades escondidas.
D. Los ventiladores de conducto siempre deben emitir
hacia afuera.
E. Si esta unidad se va a instalar sobre una tina o una
ducha, debe ser marcada como apropiada para esta
aplicación.
F. NUNCA ponga un interruptor donde se pueda
alcanzar desde una tina o una ducha.
ADVERTENCIA: Para reducir el riesgo de
incendio o descarga ectrica, no use este
ventilador con ningún dispositivo de control de
velocidad de estado sólido.
No es para uso en la cocina.
Es para instalación en cielorrasos en pendiente de
hasta 12/12 de inclinación.
La red de conductos debe apuntar para arriba.
APROPIADO PARA USAR SOBRE UNA TINA O
DUCHA CUANDO SE INSTALA EN UNA RAMA
DE CIRCUITO PROTEGIDO DE A.G.F.C.I.
NO INSTALE EN UN CIELORRASO AISLADO
CON UN VALOR MAYOR A R-40.
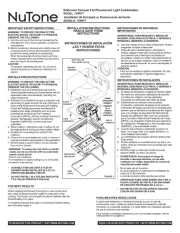
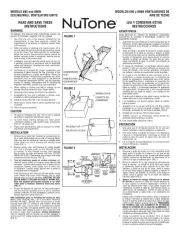
FIGURE 1
D
UCT COLLAR
COLLAR DEL DUCTO
HOUSING
CUBIERTA
SLOTS
RANURAS
TABS
LENGUETAS
GRILLE
PARRILLA
REFLECTOR
REFLECTOR
LENS
LENTE
POWER
UNIT/BLOWER
ASSEMBLY
ENSAMBLE
DE LA
UNIDADE
POTENCIA/
VENTILADOR
TO REGISTER THIS PRODUCT, VISIT WWW.NUTONE.COM
PARA COLOCAR ESTE PRODUCTO, VISITE WWW.NUTONE.COM
PLANNING DUCTWORK AND WIRING
DUCTWORK
1. Use 4" round duct.
2. Plan to run duct from the fan's discharge opening
to the outside. For best fan performance, make
duct run as short as possible and use minimum
number of elbows.
3. Use optional N one ducting accessories asuT
needed (refer to N one's catalog for a completeuT
listing of optional accessories).
WIRING
Plan to run 120vAC house wiring (with ground) from
a power source, through a standard wall switch or an
optional NuTone double FAN/LIGHT switch, to the
junction box in the Fan-Light's housing.
INSTALLATION IN A NEW
CONSTRUCTION SITE
PREPARATION
1. Unplug the power unit.
2. Remove power unit/blowerRefer to Figure 1.
assembly from the housing. Remove screw and
pull power unit assembly tabs out of slots in
housing. Set unit aside until needed.
3. Remove one of the wiring knockouts from housing.
MOUNTING THE HOUSING
USING SIDE MOUNTING TABS
Refer to Figure 2.
1. Locate housing next to ceiling joist.
2. Use wood screws (not provided) to loosely attach
housing to ceiling joist through keyhole slots in
mounting tabs.
3. Adjust housing so that it will be flush with the
finished ceiling.
4. When housing is properly adjusted, tighten screws
in slots.
USING HANGER BARS
(Hanger bars sold separately, order model HB4)
Refer to Figure 3.
1. Insert hanger bars in slots provided in housing.
2. Locate fan housing between ceiling joists so that
bottom of fan housing is even with the planned
finished ceiling.
3. Use screws or nails to secure mounting brackets
to ceiling joists.
INSTALLING DUCTWORK
1. Place duct collar over flangesRefer to Figure 1.
at discharge opening of fan. Secure collar by
snapping tabs into slots in flanges.
2. Run 4" round duct from outsideRefer to Figure 4.
to fan's discharge opening.
3. Connect duct to duct collar.
F
IGURE 2
FIGURE 3
FIGURE 4
WIRING KNOCKOUTS
P
LACAS TEMPORALES
DEL ALAMBRADO
MOUNTING TABS
LENGUETAS DEL
MONTAJE
ROOF CAP
TAPAS DE RAIZ
90° ELBOW
CODO DE 90 GRADOS
4" DIAMETER
DUCT
CONDUCTOR
DE DIAMETRO
DE 10,25 CM
(4 PULGADAS)
HANGER BARS
(SOLD SEPARATELY)
BARRAS
COLGANTES
(SE VENDEN POR
SEPARADO)
PLANEANDO LA RED DE CONDUCTOS Y
EL ALAMBRADO
RED DE CONDUCTOS
1. Use un conducto redondo de 10 centímetros
(4 pulgadas).
2. Planee poner un conducto desde la apertura de
descarga del ventilador hacia afuera. Para que el
ventilador funcione a su mejor rendimiento, haga
que el conducto sea lo mas corto posible y use el
menor número de codos.
3. Use los accesorios de conductos opcionales de
NuTone como sea necesario (vea al catálogo de
NuTone para una lista completa de los accesorios
opcionales).
ALAMBRADO
Planee poner un alambrado de casa 120vAC
(conectados a tierra) de una fuente de energía, por
medio de un interruptor de pared estándar o por un
interruptor doble VENTILADOR/LUZ opcional de
NuTone, a la caja de empalmes en la cubierta del
Ventilador-Luz.
INSTALACIÓN EN UN SITIO DE
CONSTRUCCIÓN NUEVO
PREPARACIÓN
1. Desconecte la unidad de poder.
2. Remueva la unidad deVea la figura 1.
poder/conjunto del ventilador de la cubierta. Quite
el tornillo y saque las lengüetas del conjunto de la
unidad de poder fuera de las ranuras de la
cubierta. Ponga la unidad a un lado hasta que la
necesite.
3. Remueva uno de troqueles del alambrado de la
cubierta.
MONTAJE DEL ALMACENAJE
USANDO LENGÜETAS DE MONTAJE DEL LADO
Vea la figura 2.
1. Localice la cubierta al lado de la viga del
cielorraso.
2. Use dos tornillos para madera (no son
suministrados) para ligar ligeramente la cubierta a
la viga del cielorraso por medio de la ranura de
bocallave en las lengüetas de soporte.
3. Ajuste la cubierta para que esté enrasado con el
cielorraso acabado.
4. Cuando la cubierta esté ajustada
apropiadamente, apriete los tornillos en las
ranuras.
USANDO LAS BARRAS PARA COLGAR
(Las barras para colgar se venden por separado,
ordene el modelo HB4)
Vea la figura 3.
1. Introduzca las barras para colgar en las ranuras
suministradas en la cubierta.
2. Ponga el almacenaje del ventilador entre las
vigas del cielorraso de tal forma que la parte
inferior de la cubierta del ventilador quede
uniforme con el cielorraso acabado planeado.
3. Use tornillos o clavos para fijar los soportes del
montaje a las vigas del cielorraso.
INSTALANDO RED DE CONDUCTOS
1. Coloque el collar del conductoVea la figura 1.
sobre las bridas en la apertura de descargue del
ventilador. Fije el collar ajustando las lengüetas
en las ranuras de las bridas.
2. Ponga un conducto redondo deVea la figura 4.
10 centímetros (4 pulgadas) desde afuera hasta
la apertura de descargue del ventilador.
3. Conecte el conducto al collar del conducto.


Produkt Specifikationer

Mærke: NuTone
Kategori: Ventilator
Model: 769RFT

Har du brug for hjælp?

Hvis du har brug for hjælp til NuTone 769RFT stil et spørgsmål nedenfor, og andre brugere vil svare dig