Panduit PRD10 Manual


Læs gratis den danske manual til Panduit PRD10 (4 sider) i kategorien Ikke kategoriseret. Denne vejledning er vurderet som hjælpsom af 12 personer og har en gennemsnitlig bedømmelse på 4.7 stjerner ud af 6.5 anmeldelser. Har du et spørgsmål om Panduit PRD10, eller vil du spørge andre brugere om produktet?

Side 1/4
INSTALLATION INSTRUCTIONS CM293K
© Panduit Corp. 2010
FOR TECHNICAL SUPPORT www.panduit.com/resources/install_maintain.asp
DUAL HINGED SINGLE HINGED
Single Sided Dual Sided DOORS DOORS
PRV15 PRVF15 PRD15
PRV12 PRVF12 PRD12 PRSHD12
PRV10 PRVF10 PRD10
PRV8 PRVF8 PRD8 PRSHD8
PRV6 PRVF6 PRD6 PRSHD6
All PatchRunner Managers and Dual Hinged Doors are available in 96" tall versions
6 inch and 12 inch wide PatchRunner Managers and Dual Hinged Doors are also available in
(PRV**96, PRVF**96, and PRD**96) **= 6,8,10,12,or 15 inch wide
VERTICAL CABLE MANAGEMENT
79" tall versions (PRV679, PRVF679, PRD679, PRV1279, PRVF1279, PRV1279)
Recommended bolt placement for mounting
manager to rack channel.
Middle Location
Bolt
(For Front Only Manager
& Front & Rear Manager)
Top Location
Bolt
(For Front Only & Front & Rear
Manager)
Bottom Location
Bolt and Spacer
(For Front Only Manager)
Bolt
(For Front & Rear Manager)
(1) P R ATCH UNNER Vertical Cable Manager
(6) 1/2-13 Hex Nuts
(6) 1/2-13x2.0” Bolts
(12) Washers for 1/2-13 bolts
(4) Spools
(2) .91 long 1/2-13 Bolt Spacers
* Spools sold separately for PRV6 & PRVF6
Page 1 of 4
P R ATCH UNNER Vertical Cable Manager
LOCATION GUIDE - STANDARD EIA RACK
CONTENTS
After the first rack is mounted to the floor with the
appropriate hardware, Use Three 1/2-13x2.0” bolts
(supplied with the vertical cable manager panels) to
fasten the PATCHRUNNER Vertical Cable Manager
to the rack. Next, mount the second rack to the
other side of the PATCHRUNNER Vertical Cable
Manager using the remaining 1/2-13x2.0” bolts. Then
mount the second rack to the floor using the appropriate
hardware.
Center Mounting of a P RATCH UNNER on Standard EIA Rack
Spacer
Note:
Tighten bolts to 120 lbs.-in.
Signifies Bottom
6” Vertical Manager dimension shown in brackets [...]
8” Vertical Manager dimensions shown in parenthesis (...)
10” Vertical Manager dimensions shown in asterisk *...*
15 “Vertical Manager dimensions shown in brackets {...}
PART NUMBERS
INSTALLATION INSTRUCTIONS CM293K
FOR TECHNICAL SUPPORT www.panduit.com/resources/install_maintain.asp
Page 2 of 4
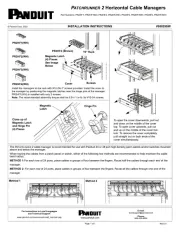
INSTALLATION OF SPOOLS
Step 1
Align buttons with mounting leg slot
Mounting Face
Step 2
Push buttons through backbone until
mounting face is flush with backbone.
Step 3
Apply downward pressure until plastic
spool clicks into place.
Removal/Replacement
Step 4
Pull back on angled flange while apply-
ing upward pressure
Step 5
Repeat steps 1-3
Angled Flange
Mounting Leg Slots
DUAL HINGED DOOR BRACKET INSTALLATION
Attach cross braces with #10-32 screws to door bracket as shown in
picture below. Align angled notch on cross brace with angled notch
on door bracket when tightening screws.
(4) Screws
Cross Brace
Door Bracket Angled Notches
FINGER REMOVAL
Apply inward pressure at finger ends to remove finger
Score Groove


Produkt Specifikationer

Mærke: Panduit
Kategori: Ikke kategoriseret
Model: PRD10

Har du brug for hjælp?

Hvis du har brug for hjælp til Panduit PRD10 stil et spørgsmål nedenfor, og andre brugere vil svare dig


Ikke kategoriseret Panduit Manualer

Panduit

Panduit MEHT187 Manual

29 December 2024
Panduit

Panduit DIRBB2007S21W Manual

29 December 2024
Panduit

Panduit CDE3 Manual

29 December 2024
Panduit

Panduit EC001 Manual

29 December 2024
Panduit

Panduit PZICE Manual

15 December 2024
Panduit

Panduit PZICEA Manual

15 December 2024
Panduit

Panduit PZNDVK Manual

15 December 2024
Panduit

Panduit DIRLC9606RB1 Manual

11 December 2024
Panduit

Panduit EA001 Manual

9 December 2024
Panduit

Panduit FPONE2 Manual

14 November 2024

Ikke kategoriseret Manualer

Nyeste Ikke kategoriseret Manualer