Never attempt to look into the sun with binoculars.
RICOH IMAGING COMPANY, LTD.
1-3-6, Nakamagome, Ohta-ku, Tokyo 143-8555, JAPAN
(http://www.ricoh-imaging.co.jp)
SPECIFICATIONS ARE SUBJECT TO CHANGE AT ANY TIME WITHOUT NOTIFICATION OR ANY
OBLIGATION ON THE PART OF THE MANUFACTURER.
DIE TECHNISCHEN DATEN DES PRODUKTS KÖNNEN JEDERZEIT OHNE WEITEREVER PFLICH-
TO RAPID CHANGES IN TEMPERATURE
1. To avoid serious eye damage, NEVER look at the sun using the binoculars.
Serious damage to the retina, or total loss of eyesight may occur.
2. Do not leave the binoculars in locations subject to direct sunlight. Sun
rays passing through the binoculars can be intensifi ed, and should they
focus on fl ammable materials, fi re may occur.
1. Do not use the binoculars while walking as depth perception and peripheral
vision are dramatically altered. This can result in injury.
2. Caution should be taken when adjusting the binocular barrels, especially by
children, to avoid fi ngers being pinched.
3. Using the binoculars may cause infl ammation of the skin around the eye where
the eyepiece ring comes in contact with the skin. Consult a physician if any
4. Do not swing the binoculars by the strap, as there is a danger of injury.
5. Keep the vinyl bag in which the binoculars are packed for delivery, and all
other vinyl bags, out of the reach of children and infants, as there is a risk of
Do not apply excessive force when adjusting the central focusing wheel, diopter
adjusting ring, eyepiece rings, eyepiece width or when mounting the binoculars
on a tripod. (Please use the optional Pentax Tripod adapter to mount the U
2. Do not drop the binoculars or subject them to strong vibration, impact or
3. Never expose the binoculars to high temperature (over 60 degrees centigrade
or 140 degrees Fahrenheit). Avoid leaving the binoculars for an extended period
of time in a hot humid place such as in a car parked in the sun or near a heater,
as this could cause the binoculars to become deformed.
4. Care should be taken when the binoculars are taken to the places with widely
varying temperatures difference as condensation or, in extreme cases, icelets
may form that could cause rust or other damage. In such circumstances the
binoculars should be covered by the bag or soft case so that the temperature
change will be as gradual as possible. After the temperatures have stabilized,
the binoculars may be uncovered and used again.
5. Reasonable care should be taken to prevent exposure to dirt, mud, sand,
moisture, toxic gas, or any other substance. These substances may cause
damage or render the binoculars inoperable.
6. These binoculars are waterproof. However, if they are wet after use, wipe them
with a dry cloth. Do not use thinner, alcohol or benzine for cleaning. If the lenses
are dirty, wipe away any residual dirt with a clean, soft, dry cloth using lens
7. Binoculars should be stored in a well-ventilated place to prevent fungus
growth. Never store them in a closet with mothballs or in an environment where
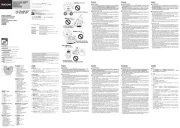
Pierścień regulacji dioptrii
Centralne pokrętło do ustawiania ostrości
Gwint statywowy (Na dole)
$E\XQLNQąüSRZDĪQHJRXV]NRG]HQLDRF]X1,*'<QLHSDWU]SU]H]ORUQHWNĊ
QDVáRĔFH0RĪHZ\VWąSLüSRZDĪQHXV]NRG]HQLHVLDWNyZNLOXEFDáNRZLWD
1LH]RVWDZLDMORUQHWNLZPLHMVFDFKQDUDĪRQ\FKQDEH]SRĞUHGQLHG]LDáDQLH
SURPLHQLVáRQHF]Q\FK3URPLHQLHVáRQHF]QH SU]HFKRG]ąFHSU]H] ORUQHWNĊ
PRJą E\ü ]LQWHQV\ILNRZDQH D MHĞOL VNXSLą VLĊ QD PDWHULDáDFK
áDWZRSDOQ\FKPRĪHGRMĞüGRSRĪDUX
1LHXĪ\ZDMORUQHWNLSRGF]DVFKRG]HQLDSRQLHZDĪSRVWU]HJDQLHJáĊELLZLG]HQLH
SHU\IHU\MQHXOHJDMąGUDPDW\F]Q\P]PLDQRP0RĪHWRVSRZRGRZDüREUDĪHQLD
1DOHĪ\]DFKRZDüRVWURĪQRĞüSRGF]DVUHJXODFMLWXEXVyZORUQHWNL]ZáDV]F]D
SU]H]G]LHFLDE\XQLNQąüSU]\WU]DĞQLĊFLDSDOFyZ
.RU]\VWDQLH]ORUQHWNLPRĪHVSRZRGRZDü]DSDOHQLHVNyU\ZRNyáRNDZPLHMVFX
NRQWDNWXSLHUĞFLHQLD RNXODUX ]HVNyUą :SU]\SDGNX ]DXZDĪHQLDMDNLFKNROZLHN
REMDZyZVNRQVXOWXMVLĊ]OHNDU]HP
1LHPDFKDMORUQHWNą]DSDVHNSRQLHZDĪLVWQLHMHQLHEH]SLHF]HĔVWZR]UDQLHQLD
3U]HFKRZXMZLQ\ORZąWRUEĊZNWyUą]DSDNRZDQDMHVWORUQHWNDQDF]DVGRVWDZ\
RUD] ZV]\VWNLH LQQH ZLQ\ORZH WRUE\ SR]D ]DVLĊJLHP G]LHFL L QLHPRZOąW
SRQLHZDĪLVWQLHMHU\]\NRXGXV]HQLD
1LHQDOHĪ\VWRVRZDüQDGPLHUQHMVLá\SRGF]DVUHJXODFMLFHQWUDOQHMĞUXE\GR
XVWDZLDQLDRVWURĞFLSLHUĞFLHQLDUHJXODFMLGLRSWULLSLHUĞFLHQLRNXODUXV]HURNRĞFL
RNXODUX lub przy montażu lornetki na statywie. (Proszę użyć opcjonalnego
adaptera Pentax Tripod Adapter , aby zamocować lornetkę na statywie.U
1LHXSXV]F]DMORUQHWNLDQLQLHQDUDĪDMMHMQDVLOQHZLEUDFMHXGHU]HQLDOXEQDFLVN
1LJG\ QLH Z\VWDZLDM ORUQHWNL QD G]LDáDQLH Z\VRNLHM WHPSHUDWXU\ SRZ\ĪHM
VWRSQL&HOVMXV]DOXEVWRSQL)DKUHQKHLWD8QLNDMSR]RVWDZLDQLDORUQHWNLQD
GáXĪV]\F]DVZJRUąF\PZLOJRWQ\PPLHMVFXWDNLPMDNVDPRFKyG]DSDUNRZDQ\
QDVáRĔFXOXEZSREOLĪXJU]HMQLNDSRQLHZDĪPRĪHWRVSRZRGRZDüGHIRUPDFMĊ
1DOHĪ\]DFKRZDüRVWURĪQRĞüJG\ORUQHWNDMHVWSU]HQRV]RQDZPLHMVFDREDUG]R
]UyĪQLFRZDQ\FKWHPSHUDWXUDFKUyĪQLF\ZSRVWDFLNRQGHQVDFMLOXEZVNUDMQ\FK
SU]\SDGNDFK PRJą WZRU]\ü VLĊ ORG\ NWyUH PRJą SRZRGRZDü UG]HZLHQLH OXE
LQQH XV]NRG]HQLD : WDNLHM V\WXDFML ORUQHWNĊ QDOHĪ\ VFKRZDü GR WRUE\ OXE
PLĊNNLHJR IXWHUDáX DE\ ]PLDQD WHPSHUDWXU\ E\áD MDN QDMEDUG]LHM VWRSQLRZD
3RXVWDELOL]RZDQLXVLĊWHPSHUDWXUORUQHWNĊPRĪQDRGVáRQLüLSRQRZQLHXĪ\ü
1DOHĪ\]DFKRZDüUR]VąGQąRVWURĪQRĞüDE\]DSRELHFQDUDĪHQLXQDEUXGEáRWR
SLDVHN ZLOJRü WRNV\F]Q\ JD] OXE MDNąNROZLHN LQQą VXEVWDQFMĊ 6XEVWDQFMH WH
PRJąVSRZRGRZDüXV]NRG]HQLHOXEXQLHPRĪOLZLüG]LDáDQLHORUQHWNL
7HORUQHWNLVąZRGRRGSRUQH-HĞOLMHGQDNVąPRNUHSRXĪ\FLXZ\WU]\MMHVXFKą
V]PDWNą 'R F]\V]F]HQLD QLH XĪ\ZDM UR]FLHĔF]DOQLND DONRKROX DQL EHQ]\Q\
-HĞOLVRF]HZNLVąEUXGQH]HWU]\MUHV]WNLEUXGXF]\VWąPLĊNNąVXFKą V]PDWNą
LĞURGNLHPGRF]\V]F]HQLDVRF]HZHN
/RUQHWNLQDOHĪ\SU]HFKRZ\ZDüZ GREU]HZHQW\ORZDQ\PPLHMVFXDE\]DSRELHF
UR]ZRMRZLJU]\EyZ 1LJG\ QLH SU]HFKRZXM LFK Z V]DILH ] NXONDPL QD PROH OXE
ZĞURGRZLVNXZNWyU\PSUDFXMHVLĊ]FKHPLNDOLDPL
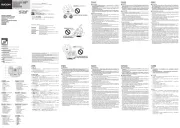
Patrząc na odległy obiekt zarówno przez prawą, jak i lewą soczewkę okularu,
wyreguluj tubusy tak, aby móc wygodnie oglądać obiekt w jednym okręgu
Patrząc przez lewą soczewkę okularu tylko lewym okiem, powoli obracaj
centralnym pokrętłem ostrości, aby ustawić ostrość na odległym obiekcie ( ys. 3-1).R
Naciśnij pierścień regulacji dioptrii, aby ustawić pozycję regulacji dioptrii (rys. 3-2).
Patrząc prawym okiem przez prawą soczewkę okularu, obracaj pierścień regulacji
dioptrii, aż biekt stanie się ostry (rys. 3-3). Uważaj, aby nie obracać centralnego
pokrętła do ustawiania ostrości.
Po ustawieniu ostrości prawym okiem, wciśnij pierścień regulacji dioptrii do pierwotnej,
całkowicie cofniętej pozycji, aby zapobiec jego obracaniu.
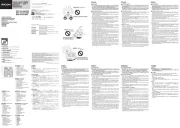
Montaż lornetki na statywie
Aby zamontować lornetkę na statywie, zdejmij osłonę gniazda statywu, obracając ją
w kierunku przeciwnym do ruchu wskazówek zegara, wkręć opcjonalny adapter
Pentax Tripod Adapter do gniazda statywu i zamocuj lornetkę na statywie (Rys. 4).U
Nigdy nie próbuj patrzeć w słońce przez lornetkę.
SPECYFIKACJE MOGĄ ULEC ZMIANIE W DOWOLNYM MOMENCIE BEZ POWIADOMIENIA
Adapter Pentax Tripod Adapter U
2. Adjusting the Eyepiece Width
• While looking at a distant object through both the right and left eyepiece
lenses, adjust the barrels so that you can view the object comfortably in one
• While looking through the left eyepiece lens with the left eye only, turn the
central focusing wheel slowly to focus on a distant object most sharply (Fig.
Push the diopter adjustment ring to set the diopter adjustment position
(Fig.3-2). While looking throughthe right eyepiece lens with the right eye, turn
the diopter adjusting until the same object comes into sharp focus (Fig.3-3).
Be careful not to rotate teh central focusing wheel.
• To observe the subject at different distances, focus by turning the central
focusing wheel to the right or left.
Mounting Binoculars on Tripod
To mount the binoculars on a tripod, remove the tripod socket cover by
turning it counterclockwise, screw the optional Pentax Tripod Adapter U
into the tripod socket and attach the binoculars on to the tripod (Fig. ).4
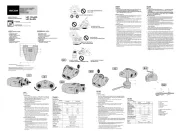
Pryzmat , ogniskowanie centralne porro
2N GRQLHVNRĔF]RQRĞFL. m 1.9
=DNUHVUHJXODFMLV]HURNRĞFL
=DĞOHSNDRELHNW\ZXRNXODUXIXWHUDáSDVHN
For easy viewing, the binoculars are usually adjusted by pullling the
eyepiece rings out while rotating them to the left (Fig. 1). You can rotate
the rings to three positions: original, middle and maximum. To set the rings
back to the original position, rotate them to the right.
If you wear glasses when using these binoculars, push the eyepiece
rings back to the original posit oni
• Do not rotate the eyepiece rings with excessive force.
After focusing with the right eye is completed, push in the diopter adjusting
ring to the original, fully-retracted position to prevent it from being turned.
To attach the neck strap to the binoculars, put the tip of the strap clasp in
the strap hook and slide the strap clasp to the eyepiece lens side while
pressing it until clicks -1 (Fig.5 ).
Check to see if the strap is securely attached to the binoculars by pulling
The strap length can be adjusted accordingly with your preference. It is
best to provide enough slack in the strap for easy adjustment (Fig. 5-2).
CAUTION: Do not pull the strap in the direction perpendicular to the top of
Aby przymocować pasek na szyję do lornetki, przełóż pasek przez oczko paska,
pętlę, a następnie przez sprzączkę. Sprawdź, czy pasek jest bezpiecznie
przymocowany do lornetki, pociągając pasek (Rys.5).
Sprawdź, czy pasek jest dobrze przymocowany do lornetki, pociągając pasek.
Długość paska można dostosować do własnych preferencji. Najlepiej
pozostawić na tyle luzu, aby ułatwić regulację ( ys. 5-2).R
UWAGA: Nie ciągnij paska w kierunku prostopadłym do górnej części tubusu.
Aby ułatwić obserwację, lornetkę zwykle reguluje się, wyciągając pierścienie
okularu, jednocześnie obracając je w lewo (rys. 1). Pierścienie można obracać w
trzech pozycjach: oryginalnej, środkowej i maksymalnej. Aby ustawić pierścienie w
pierwotnej pozycji, obróć je w prawo.
Jeśli nosisz okulary podczas korzystania z tej lornetki, przesuń pierścienie
okularu do pierwotnej pozycji
Nie obracaj pierścieni okularu z nadmierną siłą.
Aby obserwować obiekt z różnych odległości, ustaw ostrość, obracając centralne
pokrętło ostrości w prawo lub w lewo.