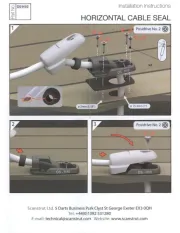
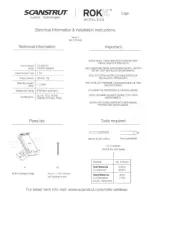
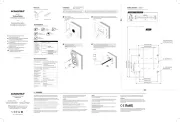
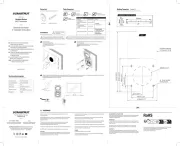
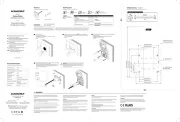
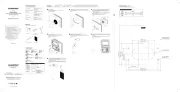
Scanstrut SC-V-P1 Manual


Læs gratis den danske manual til Scanstrut SC-V-P1 (2 sider) i kategorien Ikke kategoriseret. Denne vejledning er vurderet som hjælpsom af 4 personer og har en gennemsnitlig bedømmelse på 4.4 stjerner ud af 2.5 anmeldelser. Har du et spørgsmål om Scanstrut SC-V-P1, eller vil du spørge andre brugere om produktet?

Side 1/2
EN READ THESE INSTRUCTIONS BEFORE INSTALLING THE PRODUCT
ES LEA ESTAS INSTRUCCIONES ANTES DE INSTALAR EL PRODUCTO
FR-CA LIRE CES INSTRUCTIONS AVANT D’INSTALLER LE PRODUIT
scanstrut.com
Ventura Series
Dual 125V 20A AC Outlet
Electrical Information
& Installation Instructions
UK / EMEA / APAC
Scanstrut Ltd, 14 Dart Business Park,
Clyst St. George, Exeter, EX3 0QH
USA
Scanstrut Inc. 7 Pequot Park Rd,
#303 Westbrook, CT 06498
RevA OEM-INST005766
For the latest tech info visit
scanstrut.com
Technical Information
Rating 20A 125V
Cable
12AWG Triplex Recommended
Copper cable must be used for installation
Receptacle
• Grounded duplex NEMA 5-20R - UL & CSA-listed
• Screw terminals
Replace receptacle only with Scanstrut part
number SC-UTIL-P-006285 (Qualtek 740W-F/06)
1 x Rear Housing1 x Front Housing
Parts List
1 x Rubber Grommet1 x Receptacle 1 x Torx Bolt
1 x Cable Strain
Relief Bracket
4 x No. 6 Flange Screws
5 x 3mm Screws
Drill
Jigsaw
Drill Bit
ø 2.5mm (3/32”) | ø 8mm (5/16”) | ø 12.5mm (1/2”)
Tools Required
Silicone or
Automotive Sealant
Screwdrivers
PH1 | PH2 | T15
Material
Pilot Drill
Size
Fixing
Soft Material
eg. plywood
2.5mm
(3/32”)
Included
4x No.6 Screws
Hard Material
eg. fiberglass,
hardwood, acrylic
3mm
(1/8)
Metal eg. steel,
aluminium
4mm
(5/32”)
Recommended
Flanged M4 Panhead
Bolts, Washers and
Nyloc Nuts
(Not included)
Drilling Template Scale 1:1
• Cut out template
• Tape to mounting surface
Use template to drill:
4x ø2.5mm (3/32”) holes
3x ø8mm (5/16”) holes
2x ø12.5mm (1/2”) holes
1
Installation
Jigsaw inside of the cutting boundary.
DO NOT exceed boundary area.
Test fit the product - if needed, file the cut
area until a tight fit is achieved.
• Clean mounting surface.
2
Remove receptacle
(1x Torx T15 bolt)
from front lid assembly.
3
• Fit grommet to rear housing.
Cut grommet cross hairs to required size
for chosen installation cable.
Slide length of installation cable
through grommet - cable must
not be connected to
live power source.
4
Strip wires as required to suitable length
(minimum 7mm (0.28”), then connect and
secure to receptacle terminals:
Green Ground wire - green screw
White Neutral wire - silver screws
Black Hot/Line wire - gold screws
5
Pull through the mounting
surface and fix the wired
receptacle to the front
housing with the
Torx T15 screw.
Ensure the ground terminal
is orientated correctly.
6
Slide rear housing over wired
receptacle.
Secure to housing assembly
with 3x 3mm PH1 screws.
7
Apply silicone/automotive sealant to the
4x No.6 PH2 flanged mounting screws.
Secure the housing assembly to the
mounting surface - DO NOT over tighten
the screws.
8
Choose the desired installation
cable rear exit orientation.
Place the cable strain-relief
bracket over the protruding
cable sheath.
Clamp cable to the rear
housing with the 2x
remaining 3mm PH1 screws.
9
Professional electrician installation only for
connecting receptacle wiring to onboard 125V system.
Connect to a breaker (GFCI recommended).
10
File
If daisy chaining connection to multiple
receptacles, the slot features in the
strain-relief bracket can be used to
secure an additional cable to it with a
suitably sized cable tie (not included).
4x
2.5mm (3/32")
2x
12.5mm (1/2")
3x
8.0mm (5/16")
72.5mm (2.85")
68.2mm (2.69")
94.0mm (3.70")
38.0mm (1.50")
31.7mm (1.25")
80.5mm (3.17")
41.8mm (1.65")
43.0mm (1.69")
110.0mm (4.33")
69.0mm (2.72")
50mm
2”
�5mm
0.5”
WARNING:
CHECK SCALE
1
2
3
WH
BK
GN
OR
This product must be mounted strictly in accordance with the provided mounting template
and must not be installed in any location where submersion or partial submersion may occur.
TOP ^
Only daisy chain to circuit with other 20A duplex receptacles. Do not connect to 15A circuit.
If daisy chaining to multiple 20A receptacles in a circuit, utilize appropriate wire gauge cable
size per Industry Standards.
If daisy chaining to multiple 20A receptacles, the first receptacle in the circuit must be
GFCI protected.
This product is to be connected to a 125V AC power system only. The power system must be switched o
before installation. Rating: 125V 20A.
An appropriate circuit breaker must be used between the power source and this product. Check for correct
polarity of all wiring before switching the power on.
This product contains high voltages. Do not tamper with the product.
This product can only be used with the provided receptacle. Do not replace with any receptacle other than
Scanstrut SC-UTIL-P-006285.
This product is NOT approved for use in hazardous/flammable atmospheres.
DO NOT install in a hazardous/flammable atmosphere e.g. engine room.
Before drilling any holes, ensure the cutting template is correct to scale and the area behind the mounting
location is clear of wires, fuel and all other hazardous objects.
Ensure any holes cut will not significantly weaken the structure of the mounting surface.
The IP protection rating is only valid if the installation is carried out correctly according to the instructions and
on a perfectly flat, smooth and non-porous surface.
The IP protection rating applies to the front only and when the product lid is fully closed and not in use.
Do not leave the lid in an open position when driving/underway, this may damage the product and the mounting
surface.
When choosing a mounting location, avoid areas exposed to heat radiation devices, with poor ventilation or an
area that can become submerged.
This product must be mounted strictly in accordance with the provided mounting template and must not be
installed in any location where submersion or partial submersion may occur.
The included rear housing and grommet must be installed to prevent accidental exposure to live receptacle
wiring terminals.
WIRING
This product must be installed by a professional electrician, see Technical Information for power requirements.
Solid copper cable is required for connection to the receptacle.
ENVIRONMENTAL PROTECTION
Waste electrical products should not be disposed of with household waste. Please recycle where facilities exist.
Check with your Local Authority or retailer for recycling advice.
IMPORTANT
The lid must remain securely latched closed when not in use. Scanstrut Ltd accepts no liability for any product
malfunction as a result of the lid being left open when not in use
WARRANTY
A 3 year, non-transferable warranty covers this Scanstrut product only and not any devices that are powered
by it. No warranty is given for users’ devices. Users that expose their devices to hazards, known or unknown, at
their own risk.
EN Warning ADVERTENCIAES
Ce produit doit être connecté à un système d’alimentation 125V AC uniquement. Le système électrique doit
être mis hors tension avant l’installation. Classification : 125V 20A.
Un disjoncteur approprié doit être utilisé entre la source d’alimentation et ce produit. Vérifier la polarité de tous
les câbles avant de mettre l’appareil sous tension.
Ce produit contient des tensions élevées. Ne pas altérer le produit.
Ce produit ne peut être utilisé qu’avec le réceptacle fourni. Ne pas remplacer par un réceptacle autre que le
Scanstrut SC-UTIL-P-006285.
Ce produit n’est PAS approuvé pour une utilisation dans des atmosphères dangereuses/inflammables.
NE PAS installer dans une atmosphère dangereuse/inflammable, par exemple dans une salle des machines.
Avant de percer des trous, assurez-vous que le gabarit de coupe est à l’échelle et que la zone située derrière
l’emplacement de montage est exempte de câbles, de carburant et de tout autre objet dangereux.
Veillez à ce que les trous réalisés n’aaiblissent pas de manière significative la structure de la surface de
montage.
L’indice de protection IP nest valable que si l’installation est eectuée correctement selon les instructions et
sur une surface parfaitement plane, lisse et non poreuse.
L’indice de protection IP sapplique uniquement à la face avant et lorsque le couvercle du produit est
complètement fermé et non utilisé.
Ne laissez pas le couvercle en position ouverte lorsque vous conduisez ou roulez, cela pourrait endommager
le produit et la surface de montage.
Lors du choix de l’emplacement de montage, évitez les zones exposées à des dispositifs de rayonnement
thermique, mal ventilées ou susceptibles d’être submergées.
Ce produit doit être monté en stricte conformité avec le gabarit de montage fourni et ne doit pas être installé
dans un endroit où il risque d’être immergé ou partiellement immergé.
Le boîtier arrière et le passe-fil fournis doivent être installés pour éviter toute exposition accidentelle aux
bornes de câblage lorsque la prise est sous tension.
CÂBLAGE
Ce produit doit être installé par un électricien professionnel, voir les Informations techniques pour les
obligations électriques.
Un câble en cuivre solide ne doit être utilisé que pour la connexion au réceptacle.
Ce produit doit être monté en stricte conformité avec le gabarit de montage fourni et ne doit pas être installé
dans un endroit où il risque d’être immergé ou partiellement immergé.
Ne raccorder en guirlande (daisy chain) qu’à d’autres prises doubles de 20 A. Ne pas brancher sur un circuit
de 15 A.
En cas de raccordement en guirlande à plusieurs prises de 20 A dans un circuit, utiliser un câble de calibre
approprié conformément aux normes UL/ABYC (ou peut-être selon les normes de l’industrie).
En cas de raccordement en guirlande à plusieurs prises de 20 A, la première prise du circuit doit être
protégée par un DDFT.
PROTECTION DE L’ENVIRONNEMENT
Les déchets de produits électriques ne doivent pas être jetés avec les ordures ménagères. Veuillez recycler
dans les endroits prévus à cet eet. Renseignez-vous auprès des autorités locales ou de votre détaillant pour
obtenir des conseils en matière de recyclage.
IMPORTANT
Le couvercle doit rester bien fermé en dehors de l’utilisation. Scanstrut Ltd décline toute responsabilité pour
tout dysfonctionnement de produit dû au fait que le couvercle a été laissé ouvert en dehors de l’utilisation.
GARANTIE
Une garantie de 3 ans, non transférable, couvre uniquement ce produit Scanstrut et non les appareils
alimentés par celui-ci. Aucune garantie n’est donnée pour les appareils des utilisateurs et les utilisateurs eux-
mêmes exposant leurs appareils à des dangers, connus ou inconnus, à leurs risques et périls.
FR-CA ATTENTION
Este producto debe conectarse únicamente a un sistema de alimentación de 125 V CA. El sistema eléctrico
debe desconectarse antes de la instalación. Especificaciones eléctricas: 125V 20A.
Debe utilizarse un disyuntor adecuado entre la fuente de alimentación y este producto. Compruebe la
polaridad correcta de todo el cableado antes de conectar la alimentación.
Este producto contiene altas tensiones. No manipule el producto.
Este producto sólo puede utilizarse con el receptáculo suministrado. No sustituir por otro receptáculo que no
sea Scanstrut SC-UTIL-P-006285.
Este producto NO está aprobado para su uso en atmósferas peligrosas/inflamables.
NO instalar en una atmósfera peligrosa/inflamable, por ejemplo, en la sala de máquinas.
Antes de taladrar los orificios, asegúrese de que la plantilla de corte está a escala y de que no hay cables,
combustible ni otros objetos peligrosos en la zona de montaje.
Asegúrese de que los orificios realizados no debiliten significativamente la estructura de la superficie de
montaje.
El grado de protección IP sólo es válido si la instalación se realiza correctamente según las instrucciones y
sobre una superficie perfectamente plana, lisa y no porosa.
El grado de protección IP sólo se aplica a la parte frontal y cuando la tapa del producto está completamente
cerrada y no se utiliza.
No deje la tapa en posición abierta cuando conduzca/esté en movimiento, p2-ya que podría dañar el producto y
la superficie de montaje.
Al elegir el lugar de montaje, evite las zonas expuestas a dispositivos que irradien calor, con poca ventilación o
que puedan quedar sumergidas.
Este producto debe montarse estrictamente de acuerdo con la plantilla de montaje suministrada y no debe
instalarse en ningún lugar donde pueda quedar sumergido total o parcialmente.
La carcasa trasera y la arandela incluidos deben instalarse para evitar la exposición accidental a los puntos
de conexión eléctricos.
CABLEADO
Este producto debe ser instalado por un electricista profesional, consulte la Información técnica para
conocer los requisitos de alimentación.
Sólo debe utilizarse cable de cobre sólido para la conexión al receptáculo.
Este producto debe montarse estrictamente de acuerdo con la plantilla de montaje suministrada y no debe
instalarse en ningún lugar donde pueda quedar sumergido total o parcialmente.
Sólo se puede conectar en cadena a un circuito con otros receptáculos dúplex de 20 A. No conectar a un
circuito de 15 A.
Si se conecta en cadena a varios receptáculos de 20 A en un circuito, utilice cables del calibre adecuado
según las normas UL/ABYC (o según otras normas industriales aplicables).
Si se conecta en cadena a varios receptáculos de 20 A, el primer receptáculo del circuito debe tener
protección GFCI.
PROTECCIÓN DEL MEDIO AMBIENTE
Los residuos de productos eléctricos no deben tirarse en la basura doméstica. Por favor, recicle donde haya
instalaciones a tal efecto. Consulte a las autoridades locales o a su distribuidor para obtener consejos sobre
el reciclaje.
IMPORTANTE
La tapa debe permanecer bien cerrada cuando no se utilice. Scanstrut Ltd no acepta ninguna
responsabilidad de mal funcionamiento de este producto si se deja la tapa abierta cuando no se utiliza
GARANTÍA
La garantía intransferible de 3 años cubre únicamente este producto Scanstrut y no cubre cualquier
dispositivo que se alimente de él. No se ofrece ninguna garantía para los dispositivos de los usuarios y éstos
exponen sus dispositivos a peligros, conocidos o desconocidos, bajo su propia responsabilidad.
ES ADVERTENCIA


Produkt Specifikationer

Mærke: Scanstrut
Kategori: Ikke kategoriseret
Model: SC-V-P1

Har du brug for hjælp?

Hvis du har brug for hjælp til Scanstrut SC-V-P1 stil et spørgsmål nedenfor, og andre brugere vil svare dig