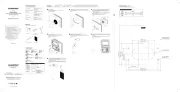
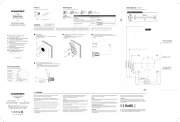
Scanstrut SC-V-W1 Manual


Læs gratis den danske manual til Scanstrut SC-V-W1 (2 sider) i kategorien Ikke kategoriseret. Denne vejledning er vurderet som hjælpsom af 15 personer og har en gennemsnitlig bedømmelse på 4.8 stjerner ud af 8 anmeldelser. Har du et spørgsmål om Scanstrut SC-V-W1, eller vil du spørge andre brugere om produktet?

Side 1/2
Ventura Series
Quick-Connect Cold Water Outlet
with Wash Down Kit
Installation Instructions
SC-V-W1
scanstrut.com
EN READ THESE INSTRUCTIONS BEFORE
INSTALLING THE PRODUCT
MIT DER INSTALLATION BEGINNEN
ES LEA ESTAS INSTRUCCIONES ANTES DE INSTALAR
EL PRODUCTO
FR VEUILLEZ PRENDRE CONNAISSANCE DE CES
INSTRUCTIONS. AVANT DE PROCÉDER
À L’INSTALLATION
IT LEGGERE QUESTE ISTRUZIONI PRIMA DI
INSTALLARE IL PRODOTTO
SWE LÄS DESSA INSTRUKTIONER INNAN
PRODUKTEN INSTALLERAS
4x Flanged
Mounting Screws
x Housing
Parts List
Drill
Holesaw
Ø38mm (1.5”)
Tools Required
PH2
Silicone or
Automotive Sealant
Drill Bit
Ø2.5mm (3/32”)
Drilling Template Scale 1:1
Installation
Professional installation
recommended.
• Cut out template
• Tape to mounting surface
Use template to drill 2x ø38mm (1.5”) holes and pilot holes as
per Pilot Drill Table above
1
Jigsaw inside of the cutting boundary. Do not exceed boundary area.
Test fit the housing - if needed, file the cut area until a tight fit is achieved.
Clean mounting surface.
2 3
Apply silicone/automotive sealant to the 4x No.6 PH2
flanged mounting screws.
Secure the housing assembly to the mounting surface -
DO NOT over tighten the screws.
This product must be mounted strictly in accordance with the provided mounting template
and must not be installed in any location where submersion or partial submersion may occur.
UK / EMEA / APAC
Scanstrut Ltd, 14 Dart Business Park,
Clyst St. George, Exeter, EX3 0QH
USA
Scanstrut Inc. 7 Pequot Park Rd,
#303 Westbrook, CT 06498
Rev A RETAIL-INST-006917
For the latest tech info visit
scanstrut.com
EU Representative (Regulatory Inquiries Only)
Eucomply OÜ, Pärnu mnt 139b-14, 11317 Tallinn, Estonia
hello@eucompliancepartner.com +3375690241
Connection Type
Quick-Connect Nickel-Plated
Brass Coupling
Max Water System Pressure 8 BAR (115PSI)
Hose Type 3m (10ft) length coiled PU material
Hose Diameter 9mm (0.35”)
Sprayer Type
Full stainless-steel construction
Locking flow switch
Adjustable spray pattern
Waterproof Rating
IP68, IP69K
Front Only When Lid Closed
Certification ROHS, REACH, EN 1112:2008
Technical Information
Jigsaw
1x Sprayer
1x Hose Assembly 1x Net Bag
4
Screw the sprayer onto the hose assembly nut connection.
overtighten – hand tight is sucient. Do not
Ensure the included sealing washer is fitted between the sprayer and the
hose assembly nut.
5 6
To connect the hose assembly to the system, grip the knurled male end
of the hose and push it firmly into the quick-connector until you hear an
audible click.
To disconnect the hose, grip the knurled collar on the quick-connector
and push forward to release.
To use the sprayer, push the rear locking switch to maintain a constant
water flow. Push the switch again to stop the flow.
The spray pattern can be adjusted from shower to aerated by rotating
the nozzle in either direction.
The hose assembly must be disconnected from the system after each
use. When not in use, it can be safely stored in the provided net bag.
7
Do not click lid closed
until installed.
Material Pilot Drill Size Fixing
Soft Material
eg. plywood, thin
metal sheet
2.5mm (3/32”)
Included
4x No.6 Screws
Hard Material
eg. fiberglass,
hardwood, acrylic
3mm (1/8”)
Bolt-Through
Mounting
4mm (5/32”)
Recommended
Flanged M4 Panhead Bolts,
Washers and Nyloc Nuts
(Not included)
Pilot Drill Table
Connect to the onboard water system with a suitable female ½” BSP
hose fitting (not included). overtighten the hose fitting.Do not
It is recommended to apply a layer of PTFE tape or equivalent around
the male connector thread.
It is recommended that a ½” BSP isolating valve is installed between this
connection for servicing.
Before use, inspect all connections to ensure a watertight fit.
Professional installation is highly recommended
Adjustable Spanner
or Wrench
PTFE Tape /
Thread Sealing Tape
CLICK!
50mm
2”
�5mm
0.5
WARNING: CHECK SCALE
38mm (1.50")
19mm (0.75")
94mm (3.70")
69.3mm (2.73")
110.2mm (4.34")
31mm (1.22")
126mm (4.96")
32mm (1.26")
70mm (2.76")
TOP ^
2x ø38mm (1.50")
Clearance required
to fully open the lid
4x Holes suitable
for No.6 screw


Produkt Specifikationer

Mærke: Scanstrut
Kategori: Ikke kategoriseret
Model: SC-V-W1

Har du brug for hjælp?

Hvis du har brug for hjælp til Scanstrut SC-V-W1 stil et spørgsmål nedenfor, og andre brugere vil svare dig


Ikke kategoriseret Scanstrut Manualer

Ikke kategoriseret Manualer

Nyeste Ikke kategoriseret Manualer

Vevor

Vevor PFDMFGMS03 Manual

1 December 2025
Vevor

Vevor SC-YMP1 Manual

1 December 2025
Vevor

Vevor AT1-2200X Manual

1 December 2025
Vevor

Vevor FX-3.5-36-8 Manual

1 December 2025
Vevor

Vevor FRTRPSKU9 Manual

1 December 2025
Vevor

Vevor SC-TC-216 Manual

1 December 2025
Vevor

Vevor EH-011 Manual

1 December 2025
Vevor

Vevor SC-CJ-603 Manual

1 December 2025
Vevor

Vevor SDC-36-2 Manual

1 December 2025
Vevor

Vevor LZ-1000KG Manual

1 December 2025