–1
( ) ( )1 2
English
This manual is for use with several different lenses.
This lens is designed for Sony cameras.
WARNING
To reduce fire or shock hazard, do not expose the unit to rain or moisture.
Do not directly look at the sun through this lens.
Doing so might harm your eyes or cause loss of eyesight.
Keep the lens out of reach of small children.
There is danger of accident or injury.
Disposal of Old Electrical & Electronic Equipment
(Applicable in the European Union and other
European countries with separate collection
systems)
This symbol on the product or on its packaging indicates that
this product shall not be treated as household waste. Instead it
shall be handed over to the applicable collection point for the
recycling of electrical and electronic equipment. By ensuring this product is
disposed of correctly, you will help prevent potential negative consequences
for the environment and human health, which could otherwise be caused
by inappropriate waste handling of this product. The recycling of materials
will help to conserve natural resources. For more detailed information
about recycling of this product, please contact your local Civic Office, your
household waste disposal service or the shop where you purchased the
product.
For the customers in the U.S.A.
THIS DEVICE COMPLIES WITH PART 15 OF THE FCC RULES.
OPERATION IS SUBJECT TO THE FOLLOWING TWO CONDITIONS:
(1) THIS DEVICE MAY NOT CAUSE HARMFUL INTERFERENCE, AND
(2) THIS DEVICE MUST ACCEPT ANY INTERFERENCE RECEIVED,
INCLUDING INTERFERENCE THAT MAY CAUSE UNDESIRED
OPERATION.
CAUTION
You are cautioned that any changes or modifications not expressly approved
in this manual could void your authority to operate this equipment.
NOTE:
This equipment has been tested and found to comply with the limits for a
Class B digital device, pursuant to Part 15 of the FCC Rules. These limits
are designed to provide reasonable protection against harmful interference
in a residential installation. This equipment generates, uses, and can radiate
radio frequency energy and, if not installed and used in accordance with the
instructions, may cause harmful interference to radio communications.
However, there is no guarantee that interference will not occur in a particular
installation. If this equipment does cause harmful interference to radio or
television reception, which can be determined by turning the equipment off
and on, the user is encouraged to try to correct the interference by one or
more of the following measures:
– Reorient or relocate the receiving antenna.
– Increase the separation between the equipment and receiver.
– Connect the equipment into an outlet on a circuit different from that to which the
receiver is connected.
– Consult the dealer or an experienced radio/TV technician for help.
For the customers in Canada
This Class B digital apparatus complies with Canadian ICES-003.
Notes on use
• Do not leave the lens in direct sunlight. If sunlight is focused onto a nearby
object, it may cause a fire. If circumstances necessitate leaving the lens in direct
sunlight, be sure to attach the lens cap.
• Be careful not to subject the lens to mechanical shock while attaching it.
• Always place the lens caps on the lens when storing.
• Do not keep the lens in a very humid place for a long period of time to prevent
mold.
• After attaching the lens, do not carry the camera by holding the lens.
• Do not touch the lens contacts. If dirt, etc., gets on the lens contacts, it may
interfere or prevent the sending and receiving of signals between the lens and the
camera, resulting in operational malfunction.
Precaution for flash use
With certain of lens/flash combinations, the lens may partially block the light
of the flash, resulting in a shadow at the bottom of the picture. When using a
built-in camera flash, make sure to remove the lens hood and shoot from at
least 1m (3.3feet) away from your subject.
Vignetting
When you use lens, the corners of the screen become darker than the center.
To reduce this phenomena (called vignetting), close the aperture by 1 to 2
stops.
Condensation
If your lens is brought directly from a cold place to a warm place,
condensation may appear on the lens. To avoid this, place the lens in a plastic
bag or something similar. When the air temperature inside the bag reaches
the surrounding temperature, take the lens out.
Cleaning the lens
• Do not touch the surface of the lens directly.
• If the lens gets dirty, brush off dust with a lens blower and wipe with a soft,
clean cloth (Cleaning Cloth KK-CA (optional) is recommended).
• Do not use any organic solvent, such as thinner or benzine, to clean the lens or
the camera cone.
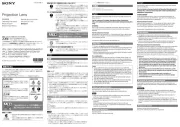
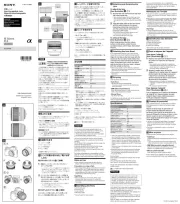
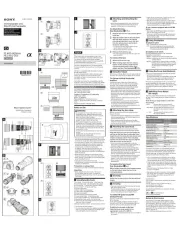
Names of parts
1…Focusing ring 2…Distance index 3…Lens contacts 4…Depth-of-field
scale 5…Distance scale 6…Focus-hold button 7…Focus-range limiter
*
8…Mounting index
* 50mm F2.8 Macro, 100mm F2.8 Macro only
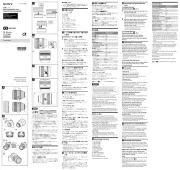
Attaching/detaching the lens
To attach the lens (See illustration -.)
1 Remove the rear and front lens caps and the camera body
cap.
• You can attach/detach the front lens cap in two ways, (1) and (2). When you
attach/detach the lens cap with the lens hood attached, use method (2).
2 Align the orange index on the lens barrel with the orange
index on the camera (mounting index), then insert the lens
into the camera mount and rotate it clockwise until it locks.
• Do not press the lens release button on the camera when mounting the lens.
• Do not mount the lens at an angle.
To remove the lens (See illustration -.)
While pressing and holding the lens release button on the
camera, rotate the lens counterclockwise until it stops, then
detach the lens.
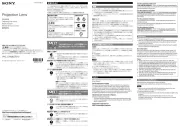
Attaching lens hood
It is recommended that you use a lens hood to reduce flare and ensure
maximum image quality.
* The 50mm F2.8 Macro does not include an external lens hood. The lens barrel
functions as a lens hood by design.
100mm F2.8 Macro:
Fit the hood into the mount on the end of the lens barrel and
rotate the hood clockwise until it clicks.
35mm F1.4 G:
Align the red line on the lens hood with the red dot on the lens.
Turn the hood clockwise until the red dot on the hood meets the
red dot on the lens and it clicks into place.
• When using a built-in camera flash, make sure to remove the lens hood to avoid
blockage of the flash light.
• If a marking (red line, red dot, etc.) is provided, attach the lens hood properly.
Otherwise, the lens hood may interfere with the desired effect or may appear in
pictures.
• When storing, turn over the lens hood and place it onto the lens backwards.
Focusing
When using the auto focus, the camera focuses the lens automatically.
When focusing manually, set your camera to the manual focus and rotate the
focusing ring while looking through the viewfinder. The focus signal in the
viewfinder indicates the current degree of the focus.
• The focusing ring can be rotated slightly past the infinity to provide accurate
focusing under various operating temperatures. Do not rotate the focusing ring
all the way to the end when focusing manually even at infinity. Look through the
viewfinder and set the focus precisely.
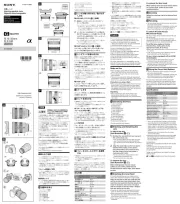
Focus-hold button –(2)
While the focus-hold button is pressed, auto focus function is suspended and
the focus is fixed for shooting.
• The function of the focus-hold button can be changed on cameras with custom
function capability. Refer to the camera manuals for details.
Focus-range limiter –(3)
For quick focusing, the focusing range can be limited to close or far range,
depending on the distance to your subject.
Close-focusing range Far-focusing range
50mm F2.8 Macro 20 - 27cm 30cm - ∞
100mm F2.8 Macro 35 - 54cm 59cm - ∞
To focus on subjects at close range (see the table above), set focus anywhere
near the subject and then set the focus-range limiter to LIMIT; the focusing
range is limited to Close-focusing range. Likewise, when shooting subjects
at far range, set the focus anywhere near the subject and then set the focus-
range limiter to LIMIT; the focus range is limited to Far-focusing range. Set
the focus-range limiter to FULL to allow the entire focusing range.
• Set the focus-range limiter to FULL, when shooting a subject between the Close
and Far focusing ranges.
Depth-of-field scale
When focus is set on a subject, anything at that same distance will appear
sharp, and anything within a certain range before and beyond the subject will
also appear in focus; this is called depth of field. Depth of field depends on
the subject distance and aperture you choose and is indicated by the lines on
the depth-of-field scale corresponding to the aperture.
Macro lens depth of field (50mm F2.8 Macro, 100mm F2.8
Macro)
Refer to the depth-of-field table for details on depth of field.
• The depth-of-field scale and depth-of-field table
is for 35mm-format
cameras. The depth-of-field is shallower when you use Digital Single Lens
Reflex Cameras equipped with an APS-C sized image sensor.
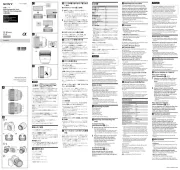
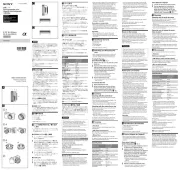
Macro photography (50mm F2.8 Macro, 100mm
F2.8 Macro)
Magnification ratios
The magnification scale is located on the extending section of the lens barrel.
The line on the magnification scale which the edge of the outer lens barrel
overlaps indicates the current magnification ratio (1:1 in illustration
).
• As the magnification increases, the camera is more vulnerable to shaking. Use a
tripod to steady the camera when shooting.
Exposure Compensation (when using a hand-held
exposure meter, etc.)
As the magnification increases, the amount of light reaching the image sensor
decreases. This is automatically compensated in all autoexposure modes, or
in the manual exposure mode as long as the exposure is adjusted according to
the camera’s meter index. If your camera is set to the manual exposure mode
and you are using a hand-held exposure meter, or if your camera is set to the
manual exposure mode and you are using the Manual Flash Control function
available on some external flash units, refer to the exposure compensation
table , and adjust exposure accordingly.
Exposure compensation table
a Exposure correction
b Magnification ratios
c Distance
(E.g., when adjusting by the aperture, +2 means opening the aperture 2 more
stops.)
日本語
この は取扱説明書 、複数 対象のレンズを としています。
本機 製はソニー カメラでお いになれます使。
安全のために
ソニー は製品 、安全 充分配慮に されています しかし。 、間違 使った
いかたをすると、人身事故 起 恐 危険 事故が きる れがあり です。を
防 次 必 守ぐために のことを ずお りください。
• 安全 注意事項 守のための を る。
• 故障 使したら わずに、おいげ買上店、またはソニーデジタル レフカメ一眼
ラ ヘルプデスクに を する専用 修理 依頼 。
下記 注意事項 守の を らないと、事故により
死亡や大けがの となります原因 。
レンズを して通、太陽強光見やいをない
目をいためたり、失明 原因の となることがあります。
乳幼児 手 届 場所 置の の く に かない
事故 原因やけがなどの となります。
使用上 注意のご
• 直射日光 当 場所 放置 太陽光 近 物 結の たる に しないでください。が くの に
像すると、火災 原因 得 直射日光下 置 場合の となります やむを。ず に く は、
レンズキャップを り けてください取 付 。
• レンズを するときやご になる には装着 使用 際 、衝撃 与を えないようにご
注意ください。
• 保管 際の は、必 取 付ずレンズにレンズキャップを り けてください。
• 湿度 高 場所 長期間置 発生の い に かないでください カビが。することがあ
ります。
• カメラにレンズを り けたあと取 付 、レンズ を ってカメラを ち本体 持 持 運
ばないでください。
• レンズ を らないでください よごれ により になる信号接点 触 。等 接触不良
と、カメラとの のやりとりが しく われず信号 正 行 、カメラが しく し正 動作
なくなりますのでご ください注意 。
フラッシュ のご使用時 注意
レンズとフラッシュの み わせによっては組 合 、レンズがフラッ
シュ を げ光妨、写真 下部 影の に ができることがあります カメラ。
内蔵 使用時フラッシュ にはレンズフードをはずし、1m以上離れ
て してください撮影 。
周辺光量について
レンズは に の が に べ します原理的 画面周辺部 光量 中心部 比 低下 。
周辺光量 低下 気 場合の が になる は、開放絞りから1〜2段絞 込り
んでご ください使用 。
結露について
結露とは、レンズを い から に かい へ ち んだときな寒 場所 急 暖 場所 持 込
どに、レンズの や に が くことです を こりにく内側 外側 水滴 付 。結露 起
くするためには、一度 袋 入レンズをポリ かバッグなどに れて、使用す
る の になじませてから環境 温度 、取 出り してください。
お れについて手入
• レンズの には れないでください表面 直接触 。
• レンズが れたときは汚、ブロアーでほこりをのぞき、柔 清潔 布らかい な で
軽 取くふき ってください。(クリーニングクロス
KK-CA( )別売 のご使用
をおすすめします。)
• レンズや のお れには鏡胴 手入 、シンナー、ベンジンなどの は有機溶剤 絶対
に わないでください使。
各部のなまえ
1…フォーカスリング 2…距離指標 3…レンズ信号接点
4…被写界深度目盛
5
…距離目盛 6…フォーカスホールドボタン
7…フォーカスレンジ り えノブ切 替 * 8…マウント標点
* mm F . Macro, mm F . Macro50 2 8 100 2 8 のみ
レンズの り けかた りはずしかた取 付 /取
取 付り けかた( )イラスト −参照
1 レンズの レンズキャップとカメラのボディキャップ前後
をはずす。
• レンズの レンズキャップは の前 図 ( )1、( )2の2通 方法 取 付りの で り
け りはずしができます/取。( )2は、レンズフードを けた での付 状態
レンズキャップの り け りはずしに です取付/取 便利 。
2 レンズとカメラのオレンジの点( )マウント標点 を わせ合
てはめ み込、レンズを くカメラに し てながら軽 押 当 、時計
方向に「 」カチッ とロックがかかるまでゆっくり す回。
• レンズを り けるときは取 付 、カメラのレンズ りはずしボタンを取 押
さないでください。
• レンズを めに し まないでください斜 差 込 。
取りはずしかた( )イラスト −参照
カメラのレンズ りはずしボタンを したまま取 押 、レンズを反
時計方向 回に してはずす。
レンズフードを り ける取 付
画面外 光 描写 影響 防にある が に するのを ぐために、レンズフード
の をおすすめします使用 。
* mm F . Macro50 2 8 は、レンズの がレンズフードの をは構成上鏡胴 役目
たすので、外付けのレンズフードがありません。
100 2 8mm F . Macro:
レンズフードの り け の とレンズの の を取 付 部 形状 先端 形状 合
わせ、「 」カチッ というまで に す時計方向 回 。
35 1 4mm F . G:
レンズフードの をレンズの に わせ赤線 赤点 合 、そのままレン
ズフードの とレンズの が い赤点 赤点 合 、「 」カチッ というまで
時計方向 回に す。
• 内蔵 使 撮影フラッシュを って するときは、フラッシュ が られること光 遮
がありますので、レンズフードをはずしてください。
• 赤線 付 場合などのマークが いている は、レンズフードを に り け正確 取 付
てください レンズフードの が なかったり。効果 出 、画面 一部の にレンズ
フードが り むことがあります写 込 。
• 撮影後 収納レンズフードを するときは、逆向 取 付きにレンズに り けてく
ださい。
ピントを わせる合
オートフォーカスでピントを わせる は合 場合 、カメラが に自動的
ピントを わせます でピントを わせる は合。手動 合 場合 、カメラを
マニュアルフォーカス( )手動 合によるピント わせ にして、ファイ
ンダーをのぞいてフォーカスリングを してください ファイン回。
ダー のフォーカス がピントの をお らせします内 表示 状態 知 。
50 2 8 100 2 8mm F . Macro: mm F . Macro:
( ) ( )1 2
( )3
Specifications
Name
(Model name)
Equivalent
35mm-format
focal length*1
(mm)
Lens
groups-
elements
Angle of
view 1*2
Angle of
view 2*2
Minimum
focus*3
(m (feet))
Maximum
magnification
(X)
Minimum
f-stop
Filter
diameter
(mm)
Dimensions
(maximum
diameter × height)
(mm (in.))
Mass
(g (oz.))
50mm F2.8 Macro
(SAL50M28) 75 6-7 47˚ 32˚ 0.2
(0.65) 1 f/32 55 Approx. 71.5×60
(2 13/16×2 3/8)
Approx. 295
(10 3/8)
100mm F2.8 Macro
(SAL100M28) 150 8-8 24˚ 16˚ 0.35
(1.2) 1 f/32 55 Approx. 75×98.5
(3×4)
Approx. 505
(18)
35mm F1.4 G
(SAL35F14G) 52.5 8-10 63˚ 44˚ 0.3
(1) 0.2 f/22 55 Approx. 69×76
(2 3/4×3)
Approx. 510
(18)
*1 The value for equivalent 35mm-format focal length is based on Digital Single Lens Reflex Cameras equipped with an APS-C sized image sensor.
*2 The value of angle of view 1 is based on 35mm-format cameras, and that of angle of view 2 is based on Digital Single Lens Reflex Cameras equipped with an APS-C sized
image sensor.
*3 Minimum focus is the shortest distance from the image sensor to the subject.
• This lens is equipped with a distance encoder. The distance encoder allows more accurate measurement (ADI) by using a flash for ADI.
• Depending on the lens mechanism, the focal length may change with any change of the shooting distance. The focal length assumes the lens is focused at infinity.
Included items: Lens (1), Front lens cap (1), Rear lens cap (1), Lens hood
*1 (1), Carrying case
*2 (1), Set of printed documentation
*1 The 50mm F2.8 Macro does not include a lens hood.
*2 The 50mm F2.8 Macro and 100mm F2.8 Macro do not include a carrying case.
Designs and specifications are subject to change without notice.
is a trademark of Sony Corporation.
50 2 8mm F . Macro:
m F 2.8 4 5.6 8 11 16 22 32
∞∞
28.0
∞
20.1
∞
14.3
∞
10.1
∞
7.16
∞
5.08
∞
3.61
∞
2.57
22.14
1.88
2.20
1.83
2.29
1.77
2.45
1.69
2.70
1.59
3.17
1.47
4.22
1.32
7.96
1.16
0.4 0.404
0.396
0.405
0.395
0.407
0.393
0.410
0.390
0.415
0.386
0.422
0.381
0.431
0.373
0.446
0.364
0.27 0.271
0.269
0.272
0.268
0.273
0.268
0.274
0.266
0.275
0.265
0.277
0.263
0.281
0.260
0.285
0.257
0.23 0.231
0.229
0.231
0.229
0.232
0.228
0.232
0.228
0.233
0.227
0.235
0.226
0.237
0.224
0.239
0.222
0.21 0.211
0.209
0.211
0.209
0.211
0.209
0.212
0.208
0.212
0.208
0.213
0.207
0.215
0.205
0.217
0.204
0.203 0.204
0.202
0.204
0.202
0.204
0.202
0.205
0.202
0.205
0.201
0.206
0.200
0.207
0.199
0.209
0.198
0.200 0.201
0.200
0.201
0.200
0.201
0.200
0.201
0.200
0.201
0.200
0.201
0.199
0.202
0.199
0.202
0.198
100 2 8mm F . Macro:
m F 2.8 4 5.6 8 11 16 22 32
∞∞
107
∞
75.8
∞
53.6
∞
38.0
∞
26.9
∞
19.0
∞
13.5
∞
9.55
33.07
2.93
3.11
2.90
3.16
2.86
3.23
2.80
3.33
2.73
3.50
2.63
3.76
2.50
4.21
2.34
11.00
0.993
1.00
0.991
1.01
0.987
1.01
0.982
1.02
0.975
1.03
0.965
1.05
0.951
1.08
0.932
0.6 0.602
0.598
0.602
0.598
0.603
0.597
0.605
0.595
0.607
0.593
0.610
0.593
0.614
0.587
0.619
0.582
0.45 0.451
0.449
0.451
0.449
0.451
0.449
0.452
0.448
0.452
0.448
0.453
0.447
0.455
0.445
0.457
0.443
0.4 0.400
0.400
0.400
0.400
0.401
0.399
0.401
0.399
0.401
0.399
0.402
0.398
0.403
0.397
0.404
0.396
0.37 0.370
0.370
0.370
0.370
0.370
0.370
0.370
0.370
0.371
0.369
0.371
0.369
0.371
0.369
0.372
0.368
0.352 0.352
0.352
0.352
0.352
0.352
0.352
0.352
0.352
0.352
0.352
0.352
0.351
0.353
0.351
0.353
0.351
50 2 8mm F . Macro:
a
b
c
•
さまざまな でも なピントが できるよう温度条件下 良好 確保 、フォーカスリングは
無限遠側 余分 回転 仕組 手動 合 場に に する みになっています。でピント わせをする
合は、無限遠撮影時 無限遠 終端でもフォーカスリングを の まで( )止まるまで 回さ
ず、ファインダーを ながら にピント わせをしてください見 正確 合 。
フォーカスホールドボタン –( )2
このボタンを している押 間、オートフォーカスの を めるこ駆動 止
とができます した でのピントが されますので。押 時点 固定 、その
ままのピントでシャッターを ることができます切。
• カスタム を しているカメラでは設定機能 搭載 、このボタンの を機能 変更
することができます はカメラの をご ください。詳細 取扱説明書 覧 。
フォーカスレンジ り えノブ切 替 –( ) 3(50 2 8mm F .
Macro, mm F . Macro100 2 8 )
ピントを わせたいものまでの に じて合 距離 応 、近距離撮影範囲内、
または にピントの を遠距離撮影範囲内 駆動範囲 制限(LIMIT)する
ことができます こうすることで。 、より くピントを わせる素早 合
ことができます。
近距離撮影範囲 遠距離撮影範囲
50 2 8 20mm F . Macro cm 〜27 30cm cm 〜∞
100 2 8 35mm F . Macro cm 〜54 59cm cm 〜∞
ピントを わせたいものが合、上 表 近距離撮影範囲内 場の の にある
合は、この の な にピントを わせてから範囲内 適当 位置 合 、フォーカ
スレンジ り えノブを切 替 LIMITにします。 、以降 ピントの う合 位
置 範囲内 制限 遠距離 撮影はこの に されます。のものを するときも
同様に、上 表 遠距離撮影範囲内 適当 位置 合の の の な にピントを わ
せてから、切 替り えノブをLIMITにして を します り範囲 制限 。切
替えノブをFULLにすると、全域 合でピントが います。
• 近距離撮影範囲 遠距離撮影範囲 間 撮影と の にあるものを するときは、切
り えノブを替FULLにしてください。
被写界深度目盛
レンズはある にピントを わせたとき距離合、その にあるもの距離
が に るだけでなく鮮鋭 写 、その にも として ピント前後 写真 実用上
が って る があります合 写 範囲 。この を といいます範囲 被写界深度 。
被写界深度 使用 撮影距離は レンズの 、絞 変化りによって します。
被写界深度は、被写界深度目盛上 該当 絞 表示で する りによって さ
れます。
マクロレンズの被写界深度(50 2 8mm F . Macro, mm 100
F . Macro2 8 )
マクロレンズの しい については詳 被写界深度 、被写界深度表を
ご ください覧。
• 被写界深度目盛、被写界深度表は35mm判 用カメラ です。APS-Cサイ
ズ の を したデジタル レフカメラでは相当 撮像素子 搭載 一眼 、被写界深度
は くなります浅。
マクロ について撮影 (50 2 8mm F . Macro,
100 2 8mm F . Macro)
撮影倍率
倍率目盛 鏡胴繰 出 部 比率 表示 本が り し に で されています レンズ。
体 先端部 重 線の と なる (イラスト では1 1:)が の で現在 撮影倍率
す。
• 撮影倍率 高 目立が くなるとカメラぶれが ちやすくなりますので、撮影時
は でカメラをしっかり してください三脚等 固定 。
露出補正( )単体露出計 使用 場合を する など
レンズの り し が くなると繰出量多 、撮像素子面 到達 光量に する が
減少 露出 自動設定 撮影 場合します カメラが。を して する 、または
マニュアルモードでもカメラの にしたがって する露出指示 撮影
場合は、自動的 補正 撮影 単体露に されるのでそのまま できます。
出計 使 撮影 場合を ってマニュアルモードで する や、一部のフラッ
シュに されているマニュアルフラッシュ を って搭載 撮影機能 使 撮
影 場合する は、露出補正 露出補正量をしてください。については、
露出補正量表 覧をご ください。
露出補正量表について
a 露出補正段数
b 撮影倍率
c 撮影距離
( : 、例 絞 補正 場合りで する +2は りを絞2段階開放側 補正に しま
す。)
保証書とアフターサービス
保証書について
• この には が されていますので製品 保証書 添付 、おいげでおけ買上店 受取
りください。
• 所定事項 記入 記載内容 確 上の および をお かめの 、大切 保管に してくださ
い。
• 保証期間は、おいげより買上日 1年間です。
アフターサービスについて
調子 悪が いときはまずチェックを
この をもう ご になってお べください それでも説明書 一度 覧 調 。具
合 悪の いときは、おいげ買上店、またはソニーデジタル レフカ一眼
メラ ヘルプデスクにご ください専用 相談 。
保証期間中 修理の は
保証書 記載内容 基 修理 詳の に づいて させていただきます。しくは
保証書 覧をご ください。
保証期間経過後 修理の は
修理 機能 維持 場合によって が できる は、ご により さ要望 有料修理
せていただきます。
お い わせ問 合
窓口 案内のご
■
ソニーデジタル レフカメラ ヘルプデスク一眼 専用
ご での な や なご のご使用上 不明 点 技術的 質問 相談、
および の です修理受付 窓口 。
製品 品質 万全 期の には を しておりますが、万一不具
合 生 場合が じた は、「ソニーデジタル レフカメ一眼
ラ ヘルプデスク専用 」までご ください に連絡 。修理
関 案内 修理するご をさせていただきます また。が
必要 場合な は、お のお まで にて客様 宅 指定宅配便 集
荷にうかがいますので、まずお ください電話 。
ナビダイヤル ....................... 0570 00 0770- -
(全国 市内通話料 利用どこからでも でご いただけま
す)
携帯電話・PHS
でのご は利用 .....0466 38 0231- -
(ナビダイヤルが できない はこちらをご使用 場合 利
用ください )
受付時間:
月 金曜日 午前〜9時 午後〜8時
土、日曜日、祝日 午前9時 午後〜5時
電話のおかけ
間違 注いにご
意ください。
–2
主 仕様な
商品名
( )型名
35mm判換算
焦点距離*1
(mm)
レンズ
群 枚−画角1*2画角2*2
最短撮影
距離*3
(m)
最大撮影倍率
( )倍最小絞りフィルター径
(mm)
外形寸法(最
大径 長×さ)
(mm)
質量(g)
50 2 8mm F . Macro
(SAL M )50 28 75 6 7 47-゚32゚0 2 1 32 55. F 約71 5.×60 約295
100 2 8mm F . Macro
(SAL M )100 28 150 8 8 24-゚
16
゚0 35 1 32 55. F 約75×98 5.約505
35 1 4mm F . G
(SAL F G)35 14
52 5.
8 10 63-゚
44
゚0 3 0 2 22. . F
55
約69×76 約510
*1 ここでの35mm判換算焦点距離とは、
APS-C サイズ の を したデジタル レフカメラでの を します相当 撮像素子 搭載 一眼 値 表 。
*2 画角1は35mm判カメラ、画角2はAPS-Cサイズ の を したデジタル レフカメラでの を します相当 撮像素子 搭載 一眼 値 表 。
*3 最短撮影距離とは、撮像素子面 被写体 最短距離 表から までの を します。
•
このレンズは エンコーダーを しています エンコーダーとは距離 搭載 。距離 、
高精度 調光な(ADI調光)を
ADI対応 組 合 実現 機能フラッシュとの み わせで する です。
• レンズの によっては機構 、撮影距離 変化 伴 焦点距離 変化 場合 記載 焦点距離 撮影距離 無限遠 定義の に って が する があります。の は が での です。
同梱物:レンズ( )1、前レンズキャップ( )1、後レンズキャップ( )1、レンズフード*1( )1、キャリングケース*2( )1、印刷物一式
*1 mm F . Macro50 2 8 にはレンズフードは されません同梱 。
*2 mm F . Macro,50 2 8 100 2 8mm F . Macroにはキャリングケースは されません同梱 。
仕様 外観および は、改良 予告 変更のため なく することがありますが、ご ください了承 。
はソニー の です株式会社 商標 。
2-685-162- (1)03
デジタル レフカメラ レンズ一眼 用 /Lens for
Digital Single Lens Reflex Camera/
Objectif pour appareil photo numérique
reflex à objectifs interchangeables
取扱説明書/Operating Instructions/Mode d'emploi/
Manual de instrucciones
50mm F2.8 Macro
100mm F2.8 Macro
35mm F1.4 G
©2006 Sony Corporation Printed in Japan
SAL50M28/100M28/35F14G
電気製品は、安全 注意事項 守のための を らないと、人身への
危害 火災 財産 損害 与や などの への を えることがあります。
この には取扱説明書 、事故 防 重要 注意事項 製品 取 扱を ぐための な と の り いかたを
示しています。この をよくお みの取扱説明書 読 上、製品 安全 使を にお いください。
お みになったあとは読、いつでも られる に ず してください見 所 必 保管 。
100 2 8mm F . Macro
( mm F . Macro)50 2 8 :
35 1 4mm F . G:
100 2 8 35 1 4mm F . Macro: mm F . G: