This instruction manual explains how to use
lenses. Precautions common to all lenses such
as notes on use are found in the separate
“Precautions before using”. Be sure to read both
documents before using your lens.
This lens is designed for Sony α camera system
E-mount cameras. You cannot use it on A-mount
The lens is compatible with the range of a 35mm
A camera equipped with a 35mm format image
sensor can also be set to shoot at APS-C size.
For details on how to set your camera, refer to its
For further information on compatibility, visit the
web site of Sony in your area, or consult your dealer
of Sony or local authorized service facility of Sony.
For Customers in the U.S.A.
For question regarding your product or for the Sony
Service Center nearest you,
call 1-800-222-SONY (7669).
Supplier’s Declaration of Conformity
Responsible Party : Sony Electronics Inc.
Address : 16535 Via Esprillo, San Diego, CA 92127
Telephone Number : 858-942-2230
• Do not point the lens directly at the sun or any
strong light source. Internal malfunction of the
camera body and lens, smoke, or a fire may result
due to the effect of light focusing.
If circumstances necessitate leaving the lens in
sunlight, be sure to attach the lens caps.
• When shooting against the sun, keep the sun
completely out of the angle of view. Otherwise,
solar rays may be concentrated at a focal point
inside the camera, causing smoke or a fire. Keeping
the sun slightly out of the angle of view may also
• Do not point the lens toward the sun when carrying
Sunlight may converge through the lens and
potentially cause a malfunction.
• This lens is not water-proof, although designed with
dust-proofness and splash-proofness in mind. If using
in the rain etc., keep water drops away from the lens.
• If the lens alone is shaken or if a camera with the lens
attached is shaken while the camera is turned off,
an internal component of the lens may rattle. This,
however, does not indicate a malfunction.
In addition, while you carry around the lens, your
movement may cause the internal lens groups to
shake. This, however, does not affect the performance
• When storing or carrying this lens, prevent it from
dropping. During shooting, use a sturdy tripod with it.
• When carrying a camera with the lens attached, firmly
grasp the body of the lens.
• Using this unit with products from other
manufacturers may affect its performance, leading to
accidents or malfunction.
Precautions on using a flash
• You cannot use a built-in camera flash with this lens.
• When using the lens, the corners of the screen
become darker than the center. To reduce this
phenomena (called vignetting), close the aperture by
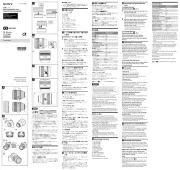
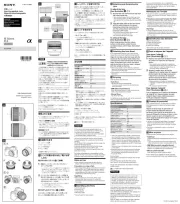
1 Lens hood 2 Lens hood index 3 Zooming ring
4 Focal-length scale 5 Focal-length index (gray)
6 Focusing ring 7 Tripod collar ring index (gray)
11 Tripod collar ring index (gray)
12 Tripod collar ring-locking knob
14 Full-time direct manual focus switch
15 Focus-range limiter 16 Mounting index
17 Lens mount rubber ring 18 SteadyShot switch
19 SteadyShot mode switch 20 Tripod collar
21 Screw holes for tripod attachment (one 1/4-inch
hole, one 3/8-inch hole)*
22 Polarizing-filter window 23 Hood release button
Do not touch the lens contacts.
You can attach the tripod (not supplied, screw length
of up to 5.5 mm) that requires the 1/4-20UNC screw
or the 3/8-16UNC screw for attachment.
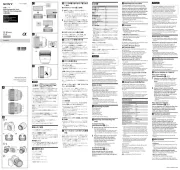
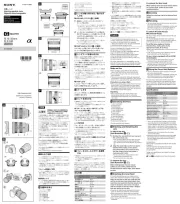
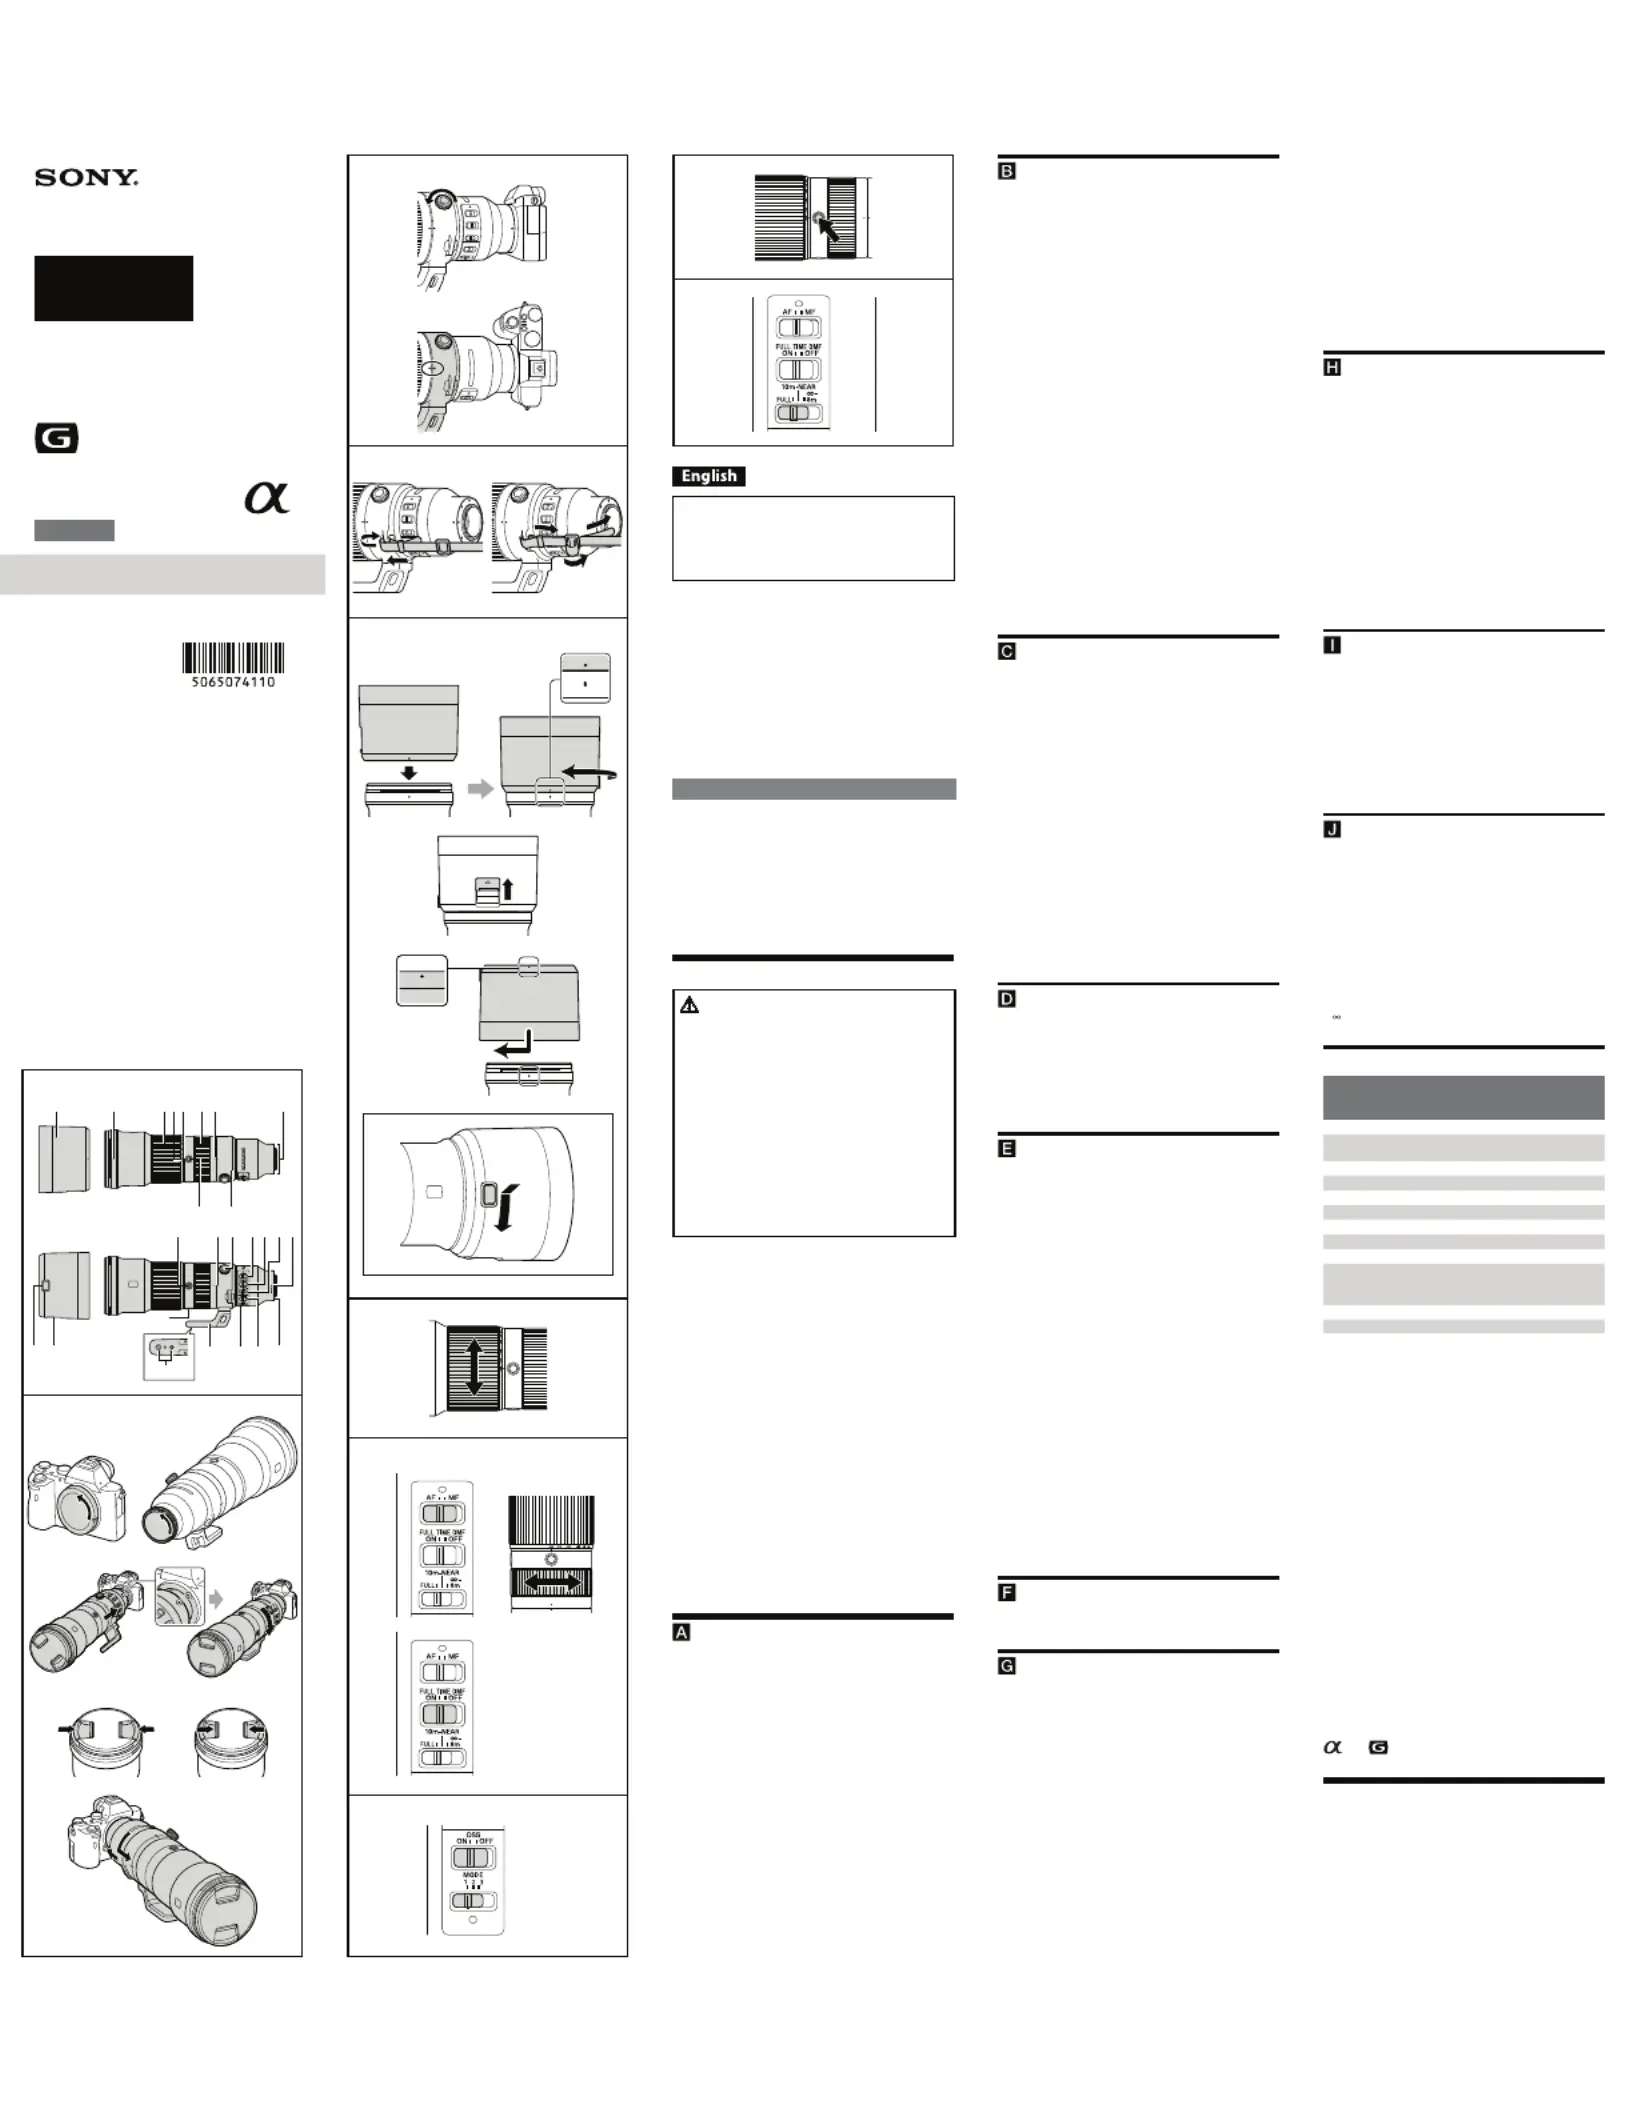
Attaching and Detaching the
• Before attaching/detaching the lens, hold the lens
by its mounting body. Do not hold it by any of its
operation controls, such as the focusing ring.
Remove the rear lens cap and the camera
Align the white index on the lens barrel
with the white index on the camera
(mounting index), then insert the lens
into the camera mount and rotate it
clockwise until it locks.
• Do not press the lens release button on the
camera when mounting the lens.
• Do not mount the lens at an angle.
Remove the front lens cap.
• You can attach/detach the front lens cap in two
Attach the front lens cap.
While holding down the lens release
button on the camera, rotate the lens
counterclockwise until it stops, then
detach the lens. (See illustration
When using a tripod, attach it to the tripod collar of
the lens, not to the tripod receptacle of the camera.
To change vertical/horizontal
Loosen the tripod collar ring-locking knob on
the tripod collar (1) and rotate the camera either
direction. The camera can be quickly switched
between vertical and horizontal positions while
maintaining stability when using a tripod.
• Gray indexes (tripod collar ring indexes) are located at
90° intervals on the collar ring. Align a gray index on
the tripod collar ring with the gray index (tripod collar
ring index) on the lens to adjust the camera position
• Tighten the tripod collar-locking knob firmly after the
• The tripod collar ring may hit the camera body or
accessory when rotated, depending on the camera
or accessory model. For more information on
compatibility with cameras and accessories, visit the
web site of Sony for your area.
Before carrying around the lens, attach the lens
• To prevent the lens from dropping, be sure to attach
the lens strap properly so that the lens strap will not
come loose from the lens.
• When carrying around the camera with the lens
attached, be sure to grasp the lens strap on the lens,
not the one on the camera.
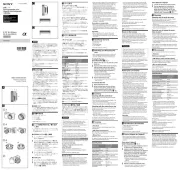
It is recommended that you use a lens hood to
reduce flare and ensure maximum image quality.
Align the red line on the lens hood with the
red line on the lens (lens hood index), then
insert the lens hood into the lens mount and
rotate it clockwise until it clicks into place
and the red dot on the lens hood is aligned
with the red line on the lens (1).
• If the lens hood is not rotated until it clicks into
place, there is a possibility that a shadow appears on
captured images or the lens hood falls off.
• The polarizing-filter window can be opened (2) to
allow the polarizing filter (sold separately) to rotate
without having to remove the lens hood. While
shooting without filter operations or carrying around
the lens, however, keep the window closed.
• If the flash light is partially blocked by the lens hood,
a shadow may appear at the bottom of captured
images. In such a case, remove the lens hood.
• When storing, fit the lens hood onto the lens
While holding down the hood release button
on the lens hood, rotate the lens hood
Rotate the zooming ring to the desired focal
• The focus mode switch of this lens does not function
For further information on compatibility, visit the web
site of Sony in your area, or consult your dealer of
Sony or local authorized service facility of Sony.
To switch AF (auto focus)/MF
The focus mode can be switched between AF and
For AF photography, both the camera and lens
should be set to AF. For MF photography, either or
both the camera or lens should be set to MF.
To set the focus mode on the lens
Slide the focus mode switch to the
appropriate mode, AF or MF (1).
• Refer to the camera manuals to set the focus mode of
• In MF, turn the focusing ring to adjust the focus (2)
while looking through the viewfinder, etc.
• With the full-time direct manual focus switch slid to
ON, the focus mode automatically switches to MF
when the focusing ring is rotated, regardless of the AF
mode setting and the focus adjustment (3).
To use a camera equipped with an AF/MF
• By pressing the AF/MF button during AF operation,
you can temporarily switch to MF.
• Pressing the AF/MF button during MF operation lets
you temporarily switch to AF if the lens is set to AF
• ON: Compensate for camera shake.
• OFF: Does not compensate for camera shake. We
recommend setting the SteadyShot switch to
OFF when shooting with a tripod.
Set the SteadyShot switch to ON, and set the
• MODE1: Compensate for normal camera shake.
• MODE2: Compensate for camera shake when panning
• MODE3: Compensate for camera shake to minimize
framing disturbances. This helps you to keep
up with fast and irregularly moving subjects
for photography, for example, in sports
Using the Focus Hold Button(s)
• The focus hold button of this lens does not function
For further information on compatibility, visit the web
site of Sony in your area, or consult your dealer of
Sony or local authorized service facility of Sony.
Press the focus hold button in AF to cancel AF. The
focus is fixed and you can release the shutter on
the fixed focus. Release the focus hold button while
pressing the shutter button halfway to start AF
The focus-range limiter enables you to reduce the
AF time. This is useful when the subject distance is
Slide the focus-range limiter to select the
• FULL: You can adjust the focus from the
minimum focusing distance to infinity.
• 10m-NEAR: You can adjust the focus from 10.0 m
(32.8 feet) to the minimum focusing
- 8m: You can adjust the focus from 8.0 m
Product name (Model name)
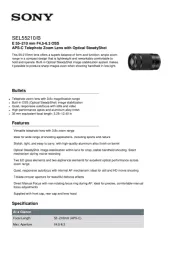
Focal length (mm) 400-800
Lens groups-elements 19-27
(m (feet)) 1.7-3.5 (5.58-11.5)
Maximum magnification (X) 0.23
Minimum aperture f/36-f/45
(maximum diameter × height)
Mass (approx., g (oz.)) 2 475 (87.4)
For further information on compatibility with the
teleconverter (sold separately) and specifications
used with the teleconverter, visit the web site of
Sony in your area, or consult your dealer of Sony or
local authorized service facility of Sony.
This is the equivalent focal length in 35mm format
when mounted on an Interchangeable Lens Digital
Camera equipped with an APS-C sized image sensor.
Angle of view 1 is the value for 35mm cameras, and
angle of view 2 is the value for Interchangeable Lens
Digital Cameras equipped with an APS-C sized image
Minimum focus is the distance from the image
• Depending on the lens mechanism, the focal length
may change with any change in shooting distance.
The focal lengths given above assume the lens is
(The number in parentheses indicates the number
Lens (1), Front lens cap (1), Rear lens cap (1),
Lens hood (1), Lens strap (1),
Set of printed documentation
Design and specifications are subject to change
This product comes with software that is used
based on licensing agreements with the owners
of that software. Based on requests by the owners
of copyright of these software applications, we
have an obligation to inform you of contents of the
agreement. For the software used on this product,
https://rd1.sony.net/help/di/lens_oss1/en/