電気製品は、安全のための注意事項を守らないと、人身への
危害や火災などの財産への損害を与えることがあります。
この取扱説明書には、事故を防ぐための重要な注意事項と製品の取り扱いかたを
示しています。この取扱説明書をよくお読みの上、製品を安全にお使いください。
お読みになったあとは、いつでも見られる所に必ず保管してください。
この「取扱説明書」ではレンズごとの使いかたを説明していま
す。使用上のご注意など、レンズに共通したご注意や説明につ
必ずご使用の前に、本書と合わせてよくお読みのうえでご使用
マウントカメラでお使いの場合は、別売のマウントアダプターをご使用
レンズを取り付けてカメラを持ち運ぶときは、カメラとレンズの両方を
本機は防じん、防滴性に配慮して設計されていますが、防水性能は備えて
いません。雨中使用時などは、水滴がかからないようにしてください。
カメラ内蔵フラッシュ使用時には、レンズフードをはずして使用
してください。レンズとフラッシュの組み合わせによっては、レ
ズがフラッシュ光を妨げ、写真の下部に影ができることがあり
レンズは原理的に画面周辺部の光量が中心部に比べ低下します。
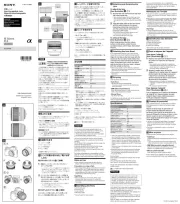
レンズの前後レンズキャップとカメラのボディキャップ
レンズとカメラのオレンジの点(マウント標点)を合わせ
てはめ込み、レンズを軽くカメラに押し当てながら、時計
方向に「カチッ」とロックがかかるまでゆっくり回す。
レンズを取り付けるときは、カメラのレンズ取りはずしボタンを押
カメラのレンズ取りはずしボタンを押したまま、レンズを反
三脚をお使いの場合、カメラの三脚ネジ穴ではなく、レンズの三脚
せることができます。三脚使用時に、安定感を損なわずに縦位置
°ごとにグレーの点(三脚座指標)があります。レンズ側
のグレーの線(三脚座指標)と合わせると、カメラの正確な位置決めがで
位置を決めた後は、三脚座クランプノブをしっかりと締めてください。
三脚をお使いにならない場合、レンズから三脚座を取りはずすこ
詳しくは、「 レンズの取り付けかた/取りはずしかた」を参照して
脚座取り付け指標)とレンズのオレンジの点(マウント標
三脚座をレンズマウント側に移動させて、レンズから取り
画面外にある光が描写に影響するのを防ぐために、レンズフード
レンズフードの赤線をレンズの赤線(レンズフード指標)に合
わせ、そのままレンズフードの赤点とレンズの赤線が合い「カ
付けたまま円偏光フィルター(別売)を操作することができます。撮影
レンズフードを正確に取り付けてください。レンズフードの効果が出な
かったり、画面の一部にレンズフードが写り込むことがあります。
撮影後レンズフードを収納するときは、逆向きにレンズに取り付けてく
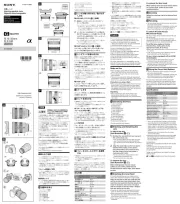
To switch AF (auto focus)/MF (manual focus)
The focus mode can be switched between AF and MF on the lens.
For AF photography, both the camera and lens should be set to AF. For MF
photography, either or both the camera or lens should be set to MF.
To set the focus mode on the lens
Slide the focus-mode switch to the appropriate mode, AF or MF (1).
Refer to the camera manuals to set the focus mode of the camera.ˎ
In MF, turn the focusing ring to adjust the focus (2) while looking through the ˎ
To use a camera equipped with an AF/MF control button
Press the AF/MF control button to switch AF to MF when both the camera and ˎ
Press the AF/MF control button to switch MF to AF when the camera is set to
MF and the lens is set to AF.
Direct manual focus (DMF)
Even when AF is set, the setting is switched to MF automatically if you rotate
the focusing ring while pressing the shutter button halfway. This provides
quick fine adjustment of focusing (DMF). Select the mode for correct DMF
from the following. Set the DMF-mode switch to whichever you prefer.
Rotate the focusing ring to set correct DMF when the focus is locked in AF-A
(automatic auto focus) or AF-S (single-shot auto focus). Using this mode is
recommended for normal subjects.
DMF is not available in AF-C (continuous auto focus), when out of focus, or ˎ
with continuous advance in AF-A after the second focus is confirmed.
In any AF mode (AF-A/S/C), rotate the focusing ring while pressing the
shutter button halfway to set correct DMF. This is useful to catch a fast-
Shooting at infinity in MF
The focusing mechanism turns slightly past infinity to provide accurate
focusing under various operating temperatures. Always confirm the image
sharpness through the viewfinder, etc., especially when the lens is focused
This lens has 3 focus-hold buttons.
Press the focus-hold button in AF to cancel AF. The focus is fixed and you
can release the shutter on the fixed focus. Release the focus-hold button while
pressing the shutter button halfway to start AF again.
The function of the focus-hold button can be changed on cameras with custom ˎ
function capability. Refer to the camera manuals for details.
Switching focus range (AF range)
The focus-range limiter enables you to reduce the auto focusing time. This is
useful when the subject distance is definite.
Slide the focus-range limiter to select the focus range.
FULL: AF is set to the minimum focusing distance to infinity.ˎ
∞ - 3m: AF is set to 3 m (9.8 feet) to infinity.ˎ
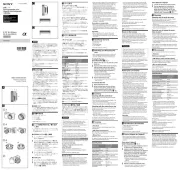
The sets of three numbers, upper, middle, and bottom, are for 70 mm,
105 mm, and 200 mm focal length respectively, in meters.
The depth-of-field table is for 35mm-format cameras. The depth-of-field is
shallower when you use Interchangeable Lens Digital Cameras equipped with
an APS-C sized image sensor.
Equivalent 35mm-format focal length*
Maximum magnification (×)
Dimensions (maximum diameter × height)
(excluding tripod-mounting collar)
The value for the equivalent 35mm-format focal length is based on Interchangeable
Lens Digital Cameras equipped with an APS-C sized image sensor.
The value of angle of view 1 is based on 35mm-format cameras, and that of
angle of view 2 is based on Interchangeable Lens Digital Cameras equipped
with an APS-C sized image sensor.
Minimum focus is the distance from the image sensor to the subject.
This lens is equipped with a distance encoder. The distance encoder allows more
accurate measurement (ADI) by employing a flash for the process.
Depending on the lens mechanism, the focal length may change with any change
of the shooting distance. The focal length assumes the lens is focused at infinity.
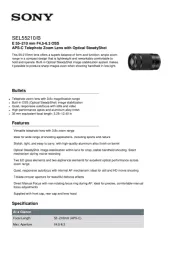
Included items: Lens (1), Lens front cap (1), Lens rear cap (1), Lens hood (1),
Lens case (1), Set of printed documentation
Designs and specifications are subject to change without notice.
and is a trademark of Sony Corporation.
Company names and company product names are trademarks or registered
trademarks of those companies.
You will find information on using each lens in this manual. Precautions
common to lenses, such as notes on use will be found in “Precautions
before using” on a separate sheet. Be sure to read both documents before
This lens is designed for A-mount, which can be used on Sony cameras.α
When using this lens with an E-mount camera, attach a separately sold Mount ˎ
Adaptor. Do not attach the lens directly to the E-mount camera or you may
When you carry the camera with the lens attached, make sure to hold both the
camera and the lens steadily.
This lens is not water-proof, although designed with dust-proofness and splash-
proofness in mind. If using in the rain etc., keep water drops away from the lens.
When using a built-in camera flash, make sure to remove the lens hood.
With certain of lens/flash combinations, the lens may partially block the light
of the flash, resulting in a shadow at the bottom of the picture.
When you use lens, the corners of the screen become darker than the center.
To reduce this phenomena (called vignetting), close the aperture by 1 to 2
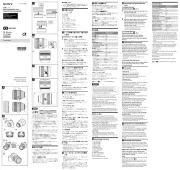
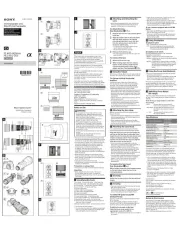
1···Lens hood index 2···Focusing ring 3···Zooming ring
4···Focal-length scale 5···Focal-length index 6···Collar mounting index (red)
7···Lens index (gray) 8···Collar index (gray) 9···Lens contacts 10···Collar
11···Distance index 12···Distance scale 13···Focus-mode switch
14···Lens mounting index 15···DMF-mode switch 16···Focus-range limiter
17···Collar-locking knob 18···Focus-hold button
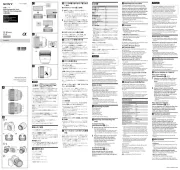
Attaching/detaching the lens
To attach the lens (See illustration
Remove the rear and front lens caps and the camera body cap.
You can attach/detach the lens front cap in two ways, (1) and (2). When
you attach/detach the lens cap with the lens hood attached, use method (2).
Align the orange dot on the lens barrel (mounting index) with the
orange dot on the camera (mounting index), then insert the lens
into the camera mount and rotate it clockwise until it locks.
Do not press the lens release button on the camera when mounting the lens.
Do not mount the lens at an angle.
To remove the lens (See illustration
While pressing and holding the lens release button on the camera, rotate
the lens counterclockwise until it stops, then detach the lens.
When using a tripod, attach it to the-mounting collar of the lens, not to the
tripod receptacle of the camera.
To change vertical/horizontal position
Loosen the collar-locking knob on the tripod-mounting collar (1) and rotate the
camera either direction. The camera can be quickly switched between vertical
and horizontal positions while maintaining stability when using a tripod.
Gray dots (collar indexes) are located at 90° intervals on the tripod-mounting ˎ
collar. Align a gray dot on the tripod-mounting collar with the gray line (collar
index) on the lens to adjust the camera position precisely (2).
Tighten the collar-locking knob firmly after the camera position is set.
To detach the tripod-mounting collar from the lens
The tripod-mounting collar can be detached from the lens when not using a
Remove the lens from the camera.
Attaching/detaching the lens” for details.
Loosen the collar-locking knob (1).
Rotate the tripod-mounting collar to align the red line on the
tripod-mounting collar (collar mounting index next to SET/
RELEASE) with the orange dot on the lens (mounting index) (3).
Move the tripod-mounting collar towards the lens mount and
detach the tripod-mounting collar from the lens (4).
It is recommended that you use a lens hood to reduce flare and ensure
Align the red line on the lens hood with the red line on the lens (Lens
hood index). Turn the lens hood clockwise until the red line on the
lens meets the red dot on the lens hood and it clicks into place (1).
The polarizing-filter window can be opened (2) to allow the rotation of the ˎ
polarizing filter (sold separately) without having to remove the lens hood. Close
the window when shooting.
Attach the lens hood properly. Otherwise, the lens hood may interfere with the
desired effect or may appear in pictures.
When storing, turn over the lens hood and place it onto the lens backwards.
Rotate the zooming ring to the desired focal length.
ズームリングを回して、希望の焦点距離(ズームの位置)に合わせ
ます。カメラ側あるいはレンズ側のいずれか一方、または両方の
カメラのフォーカスモードの設定方法については、カメラの取扱説明書
ではファインダー等を見ながらフォーカスリングを回して、ピントを
撮影でも、シャッターボタンを半押ししている間にフォーカス
カスロックしているときに、フォーカスリングを回すと
動します。通常は、このモードの使用をお勧めします。
シャッターボタンを半押ししているときに、フォーカスリングを
温度変化によるピントの移動を補正するため、無限遠(∞)位置に
は、ファインダー等を見ながら正確にピントを合わせてください。
ことができます。ピントが固定され、そのままのピントでシャッ
ターを切れます。シャッターボタンを半押しした状態で、フォー
カスタム設定機能を搭載しているカメラでは、このボタンの機能を変更
することができます。詳細はカメラの取扱説明書をご覧ください。
の駆動範囲を切り替えて、ピント合わせの時間を短縮できま
す。撮影距離が一定の範囲内に限られている場合に便利です。
フォーカスレンジ切り替えスイッチで、撮影距離範囲を選択
像素子を搭載したレンズ交換式デジタルカメラでは、被写界深度
搭載したレンズ交換式デジタルカメラでの値を表します。
このレンズは距離エンコーダーを搭載しています。距離エンコーダーに
レンズの機構によっては、撮影距離の変化に伴って焦点距離が変化する
場合があります。記載の焦点距離は撮影距離が無限遠での定義です。
仕様および外観は、改良のため予告なく変更することがあります
その他、各社名及び各商品名は各社の商標または登録商標です。
/Operating Instructions/Mode d'emploi/Manual de
instrucciones/
/
Interchangeable Lens/
Objectif interchangeable/
/Depth-of-field table (in meters)/Tableau de profondeur de champ (en
mètres)/Tabla de profundidad de campo (en metros)/
mm/Upper row: 70 mm, middle row: 105 mm, lower row: 200 mm/Ligne du haut : 70 mm, ligne du milieu :
105 mm, ligne du bas : 200 mm/Fila superior: 70 mm, fila del medio: 105 mm, fila inferior: 200 mm/
F2.8 F4 F5.6 F8 F11 F16 F22 F32