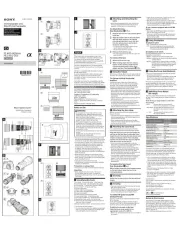
この取扱説明書には、事故を防ぐための重要な注意事項と製品
の取り扱いかたを示しています。この取扱説明書をよくお読
みの上、製品を安全にお使いください。お読みになったあとは、
マウントカメラでお使いの場合は、別売のマウントアダ
プターをご使用ください。破損のおそれがありますので、
レンズを取り付けてカメラを持ち運ぶときは、カメラと
レンズを取り付けるときは、カメラのレンズ取りは
レンズを外したときは、接点やレンズ面を傷付けないよ
撮影後レンズフードを収納するときは、逆向きにレンズ
インダー内のフォーカス表示がピントの状態をお知らせ
カスタム設定機能を搭載しているカメラでは、このボタ
ンの機能を変更することができます。詳細はカメラの取
このレンズは距離エンコーダーを搭載しています。距離
レンズの機構によっては、撮影距離の変化に伴って焦点
距離が変化する場合があります。記載の焦点距離は撮影
You will find information on using each lens in this
manual. Precautions common to lenses, such as notes
on use will be found in “Precautions before using” on a
separate sheet. Be sure to read both documents before
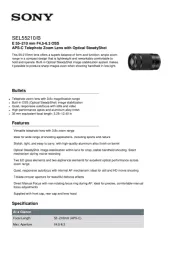
This lens is designed for Sony cameras.α
This lens was developed jointly by Carl Zeiss and Sony
Corporation and designed for Sony A-mount cameras.
This lens is produced according to the strict standards and
quality assurance system of Carl Zeiss.
When using this lens with an E-mount camera, attach a
separately sold Mount Adaptor. Do not attach the lens directly
to the E-mount camera or you may damage both.
When you carry the camera with the lens attached, make sure
to hold both the camera and the lens steadily.
Precautions for flash use
When using a built-in camera flash, make sure to remove
the lens hood and shoot from at least 1 m (3.3 feet) away
from your subject. With certain of lens/flash combinations,
the lens may partially block the light of the flash, resulting
in a shadow at the bottom of the picture.
When you use lens, the corners of the screen become
darker than the center. To reduce this phenomena (called
vignetting), close the aperture by 1 to 2 stops.
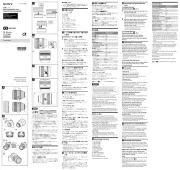
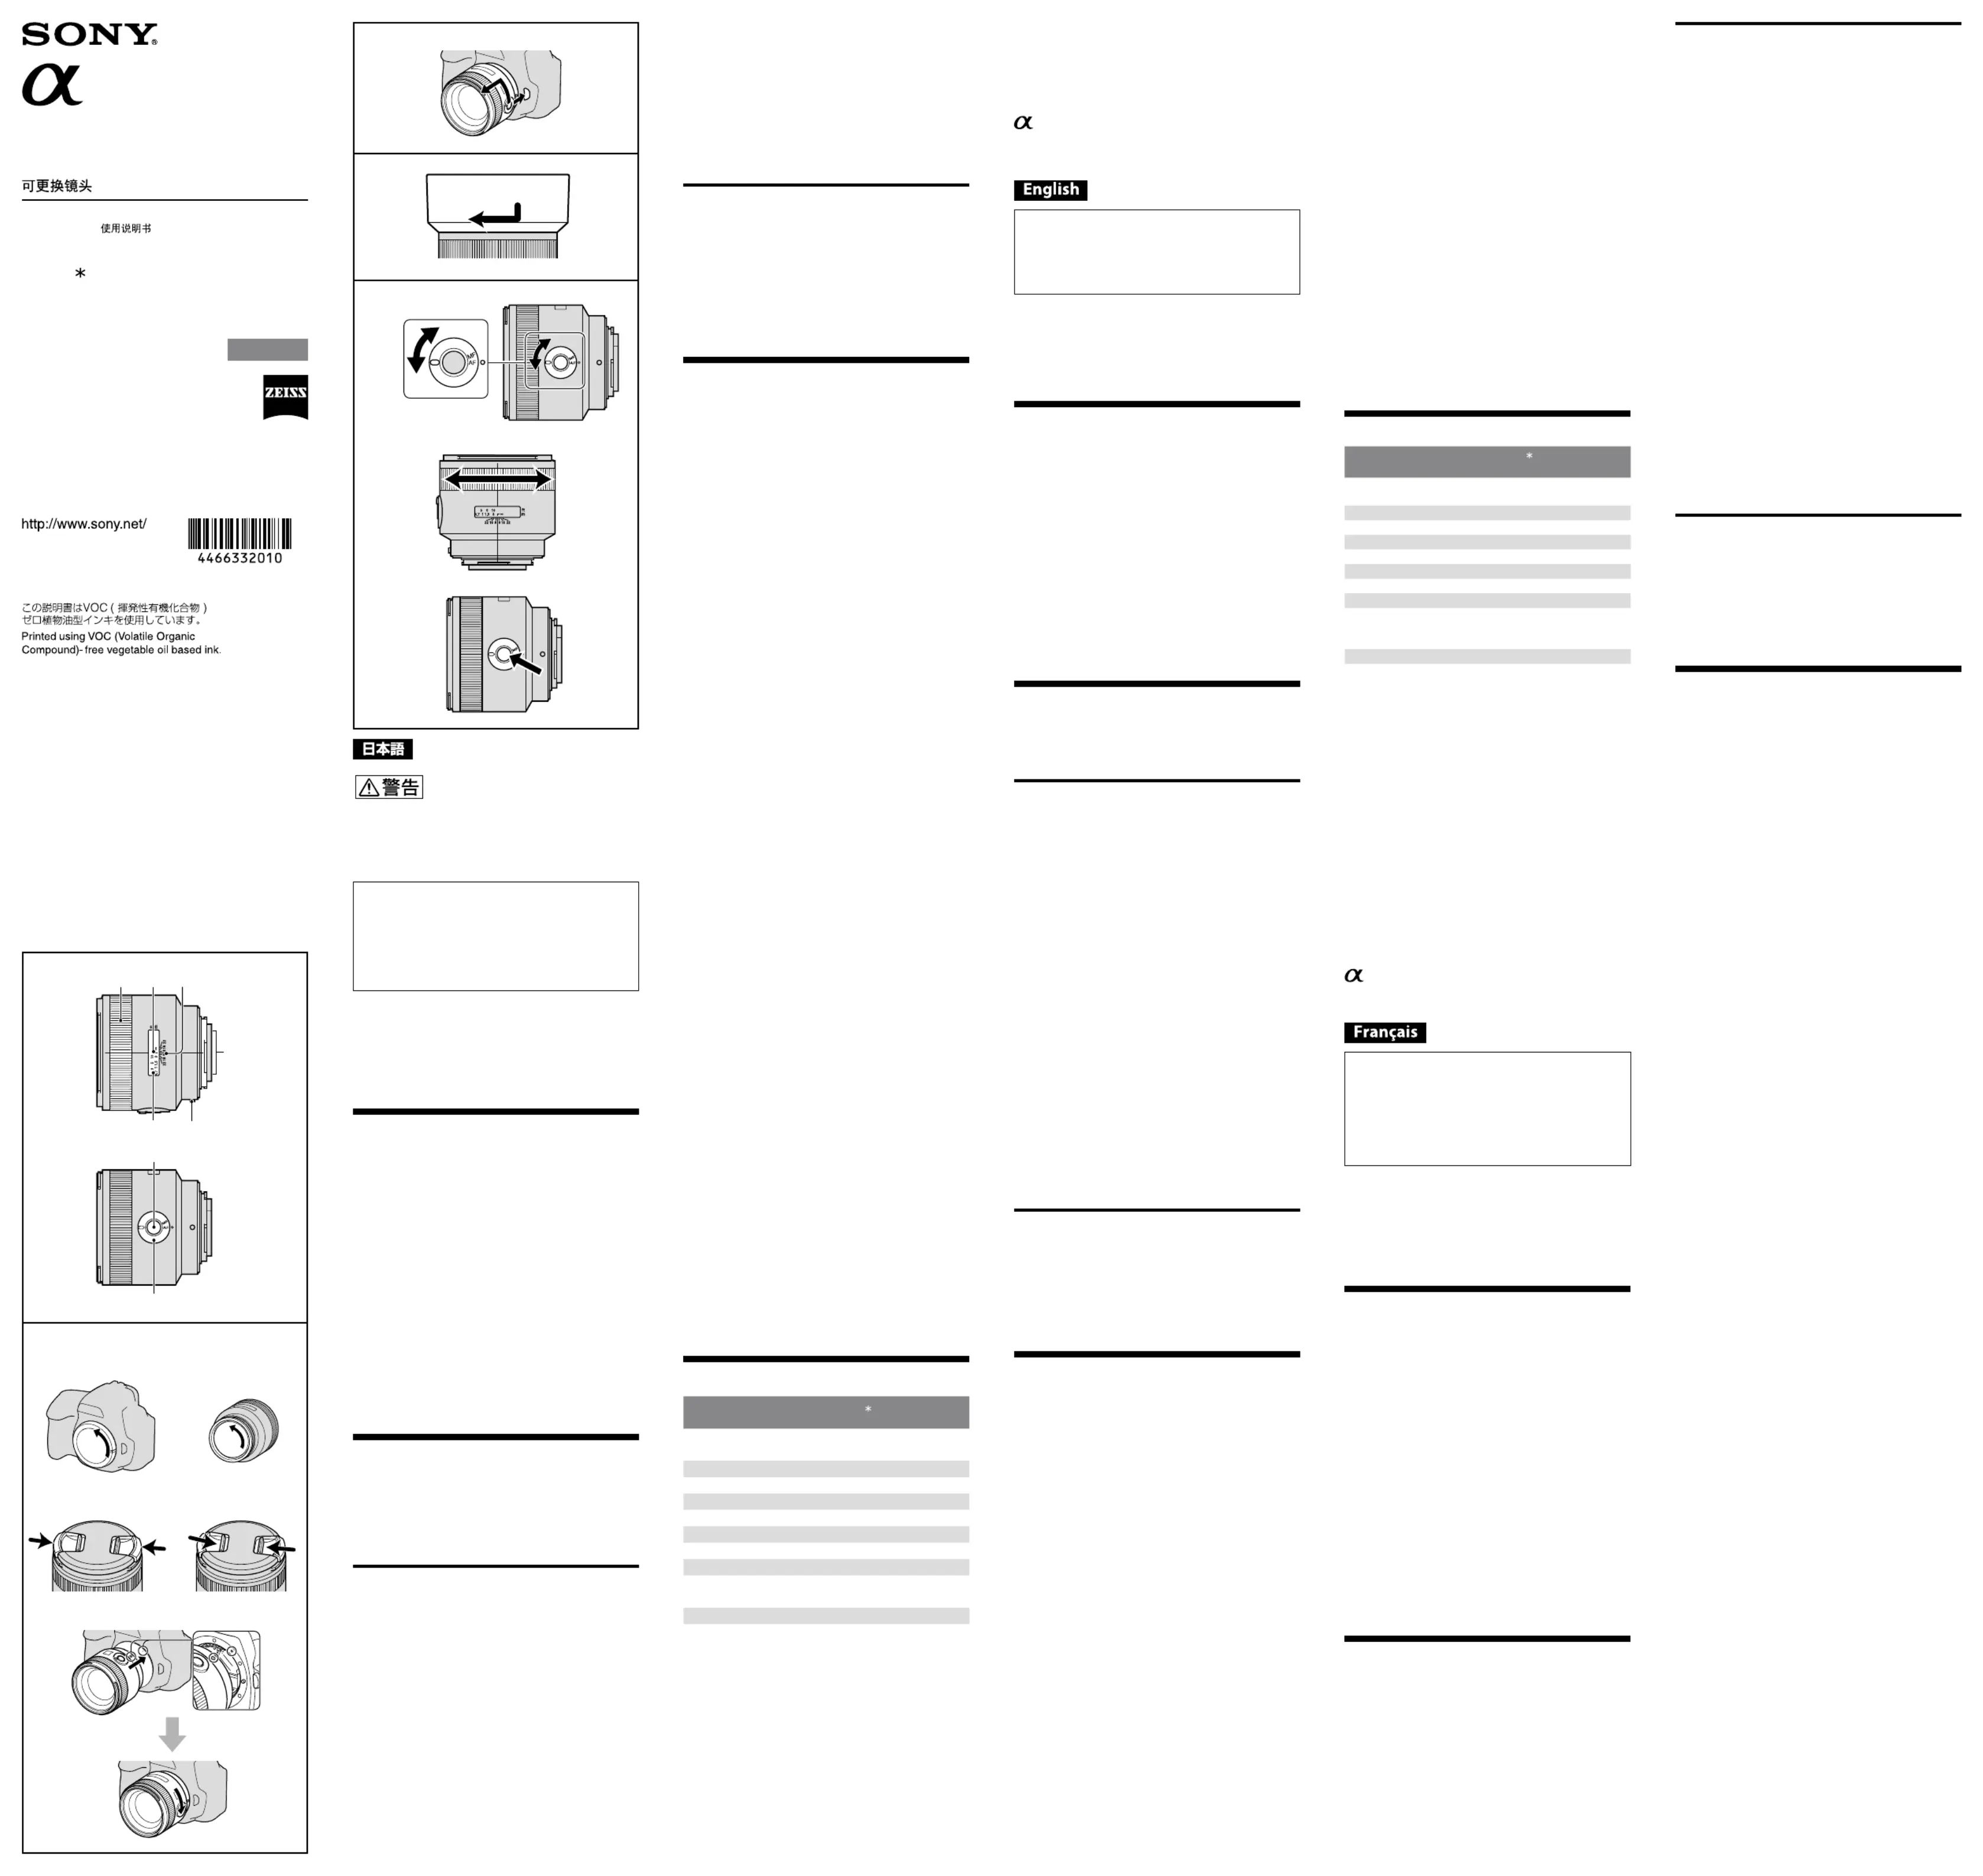
1···Focusing ring 2···Distance index
3···Depth-of-field scale 4···Lens contacts
5···Mounting index 6···Distance scale
7···Focus-hold button 8...Focus-mode switch
Attaching/detaching the lens
1 Remove the rear and front lens caps and the
You can attach/detach the lens front cap in two ways, (1)
and (2). When you attach/detach the lens cap with the
lens hood attached, use method (2).
2 Align the orange index on the lens barrel with
the orange index on the camera (mounting
index), then insert the lens into the camera
mount and rotate it clockwise until it locks.
Do not press the lens release button on the camera when
Do not mount the lens at an angle.
While pressing and holding the lens release button on
the camera, rotate the lens counterclockwise until it
stops, then detach the lens.
After removing the lens, place it with the lens contacts facing
up so that neither the lens contacts nor the rear glass are
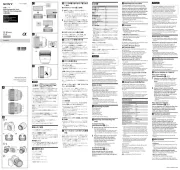
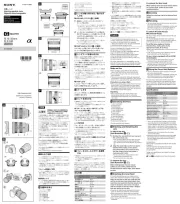
It is recommended that you use a lens hood to reduce flare
and ensure maximum image quality.
Fit the lens hood into the mount on the end of the
lens barrel and rotate the lens hood clockwise until it
When storing, turn over the lens hood and place it onto the
To switch between AF (auto focus) and
Focusing can be switched between AF and MF on the lens.
For AF photography, both the camera and lens should be
set to AF. For MF photography, either or both the camera
or lens should be set to MF.
To set the focus mode on the lens
(See illustration - .)
Slide the focus-mode switch to the appropriate mode, AF
In MF, turn the focusing ring to adjust the focus while
looking through the viewfinder (See illustration - ).
The focus signal in the viewfinder indicates the current
To use a camera equipped with an AF/
Press the AF/MF control button to switch AF to MF when
both the camera and lens are set to AF.
Press the AF/MF control button to switch MF to AF when the
camera is set to MF and the lens is set to AF.
Direct manual focus (DMF)
Rotate the focusing ring to set the correct DMF when the
focus is locked in AF-A (automatic auto focus) or AF-S
DMF is not available in the following cases:
When the image is out of focus
When AF-C (continuous auto focus) is selected
/Operating Instructions/Mode d’emploi/Manual
de instrucciones/
/
Interchangeable Lens/
Objectif interchangeable/
(Suite à la page arrière)
When focusing of the second photo is complete in
continuous recording in AF-A
Shooting at infinity in MF
The focusing mechanism turns slightly past infinity
to provide accurate focusing under various operating
temperatures. Always confirm the image sharpness through
the viewfinder, especially when the lens is focused near
(See illustration - .)
While the focus-hold button is pressed, the auto focus
function is suspended and focusing is fixed for shooting.
The function of the focus-hold button can be changed on
cameras with custom function capability. Refer to your
camera manual for details.
When focus is set on a subject, anything at that same
distance will appear sharp, and anything within a certain
range before and beyond the subject will also appear in
focus; this is called depth of field. Depth of field depends
on the subject distance and aperture you choose and
is indicated by the lines on the depth-of-field scale
corresponding to the aperture.
Maximum magnification (X)
The value for the equivalent 35mm-format focal length is
based on Interchangeable Lens Digital Cameras equipped
with an APS-C sized image sensor.
The value of angle of view 1 is based on 35mm-format
cameras, and that of angle of view 2 is based on
Interchangeable Lens Digital Cameras equipped with an
APS-C sized image sensor.
Minimum focus is the distance from the image sensor to the
This lens is equipped with a distance encoder. The distance
encoder allows more accurate measurement (ADI) by
employing a flash for the process.
Depending on the lens mechanism, the focal length may
change with any change of the shooting distance. The focal
length assumes the lens is focused at infinity.
Included items: Lens (1), Lens front cap (1), Lens rear cap
(1), Lens hood (1), Set of printed documentation
Designs and specifications are subject to change without
is a trademark of Sony Corporation.
Company names and company product names are
trademarks or registered trademarks of those companies.
Des informations relatives à l’utilisation de chaque
objectif sont disponibles dans ce manuel. La section
« Précautions avant toute utilisation », qui fait l’objet
d’un document séparé, contient des précautions
relatives aux objectifs, telles que des remarques sur
leur utilisation. Veuillez lire attentivement ces deux
documents avant d’utiliser l’objectif.
Cet objectif est conçu pour les appareils photo Sony α.
Cet objectif a été développé en collaboration par Carl Zeiss
et Sony Corporation et est conçu pour les appareils photo
à monture Sony A. Cet objectif a été conçu conformément
aux normes strictes et au système d’assurance qualité de
Remarques sur l’utilisation
Lorsque cet objectif est utilisé avec un appareil photo à
monture E, rattachez un adaptateur pour monture d’objectif
vendu séparément. Ne rattachez pas directement l’objectif
à l’appareil photo à monture E sinon l’objectif et l’appareil
pourraient être endommagés.
Tenez fermement à la fois l’appareil photo et l’objectif lorsque
vous transportez l’appareil photo avec l’objectif fixé.
Précaution concernant l’utilisation du flash
Lorsque vous utilisez un flash intégré, veillez à retirer
le pare-soleil et à prendre la photo à une distance d’au
moins 1 m (3,3 pieds) du sujet. Dans le cas de certaines
combinaisons objectif/flash, l’objectif peut partiellement
bloquer la lumière du flash, ce qui génère une ombre en bas
Lorsque vous utilisez l’objectif, les coins de l’écran
peuvent s’assombrir par rapport au centre. Pour réduire ce
phénomène (appelé vignetage), l’ouverture doit être réglée à
une valeur comprise entre 1 et 2 par rapport à la position de
1···Bague de mise au point 2···Index de distance
3···Echelle de profondeur de champ
4···Contacts de l’objectif 5···Repère de montage
6···Echelle de mise au point
7···Bouton de désactivation de la mise au point
8...Commutateur de mode de mise au point
Fixation/retrait de l’objectif
1 Retirez les capuchons d’objectif situés à l’avant
et l’arrière, ainsi que le capuchon de l’appareil
Vous pouvez fixer/détacher le capuchon avant de
l’objectif de deux façons, (1) et (2). Lorsque vous fixez/
détachez le capuchon d’objectif alors que le pare-soleil est
en place, utilisez la méthode (2).
2 Alignez le repère orange situé sur la monture
de l’objectif sur le repère orange de l’appareil
(repère de montage), puis insérez l’objectif
dans la monture de l’appareil et tournez-le
dans le sens horaire jusqu’à ce qu’il se bloque.
N’appuyez pas sur le bouton de déblocage de l’objectif de
l’appareil lorsque vous fixez l’objectif.
Ne fixez pas l’objectif de travers.
Retrait de l’objectif (Voir l’illustration
Tout en appuyant et en maintenant enfoncé le bouton
de déblocage de l’objectif sur l’appareil, tournez
l’objectif dans le sens anti-horaire jusqu’à la butée,
puis détachez l’objectif.
Après avoir retiré l’objectif, posez-le avec les contacts de
l’objectif orientés vers le haut de sorte que ni les contacts de
l’objectif ni le verre arrière ne soient endommagés.
Il est recommandé d’utiliser un pare-soleil afin de réduire la
lumière parasite et d’assurer une qualité d’image maximale.
Insérez le pare-soleil dans la monture située à
l’extrémité de l’objectif et tournez-le dans le sens
Lorsque vous le rangez, retournez le pare-soleil et placez-le sur
Pour commuter entre AF (mise au point
automatique) et MF (mise au point
Il est possible de régler le mode de mise au point sur AF ou
Pour la photographie en mode AF, l’appareil photo et
l’objectif doivent être tous les deux réglés sur AF. Pour la
photographie en mode MF, l’appareil photo ou l’objectif, ou
bien les deux, doivent être réglés sur MF.
Pour régler le mode de mise au point sur
l’objectif (Voir l’illustration - .)
Réglez le commutateur de mode de mise au point sur le
En mode MF, tournez la bague de mise au point pour faire
la mise au point tout en regardant dans le viseur (Voir
Le signal de mise au point dans le viseur indique l’état actuel
Pour utiliser un appareil photo pourvu
d’une touche de commande AF/MF
Appuyez sur la touche de commande AF/MF pour passer de
AF à MF lorsque l’appareil photo et l’objectif sont tous deux
Appuyez sur la touche de commande AF/MF pour passer de
MF à AF lorsque l’appareil photo est réglé sur MF et l’objectif
Mise au point manuelle directe (DMF)
Tournez la bague de mise au point pour régler le mode
DMF correctement lorsque la mise au point est verrouillée
sur AF-A (mise au point automatique automatique) ou
AF-S (mise au point automatique unique).
Le mode DMF n’est pas disponible dans les cas suivants :
Lorsque l’image n’est pas mise au point
Lorsque AF-C (mise au point automatique continue) est
Lorsque la mise au point est confirmée pour la deuxième
photo lors d’un enregistrement en continu avec AF-A
Prise de vue à l’infini en mode MF
Le mécanisme de mise au point dépasse légèrement
l’infini pour atteindre une plus grande netteté à diverses
températures de fonctionnement. Vérifiez toujours la
netteté de l’image dans le viseur, notamment lorsque le
réglage de l’objectif est proche de l’infini.
Bouton de maintien de la mise au point
(Voir l’illustration - .)
Lorsque vous appuyez sur le bouton de maintien de la mise
au point, la fonction de mise au point automatique est
suspendue et la mise au point reste fixe pendant la prise de
La fonction du bouton de maintien de la mise au point
peut être changée sur les appareils photo permettant de
personnaliser la fonction de ce bouton. Reportez-vous au
mode d’emploi de votre appareil photo pour le détail.
Echelle de profondeur de champ
La profondeur de champ est la zone de netteté située devant
et derrière le sujet sur lequel est réglée la mise au point de
l’appareil, ainsi que la zone située à la même distance que
le sujet. La profondeur de champ dépend de la distance
à laquelle se trouve le sujet, ainsi que de l’ouverture du
diaphragme choisie. Elle est indiquée par les lignes situées
sur l’échelle de profondeur de champ qui correspondent à
l’ouverture du diaphragme.