Sony SNC-XM632 Manual
Sony
Overvågningskamera
SNC-XM632

| Mærke: | Sony |
| Kategori: | Overvågningskamera |
| Model: | SNC-XM632 |
| Type: | IP-sikkerhedskamera |
| Produktfarve: | Hvid |
| Formfaktor: | Kuppel |
| Understøttede videotilstande: | 1080p |
| Opbevaringstemperatur (T-T): | -30 - 60 °C |
| Relativ luftfugtighed ved opbevaring (H-H): | 20 - 80 % |
| Ethernet LAN-porte (RJ-45): | 1 |
| Ethernet LAN: | Ja |
| Understøttede videoformater: | H.264, M-JPEG |
| Driftstemperatur (T-T): | -25 - 50 °C |
| Maksimal opløsning: | 1920 x 1080 pixel |
| Sikkerhedsalgoritmer: | HTTPS |
| Understøttede grafikopløsninger: | 352 x 288,704 x 576,720 x 480,720 x 576,1024 x 576 (WSVGA),1280 x 720 (HD 720),1920 x 1080 (HD 1080),640 x 480 (VGA) |
| Forbindelsesteknologi: | Ledningsført |
| Kabelteknologi: | 10/100Base-T(X) |
| Understøttede netværksprotokoller: | IPv4, TCP, UDP, ARP, ICMP, IGMP, HTTP, DHCP, DNS, NTP, RTP/RTCP, RTSPoverTCP, RTSPoverHTTP, SMTP, IPv6, HTTPS, SNMP (v1, 2c, 3), SSL |
| Strømkilde type: | PoE |
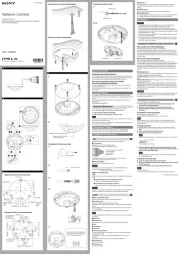
| Monteringstype: | Loft |
| Diameter: | 114 mm |
| Indbygget HDD: | Ingen |
| Understøttet placering: | Udendørs |
| Understøttede Windows-operativsystemer: | Windows 7 Ultimate, Windows 7 Ultimate x64, Windows 8 Pro, Windows 8 Pro x64, Windows Vista Ultimate, Windows XP Home, Windows XP Professional |
| Hvidbalance: | ATW, Fluorescent L, Manual |
| Sensortype: | CMOS |
| Samlet antal megapixels: | 2.14 MP |
| Optisk zoom: | - x |
| Digital zoom: | 3 x |
| Længde: | 47 mm |
| Progressiv scanning: | Ja |
| Strøm over Ethernet (PoE): | Ja |
| Bredt dynamikområde (WDR): | Ja |
| Dag/nat funktion: | Ja |
| Minimumsbelysning: | 0.2 Lux |
| Optisk sensorstørrelse: | 1/2.9 " |
| Fast brændvidde: | 2.8 mm |
| HTTPS -kryptering: | Ja |
| Minimum processor: | Intel Corei7 2.8 GHz |
| Minimum RAM: | 2048 MB |
| Objektivets synsvinkel, vandret: | 113 ° |
Har du brug for hjælp?
Hvis du har brug for hjælp til Sony SNC-XM632 stil et spørgsmål nedenfor, og andre brugere vil svare dig
Overvågningskamera Sony Manualer
3 Oktober 2025

2 Oktober 2025
10 August 2025
29 Juli 2025
28 Juli 2025
28 Juli 2025
28 Juli 2025
28 Juli 2025

28 Juli 2025
8 Juli 2025
Overvågningskamera Manualer
- AVerMedia
- Tellur
- Vaddio
- Avigilon
- Elmo
- Zmodo
- REVO
- Moen
- TRENDnet
- Strong
- AVMATRIX
- Vosker
- Dedicated Micros
- Anker
- Vimtag
Nyeste Overvågningskamera Manualer
31 Oktober 2025
31 Oktober 2025
30 Oktober 2025

30 Oktober 2025
30 Oktober 2025
30 Oktober 2025

30 Oktober 2025

30 Oktober 2025
30 Oktober 2025

30 Oktober 2025