TFA 38.2051.02 Manual

TFA Ikke kategoriseret 38.2051.02

Læs gratis den danske manual til TFA 38.2051.02 (4 sider) i kategorien Ikke kategoriseret. Denne vejledning er vurderet som hjælpsom af 5 personer og har en gennemsnitlig bedømmelse på 4.5 stjerner ud af 3 anmeldelser. Har du et spørgsmål om TFA 38.2051.02, eller vil du spørge andre brugere om produktet?

Side 1/4
A 6
A 5
Fig. 1
Bedienungsanleitung –
Kat. Nr. 38.2051.02
Digitaler Timer mit Stoppuhr und Wecker
Bedienungsanleitung –
Kat. Nr. 38.2051.02
Instruction manual
Cat. No. 38.2051.02
Digital count-down timer
with stopwatch and alarm clock
Vielen Dank, dass Sie sich für dieses Gerät aus dem Hause TFA entschieden
haben.
1. Bevor Sie mit dem Gerät arbeiten
Lesen Sie sich bitte die Bedienungsanleitung genau durch .
Verwenden Sie das Gerät nicht anders, als in der Anleitung dargestellt wird.
Beachten Sie besonders die Sicherheitshinweise!
Bewahren Sie die Bedienungsanleitung gut auf!
2. Sicherheitshinweise
WARNUNG
Halten Sie das Gerät und die Batterien außerhalb der Reichweite von Kindern.
Kleinteile können von Kindern (unter drei Jahren) verschluckt werden.
Batterien enthalten gesundheitsschädliche Säuren und können bei Verschlu-
cken lebensgefährlich sein. Wenn Sie vermuten, eine Batterie nnte ver-
schluckt oder anderweitig in den rper gelangt sein, nehmen Sie sofort
medizinische Hilfe in Anspruch.
Batterien nicht ins Feuer werfen, kurzschließen, auseinandernehmen oder auf-
laden. Explosionsgefahr!
Um ein Auslaufen der Batterien zu vermeiden, sollten schwache Batterien
möglichst schnell ausgetauscht werden. Verwenden Sie nie gleichzeitig alte
und neue Batterien oder Batterien unterschiedlichen Typs. Entfernen Sie die
Batterien, wenn Sie das Gerät längere Zeit nicht verwenden. Sollte eine Batterie
ausgelaufen sein, vermeiden Sie Kontakt mit Haut, Augen und Schleimhäuten.
Spülen Sie ggf. umgehend die betroffenen Stellen mit Wasser und suchen Sie
einen Arzt auf.
ACHTUNG
Das eigenmächtige Reparieren, Umbauen oder Verändern des Geräts ist nicht
gestattet.
Setzen Sie das Gerät keinen extremen Temperaturen, Vibrationen und Erschüt-
terungen aus.
Reinigen Sie das Gerät mit einem weichen, leicht feuchten Tuch. Keine Scheu-
er- oder Lösungsmittel verwenden!
Vor Feuchtigkeit schützen!
Sobald die Funktionen schwächer werden, wechseln Sie bitte die Batterien.
3. Bestandteile
A: Display (Fig. 1):
A 1: A 2:Stunden Minuten
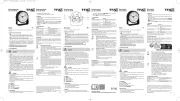
A 3: A 4:Sekunden Weckalarm aktiviert
A 5: A 6:Weckzeit AM/PM bei 12-Stunden-Format
B: Tasten (Fig. 2):
B 1: +/HOUR Taste TasteB 2: –/MIN
B 3: SEC Taste TasteB 4: ALARM/ON/OFF
B 5: MODE Taste TasteB 6: 12/24/RESET
B 7: START/STOP Taste Schiebeschalter Alarmeinstellung B 8:
C: Gehäuse (Fig. 2+3):
C 1: C 2:LED-Warnlicht Befestigungsmagnet
C 3: C 4:Wandaufhängung Batteriefach
C 5: Ständer (ausklappbar)
4. Inbetriebnahme
Ziehen Sie die Schutzfolie vom Display.
Klappen Sie den Ständer hoch. Schieben Sie den Batteriefachdeckel nach
unten (in Pfeilrichtung) und legen Sie zwei neue Batterien (2 x 1,5 V AAA) ein.
Achten Sie auf die richtige Polarität.
Schließen Sie den Deckel wieder.
5. Bedienung
5.1 Alarmeinstellung
Stellen Sie mit dem Schiebeschalter auf der rechten Seite das gewünschte
Alarmsignal für Timer und Wecker ein:
Ton laut
Ton normal
Ton aus, LED-Warnlicht
5.2 Displaymodus
Schalten Sie im Normalmodus mit der MODE Taste zwischen folgenden Anzei-
gen um: Uhrzeitmodus, Alarmmodus (AL) und Timermodus.
5.2.1 Uhrzeitmodus
Im Uhrzeitmodus können Sie mit der Taste zwischen dem 12-12/24/RESET
(AM/PM erscheint im Display) oder 24-Stunden-Zeitsystem wählen.
Zum Einstellen der Uhrzeit halten Sie die Taste für drei SekundenMODE
gedrückt. Die Stundenanzeige blinkt. Stellen Sie mit der und der +/HOUR
–/MIN Taste die Stunden ein. Bestätigen Sie mit der Taste. MODE
Stellen Sie die Minuten auf gleiche Weise ein. r einen Schnelldurchlauf hal-
ten Sie die Tasten gedrückt.
Bestätigen Sie mit der Taste.MODE
5.2.2 Alarmmodus
Zum Einstellen der Weckzeit halten Sie im Alarmmodus (AL) die MODE Taste
für drei Sekunden gedrückt.
7:00 Uhr (Voreinstellung) bzw. die zuletzt eingestellte Weckzeit wird auf dem
Display angezeigt.
Die Stundenanzeige blinkt. Stellen Sie mit der und der +/HOUR –/MIN Taste die
Stunden ein. Bestätigen Sie mit der Taste. MODE
Stellen Sie die Minuten auf gleiche Weise ein. Drücken Sie noch einmal kurz
die MODE Taste, bestätigen Sie die Eingabe und gelangen zurück in den Uhr-
zeitmodus.
Um die Alarmfunktion zu aktivieren oder zu deaktivieren, drücken Sie die
ALARM/ON/OFF Taste.
Das Alarmsymbol erscheint oder verschwindet im Display.
Bei aktiviertem Alarm beginnt der Wecker in der ausgewählten Lautstärke zu
klingeln oder das rote LED-Warnlicht blinkt, wenn die eingestellte Weckzeit
erreicht ist. Das Alarmsymbol blinkt.
Drücken Sie auf die Taste und der Alarm wird beendet. ALARM/ON/OFF
Wird der Alarm nicht unterbrochen, schaltet sich das Alarmsignal nach einer
Minute aus und aktiviert sich erneut zur gleichen Weckzeit wieder.
Das Alarmsymbol bleibt im Display stehen.
5.2.3 Timermodus
Im Timermodus stellen Sie mit der Taste die Stunden, mit der +/HOUR –/MIN
Taste die Minuten und mit der Taste die Sekunden der gewünschten ZeitSEC
ein. Halten Sie die Tasten gedrückt, gelangen Sie in den Schnelllauf.
Drücken Sie die START/STOP Taste und die Zählung beginnt.
Mit der START/STOP Taste nnen Sie die hlung anhalten und wieder fort-
setzen.
Nach Ablauf der Zeit beginnt der Wecker für eine Minute in der ausgewählten
Lautstärke zu klingeln oder das rote LED-Warnlicht blinkt. H M S blinken und
der Timer zählt nun die verstrichene Zeit.
Drücken Sie die START/STOP Taste, um die Zählung zu stoppen und das
Alarmsignal auszuschalten.
Es erscheint automatisch die zuletzt vorgewählte Zeit.
Durch Drücken der Taste wird die Anzeige auf 00:00:00 zurück-12/24/RESET
gesetzt.
Stoppuhrfunktion: Drücken Sie die START/STOP Taste (Anzeige 00:00:00) und
diehlung beginnt. Mit der START/STOP Taste können Sie die Zählung anhal-
ten und wieder fortsetzen.
Der Timer läuft weiter, wenn Sie in einen anderen Anzeigemodus wechseln.
H M S blinken.
6. Entsorgung
Entsorgen Sie die Verpackung umweltgerecht über die eingerichteten Sammelsy-
steme.
Entsorgung des Elektrogeräts
Entnehmen Sie nicht festverbaute Batterien und Akkus aus dem Gerät
und entsorgen Sie diese getrennt.
Dieses Gerät ist entsprechend der EU-Richtlinie über die Entsorgung
von Elektro- und Elektronik-Altgeräten (WEEE) gekennzeichnet.
Dieses Produkt darf nicht mit dem Hausmüll entsorgt werden. Der Nut-
zer ist verpflichtet, das Altgerät zur umweltgerechten Entsorgung bei
einer ausgewiesenen Annahmestelle r die Entsorgung von Elektro-
und Elektronikgeräten abzugeben. Die Rückgabe ist unentgeltlich.
Beachten Sie die aktuell geltenden Vorschriften!
Entsorgung der Batterien
Batterien und Akkus rfen keinesfalls in den Hausmüll. Sie enthalten
Schadstoffe, die bei unsachgemäßer Entsorgung der Umwelt und der
Gesundheit Schaden zufügen können. Als Verbraucher sind Sie gesetz-
lich verpflichtet, gebrauchte Batterien und Akkus zur umweltgerechten
Entsorgung beim Handel oder entsprechenden Sammelstellen gemäß
nationalen oder lokalen Bestimmungen abzugeben. Die Rückgabe ist
unentgeltlich.
Die Bezeichnungen für enthaltene Schadstoffe sind:
Cd=Cadmium, Hg=Quecksilber, Pb=Blei.
11. Technische Daten
Messbereich Timer/Stoppuhr 99 h/59min/59 s
Spannungsversorgung 2 x 1,5 V AAA Batterien (nicht inklusive)
Gehäusemaße 84 x 21 (63) x 88 mm
Gewicht 79 g
Diese Anleitung oder Auszüge daraus dürfen nur mit Zustimmung von TFA Dostmann veröffentlicht werden.
Die technischen Daten entsprechen dem Stand bei Drucklegung und können ohne vorherige Benachrichtigung
geändert werden.
Die neuesten technischen Daten und Informationen zu Ihrem Produkt finden Sie auf unserer Homepage unter
Eingabe der Artikel-Nummer in das Suchfeld.
www.tfa-dostmann.de
E-Mail: info@tfa-dostmann.de
TFA Dostmann GmbH & Co.KG, Zum Ottersberg 12, 97877 Wertheim, Deutschland 06/23
Thank you for choosing this product from TFA.
1. Before you use this device
Please make sure you read the instruction manual carefully .
This product should only be used as described within these instructions.
Please pay particular attention to the safety notices!
Please keep this instruction manual safe for future reference.
2. Safety notices
WARNING
Keep this device and the batteries out of reach of children.
Small parts can be swallowed by children (under three years old).
Batteries contain harmful acids and may be hazardous if swallowed. If you
suspect a battery could have been swallowed or otherwise caught in the body,
seek medical help immediately.
Batteries must not be thrown into a fire, short-circuited, taken apart or
recharged. Risk of explosion!
Low batteries should be changed as soon as possible to prevent damage
caused by leaking. Never use a combination of old and new batteries together,
nor batteries of different types. Remove the batteries if the device will not be
used for an extended period of time. Avoid contact with skin, eyes and mucous
membranes when handling leaking batteries. In case of contact, immediately
rinse the affected areas with water and consult a doctor.
CAUTION
Unauthorised repairs, alterations or changes to the product are prohibited.
Do not expose the device to extreme temperatures, vibrations or shocks.
Clean the device with a soft damp cloth. Do not use solvents or scouring
agents.
Protect it from moisture!
Change the batteries when the device functions become weak.
3. Elements
A: Display (Fig. 1):
A 1: A 2:Hours Minutes
A 3: A 4:Seconds Activated alarm clock
A 5: A 6:Alarm time AM/PM in 12-hour format
B: Buttons (Fig. 2):
B 1: +/HOUR B 2: –/MIN button button
B 3: SEC button buttonB 4: ALARM/ON/OFF
B 5: MODE B 6: 12/24/RESET button button
B 7: START/STOP B 8:button Switch alarm settings
C: Housing (Fig. 2+3):
C 1: C 2:LED alarm light Magnet
C 3: C 4:Wall mounting hole Battery compartment
C 5: Stand (fold out)
4. Getting started
Remove the protective film from the display.
Fold out the stand. Slide the lid of the battery compartment downwards (in
direction of the arrow) and insert two new batteries (2 x 1,5 V AAA). Make
sure the polarities are correct.
Close the battery compartment again.
5. Operation
5.1 Alarm settings
Use the slide switch on the right to set the desired alarm signal for the timer
and alarm clock:
Alarm tone loud
Alarm tone normal
Mute, LED alarm light
5.2 Display mode
Each press on the button in normal mode will change the displayMODE
between: clock mode, alarm mode (AL) and timer mode.
5.2.1 Clock mode
Press the button in clock mode to choose between 24- and 1212/24/RESET
HR system (AM or PM appears on the display).
To set the time, press and hold the button for 3 seconds. The hour dig-MODE
its flash. Press button to adjust the hours. Confirm with the+/HOUR –/MINor
MODE button.
Set the minutes in the same way. Press and hold the buttons for quick setting.
Confirm with the button.MODE
5.2.2 Alarm mode
To set the alarm time, press and hold the button for 3 seconds in alarmMODE
mode (AL).
7:00 (default) or the last adjusted alarm time appear on the display.
A 4
B 1
B 2
B 5 B 6 B 7
A 3A 2A 1
Fig. 2
B 3
B 8
B 4
C 1
C 2
Fig. 3
C 4
C 3
C 5
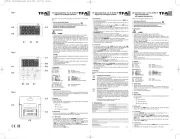
TFA_No. 38.2051_Anleitung 05.07.2023 15:37 Uhr Seite 1
A 6
A 5
Fig. 1
Instruction manual
Cat. No. 38.2051.02
Digital count-down timer
with stopwatch and alarm clock
Mode d'emploi –
d'art. 38.2051.02
Minuteur numérique avec chronomètre
et réveil
Mode d'emploi –
d'art. 38.2051.02
Minuteur numérique avec chronomètre
et réveil
The hour digits flash. Press button to adjust the hours. Con-+/HOUR –/MIN or
firm with the button. MODE
Set the minutes in the same way. Briefly press the button again to con-MODE
firm and return to clock mode.
Press the button to activate or deactivate the alarm function.ALARM/ON/OFF
The alarm symbol appears/disappears on the display.
When the alarm is activated, the alarm starts to ring at the selected volume
level or the red LED light flashes, when the set alarm time is reached. The
alarm symbol flashes.
Press the button and the alarm will stop. ALARM/ON/OFF
If the alarm is not stopped manually, the alarm signal automatically turns off
after one minute and will be reactivated at the same set time in the following
day.
The alarm symbol remains on the display.
5.2.3 Timer mode
In timer mode, press the button to set the hours, the +/HOUR –/MIN button to
set the minutes and the button to set the seconds of the respective time.SEC
Press and hold the buttons for fast mode.
Press the START/STOP button to start the count-down process.
With the START/STOP button you can stop and restart the counting.
When the timer counted down to zero, the alarm starts to ring at the selected
volume level or the red LED light flashes. H M S are flashing on the display
and the timer will start to count-up the elapsed time.
With the START/STOP button you can stop the counting and the alarm.
The timer will recall the last selected time automatically.
Press the button to reset the timer to 00:00:00.12/24/RESET
Stopwatch function: Press the START/STOP button (display 00:00:00) to start
the count-up process. With the START/STOP button you can stop and restart
the counting.
The timer will also operate if switching to another display mode. H M S are
flashing on the display
6. Waste disposal
Dispose of the packaging in an environmentally friendly manner using the collec-
tion systems that have been set up.
Disposal of the electrical device
Remove non-permanently installed batteries and rechargeable batteries
from the device and dispose of them separately.
This product is labelled in accordance with the EU Waste Electrical and
Electronic Equipment Directive (WEEE).
This product must not be disposed of in ordinary household waste. As
a consumer, you are required to take end-of-life devices to a designa-
ted collection point for the disposal of electrical and electronic equip-
ment, in order to ensure environmentally-compatible disposal. The
return service is free of charge. Observe the current regulations in
place!
Disposal of the batteries
Never dispose of empty batteries and rechargeable batteries with ordi-
nary household waste. They contain pollutants which, if improperly
disposed of, can harm the environment and human health. As a con-
sumer, you are required by law to take them to your retail store or to an
appropriate collection site depending on national or local regulations in
order to protect the environment. The return service is free of charge.
The symbols for the contained heavy metals are:
Cd=cadmium, Hg=mercury, Pb=lead.
11. Specifications
Measuring range timer/stopwatch 99 h/59min/59 s
Power consumption Batteries 2 x 1,5 V AAA (not included)
Housing dimension 84 x 21 (63) x 88 mm
Weight 79 g
No part of this manual may be reproduced without written consent of TFA Dostmann. The technical data are
correct at the time of going to print and may change without prior notice.
The latest technical data and information about this product can be found in our homepage by simply entering
the product number in the search box.
www.tfa-dostmann.de
E-Mail: info@tfa-dostmann.de
TFA Dostmann GmbH & Co.KG, Zum Ottersberg 12, 97877 Wertheim, Germany 06/23
Nous vous remercions d'avoir choisi l'appareil de la société TFA.
1. Avant d'utiliser votre appareil
Veuillez lire attentivement le mode d'emploi .
N'utilisez jamais l’appareil à d'autres fins que celles décrites dans le présent
mode d'emploi.
Suivez bien toutes les consignes de sécurité !
Conservez soigneusement le mode d'emploi !
2. Consignes de sécurité
AVERTISSEMENT
Placez votre appareil et les piles hors de la portée des enfants.
Les petites pièces peuvent être avalées par les enfants (moins de trois ans).
Les piles contiennent des acides nocifs pour la santé et peuvent être mortelles
dans le cas d’une ingestion. Si vous craignez qu’une pile ait pu être avalée ou
ingérée d’une autre manière, quelle qu’elle soit, contactez immédiatement un
médecin d’urgence.
Ne jetez jamais de piles dans le feu, ne les court-circuitez pas, ne les démontez
pas et ne les rechargez pas. Risque d'explosion !
Une pile faible doit être remplacée le plus rapidement possible afin d'éviter
toute fuite. N'utilisez jamais simultanément de piles anciennes avec des piles
neuves ou des piles de types différents. Retirez les piles si vous n'utilisez pas
votre appareil pendant une durée prolongée. Évitez tout contact de la peau, des
yeux et des muqueuses avec le liquide des piles. En cas de contact, rincez
immédiatement les zones concernées à l’eau et consultez un médecin.
ATTENTION
Vous ne devez en aucun cas réparer, démonter ou modifier l'appareil par vous-
même.
Évitez d’exposer l’appareil à des températures extrêmes, à des vibrations ou à
des chocs.
Pour le nettoyage de votre appareil, utilisez un chiffon doux et humide. N’utili-
sez pas de solvants ou d'agents abrasifs !
Protégez l'appareil contre l'humidité !
Remplacez les piles si les fonctions de l'appareil s'affaiblissent.
3. Composants
A : Affichage (Fig. 1) :
A 1 : A 2 :Heures Minutes
A 3 : A 4 :Secondes Réveil acti
A 5 : A 6 :Heure de réveil AM/PM en format de 12 heures
B : Touches (Fig. 2):
B 1 : Touche Touche +/HOUR B 2 : –/MIN
B 3 : Touche Touche SEC B 4 : ALARM ON/OFF
B 5 : Touche Touche MODE B 6 : 12/24/RESET
B 7 : Touche START/STOP B 8 : Interrupteur réglage d'alarme
C : Boîtier (Fig. 2+3) :
C 1 : C 2 :Signal lumineux LED Aimant
C 3 : C 4 :Œillet de suspension Compartiment à piles
C 5 : Support (dépliable)
4. Mise en service
Retirez le film de protection de l'affichage.
Relevez le support. Poussez le couvercle du compartiment à piles vers le bas
(en direction de la flèche) et insérez deux piles neuves de type 1,5 V AAA. Veil-
lez à la bonne polarité des piles.
Refermez le couvercle.
5. Utilisation
5.1 Réglage d'alarme
Utilisez l'interrupteur situé sur le côté droit pour régler le signal d'alarme sou-
haité pour le minuteur et le réveil :
Alarme sonore fort
Alarme sonore normal
Son désactivé, signal lumineux LED
5.2 Mode d'affichage
En appuyant sur la touche MODE vous pouvez choisir entre les indications sui-
vantes : mode horloge, mode réveil (AL) et mode minuteur.
5.2.1 Mode horloge
Avec la touche vous pouvez configurer le système horaire sur 1212/24/RESET
heures (AM/PM apparaît sur l'écran) ou sur 24 heures en mode horloge.
Pour le glage de l'heure maintenez la touche appuyée pendant troisMODE
secondes. L'affichage de l'heure clignote. Réglez l'heure avec les touches
+/HOUR –/MIN MODEet . Validez au moyen de la touche .
Procédez de même pour régler les minutes. Si vous maintenez la touche
appuyée, la valeur augmentera plus vite.
Validez au moyen de la touche MODE.
5.2.2 Mode de réveil
Pour le réglage de l'heure de réveil maintenez la touche appuyée enMODE
mode de réveil pendant trois secondes.
7:00 (par défaut) ou l'heure de réveil réglée précédemment est affiché à l'écran.
L'affichage de l'heure clignote. Réglez l'heure avec les touches +/HOUR et
–/MIN. Validez au moyen de la touche . MODE
Procédez de même pour gler les minutes. Appuyez de nouveau brièvement
sur la touche pour confirmer et revenir au mode horloge.MODE
Appuyez sur la touche pour activer ou sactiver la fonctionALARM/ON/OFF
de réveil.
Le symbole de réveil apparaît ou disparaît sur l'écran.
Lorsque l'heure deveil fixée est atteinte, le réveil se met à sonner au volume
sélectionné ou la signal lumineux LED clignote (si la fonction de réveil est acti-
vée). Le symbole de réveil clignote.
Appuyez sur la touche pour éteindre le réveil. ALARM/ON/OFF
Si le réveil n'est pas coupé, il s'arrêtera automatiquement après une minute et
sera de nouveau activé pour l'heure de réveil suivante.
Le symbole de réveil reste à l'écran.
5.2.3 Mode minuteur
En mode minuteur, utilisez la touche pour régler l'heure, la touche+/HOUR
–/MIN SEC pour régler les minutes et la touche pour régler les secondes de
l'heure souhaitée. Si vous maintenez les touches appuyées, vous passez en
déroulement rapide.
Appuyez sur la touche START/STOP et le minuteur commence à compter.
Appuyez sur la touche START/STOP pour arrêter et redémarrer le comptage.
Une fois le temps est écoulé, le veil se met à sonner au volume sélectionné
ou la signal lumineux LED clignote. H M S clignote sur l'écran et la minuterie
compte maintenant le temps écoulé.
Appuyez sur la touche START/STOP pour arrêter le compte et pour couper
l'alarme.
Le dernier tempsglé apparaît automatiquement.
Appuyez sur la touche et l’affichage est remis sur 00:00:00.12/24/RESET
Chronomètre : Appuyez sur la touche START/STOP (affichage 00:00:00) et le
chronomètre commence à compter. Appuyez sur la touche START/STOP pour
arrêter et redémarrer le comptage.
La minuterie continue même si vous changez de mode d'affichage. H M S cli-
gnote sur l'écran.
6. Traitement des déchets
Éliminez les emballages de manière respectueuse de l'environnement par le biais
des systèmes de collecte établis.
Mise au rebut de l'appareil électrique
Retirez de l'appareil les piles et les batteries rechargeables qui ne sont
pas installées de façon permanente et jetez-les séparément.
Cet appareil est conforme aux normes de l'UE relatives au traitement
des déchets électriques et électroniques (WEEE).
L'appareil usagé ne doit pas être je dans les ordures ménagères.
L’utilisateur s’engage, pour le respect de l’environnement, à déposer
l’appareil usagé dans un centre de traitement agréé pour les chets
électriques et électroniques. La collecte est gratuite. Respectez les
réglementations en vigueur !
Élimination des piles
Les piles et les batteries rechargeables ne doivent pas être jetées dans
les détritus ménagers. Elles contiennent des polluants qui peuvent nuire
à l'environnement et à la santé si elles sont éliminées de manière inap-
propriée. En tant qu'utilisateur, vous avez l'obligation légale de rappor-
ter les piles et batteries rechargeables usagées à votre revendeur ou de
les déposer dans une déchetterie proche de votre domicile conformé-
ment à la réglementation nationale et locale. La collecte est gratuite.
Les métaux lourds sont désignés comme suit :
Cd = cadmium, Hg = mercure, Pb = plomb.
11. Caractéristiques techniques
Plage de mesure minuteur/chronomètre 99 h/59min/59 s
Alimentation Piles 2 x 1,5 V AAA (non incluses)
Dimensions du boîtier 84 x 21 (63) x 88 mm
Poids 79 g
La reproduction, même partielle, du présent mode d'emploi est strictement interdite sans l'accord explicite de
TFA Dostmann. Les caractéristiques techniques de ce produit ont éactualisées au moment de l'impression
et peuvent être modifiées sans avis préalable. Les dernières données techniques et les informations concer-
nant votre produit peuvent être consultées en entrant le numéro de l'article sur notre site Internet.
www.tfa-dostmann.de
E-Mail : info@tfa-dostmann.de
TFA Dostmann GmbH & Co.KG, Zum Ottersberg 12, 97877 Wertheim, Allemagne 06/23
Instruction manuals
www.tfa-dostmann.de/en/service/downloads/instruction-manuals
A 4
B 1
B 2
B 5 B 6 B 7
A 3A 2A 1
Fig. 2
B 3
B 8
B 4
C 1
C 2
Fig. 3
C 4
C 3
C 5
TFA_No. 38.2051_Anleitung 05.07.2023 15:37 Uhr Seite 2


Produkt Specifikationer

Mærke: TFA
Kategori: Ikke kategoriseret
Model: 38.2051.02

Har du brug for hjælp?

Hvis du har brug for hjælp til TFA 38.2051.02 stil et spørgsmål nedenfor, og andre brugere vil svare dig