Alora Harmony PD406414 Manual

| Mærke: | Alora |
| Kategori: | Lys |
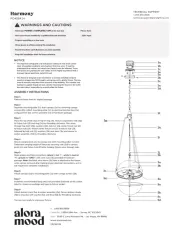
| Model: | Harmony PD406414 |
Har du brug for hjælp?
Hvis du har brug for hjælp til Alora Harmony PD406414 stil et spørgsmål nedenfor, og andre brugere vil svare dig
Lys Alora Manualer

21 December 2025

20 December 2025

16 December 2025

9 December 2025

9 December 2025

8 December 2025
5 Juli 2025
5 Juli 2025
5 Juli 2025
Lys Manualer
- ProLights
- NightStick
- Omnitronic
- SLV
- Forte Lighting
- Laserworld
- Savage
- WAC Lighting
- Allen + Roth
- Sygonix
- Craftsman
- Nordlux
- Workzone
- Hazet
- Elgato
Nyeste Lys Manualer

7 Januar 2026

7 Januar 2026

7 Januar 2026

7 Januar 2026

7 Januar 2026

6 Januar 2026

6 Januar 2026

6 Januar 2026

6 Januar 2026

6 Januar 2026