W D CA I SARNING ANS UT ON
· Prepare everything in a clear area
· Read instructions carefully before you start assembly
· Keep this installation sheet for future reference
C DA:ANA 19054 28 - Sur V3Z 6Mth Ave., rey, C B 3
USA: 3035 E L i Rd. V s, N 1. one Mounta n - Las ega V 8908
· For your safety this lamp is outfitted with a polarized plug (one blade is wider than the other). If
the plug does not fit securely into the outlet, do not force it - contact a licensed electrician. The
plug can be used with an extension cord only if it can be fully inserted into the cord’s socket. Never
alter the plug in any way.
· This lamp comes with all wires connected. When unpacking, be careful not to pull the electrical
wire as damages may occur. Do not connect the fixture to power until fully assembled. To reduce
the risk of fire, electrical shock, or personal injury, always turn off fixture and allow it to cool prior
to replacing the light bulb.
• T r f ar s uct out t et ca ot he impo tant sa egu ds and in tr ions lined in his she nn
cov le c t t that may occur t st be er all possib ondi ions and situa ions . I mu
unde ood hat tain be ol hesrst t caut cerion and care factors ust m f lowed. T e
in ions ided sa high endstruct ar rove p fo yor ur fet e y and wly recomm that a
li trician in tall his nicensed, tra lecined e s t u t .
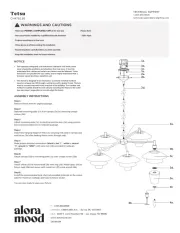
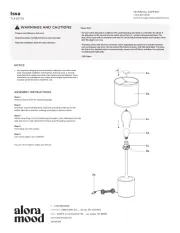
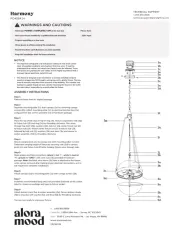
A LSSEMB Y TRU ONINS CTI S
Remove fixture from its original package.
Install the recommended lamp (1d) (not provided) (referred on the
socket label for maximum wattage and type) to fixture socket.
Attach lamp harp (1c) into lamp harp shoulders (1e), followed by shade
(1b) and secure with decorative finial (1a) by threading clockwise.
Insert plug (2a) into outlet.
Use switch (2b) to turn ON/OFF.
You are now ready to enjoy your fixture.
TE C H N IC P O R TA L SU P
t cal pp rt l r .cechni su o@a oalighting om