Professional UHF
Wireless Systems
ATW-BH1 Antenna Bulkhead Connector Kit
Installation and Operation
The Audio-Technica ATW-BH1 is an antenna bulkhead connector kit.
The ATW-BH1 allows you to mount antennas away from the receiver.
When wireless receivers are installed in metal equipment racks or other
enclosures, it may be necessary to locate the antennas on the outside
of the enclosure or on a separate rack panel in the enclosure in order to
improve RF performance.
Kit Contents:
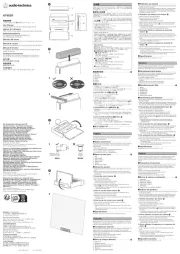
Each ATW-BH1 Antenna Bulkhead Connector Kit contains two BNC
bulkhead connectors with mounting hardware and two 3' RG-58
BNC – BNC cable assemblies. (Note: this kit does not contain antennas,
drill bits or “D” punches.)
Installing and Using the ATW-BH1:
First, determine the locations for each of the BNC bulkhead
connectors. Possible locations include the top of an equipment rack,
the sides of the rack, or a blank panel mounted to the front or rear of
the rack. If the kit is being used to remotely mount the receiver’s
standard antennas, please observe the following recommendations:
1. The BNC connectors must be mounted to a metal surface at least
8" W x 8" L to maintain the proper ground plane requirements for
the antenna. The metal surface must be no thicker than 0.217"
(5.5 mm).
2. Each pair of antennas should be spaced at least 8" apart.
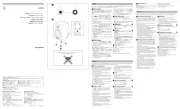
BNC bulkhead connector
with mounting hardware
BNC bulkhead
connector
3. There must be sufficient clearance behind the BNC bulkhead
connector to accommodate the BNC cable and its connector.
Second, punch or drill a mounting hole in the desired location for each
BNC bulkhead connector.
Maximum panel thickness: 0.217" (5.5 mm).
Recommended dimensions of the mounting hole (see diagram):
0.476" (12.10 mm) high; 0.512" (13.00 mm) wide.
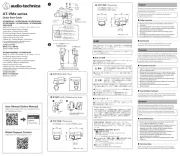
Third, mount each BNC bulkhead connector using the included
hardware. Place the toothed lock-washer between the panel and rear
nut (see diagram below). Tighten the rear nut securely to ensure a good
ground connection. Note: If the panel surface is painted, make certain
that a solid metal-to-metal contact is made between the bulkhead con-
nector and panel.
Fourth, attach one end of each included BNC cable to each BNC
bulkhead connector; attach the other end of each included BNC cable
to the wireless receiver’s or antenna distribution amplifier’s antenna
input connection.
Finally, mount the receiver’s antennas to each of the BNC bulkhead
connectors.
Rear nut (16 hex)
Toothed lock-washer
0.754" (19.15 mm)
1.287" (32.69 mm)
0.612" (15.54 mm)
Recommended mounting hole
0.512" (13.00 mm)
0.476" (12.10 mm)
Note: Placed the toothed lock-washer between the panel and rear nut. Note: Maximum panel thickness: 0.217" (5.5 mm).
Drawings not to scale.