Chapin 8200A Manual
Chapin
Ikke kategoriseret
8200A
Læs gratis den danske manual til Chapin 8200A (20 sider) i kategorien Ikke kategoriseret. Denne vejledning er vurderet som hjælpsom af 9 personer og har en gennemsnitlig bedømmelse på 5.0 stjerner ud af 5 anmeldelser. Har du et spørgsmål om Chapin 8200A, eller vil du spørge andre brugere om produktet?
Side 1/20

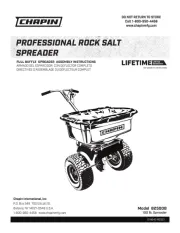
80 lb. Spreader
See website for warranty detail
Model 8200A
014644R0224
USE AND CARE MANUAL
Chapin International, Inc
P.O. Box 549 700 Ellicott St.
Batavia, NY 14021-0549 U.S.A.
1-800-950-4458 www.chapinmfg.com
CAREFULLY READ THESE INSTRUCTIONS BEFORE USE
Failure to do so may result in damage to property and/or person.
WARNING
BEFORE RETURNING THIS PRODUCT FOR ANY REASON, PLEASE CALL:
1-800-950-4458
When calling, please have the following information available: Sales receipt & model number. This number
connects you directly with the manufacturer of this product. Our Technical Support Team will be happy to
help you with any assembly, troubleshooting and replacement information you may need.
CONGRATULATIONS!
YOU HAVE JUST PURCHASED A QUALITY CHAPIN PRODUCT.
REGISTER YOUR SPRAYER ONLINE @ WWW.CHAPINMFG.COM
VISIT US ON THE INTERNET: WWW.CHAPINMFG.COM
RESIDENTIAL
TURF SPREADER

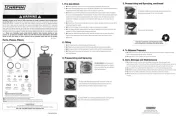
Figure A
Suggested Tools:
Wrench and/or Ratchet Set
Approximate assembly time is 5-10 minutes
Assembly Instructions
1E
Chapin Spreader Operator’s Manual - English
WARNING: IMPROPER USE OR FAILURE TO FOLLOW INSTRUCTIONS CAN RESULT
IN PRODUCT FAILURE OR INJURIES. FOR SAFE USE OF THIS PRODUCT YOU
MUST READ AND FOLLOW ALL INSTRUCTIONS BEFORE USING.
Do not allow anyone to operate the broadcast spreader without proper instructions. Do not
permit children to operate the broadcast spreader. Wear protective eyewear and gloves when
handling and applying lawn and garden chemicals. Read the chemical label instructions and
warnings for handling and applying the chemicals you plan to spread – application settings
provided are only a guideline.
Auger is designed to work in forward motion. Excessive reverse motion could cause
binding. If resistance is felt while pulling spreader backwards, stop and clear salt
from auger.
WARNING
HANDLE ASSEMBLY
• Assemble handle to uprights with Hex
bolts and M6 nuts (Figure A).
• Tighten M6 nuts completely.
Note: If you frequently store your spreader with
the handle down, optional thumb screws are
provided for faster disassembling.

GENERAL OPERATING INSTRUCTIONS
• Be sure gate control is in the closed position (do not hold bail down when filling).
• Determine appropriate setting for material being used by reading the suggested setting on
the material’s bag AND/OR by referencing the application chart on your spreader’s control panel
(Charts provided are only guidelines. Be sure to read the instructions on the bag/box of the
material you’re spreading to identify accurate setting needed).
• Set the dial to the desired setting Important Note: Do not adjust dial while holding bail down
and gate is open. This will alter the accuracy of gate settings and cause parts to break.
• To begin spreading, start walking (about 3 mph pace) and pull the bail system down to open gate.
• To stop spreading simply let go of the bail and the gate will close.
STORAGE AND MAINTENANCE
• When finished spreading empty hopper of any remaining material.
• Use garden hose to wash down the spreader after each use.
• Be careful not to direct the spray directly onto the gear box.
• It is recommended that you DO NOT use a power washer on your spreader.
• Allow to dry before storing.
BAFFLE OPERATING INSTRUCTIONS
• Adjust baffle by hand to block distribution accordingly.
• Use wing nuts to adjust tension on baffles.
NOTE: To avoid overapplication- using the baffle in the down position will disperse product in
greater amounts directly below the deflection point. Adjust the gate setting to apply less than the
intended amount when using baffle. Consult fertilizer/seed manufacture’s coverage information.
3E
Chapin Spreader Operator’s Manual - English
Choose spiked auger for use with dense materials that have a
tendency to clump or have a higher moisture content.
• Ice Melt- Calcium Chloride
• Lawn Mineral Supplement
CAUTION: This spreader is NOT recommended for use with rock salt.
SPIKED AUGER ASSEMBLY
Thread auger clockwise onto impeller shaft. Insert auger
nut. Tighten with 10 mm wrench. Do not over tighten.
AUGER
AUGER
NUT
IMPELLER
SHAFT
To fold down handle:
- Simply remove the bottom two bolts on the handle
- Loosen two M6 Hex nuts and fold down handle
- Replace two bottom bolts
- Tighten M6 Hex nuts completely

REPLACEMENT PARTS
REF NO. PART NO. QTY DESCRIPTION
1 6-9071 1 Gear Box Assembly
2 6-9040 1 Drive Shaft w/2 bearings
3 6-9072 1 Bail Assembly
4 6-9073 1 Single Baffle
5 6-9096 1 Hardware Blister with auger
6 6-9061 1 Impeller
7 6-9020 1 Wheels w/hardware & instructions
8 6-9050 1 Rear Baffle
9 6-9001 1 Grate
Additional Replacement Parts Available
10 6-9021 1 Thumb Nuts
11 6-9022 1 Hardware Bag
Chapin Spreader Operator’s Manual - English
4E
10
5
Note: Not all components shown in
kit will be needed for your model
7
8
9
1
2
3
4
6
11

APPLICATION CHART
SAMPLE SPREAD PATTERN
SHUT OFF
HERE
SHUT OFF
HERE
START RESTART RESTART
RESTART RESTART
SHUT OFF
HERE
SHUT OFF
HERE
All Season Residential & Professional General Application Guidelines
SCOTTS 2 2.5 3 3.25 3.5 4 4.75 5 5.5 6 7 8 9 10 11 12 13 14 15
CHAPIN 9 10 11 11 12 13 14 14 15 16 17 19 20 22 23 25 26 28 30
All Season Residential & Professional General Application
Guidelines
Weed Control 10-12
Fertilizer 12-16
Grass Seed-Overseeding 16-20
Grass Seed-New lawn 21-27
Salt & Ice-Melt 28-30
5E
Chapin Spreader Operator’s Manual - English
For detailed information on how to calibrate your Chapin spreader:
visit https://youtu.be/d-RPp8qrM1M

1S
Manual del operador del esparcidor Chapin - Español
Herramientas sugeridas:
Juego de llaves y/o matracas
El tiempo aproximado de armado es de 5-10 minutos
INSTRUCCIONES DE ARMADO
ADVERTENCIA: EL USO INAPROPIADO O NO SEGUIR LAS INSTRUCCIONES PUEDE
RESULTAR EN FALLAS DEL PRODUCTO O LESIONES. PARA USAR ESTE PRODUCTO
DE MANERA SEGURA DEBE LEER Y SEGUIR TODAS LAS INSTRUCCIONES ANTES
DE USARLO.
No permita que nadie opere el esparcidor a voleo sin las instrucciones apropiadas. No permita
que niños operen el esparcidor a voleo. Use gafas de seguridad y guantes al manejar y
aplicar sustancias químicas a patios y jardines. Lea las instrucciones y advertencias químicas
en la etiqueta respecto al manejo y aplicación de las sustancias que planea esparcir – las
configuraciones de aplicación proporcionadas son sólo una guía.
El tornillo sin fin está diseñado para funcionar con un movimiento hacia adelante. El
movimiento hacia atrás excesivo podría causar que se trabe. Si siente resistencia
mientras se tira el distribuidor hacia atrás, deténgase y retire la sal del tornillo sin fin.
ADVERTENCIA
Figure A
• Monte la manija de forma vertical con
pernos y tuercas hexagonales.
• Apriete las tuercas M6 por completo.
MONTAJE DE LA MANIJA
Nota: Si almacena con frecuencia
la esparcidora con la manija hacia
abajo, se proporcionan tornillos
mariposa opcionales para un
desmontaje más rápido.

3S
INSTRUCCIONES GENERALES DE OPERACIÓN
• Asegúrese de que el control de compuerta esté en posición cerrada (no detenga hacia abajo el
conjunto de sujeción durante el llenado).
• Determine la configuración adecuada para el material que se utiliza leyendo la configuración
sugerida en la bolsa del material Y/O consultando la tabla de aplicación en el panel de control del
esparcidor (Las tablas provistas son solo lineamientos Asegúrese de leer las instrucciones en la
bolsa/caja del material que está esparciendo para identificar la configuración exacta requerida).
• Fije el control en la configuración deseada Nota importante: No ajuste el control mientras
sostiene el conjunto de sujeción hacia abajo y la compuerta está abierta. Esto alterará la
precisión de la configuración de la compuerta y hará que se rompan partes.
• Para comenzar a esparcir, empiece a caminar (a un paso de 4.5 km/h) y jale hacia abajo el
sistema de sujeción para abrir la compuerta
• Para dejar de esparcir, simplemente suelte el sujetador y la compuerta se cerrará
INSTRUCCIONES DE OPERACIÓN DEL DEFLECTOR
• Ajuste el deflector con la mano para bloquear la distribución adecuadamente.
• Use tuercas de mariposa para ajustar la tensión en los deflectores
NOTE:Para evitar la sobre aplicación: utilizando el deflector en posición abajo, disperse el producto
en mayores cantidades directamente debajo del punto de desviación. Ajuste la configuración de
la compuerta para aplicar menos de la cantidad deseada cuando use el deflector. Consulte la
información de cobertura del fabricante de fertilizante/semillas.
Seleccione el barreno con púas para usarlo con materiales
densos que tengan tendencia a aglutinarse o que tengan un
contenido de humedad más alto.
• Derretidor de hielo - Cloruro de calcio
• Suplementos minerales para jardín
PRECAUCIÓN: NO se recomienda usar esta esparcidora con sal de roca.
SPIKED AUGER ASSEMBLY
Atornille el barreno en sentido de las agujas del reloj en el eje del impulsor.
Inserte la tuerca de barreno. Apriete con una llave de 10 mm. No apriete
demasiado.
Manual del operador del esparcidor Chapin - Español
BARRENO
CON PÚAS
TUERCA DEL
BARRENO
EJE DEL
IMPULSOR
ALMACENAJE Y MANTENIMIENTO
• Cuando termine de esparcir, quite cualquier material restante de la tolva
• Utilice la manguera de jardín para lavar la esparcidora después de cada uso.
• Tenga cuidado de no dirigir el rociador directamente a la caja de velocidades
• Se recomienda que NO utilice una lavadora a presión en su esparcidora.
• Déjelo secar antes de guardarlo.
Para bajar la manija:
- Sólo retire los dos pernos inferiores de la manija.
- Afloje dos tuercas hexagonales M6 y doble la manija hacia abajo.
- Vuelva a colocar los dos pernos inferiores.
- Apriete las tuercas hexagonales M6 por completo.
Produkt Specifikationer
Mærke: | Chapin |
Kategori: | Ikke kategoriseret |
Model: | 8200A |
Har du brug for hjælp?
Hvis du har brug for hjælp til Chapin 8200A stil et spørgsmål nedenfor, og andre brugere vil svare dig
Ikke kategoriseret Chapin Manualer
22 Juni 2025
20 Juni 2025
20 Juni 2025
20 Juni 2025
20 Juni 2025
20 Juni 2025
20 Juni 2025
19 Juni 2025
19 Juni 2025
19 Juni 2025
Ikke kategoriseret Manualer
- Moman
- Adam
- Segway
- Sonorous
- Wegman
- Anslut
- Mermade Hair
- Autel
- Olight
- Nivian
- Crestron
- Omega Altise
- Bretford
- Innoliving
- Leaptel
Nyeste Ikke kategoriseret Manualer
14 Juli 2025
14 Juli 2025
14 Juli 2025
14 Juli 2025
14 Juli 2025
14 Juli 2025
14 Juli 2025
14 Juli 2025
14 Juli 2025
14 Juli 2025