1. INTRODUCTION
Multireg6 is an electronic thermostat designed for electrical
heating. The thermostat has a user friendly interface that can
be controlled from the buttons on the front.
Multireg6 has 3 modes; Heat - Cool and Eco.
The thermostat fits in standard European junction boxes and
may be used with most System 55 frames. It has a sturdy metal
frame for secure fastening on the junction box. The thermostat
has one built-in room temperature sensor. Two additional
external temperature sensors may also be connected.
The product has implemented ZeroX technology. This
technology makes sure the relay switches at 0V when turning
on and o. With this technology the thermostat will have a
much longer lifetime.
Multireg6 has power metering which allows the user to see the
total accumulated energy consumption in kWh.
The thermostat can withstand a load of max 16A/3600W at
230VAC. We recommend a contactor for loads above 13A.
2. QUICK START
1. Switch o the mains voltage (turn o the fuse).
2. Open the junction box.
3. Connect according to the wiring diagram as shown in
Chapter “Connections”.
4. After verifying the connections, switch on the mains voltage.
3. INSTALLATION
Installation must be done by a qualified electrician in
accordance with national building codes. Before installation,
disconnect the power to the device from the mains. During
installation of the device, power to the device must be
disconnected AT ALL TIMES!
The product allows for wiring of cables with a cross section of
up to 1x2.5mm.
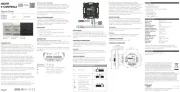
4. CONNECTIONS
Max tightening torque for terminal screws: 2Nm.
If the cable used has multiple strands using a end sleeve is
advised.
To access the terminal screws, hold the sides of the display
and gently pull outwards to detach the front piece.
TABLE OF CONTENTS
1. Introduction
2. Quick Start
3. Installation
4. Connections
5. Factory reset
6. Startup
7. Principles of regulation
8. Local settings menu
9. Display menu structure
10. Temperature shown in display
11. Standby and main screen
12. KWh value in menu
13. Size of load
14. Choice of sensor
15. Selecting sensor value
16. Calibration
17. Brightness
18. Display on/o
19. Display icons
20. Child lock
21. Open window detection
22. Error codes
23. Safety features
24. Thermostat setpoint
25. Thermostat mode
26. Thermostat dimensions
27. Thermostat controls
28. Chart - Display menu structure
Product info
White RAL 9003
54 305 34
Black matt
54 305 35
White RAL 9010
54 305 33
MULTIREG6
Installers manual
Firmware version Document version
FW 1.0 2023-B
Article no. Document date
54 305 33
54 305 34
54 305 35
01.09.2023
Org. doc. date 01.04.2023
PRODUCT
DOCUMENTS