Heatit WiFi Manual


Læs gratis den danske manual til Heatit WiFi (4 sider) i kategorien Termostat. Denne vejledning er vurderet som hjælpsom af 36 personer og har en gennemsnitlig bedømmelse på 4.4 stjerner ud af 18.5 anmeldelser. Har du et spørgsmål om Heatit WiFi, eller vil du spørge andre brugere om produktet?

Side 1/4
1. INTRODUCTION
Heatit WiFi thermostat is an electronic thermostat for electrical
underfloor heating. The thermostat has a simple user interface and
can be easily programmed via the capacitive buttons. The color screen
displays an accessible user interface. The thermostat has a built-in WiFi
chip that allows you to control it from a user-friendly app. The ”Heatit
WiFi” app is available on Google Play and in the App Store. Works
with Amazon Alexa and Google Home (pending). If you are installing
multiple thermostats in the same house, you may copy the settings
from one thermostat to the next. This simplifies installation.
Heatit WiFi thermostat 16A is equipped with a single-pole switch and
fits into most common frames (e.g. System 55, Elko RS16, Schneider
Exxact). The thermostat can withstand a load of max 16A/3600W
at 230VAC. We recommend a contactor for loads above 13A. The
thermostat may be connected to an external sensor.
2. INSTALLATION
Installation must be done by a qualified electrician in accordance with
the national building codes. Before installation, disconnect any power
to the device mains. During installation of the device, power to the
device must be disconnected AT ALL TIMES!
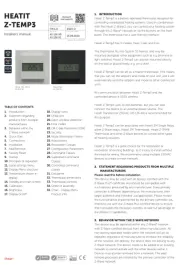
Release the front cover by pressing e.g. a screwdriver gently into the
ejector latch centered at the bottom of the thermostat front.
Now connect the wires to the thermostat terminals:
L Power connection (Live)
LOAD (N) Heating Cable connection (Neutral)
LOAD (L) Heating Cable connection (Live)
N Power connection (Neutral)
PILOT Pilot Wire (if applicable)
SENSOR Floor temp sensor, NTC type
Wires must be stripped 9-10mm. Wires can be released by pressing
the connectors release switch. Floor sensor must be placed into a
TABLE OF CONTENTS
1. Introduction
2. Installation
3. Startup
4. Symbols
4.1 Operation mode
4.2 Heating/Cooling active
4.3 Note
5. Controls
6. Standby and main screen
7. Menu items
8. Operation mode
9. Weekly schedule
10. Heatit WiFi zones
11. Advanced settings
12. WiFi settings
13. Phone applications
14. Product info
HEATIT WIFI
Installers manual
Ver 2022-C
01.10.2021
DO INSERT NOT
ANYTHING HERE!
EJECTOR
LATCH
54 305 89 54 305 88
controlled by three touch sensitive buttons:
Left (Up)
Center (Confirm)
Right (Down)
Each button has its own background light. When the background light is lit on
a button, the button is available for use.
Tip: Holding the left button for 2 seconds at any time will make a quick return
to the main screen.
Tip: While browsing the thermostat menu, pause at any menu item for a
moment, and a help text will be shown. This help text gives useful information
and guides the user through the functions related to that menu item. The help
text delay can be adjusted under Settings in the main menu.
6. STANDBY AND MAIN SCREEN
If the thermostat is not touched for a while, it will automatically go to standby
screen. While in standby, touching any of the buttons will display the main
screen below:
1. WiFi indicator
2. Measured temperature
3. Heating switched on/off
4. Operation mode
5. Time
In the main screen, pressing the center button will access the main
menu. Pressing the left or right button will change the set temperature.
7. MENU ITEMS
The main menu has the following items:
Operation Mode See point 8: ”Operation Mode
Schedule See point 9:Weekly schedule
Settings Adjust the settings
WiFi Adjust WiFi settings
Energy consumption Show energy consumption
Child Lock Activate lock
Info Thermostat information
Shut down Switch thermostat on/off
Tip: “Energy Consumption shows consumption statistics over different
time periods. Press center button to reset statistics.
Tip: Select “Child Lock” and press center button three times to activate/
deactivate the lock.
°C
HOME 10:40
1
2 3
4 5
protective tube when used in concrete. Make sure there is no water
in the tube. Next, position the thermostat and fasten it onto the wall
mounting box using 2-4 screws. Open the frame retaining spring,
position the frame and close the spring. Then attach the front part,
making sure the connector between the front and bottom parts are
correctly placed. Press the front part until it snaps in place. The front part
may later be removed by pressing the ejector latch.
3. STARTUP
After connecting the power to the thermostat for therst time or after
performing a factory reset, the startup wizard will prompt the following
questions:
Language Set language
Set timezone Timezone compared to GMT
Daylight saving Daylight saving in use Y/N
Date & time Set current date & time
Thermostat use Heating or Cooling
Heating system Floor (Slow), Floor (Fast), Other (Fast)
Floor type Concrete or wooden
Floor Temp limit 5°C - 40°C (concrete) or C - 27°C (wood)
Choice of sensor Room/Floor
Gradual Heating ON or OFF - used with new concrete floors
to limit temperature rise time. Only in floor
sensor mode.
Note: Wooden floors require a floor sensor to be connected, in order to
set the floor temperature limit to 27°C.
4. SYMBOLS
4.1 Operation mode
4.2 Heating/Cooling Active
4.3 Note
5. CONTROLS
Wooden floor has reached the maximum temperature of
27°C, thus heating is being limited.
Heating enabled Cooling
Cooling enabled
Home
Power regulation
Week schedule
Away
Anti-frost
°C
GRADUAL 10:40
Gradual heating
Gradual heating will raise the temperature slowly over the
course of 20 days. This is mainly user for new installations.
The thermostat is


Produkt Specifikationer

Mærke: Heatit
Kategori: Termostat
Model: WiFi

Har du brug for hjælp?

Hvis du har brug for hjælp til Heatit WiFi stil et spørgsmål nedenfor, og andre brugere vil svare dig