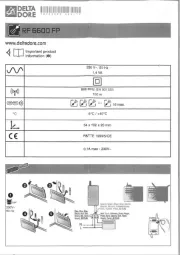
Heatit Z-Wave Plus Manual

Heatit Termostat Z-Wave Plus

Læs gratis den danske manual til Heatit Z-Wave Plus (10 sider) i kategorien Termostat. Denne vejledning er vurderet som hjælpsom af 34 personer og har en gennemsnitlig bedømmelse på 4.6 stjerner ud af 17.5 anmeldelser. Har du et spørgsmål om Heatit Z-Wave Plus, eller vil du spørge andre brugere om produktet?

Side 1/10
Ver 2016-B
IMPORTANT!
PLEASE READ THIS BEFORE INSTALLATION.
This thermostat is tested and certified by Pepper One Gmbh
according to the requirements put forward by the Z-Wave
Alliance. This is a Z-wave Plus product with the 500 series chip.
If the product does not work with your gateway, then the
gateway manufacturer has not made an integration or
implemented such a thermostat with their gateway.
We do not give any guarantee towards integration.
PRINCIPLES FOR REGULATION
The Heatit Z-Wave thermostat is designed for controlling
electrical heating cables and electrical radiators/convectors.
The thermostat has 2 internal temperature sensors and has
3 algorithms for temperature compensation. After you have
set the temperature, the thermostat will use a hysteresis to
regulate the temperature. The hysteresis is adjustable.
TEMPERATURE SHOWN IN DISPLAY
The temperature shown in the display is the actual temperature
for floor sensor and the external room sensor. You are able to
calibrate the sensor values.
When using the internal room sensor, the temperature shown
is the set point. When using the internal sensor, the thermostat
can seem somewhat inaccurate. This is due to heat generation
inside the thermostat, draft and other external influences.
If the thermostat is to be used with waterbased heating systems,
you have to use an external sensor.
SETUP
This manual describes the most essential functions and
technical specifications of the thermostat. These instructions
help the user to control the thermostat, and the electrician
to install and setup the thermostat.
INSTALLATION
Installation must be done by a qualified electrical installer in
accordance with the National Building codes. Before installation,
disconnect any power to the thermostat’s mains. During
installation of the thermostat, power to the thermostat must
be disconnected AT ALL TIMES!
Use e.g. a small slotted screwdriver. Start by carefully removing
the front cover by pushing the release springs. The front cover
and the frame can now be removed.
Now connect the wires to the thermostat’s terminals:
HEATING (N) Heating cable connection (Neutral)
N Power connection (Neutral) 230V
L Power connection (Live) 230V
HEATING (L) Heating cable connection (Live)
PILOT Pilot signal (ECO temp) 230V
FLOOR SENSOR NTC type (10, 12, 15, 22, 33 or 47kΩ).
Default 10kΩ.
EXTERNAL SENSOR NTC type (10, 12, 15, 22, 33 or 47kΩ).
Default 10kΩ.
Next, position the thermostat and fasten it onto the wall’s
mounting box using 2-4 screws. Position the frame, then
position and carefully press the front cover until it snaps in
place. Check that the front cover has snapped in place properly
on both left and right side. The front cover should now be firmly
fixed on all sides.
STARTUP
AFTER CONNECTING THE POWER TO THE THERMOSTAT FOR THE
FIRST TIME, ALL PARAMETERS WILL HAVE DEFAULT SETTINGS.
2 yr
HEATIT Z-WAVE
Installers manual
Firmware 1.8
01.06.2016
Release spring
1: Left 3: Right2: Center
87 mm
58,8 mm
HEAT ING L
L
N
HEA
TING N
PIL OT
WIRE
FL OOR
SENSOR
EXT ERNAL
SENSOR
Made in EU
TF 021
21,3 mm
51,1 mm
87 mm
58,8 mm
29,9 mm
CONTROL
The thermostat is controlled by three touch sensitive capacitive
buttons.
You only need to touch lightly to activate the buttons.
1: Left (Up)
2: Center (Confirm)
3: Right (Down)
INCLUSION/EXCLUSION
To include the thermostat to your home automation gateway,
press Center (confirm) for 10 seconds.
The display will show OFF. Press Right (down) 4 times till you
see Con in the display. Now start add device in your home
automation software. Start inclusion mode by pressing Center
(confirm) for approximately 2 seconds. The inclusion/exclusion
icon will appear in the display. Confirmation will show Inc/EcL
in the display. If inclusion fails, Err (error) will appear.
Leave programming mode by choosing ESC in menu.
Your thermostat is ready for use with default settings.
PROGRAMMING YOUR THERMOSTAT
To activate the programming mode, press Center (confirm)
for 10 seconds. Now the display will show OFF.
Now you are in programming mode. To scroll up and down
in the menu use button 1 and 3 (left and right) to navigate.
To enter submenu press Center (confirm). Always confirm
your setting by pressing Center (confirm) for 2 seconds.
Menu:
OFF Turns the thermostat off.
Sensors:
F Floor sensor
A Internal room sensor
AF Internal room + Floor sensor
A2 External room sensor
P Power regulator
FP Floor sensor + Power regulator
A2F External room sensor + Floor sensor
Depending on your choice of sensors, the menu will change.
SEn Select the right Ohm value for your external/floor sensor.
NTC type (10, 12, 15, 22, 33 or 47kΩ). Default 10kΩ.
CAE Calibration for external sensor.
CAF Calibration for floor sensor.
CAR Calibration for room sensor.
br1 Brightness of display can be adjusted in this menu.
Con Activation of inclusion/exclusion mode.
diF Hysteresis
ALo Setting lowest allowed temperature (limitation).
(Airsensor)
AHI Setting highest allowed temperature (limitation).
(Airsensor)
FLO Setting lowest allowed temperature (limitation).
(Floor sensor)
FHI Setting highest allowed temperature (limitation).
(Floor sensor)
HEA Switch between heating and cooling function.
ESC Escape – exit programming menu.
PRODUCT INFO Heatit Z-Wave
FEATURES
Floor sensor
External room sensor
Internal room sensor
Temperature limiter
Power regulator
Z-Wave Plus, 500 series
Weekly program via gateway
Setback mode via
gateway or pilot wire
LED-diode
Can be used in connection
with different NTC-sensors
Lock mode/child lock
Backlight
Calibration
8 associations
TECHNICAL DATA
Protocol Z-Wave Plus, 868,4 MHz
Rated voltage 230V 50/60Hz
Max load 3600W (resistive load)
750W self-limiting heating cable
Max current 16A
Power consumption 1,5W
Power regulator Time cycle 0-30 min
Min/max installation temp. -20°C to 40°C
Min/max operating temp. 5°C to 40°C
Temperature intervals Floor sensor 5°C to 40°C
External room sensor 5°C to 40°C
Hysteresis 0,3°C to 3,0°C (default 0,5°C)
Sensor values 0°C 29,1 kOhm
10°C 18,6 kOhm
15°C 15,1 kOhm
20°C 12,2 kOhm
25°C 10,0 kOhm
Switch Single-pole switch
IP class IP21
TERMINAL
Use 1,5 mm² or 2,5 mm² according to load.
INCLUDED IN PACKAGE
Floor sensor 3 meters, Art. no. 5430109
WARRANTY
2 years
The thermostat is designed for electrical heating.
ART. NO. PRODUCT COLOR
5430499 Heatit Z-Wave thermostat 3600W 16A White RAL 9003
5430498 Heatit Z-Wave thermostat 3600W 16A Black RAL 9011
5430311 Frame for Heatit White RAL 9003
5430312 Frame for Heatit Black RAL 9011
5430497 Cable for software update on thermostat
5430108 Floor sensor Ø3mm 6m NTC 10 kOhm
5430109 Floor sensor Ø4mm 3m NTC 10 kOhm
5430128 External room sensor, glass front NTC 10 kOhm
5430471 External enclosed sensor IP 20/54


Produkt Specifikationer

Mærke: Heatit
Kategori: Termostat
Model: Z-Wave Plus

Har du brug for hjælp?

Hvis du har brug for hjælp til Heatit Z-Wave Plus stil et spørgsmål nedenfor, og andre brugere vil svare dig