Intellinet 506441 Manual


Læs gratis den danske manual til Intellinet 506441 (6 sider) i kategorien Skifte. Denne vejledning er vurderet som hjælpsom af 33 personer og har en gennemsnitlig bedømmelse på 4.5 stjerner ud af 17 anmeldelser. Har du et spørgsmål om Intellinet 506441, eller vil du spørge andre brugere om produktet?

Side 1/6
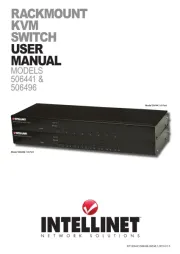
Rackmount
kVm
Switch
uSeR
manual
Models
506441 &
506496
INT-506441/506496-UM-Ml1-0810-01-0
Model 506441: 8-Port
Model 506496: 16-Port
2ENGLISH
Rackmount KVM Switch • User Manual English
INTRODUCTION
Thank you for purchasing the INTELLINET NETWORK SOLUTIONS 8-Port Rackmount KVM Switch, Model 506441 or 16-Port Rackmount
KVM Switch, Model 506496. For a full list of specications, refer to the datasheets available at www.intellinet-network.com.
The USB and the PS/2 interface standard on both console side and PC side makes this switch especially useful in an environment with
mixed equipment; e.g., older computers with PS/2 connections and newer models featuring USB ports. With the ability to manage and
control multiple PS/2 or USB computers from a single console, you’ll also be able to enjoy these convenient features:
Package Contents
Rackmount KVM Switch: 8-Port, Model 506441 or 16-Port, Model 506496
19” rackmount brackets
4-in-1 connection cables: 8 with Model 506441 or 16 with Model 506496
User manual
INSTALLATION
Rackmounting
To install the Rackmount KVM Switch in a standard 19” rack unit, simply screw the two
mounting brackets to the sides of the switch (screws and brackets included). NOTE: Two sets
of pre-drilled holes let you connect the brackets so either the front panel or the rear panel of
the switch is facing out. Then attach the two brackets to the rack.
Rear Panel Connections
Before making any power or network connections to the Rackmount KVM Switch, make sure that all devices in the conguration are
turned o and properly grounded.
1. Connect the USB or PS/2 keyboard and mouse and the monitor of your command (console) computer to the corresponding plugs in
the console section of the switchs rear panel (highlighted at
right).
2. Plug the HD15 connector on one of the included 4-in-1
connection cables into any of the PC ports to the right of the
console section on the rear panel of the switch, then plug the
keyboard/mouse and monitor connectors on the other end of the
connection cable into a computer to be included in the
conguration. Repeat this step for as many computers as you
desire and the switch allows (8 or 16 total). NOTE: The shape of these HD15 connectors has been modied so that only KVM cables
designed to work specically with this series of switches can be properly plugged in. Do not try to use ordinary 15-pin VGA connector
cables in your conguration.
3. Plug the included power adapter into the DC9V jack, then connect it to an AC power outlet and turn on the computers.
Front Panel Controls and Indicators
The port LEDs (1-3 are shown at right for reference) indicate the status of the ports as determined by using either the corresponding
buttons on the switch — below the LEDs — or the On-Screen
Display (OSD).
The On Line LEDs light red to indicate that the computer
connected to the corresponding port is powered on.
The Selected LEDs light green to indicate that the computer
connected to the corresponding port is the one currently
selected and controlled by the console.
The Port Selection buttons can be pressed to select and control the computer connected to the corresponding port.
The recessed Reset button can be pressed (using a pin or similar pointed object) to reset the switch if it isn’t responding.
OPERATION
Hot Plugging
The Rackmount KVM Switch supports hot Plug and Play: Computers can be removed from the conguration and added back into it
simply by disconnecting then re-connecting their cables from their PC ports — without the need to turn o the switch. The computer,
however, must be re-connected to the same port as before for this feature to work properly. NOTE: The console section doesn’t support
hot-plugging of a PS/2 keyboard or mouse.
8-port rear panel
12
3
• Pop-up on-screen display (OSD) menu
• Computer selection and operation using
front-panel push buttons and OSD menu
• Hot Plug and Play: no need to shut down
the KVM switch to attach or remove PCs
• Numerical display and LED indicators for
easy bank/port status monitoring
• Screen resolution support up to 1600 x 900
• Support of Microsoft and Logitech standard
5-key mice and compatible models
• Auto-Scan period programmable via OSD
menu option
• Password protection
• Auto-logout timeout support


Produkt Specifikationer

Mærke: Intellinet
Kategori: Skifte
Model: 506441

Har du brug for hjælp?

Hvis du har brug for hjælp til Intellinet 506441 stil et spørgsmål nedenfor, og andre brugere vil svare dig


Skifte Intellinet Manualer

Intellinet

Intellinet 561846 Manual

4 September 2024
Intellinet

Intellinet 561617 Manual

3 September 2024
Intellinet

Intellinet 561945 Manual

3 September 2024
Intellinet

Intellinet 561686 Manual

3 September 2024
Intellinet

Intellinet 560641 Manual

21 August 2024
Intellinet

Intellinet 560849 Manual

17 August 2024
Intellinet

Intellinet 506441 Manual

17 August 2024

Skifte Manualer

Nyeste Skifte Manualer