Kramer VS-211X Manual

Kramer Router VS-211X

Læs gratis den danske manual til Kramer VS-211X (2 sider) i kategorien Router. Denne vejledning er vurderet som hjælpsom af 71 personer og har en gennemsnitlig bedømmelse på 4.8 stjerner ud af 36 anmeldelser. Har du et spørgsmål om Kramer VS-211X, eller vil du spørge andre brugere om produktet?

Side 1/2
VS-211X / VS-411X Quick Start
P/N:
2900- 30124 7 QS
Rev:
3
Scan for full manual
VS-211X and VS-411X Quick Start Guide
This guide helps you install and use your VS-211X / VS-411X for the first time.
Go to www.kramerav.com/downloads/VS-411X to download the latest user manual and check if firmware
upgrades are available.
Step 1: Check what’s in the box
VS-211X / VS-411X 4K Auto Switcher
4 Rubber feet
1 Power adapter and cord
1 Quick start guide
Step 2: Get to know your VS-211X / VS-411X
The terms HDMI, HDMI High-Definition Multimedia Interface, and the HDMI Logo are trademarks or registered trademarks of HDMI Licensing Administrator, Inc.
#
Feature
Function
1
PROG Micro USB Connector
Connect to upgrade the firmware.
2
SETUP 4-way DIP-Switches
Set the operation DIP-switches (see Setting the DIP-Switches).
3
IN Buttons
Press to select an HDMI input (button lights orange).
4
OUT LED
Lights green when an HDMI output is connected.
5
ON LED
Lights green when the device receives power.
6
HDMI IN Connectors
Connect to an HDMI source (2 for VS-211X, 4 for VS-411X).
7
HDMI™ OUT Connector
Connect to an HDMI acceptor.
8
AUDIO OUT3.5mm Mini Jack
Connector
Connect to an unbalanced stereo audio acceptor.
9
REMOTE IN Terminal block Connector
Connect to contact closure switches by momentary contact between the desired
pin and common GND pin to select an input.
10
5V DC Power Connector
Connect to the power supply and to the mains electricity.
Step 3: Install VS-211X / VS-411X
Install VS-211X / VS-411X using one of the following methods:
Attach the rubber feet and place the unit on a flat surface.
Fasten a bracket (included) on each side of the unit and attach it to a flat surface
(see www.kramerav.com/downloads/VS-411X).
Mount the unit in a rack using the recommended rack adapter
(see www.kramerav.com/product/VS-411X).
Ensure that the environment (e.g., maximum ambient temperature &
air flow) is compatible for the device.
Avoid uneven mechanical loading.
Appropriate consideration of equipment nameplate ratings should be
used for avoiding overloading of the circuits.
Reliable earthing of rack-mounted equipment should be maintained.
Maximum mounting height for the device is 2 meters.
Step 4: Connect the inputs and outputs
Always switch OFF the power on each device before connecting it to your VS-211X. For best results, we recommend that you
always use Kramer high-performance cables to connect AV equipment to the VS-211X. VS-211X and VS-411X are identical
except for the number of inputs.
Setting the DIP-Switches
DIP-switches 1, 2 and 3 are set to ON (down) by default and DIP-switch 4 is always set to OFF (up).
DIP-switch changes take effect immediately.
#
Feature
Dip-Switch Settings
1
Switching Mode
OFF (up) Manual mode.
ON (down) Auto-switching mode.
2
Auto-switching Mode
OFF (up) Priority switching mode: the device switches the source with the
highest priority to the output.
ON (down) Last connected switching mode: the last detected active source is
auto-switched to the output.
3
EDID lock
Off (up) EDID Locked.
On (down) EDID parameters are passed-through.
4
Reserved for Factory Use
It is mandatory to keep set to OFF (up).
For optimum range and performance use the recommended Kramer cables available at www.kramerav.com/product/VS-411X
Step 5: Connect the power
Connect the power cord to VS-211X / VS-411X and plug it into the mains electricity.
Safety Instructions (See www.kramerav.com for updated safety information).
Caution:
For products with relay terminals and GPI\O ports, please refer to the permitted rating for an external connection, located next to the
terminal or in the User Manual.
There are no operator serviceable parts inside the unit.
Warning:
Use only the power cord that is supplied with the unit.
Disconnect the power and unplug the unit from the wall before installing.


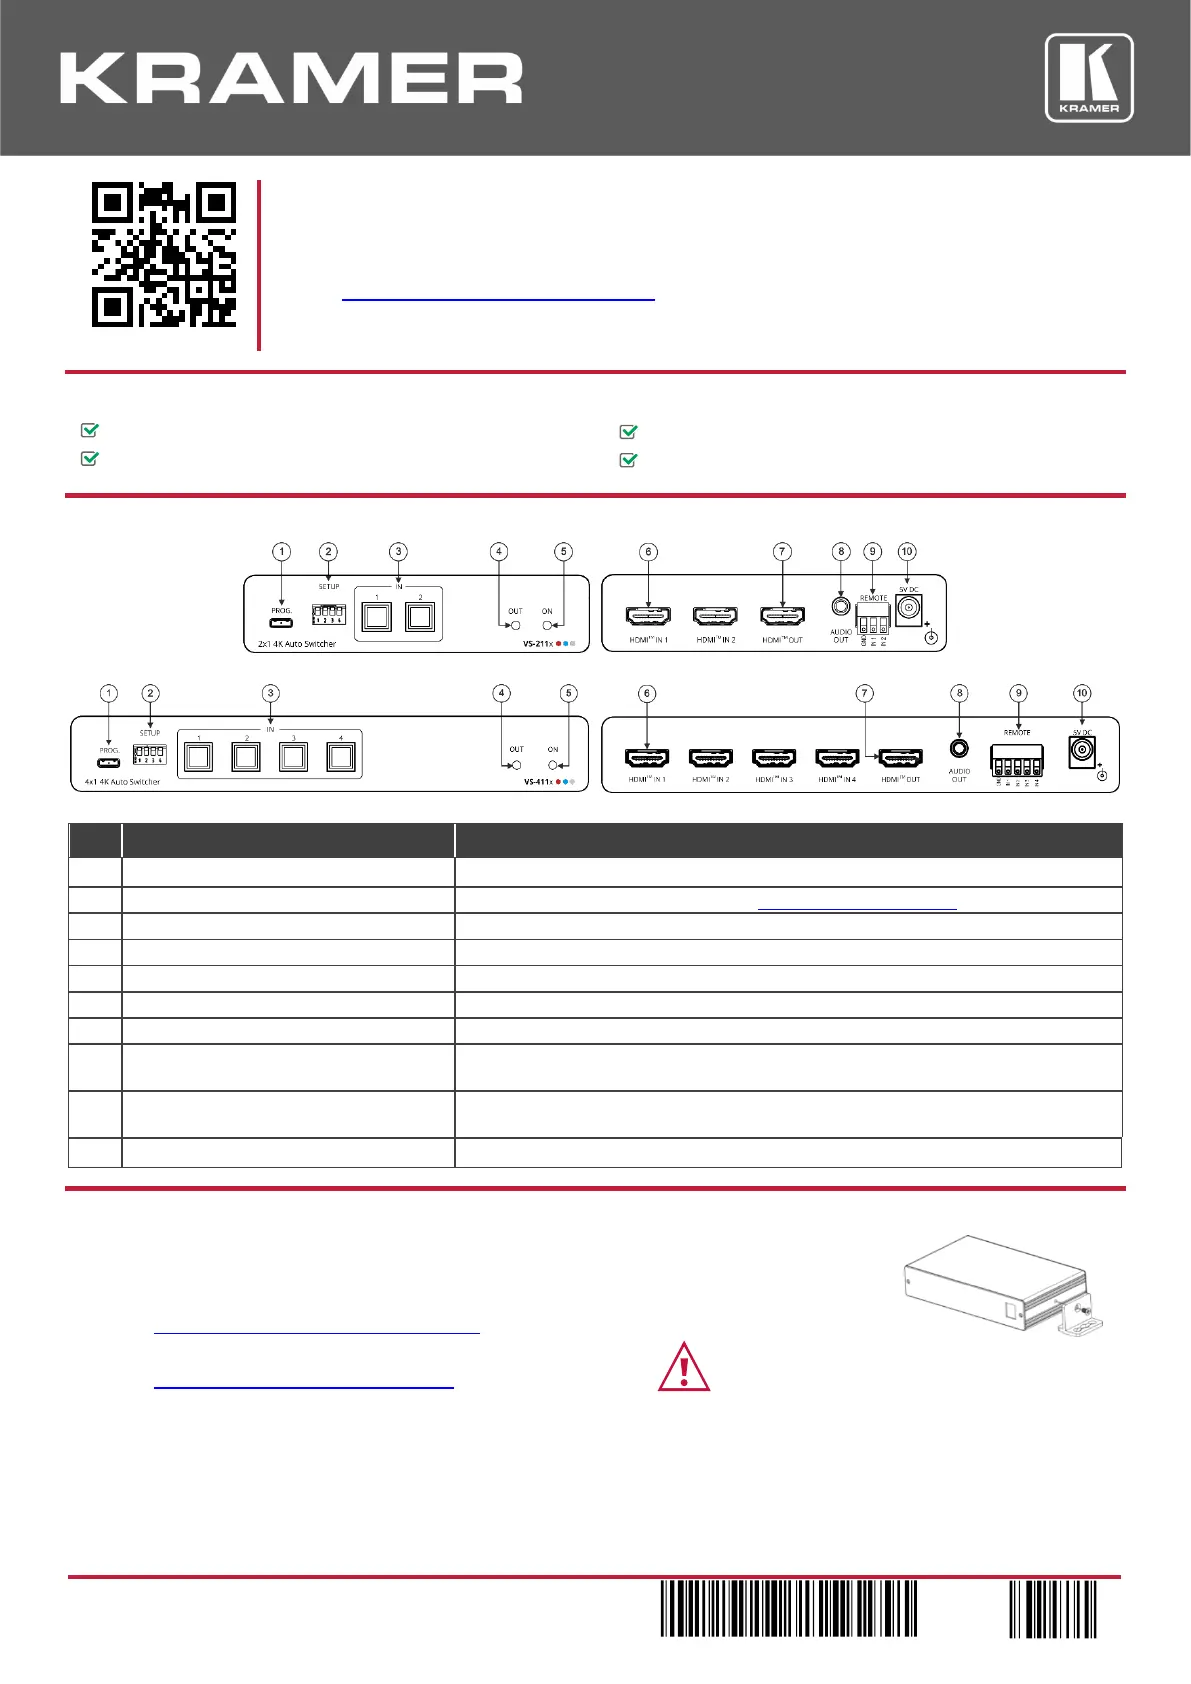
Produkt Specifikationer

Mærke: Kramer
Kategori: Router
Model: VS-211X
Bredde: 120 mm
Dybde: 71.5 mm
Højde: 24.4 mm
Vægt: 200 g
Antal pr. pakke: 1 stk
Produktfarve: Sort
Pakkevægt: 700 g
Pakkedybde: 120 mm
Pakkebredde: 157 mm
Pakkehøjde: 87 mm
Understøttede videotilstande: 2160p
Opbevaringstemperatur (T-T): -40 - 70 °C
Relativ luftfugtighed ved drift (H-H): 10 - 90 %
Relativ luftfugtighed ved opbevaring (H-H): 10 - 90 %
Antal HDMI-porte: 3
HDCP: Ja
Driftstemperatur (T-T): 0 - 40 °C
Udgangsspænding for vekselstrømsadapter: 5 V
Materiale: Aluminium
DC-in-stik: Ja
Harmoniseret systemkode (HS): 85176990
Bæredygtighedscertifikater: CE, RoHS, WEEE
Strømforbrug: 500 mA
HDMI-version: 2.0
Overholdelse af bæredygtighed: Ja
Vekselstrømsadapterens udgangsstrøm: 2 A
HSMI-indgang: 2
Antal HDMI-udgange: 1
HDCP-version: 2.2
Video porttype: HDMI
Båndbredde: 17.82 Gbit/sek.
Udvidet display identifikationsdata (EDID): Ja
3,5 mm ud: Ja

Har du brug for hjælp?

Hvis du har brug for hjælp til Kramer VS-211X stil et spørgsmål nedenfor, og andre brugere vil svare dig


Router Kramer Manualer

Kramer

Kramer PL-50 Manual

28 September 2025
Kramer

Kramer VS-84UT Manual

4 September 2025
Kramer

Kramer VS-411XS Manual

3 Januar 2025
Kramer

Kramer VS-211X Manual

4 September 2024
Kramer

Kramer WP-211T Manual

31 August 2024
Kramer

Kramer MV-4X Manual

31 August 2024
Kramer

Kramer VS-44H2 Manual

21 August 2024
Kramer

Kramer FC-54P Manual

20 August 2024
Kramer

Kramer VS-42H2 Manual

20 August 2024

Router Manualer

Nyeste Router Manualer

Blustream

Blustream WMF51 Manual

29 September 2025
Panasonic

Panasonic ET-YFB200G Manual

29 September 2025
MSolutions

MSolutions MS-0401E Manual

29 September 2025
Blustream

Blustream SW42DA Manual

29 September 2025
Opticis

Opticis OMM-2500 Manual

29 September 2025
RDL

RDL EZ-HSX4 Manual

29 September 2025
Shinybow

Shinybow SB-5669K Manual

28 September 2025
RDL

RDL RU-ASX4DR Manual

28 September 2025