Read all instructions before use.
This product is intended for adult use only.
This product is not a toy.
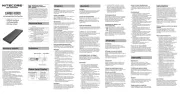
Installing or Removing the Battery
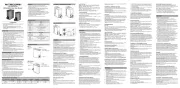
Removing: As illustrated, press both Quick Release
Buttons simultaneously to remove the Battery Cartridge.
Installing: Align the Proprietary Repeller Connector
( ) on the Battery Cartridge with the Input Port ( ) ⑨ ⑦
of the Mosquito Repeller, and then insert to install.
Charge the Battery Cartridge
The product is equipped with an intelligent charging
system. Please charge the Battery Cartridge before the
Power Connection: After removing the Battery
Cartridge, use the USB-C charging cable to connect a USB
adapter or other USB power sources to the IN/OUT Port of
the Battery Cartridge to begin the charging process. The
charging time is approx. 4 hours and 30 minutes. (Input:
Charging Indication: During the charging process, the
power indicators will transition gradually from ashing
to a steady light, one by one, displaying the battery
level. When the Battery Cartridge is fully charged, the
4 indicators will become steadily turned on. When fully
charged, the standby time is approx. 12 months.
The Mosquito Repeller can be powered by the Battery
Cartridge or an external power supply. When successfully
connected to an external power supply, the screen
will show a USB icon. If the external power supply is
unavailable due to potential compatibility issues, the
Battery Cartridge can be installed to provide power.
Connecting to an External Power Supply: Connect
one end of the USB-C cable to the Input Port of the
Mosquito Repeller and the other end to a USB adapter or
Multifunctional OLED Display
The product is equipped with a multifunctional OLED
display. (Please remove the screen protector before the
Screen On: Long press either button until the screen is
● When neither the mosquito repelling function nor the
ultrasonic function is activated, the display screen will
automatically turn o after 20 seconds of inactivity.
● When either the mosquito repelling function or
the ultrasonic function is active, double press the
Ultrasonic Button to turn o the display. To wake
the screen after it has turned o, short press either
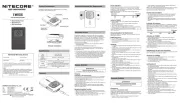
When Powered by the Battery Cartridge:
● The screen will show the current battery percentage
when turned on, as shown in gure (1), and goes out
automatically after 20 seconds of inactivity.
● When the mosquito repelling function is activated,
the screen will become steadily turned on and show
the current info (Current Mode, Battery Icon, and
Remaining Runtime) as shown in gure (2).
● When the ultrasonic function is activated, the screen
will become steadily turned on and show the current
info (Ultrasonic Icon, Battery Icon, and Remaining
Runtime) as shown in gure (3).
When Powered by an External Power Supply:
● When the Mosquito Repeller is successfully connected
to an external power supply, the screen will show
the USB icon as shown in gure (4) and goes out
automatically after 20 seconds of inactivity.
● When the mosquito repelling function is activated, the
screen will become steadily turned on and show the
current info (Current Mode and USB Icon) as shown in
● When the ultrasonic function is activated, the screen will
become steadily turned on and show the current info
(Ultrasonic Icon and USB Icon) as shown in gure (6).
Note: When using the mosquito repelling function
together with the ultrasonic function, the screen will
become steadily turned on and show both the Current
Mode and Ultrasonic Icon.
Mosquito Repelling Function
On: When the screen is on, long press the Repeller
Button for 1 second to activate the mosquito repelling
O: When the mosquito repelling function is on, long
press the Repeller Button for 1 second to turn it o. The
screen will show the current battery percentage or the
Switching: When the mosquito repelling function is on,
short press the Repeller Button to switch between LOW
POWER Mode and HIGH POWER Mode. The screen will
On: When the screen is on, long press the Ultrasonic
Button for 1 second to activate the ultrasonic function.
O: When the ultrasonic function is on, long press the
Ultrasonic Button for 1 second to turn it o.
1. When the product is o, insert the repellent mat(s)
into the Repellent Mat Compartment.
2. The protection zone will be created after activating
the mosquito repelling function for 10 minutes.
Lisez toutes les instructions avant utilisation.
Ce produit est destiné à être utilisé par des adultes.
Ce produit n’est pas un jouet.
1. Veuillez lire attentivement le manuel d’utilisation avant
d'utiliser le produit connectez des appareils externes
que conformément aux indications de ce manuel de
2. Ce produit est destiné à être utilisé par des adultes
âgés de 18 ans et plus. Veuillez le tenir hors de portée
des enfants et des animaux domestiques.
3. Une surveillance accrue est nécessaire pour éviter
les brûlures lorsque le produit est utilisé à proximité
4. Température ambiante d'utilisation : -10~35°C
(14~95°F) ; Température de stockage : -20~60°C
5. Ne laissez pas le produit sans surveillance lorsqu'il est
en cours d'utilisation. Cessez d'utiliser le produit au
moindre signe de dysfonctionnement.
6. NE PAS toucher le compartiment du patch répulsif
pendant l'utilisation de la fonction répulsif anti-
7. NE PAS couvrir le produit ou le placer à proximité
d'autres objets, car cela pourrait endommager
le produit ou provoquer des accidents dus à des
8. Conservez le produit dans un endroit sec et ventilé.
N'exposez PAS l'appareil à la pluie. Tenez-le éloigné de
tout matériau combustible.
9. Lorsque le produit est placé dans un environnement
clos ou inammable, tel qu'une poche ou un sac à
dos, ou lorsqu'il n'est pas utilisé pendant une période
prolongée, veuillez retirer le bloc batterie an d'éviter
une activation accidentelle et les dangers causés par
10. Rechargez la batterie tous les 3 mois si vous ne
l'utilisez pas pendant une période prolongée.
11. NE PAS placer le produit dans l'eau.
12. NE METTEZ PAS vos doigts, des métaux ou tout autre
objet étranger dans le produit.
13. NE PAS utiliser la fonction anti-moustique dans un
14. NE PAS exposer le produit à des températures
supérieures à 60°C (140℉) pendant une période
15. NE PAS démonter ou modier ce produit, car cela
l'endommagerait et rendrait la garantie du produit
invalide. Veuillez-vous référer à la section garantie du
manuel pour des informations complètes sur la garantie.
⚠ Sécurité de la batterie
Une utilisation inappropriée de la batterie peut entraîner
de graves dommages ou des risques de sécurité tels que
la combustion ou l'explosion. N'utilisez PAS la batterie si
elle est endommagée. NE PAS démonter, percer, couper,
écraser, incinérer ou court-circuiter la batterie. En cas
de fuite ou d'odeur anormale, cessez immédiatement
d'utiliser la batterie et mettez-la au rebut de manière
appropriée. Recyclez l'appareil/la batterie conformément
aux lois et réglementations locales en vigueur.
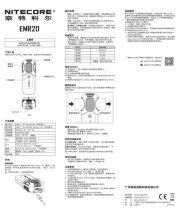
②Compartiment pour patch répulsif
⑥Boutons de déverrouillage rapide
⑪Indicateurs de puissance
Montage ou démontage du bloc batterie
Démontage : Comme illustré, appuyez simultanément
sur les deux boutons de déverrouillage rapide pour retirer
Montage : Aligner le connecteur du répulsif ( ) au ⑨
port du bloc batterie ( ), puis l'insérer pour l'installer.⑦
Rechargez le bloc batterie
Le produit est équipé d'un système de charge
intelligent. Veuillez recharger le bloc batterie avant la
Connexion à une source d’alimentation : Après avoir
retiré le bloc batterie, utilisez le câble de charge USB-C
pour connecter un adaptateur USB ou d'autres sources
d'alimentation USB au port IN/OUT du bloc batterie pour
commencer le processus de recharge. Le temps de recharge
est d'environ 4 heures et 30 minutes. (Entrée : 5V⎓3A)
Indication de charge : Pendant le processus de charge,
les indicateurs d'alimentation passent progressivement
du clignotement à une lumière xe, un par un, achant
le niveau de la batterie. Lorsque le bloc batterie est
complètement chargé, les 4 indicateurs s'allument de
manière xe. Lorsque la batterie est complètement
chargée, l'autonomie en veille est d'environ 12 mois.
Le répulsif anti-moustique peut être alimenté par le
bloc batterie ou par une source d'alimentation externe.
Lorsqu'il est connecté à une source d'alimentation
externe, l'écran ache une icône USB. Si le bloc
d'alimentation externe n'est pas disponible en raison de
problèmes de compatibilité potentiels, le bloc batterie
peut être installé pour fournir de l'énergie.
Connexion à une alimentation externe : Connectez
une extrémité du câble USB-C au port d'entrée du répulsif
anti-moustique et l'autre extrémité à un adaptateur USB
ou à d'autres sources d'alimentation USB.
Le produit est équipé d'un écran OLED polyvalent. (Veuillez
retirer le protecteur d'écran avant la première utilisation.)
Activation de l'écran : Appuyez longuement sur l'un
des boutons jusqu'à ce que l'écran s'active.
● Lorsque ni la fonction anti-moustique ni la
fonction ultrason ne sont activées, l'écran s'éteint
automatiquement après 20 secondes d'inactivité.
● Lorsque la fonction anti-moustique ou la fonction
ultrason est activée, appuyez deux fois sur le bouton
ultrason pour éteindre l'écran. Pour réactiver l'écran
après qu'il se soit éteint, appuyez brièvement sur l'un
Lorsque l'appareil est alimenté par le bloc
● L'écran ache le pourcentage actuel de la batterie
lorsqu'il est allumé, comme le montre la gure (1), et
s'éteint automatiquement après 20 secondes d'inactivité.
● Lorsque la fonction anti-moustique est activée, l'écran
s'allume régulièrement et ache les informations
actuelles (mode actuel, icône de la batterie et durée
d'utilisation restante), comme le montre la gure (2).
● Lorsque la fonction ultrason est activée, l'écran
s'allume régulièrement et ache les informations
actuelles (icône ultrason, icône de la batterie et durée
d'utilisation restante), comme le montre la gure (3).
Lorsqu'il est alimenté par une source
● Lorsque le répulsif anti-moustique est correctement
connecté à une source d'alimentation externe, l'écran
ache l'icône USB comme indiqué dans la gure (4) et
s'éteint automatiquement après 20 secondes d'inactivité.
● Lorsque la fonction anti-moustique est activée, l'écran
s'allume régulièrement et ache les informations
actuelles (mode actuel et icône USB) comme indiqué
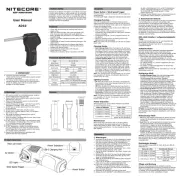
Removing the Battery Cartridge
Multifunctional OLED Display
Repellent Mat Replacement
Charge the Battery Cartridge
Lesen Sie vor dem Gebrauch alle Anweisungen!
Dieses Produkt ist nur für den Gebrauch durch
Erwachsene bestimmt. Dieses Produkt ist kein Spielzeug!
1. Bitte lesen Sie die Bedienungsanleitung sorgfältig
durch, bevor Sie das Produkt verwenden, und schließen
Sie die entsprechenden externen Geräte nur gemäß
den Angaben in dieser Bedienungsanleitung an.
2. Dieses Produkt ist für die Verwendung durch
Erwachsene ab 18 Jahren bestimmt. Bitte bewahren
Sie es außerhalb der Reichweite von Kindern und
3. Wenn das Produkt in der Nähe von Kindern verwendet
wird, ist eine strenge Überwachung erforderlich, um
Verbrennungen zu vermeiden.
4. Umgebungstemperatur bei der Verwendung: -10 ~
35°C; Temperatur bei der Lagerung: -20 ~ 60°C.
5. Lassen Sie das Produkt NICHT unbeaufsichtigt, wenn
es in Gebrauch ist. Beenden Sie den Gebrauch des
Geräts bei jedem Anzeichen einer Fehlfunktion.
6. Berühren Sie während der Verwendung der
Mückenabwehr-Funktion NICHT das Fach für das
7. Decken Sie das Gerät NICHT ab und stellen Sie es
NICHT in die Nähe von anderen Gegenständen, da
dies zu Schäden am Gerät oder Unfällen aufgrund
hoher Temperaturen führen kann.
8. Bitte lagern Sie das Gerät in trockenen und belüfteten
Räumen. Setzen Sie das Gerät NICHT dem Regen aus.
Halten Sie es fern von brennbarem Material.
9. Wenn Sie das Gerät in einer geschlossenen oder
brennbaren Umgebung aufbewahren, z. B. in einer
Tasche oder einem Rucksack, oder wenn Sie es über
einen längeren Zeitraum nicht benutzen, nehmen Sie
bitte das Akku-Pack heraus, um eine versehentliche
Aktivierung und Gefahren durch übermäßige Hitze zu
10. Bitte laden Sie den Akku alle 3 Monate auf, wenn er
längere Zeit nicht benutzt wird.
11. Legen Sie das Produkt NICHT ins Wasser.
12. Stecken Sie NICHT Ihre Finger, Metalle oder andere
Fremdkörper in das Gerät.
13. Verwenden Sie die Mückenabwehr-Funktion NICHT in
einem geschlossenen Raum.
14. Setzen Sie das Produkt NICHT über einen längeren
Zeitraum Temperaturen über 60°C aus.
15. Das Produkt darf NICHT zerlegt oder modiziert
werden, da es sonst beschädigt wird und
die Produktgarantie ungültig. Vollständige
Informationen zur Garantie nden Sie im Abschnitt
„Garantiebedingungen“ in dieser Anleitung.
Die unsachgemäße Verwendung des Akkus kann zu
schweren Akkuschäden oder Sicherheitsrisiken wie
Verbrennung oder Explosion führen. Verwenden Sie
den Akku NICHT, wenn er beschädigt ist. Der Akku darf
NICHT zerlegt, durchstochen, zerschnitten, zerquetscht,
verbrannt oder kurzgeschlossen werden. Wenn Sie ein
Auslaufen oder einen ungewöhnlichen Geruch feststellen,
stellen Sie die Verwendung des Akkus sofort ein und
entsorgen Sie ihn ordnungsgemäß. Entsorgen Sie das
Gerät/die Batterie gemäß den geltenden örtlichen
Gesetzen und Vorschriften.
① ② Mückenabwehrgerät Mückenabwehr-Pad Ablage
③ ④ Ultraschalltaste OLED Display
⑤ Abwehr-Taste Schnellverschluss-Tasten⑥
⑨ Proprietärer Mückenabwehr-Anschluss
⑩ ⑪ IN/OUT Port Funktions-Anzeige
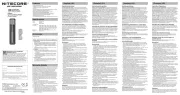
Einsetzen oder Herausnehmen der
Herausnehmen: Drücken Sie - wie in der Abbildung
gezeigt - beide Schnellverriegelungs-Tasten gleichzeitig,
um die Akku-Pack zu entfernen.
Einsetzen: Richten Sie den proprietären Mückenabwehr-
Anschluss ( ) an der Akku-Pack auf den Input-⑨
Anschluss ( ) des Mückenabwehrgeräts aus und setzen ⑦
Das Produkt ist mit einem intelligenten Ladesystem
ausgestattet. Bitte laden Sie das Akku-Pack vor dem
Stromanschluss: Nachdem Sie das Akku-Pack entfernt
haben, verwenden Sie das USB-C-Ladekabel, um einen
USB-Adapter oder eine andere USB-Stromquelle an den
IN/OUT-Anschluss des Akku-Packs anzuschließen und
den Ladevorgang zu starten. Die Ladezeit beträgt ca. 4
Stunden und 30 Minuten. (Eingang: 5V 3A)⎓
Anzeige des Ladevorgangs: Während des
Ladevorgangs gehen die LEDs allmählich von Blinken zu
Dauerlicht über und zeigen so den Ladestand an. Wenn
das Akku-Pack vollständig geladen ist, leuchten die 4
LEDs dauerhaft. Bei voller Ladung beträgt die Standby-
Das Mückenabwehr-Gerät kann über den Akku-Pack
oder eine externe Stromversorgung betrieben werden.
Wenn das Mückenabwehr-Gerät erfolgreich an eine
externe Stromversorgung angeschlossen ist, wird
auf dem Display ein USB-Symbol angezeigt. Wenn
die externe Stromversorgung aufgrund möglicher
Kompatibilitätsprobleme nicht verfügbar ist, kann das
Akku-Pack zur Stromversorgung installiert werden.
Thanks for purchasing NITECORE!
Please read this manual carefully before using the
product and follow the instructions.
This manual contains important safety information
and operating instructions. Please keep it for future
In case of updates, please refer to the latest version
available on the ocial website.
1. Please read the user manual carefully before using the
product and connect the applicable external devices
only according to the specications in this user manual.
2. This product is intended for use by adults aged 18 and
over. Please keep it out of reach of children and pets.
3. Close supervision is necessary to avoid burns when
the product is used near children.
4. Ambient Temperature of Usage: -10~35°C (14~95°F);
Temperature of Storage: -20~60°C (-4~140°F)
5. DO NOT leave the product unattended when it is in use.
Stop using the product at any sign of malfunction.
6. DO NOT touch the Repellent Mat Compartment while
using the mosquito repelling function.
7. DO NOT cover the product or put it close to other
objects, as this may cause damage to the product or
accidents due to high temperatures.
8. Please store the product in dry and ventilated areas.
DO NOT expose the device in rain. Keep it away from
any combustible material.
9. When the product is placed in an enclosed or
ammable environment such as a pocket or backpack,
or when it is left unused for an extended period, please
remove the Battery Cartridge to avoid accidental
activation and dangers caused by excessive heat.
10. Please recharge the battery every 3 months when
left unused for a prolonged time.
11. DO NOT place the product in water.
12. DO NOT put your ngers, metals, or any foreign
objects into the product.
13. DO NOT use the mosquito repelling function in a
14. DO NOT expose the product to temperatures above
60°C (140℉) for a prolonged time.
15. DO NOT disassemble or modify this product as doing
so will cause damage to it and render the product
warranty invalid. Please refer to the warranty section
in the manual for complete warranty information.
Improper use of the battery may result in severe
battery damage or safety hazards such as combustion
or explosion. DO NOT use the battery if it is damaged.
DO NOT disassemble, puncture, cut, crush, incinerate
or short-circuit the battery. If any leakage or abnormal
odor is noticed, stop using the battery immediately and
dispose of it properly. Dispose of the device/battery in
accordance with applicable local laws and regulations.
① ②Mosquito Repeller Repellent Mat Compartment
③ ④Ultrasonic Button OLED Display
⑤ ⑥Repeller Button Quick Release Buttons
⑦ ⑧Input Port Battery Cartridge
⑨Proprietary Repeller Connector
3. When there is wind, please place the product upwind
of the expected protection area.
4. DO NOT cover the product when using it.
5. It is recommended to use multiple EMR25s together
for a larger protection zone.
6. Please store the product only after the mosquito
repelling function is turned o and it has completely
Note: The MRM10 mini Mosquito Repellent Mat (size:
35mm x 22mm / 1.38'' x 0.87'') lasts up to 6 hours each.
Repellent Mat Replacement
Make sure the product is o and cooled. Insert a new
repellent mat while pushing out the used one.
The Battery Cartridge can be used as a power bank to
charge external USB devices. To use the USB-C Output
Function, the Battery Cartridge must rst be removed.
Power Connection: Use the USB-C charging cable to
connect an external USB device to the IN/OUT Port of the
Battery Cartridge to begin the charging process.
When using the USB-C output function, the
corresponding blue indicators will turn on constantly to
indicate the remaining battery power.
Status of Indicators Power Level
0%-5% (Please recharge the
battery as soon as possible)
● Lorsque la fonction ultrason est activée, l'écran
s'allume régulièrement et ache les informations
actuelles (icône ultrasonique et icône USB), comme le
Remarque : Lorsque la fonction anti-moustique est
utilisée en même temps que la fonction ultrason, l'écran
reste allumé en permanence et ache à la fois le mode
actuel et l'icône ultrason.
On : Lorsque l'écran est allumé, appuyez longuement
sur le bouton répulsif pendant 1 seconde pour activer la
O : Lorsque la fonction anti-moustique est activée,
appuyez longuement sur le bouton répulsif pendant 1
seconde pour l'arrêter. L'écran ache le pourcentage
actuel de la batterie ou l'icône USB.
Changement : Lorsque la fonction anti-moustique est
activée, appuyez brièvement sur le bouton répulsif pour
passer du mode BASSE PUISSANCE au mode HAUTE
PUISSANCE. L'écran ache le mode actuel.
On : lorsque l'écran est allumé, appuyer longuement sur
le bouton ultrason pendant 1 seconde pour activer la
O : Lorsque la fonction ultrason est activée, appuyez
longuement sur la touche ultrason pendant 1 seconde
1. Lorsque l'appareil est éteint, insérez le(s) patch(s)
répulsif(s) dans le compartiment du patch répulsif.
2. La zone de protection sera créée après avoir activé la
fonction répulsif anti-moustique pendant 10 minutes.
3. En cas de vent, placez le produit dans le sens du vent
par rapport à la zone de protection prévue.
4. NE PAS couvrir le produit lorsqu'il est utilisé.
5. Il est recommandé d'utiliser plusieurs EMR25 ensemble
pour obtenir une zone de protection plus large.
6. Ne rangez le produit qu'une fois que la fonction
anti-moustique est désactivée et qu'il a
Remarque : le mini patch anti-moustiques MRM10
(dimensions : 35 mm x 22 mm / 1,38'' x 0,87'') a une
durée de vie de 6 heures chacun.
Remplacement du patch répulsif
Assurez-vous que le produit est éteint et refroidi. Insérez un
nouveau patch répulsif tout en repoussant le patch usagé.
Le bloc batterie peut être utilisé comme une batterie
externe pour charger des appareils USB. Pour utiliser la
fonction de sortie USB-C, le bloc batterie doit d'abord
Connexion à l'alimentation : Utilisez le câble de
charge USB-C pour connecter un appareil USB externe
au port IN/OUT du bloc batterie pour commencer le
Lorsque vous utilisez la fonction de sortie USB-C, les
indicateurs bleus correspondants s'allument en permanence
pour indiquer la puissance restante de la batterie.
Statut des indicateurs Niveau de puissance
0%-5% (Veuillez recharger
Перед эксплуатацией полностью ознакомьтесь
с руководством пользователя.
Устройство предназначено для эксплуатации
исключительно взрослыми людьми. Продукт не
1. Внимательно ознакомьтесь с руководством
пользователя перед использованием устройства
и подключайте только совместимые внешние
устройства согласно указаниям текущего
2. Данное устройство предназначено для
использования лицами 18 лет и старше. Храните в
недоступном для детей и домашних животных месте.
3. Требуются постоянные наблюдение и контроль при
использовании вблизи детей во избежание ожогов.
4. Рабочая температура окружающей среды:
-10~35°C (14~95°F); температура хранения:
5. НЕ оставляйте устройство без присмотра во время
работы. Прекратите использование при любых
6. НЕ прикасайтесь к отсеку с репеллентной пластиной,
когда активирована репеллентная функция.
7. НЕ накрывайте устройство и НЕ размещайте его
вблизи других предметов — это может послужить
причиной повреждения или аварийных ситуаций
8. Храните устройство в сухом, хорошо проветриваемом
месте. НЕ допускайте попадания дождя. Держите
вдали от легковоспламеняющихся материалов.
9. При размещении устройства в закрытом
пространстве (например, в кармане или
рюкзаке) или при длительном неиспользовании
заранее извлекайте аккумуляторный блок для
предотвращения случайной активации устройства
10. Заряжайте аккумуляторный блок каждые 3 месяца
11. НЕ погружайте устройство в воду.
12. НЕ помещайте пальцы, металлические предметы
или другие посторонние объекты в устройство.
13. НЕ используйте репеллентную функцию в закрытых
14. НЕ подвергайте устройство воздействию температур
выше 60°C (140°F) в течение длительного времени.
15. НЕ разбирайте устройство и НЕ вносите какие-
либо изменения в его конструкцию — это приведет
к его повреждению, а также сделает гарантию
недействительной. Полную информацию о
гарантийном обслуживании см. в соответствующем
⚠ Безопасность аккумулятора
Неправильное использование аккумулятора может
привести к его повреждению или опасным ситуациям,
таким как возгорание или взрыв. НЕ используйте
поврежденный аккумулятор. ЗАПРЕЩЕНО разбирать,
прокалывать, разрезать, сдавливать и поджигать
аккумулятор, а также подвергать его короткому
замыканию. При обнаружении утечки электролита
или странного запаха немедленно прекратите
использование аккумулятора и утилизируйте его
должным образом. Утилизируйте устройство/
аккумулятор в соответствии с действующим
законодательством и нормативным требованиям.
① Противомоскитный репеллер
② Отсек репеллентн ой пластины
③ Кнопка ультразвукового режима
⑤ Кнопка активации репеллера
⑨ Фирменный разъём репеллера
⑩ Универсальный порт IN/OUT
Извлечение: чтобы извлечь аккумуляторный
блок, нажмите на обе кнопки быстрого съёма ( ⑥)
одновременно, как это показано на иллюстрации.
Установка: совместите фирменный разъём репеллера
(⑨) на аккумуляторном блоке с входным портом ( ⑦)
противомоскитного репеллера, после чего вставьте
аккумуляторный блок для его установки.
Зарядка аккумуляторного блока
Устройство оснащено интеллектуальной системой
зарядки. Перед первым использованием необходимо
зарядить аккумуляторный блок.
Подключение к источнику питания: после
извлечения аккумуляторного блока из устройства
с помощью кабеля USB-C подключите блок к USB-
адаптеру или другому источнику питания USB
через универсальный порт IN/OUT. Начнется
процесс зарядки. Время полной зарядки составляет
приблизительно 4 часа 30 минут (при входных
Сообщение уровня заряда: во время зарядки
индикаторы питания будут последовательно сменять
свое состояние с мигающего на постоянное свечение,
сообщая таким образом текущий уровень заряда. При
достижении полной зарядки все 4 индикатора начинают
гореть постоянно. С полным зарядом устройство может
находиться в режиме ожидания до 12 месяцев.
Противомоскитный репеллер может работать как от
аккумуляторного блока, так и от внешнего источника
питания. При успешном подключении к внешнему
источнику на экране появляется значок USB.
Если использование внешнего источника питания
невозможно из-за несовместимости, для обеспечения
питания можно установить аккумуляторный блок.
Подключение к внешнему источнику питания:
подключите кабель USB-C одним концом к входному
порту устройства, а другим – к USB-адаптеру или
другому источнику питания USB.
Многофункциональный OLED-дисплей
Устройство оснащено многофункциональным OLED-
дисплеем. (Перед первым использованием удалите
защитную пленку с экрана.)
Включение экрана: экран активируется при долгом
● Когда ни репеллентная функция, ни
ультразвуковая функция защиты от комаров не
активированы, экран автоматически гаснет через
● Для погашения экрана при активированной
репеллентной или ультразвуковой функции
защиты от комаров дважды нажмите на кнопку
ультразвукового режима. Чтобы повторно
активировать экран после его погашения,
кратковременно нажмите на любую из кнопок.
При питании от аккумуляторного блока:
● После активации экрана на нём отображается
текущий процент заряда аккумуляторного блока,
как это показано на иллюстрации (1). Экран
автоматически гаснет через 20 секунд бездействия.
● При активированной репеллентной функции
защиты от комаров экран постоянно работает и
отображает текущую информацию (Выбранный
режим, Значок аккумулятора и Оставшееся время
работы), как это показано на иллюстрации (2).
● При активированной ультразвуковой функции
защиты от комаров экран постоянно работает
и отображает текущую информацию (Значок
ультразвука, Значок аккумулятора и Оставшееся
время работы), как это показано на иллюстрации (3).
При питании от внешнего источника:
● При успешном подключении к внешнему источнику
питания на экране отображается Значок USB, как
это показано на иллюстрации (4), после чего экран
автоматически гаснет через 20 секунд бездействия.
● При активации репеллентной функции защиты от
комаров экран остается постоянно включенным
и отображает текущую информацию (Выбранный
режим и Значок USB), как это показано на
● При активации ультразвуковой функции защиты
от комаров экран остается постоянно включенным
и отображает текущую информацию (Значок
ультразвука и Значок USB), как это показано на
Примечание: при одновременной работе
репеллентной и ультразвуковой функций экран
остается постоянно включенным и отображает:
Выбранный режим работы и Значок ультразвука.
Включение: когда экран включен, удерживайте
кнопку активации репеллера в течение 1 секунды для
активации репеллентной функции.
Выключение: когда активирована репеллентная
функция, удерживайте кнопку репеллера в течение 1
секунды для её отключения. На экране отобразится
текущий уровень заряда или Значок USB.
Переключение между режимами: при
активированной репеллентной функции
кратковременно нажимайте на кнопку репеллера для
переключения между режимами НИЗКОЙ МОЩНОСТИ
(LOW POWER) и ВЫСОКОЙ МОЩНОСТИ (HIGH POWER).
Выбранный режим будет отображаться на экране.
Включение: когда экран включен, удерживайте
кнопку ультразвукового режима в течение 1 секунды
Выключение: когда активирована ультразвуковая
функция, удерживайте кнопку ультразвукового
режима в течение 1 секунды для её отключения.
1. Когда устройство выключено, вставьте
репеллентную пластину(-ы) в отсек.
Зона защиты образуется через 10 минут после
активации репеллентной функции защиты от комаров.
3. При наличии ветра расположите устройство
с наветренной стороны относительно
предполагаемой зоны защиты.
4. НЕ накрывайте устройство во время использования.
5. Для увеличения зоны защиты рекомендуется
использовать несколько устройств EMR25
6. Убирайте устройство на хранение только после
того, как репеллентная функция будет выключена,
и устройство полностью остынет.
Примечание: репеллентная пластина MRM10 mini
(размер: 35 мм × 22 мм / 1,38" × 0,87") обеспечивает
защиту до 6 часов каждая.
Замена репеллентной пластины
Убедитесь, что устройство выключено и остыло.
Вставляйте новую репеллентную пластину,
одновременно выталкивая этим движением уже
products are warranted for quality.
Any DOA / defective product can be exchanged for
a replacement through a local distributor/dealer
within 15 days of purchase. After that, all defective /
free of charge within 12 months from the date of
purchase. Beyond 12 months, the charge for accessories,
replacement parts and delivery shall be at your own
The warranty will be nullied if
1. the product(s) is/are broken down, reconstructed and/
or modied by unauthorized parties.
2. the product(s) is/are damaged due to improper use.
For the latest information on NITECORE
and services, please contact a local NITECORE
distributor or send an email to service@nitecore.com.
SYSMAX Innovations Co., Ltd.
E-mail: info@nitecore.com
Unit 6355, 5/F, No.1021 Gaopu Road,
Tianhe District, Guangzhou, 510653,
Thanks for purchasing NITECORE!
Please nd us on facebook : Nitecore Outdoor Electronics
Anschluss an eine externe Stromquelle: Verbinden
Sie ein Ende des USB-C-Kabels mit dem Eingangs-Port
des Mückenabwehr-Geräts und das andere Ende mit
einem USB-Adapter oder einer anderen USB-Stromquelle.
Multifunktionales OLED-Display
Das Produkt ist mit einem multifunktionalen OLED-
Display ausgestattet. (Bitte entfernen Sie den
Bildschirmschutz vor dem ersten Gebrauch.)
Display ein: Drücken Sie eine der beiden Tasten lange,
bis das Display aktiviert ist.
● Wenn weder die Mückenabwehr noch die
Ultraschallfunktion aktiviert ist, schaltet sich das
Display nach 20 Sekunden Inaktivität automatisch
● Wenn entweder die Mückenabwehr oder die
Ultraschallfunktion aktiv ist, drücken Sie zweimal
die Ultraschalltaste, um das Display auszuschalten.
Um das Display nach dem Ausschalten wieder zu
aktivieren, drücken Sie kurz eine der Tasten.
Wenn das Gerät über den Akku betrieben wird:
● Das Display zeigt beim Einschalten den aktuellen
Ladestand an, wie in Abbildung (1) dargestellt,
und schaltet sich nach 20 Sekunden Inaktivität
● Wenn die Mückenabwehr-Funktion aktiviert ist,
schaltet sich das Display kontinuierlich an und zeigt
die aktuellen Informationen an (aktueller Mode,
Batteriesymbol und verbleibende Laufzeit), wie in
Abbildung (2) dargestellt.
● Wenn die Ultraschallfunktion aktiviert ist, schaltet sich
das Display kontinuierlich ein und zeigt die aktuellen
Informationen (Ultraschallsymbol, Batteriesymbol
und verbleibende Laufzeit) an, wie in Abbildung (3)
Bei Stromversorgung durch ein externes
● Wenn die Mückenabwehr-Funktion erfolgreich an
eine externe Stromversorgung angeschlossen wurde,
erscheint auf dem Display das USB-Symbol, wie in
Abbildung (4) dargestellt, und erlischt automatisch
nach 20 Sekunden Inaktivität.
● Wenn die Mückenabwehr-Funktion aktiviert ist,
schaltet sich das Display kontinuierlich ein und zeigt
die aktuellen Informationen an (aktueller Mode und
USB-Symbol), wie in Abbildung (5) dargestellt.
● Wenn die Ultraschallfunktion aktiviert ist, schaltet sich
das Display kontinuierlich ein und zeigt die aktuellen
Informationen (Ultraschallsymbol, Batteriesymbol
und verbleibende Laufzeit) an, wie in Abbildung (6)
Hinweis: Wenn Sie die Mückenabwehr-Funktion
zusammen mit der Ultraschallfunktion verwenden, wird
das Display ständig eingeschaltet und zeigt sowohl den
aktuellen Mode als auch das Ultraschallsymbol an.
● Ein: Wenn das Display eingeschaltet ist, halten Sie
die Abwehr-Taste 1 Sekunde lang gedrückt, um die
Mückenabwehr-Funktion zu aktivieren.
● Aus: Wenn die Mückenabwehr-Funktion eingeschaltet
ist, halten Sie die Abwehr-Taste 1 Sekunde lang
gedrückt, um sie auszuschalten. Auf dem Display
wird der aktuelle Ladestand in Prozent oder das USB-
● Umschalten: Wenn die Mückenabwehr-Funktion
eingeschaltet ist, drücken Sie kurz auf die Abwehr-
Taste, um zwischen den Modi „LOW-POWER“ und
„HIGH-POWER“ zu wechseln. Auf dem Display wird
der aktuelle Mode angezeigt.
Ein: Wenn der Bildschirm eingeschaltet ist, halten Sie
die Ultraschalltaste 1 Sekunde lang gedrückt, um die
Ultraschallfunktion zu aktivieren.
Aus: Wenn die Ultraschallfunktion eingeschaltet ist,
halten Sie die Ultraschalltaste 1 Sekunde lang gedrückt,
1. Legen Sie bei ausgeschaltetem Gerät die
Mückenabwehr-Pads in das Fach ein.
2. Die Schutzzone wird nach Aktivierung der
Mückenabwehr-Funktion für 10 Minuten eingerichtet.
3. Wenn es windig ist, platzieren Sie das Gerät bitte im
Windschatten des zu erwartenden Schutzbereichs.
4. Decken Sie das Produkt NICHT ab, wenn Sie es
5. Es wird empfohlen, mehrere EMR25 zusammen zu
verwenden, um einen größeren Schutzbereich zu
6. Bitte lagern Sie das Produkt erst, wenn die
Mückenabwehr-Funktion ausgeschaltet ist und es
vollständig abgekühlt ist.
Hinweis: Die MRM10 Mini-Mückenabwehr-Pads (Größe:
35mm x 22mm) halten jeweils bis zu 6 Stunden.
Auswechseln des Mückenschutz-Pads
Stellen Sie sicher, dass das Gerät ausgeschaltet und
abgekühlt ist. Legen Sie ein neues Mückenabwehr-Pad
ein und schieben Sie das verbrauchte Pad heraus.
Das Akku-Pack kann als Powerbank verwendet werden,
um externe USB-Geräte aufzuladen. Um die USB-C-
Ausgangsfunktion zu nutzen, muss die Akku-Pack
zunächst entfernt werden.
Stromanschluss: Verwenden Sie das USB-C-Ladekabel,
um ein externes USB-Gerät an den IN/OUT-Anschluss
des Akku-Packs anzuschließen und den Ladevorgang zu
Anzeige der Stromversorgung
Wenn Sie die USB-C-Ausgangsfunktion verwenden,
leuchten die entsprechenden blauen Anzeigen konstant
auf, um die verbleibende Akkuleistung anzuzeigen.
Status der LEDs Power Level
Fast entladen. (Bitte laden Sie das
Produkt so bald wie möglich auf)
Entsorgung von Elektro- und
Die durchgestrichene Mülltonne bedeutet,
dass Sie gesetzlich verpichtet sind, diese
Geräte einer vom unsortierten Siedlungsabfall
getrennten Erfassung zuzuführen. Die
Entsorgung über die Restmülltonne oder die gelbe Tonne
ist untersagt. Enthalten die Produkte Batterien oder
Akkus, die nicht fest verbaut sind, müssen diese vor
der Entsorgung entnommen und getrennt als Batterie
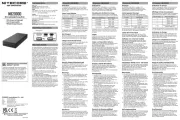
Rated Energy 5,600mAh 5V (TYP 3A)
IN/OUT Port: 5V 3A / 9V⎓ ⎓2A / 12V⎓1.5A
IN/OUT Port: 5V 3A / 9V 2.22A / ⎓ ⎓
Proprietary Repeller Connector: 5V 3A⎓
LOW POWER Mode: 11ft Protection Zone
HIGH POWER Mode: 16ft Protection Zone
165.4mm x 56.2mm x 41.9mm /
(Battery Cartridge Included)
295g±5g / 10.41 oz±0.1 oz
(Battery Cartridge Included)
USB-C to USB-C Charging Cable,
Storage Case, MRM10 mini Mosquito
Repellent Mat x 12 (Optional)
Note: Mosquito repellent mats are optional.
* The above images are for illustrative purposes only.
Please refer to the actual product for details.