$GYDQFHG$PSOL¿HU,QWHUIDFHIRU
6HOHFW&KU\VOHU'RGJH9HKLFOHV
AP4-CH31
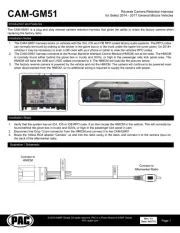
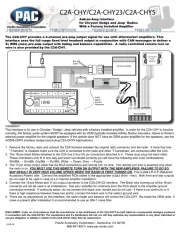
The AP4-CH31 provides a 6-channel pre-amp output for use with aftermarket audio equipment. Using the full range,
¿[HGOHYHOKHDGXQLWRXWSXWLQFRQMXQFWLRQZLWK&$1PHVVDJHVWKH$3&+GHOLYHUVDYDULDEOHY506SUHDPS
RXWSXWZLWKIDGLQJEDODQFHHTXDOL]DWLRQDQGOHYHOFRQWUROFDSDELOLWLHV7KHPRGXOHDOVRUHWDLQVDOODXGLRIURP
RWKHUYHKLFOHIHDWXUHVVXFKDVIDFWRU\1DYLJDWLRQ3URPSWV%OXHWRRWKX&RQQHFWDQGSDUNLQJVHQVRUFKLPHV A data
FRQWUROOHGUHPRWHDPSOL¿HUWXUQRQZLUHLVDOVRSURYLGHGE\WKH$3&+:KHQXVHGLQFRQMXQFWLRQZLWKWKH$3$
726VROGVHSDUDWHO\WKHPRGXOHFDQSURYLGHDYDULDEOHFKDQQHO¿EHURSWLFGLJLWDODXGLRRXWSXW726/,1.
Introduction and Features
Important Notes
1. This interface is only compatible in vehicles equipped with a data-bus controlled premium sound system. To verify
compatibility, look for an Alpine, Beats, or Harmon Kardon badge on the door speakers, center speaker, or factory sub
woofer. If none of these brands are shown, check for the presence of a center speaker or sub woofer.
2. 7KHIDFWRU\DPSOL¿HUPXVWUHPDLQFRQQHFWHGDQGLQWKHYHKLFOHDIWHUWKH$PS352KDVEHHQLQVWDOOHG
3. The remote output is rated at 2A of current. If more current is needed an external relay must be used.
4. Channels 5 and 6 are non-fading outputs. The output level of channels 5 and 6 can be controlled using the supplied level
control knob.
5. The minimum volume level is set to 0 dB by default. If you are happy with this level in your particular application then
additional adjustment is not required. The level control knob must be connected in order to manually adjust the minimum
volume setting.
6. No adjustments can be made manually using the programming button, or the factory SWC when the module is connected to
D3&
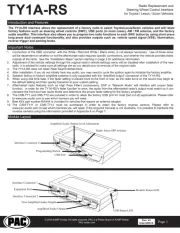
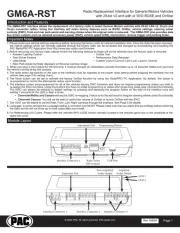
Wiring Connection Chart
To Aftermarket
Amplier
Non-FadingRearFront
1(L) 2(R) 4(R) 5(L) 6(R)3(L)
Remote Turn On Output
2A Max Output
AP4-CH31-HAR
To Radio To Vehicle
Harness
Non-Fading
Level Control
Knob
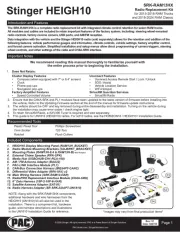
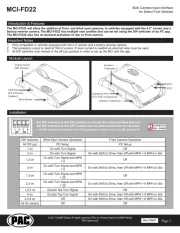
Module Layout
Interface Connector 1
Expansion Port
Programming Button
Feature Select
DIP switches
Non-Fading Level Control
Knob Connection
USB Connection
LED 1
TOSLINK Output
(APA-TOS1 sold separately)
Front Output
Ch. 1(L) and 2(R)
Rear Output
Ch. 3(L) and 4(R)
Non-Fading Output
Ch. 5(L) and 6(R)
LED 2