PAC MCI-FD22 Manual


Læs gratis den danske manual til PAC MCI-FD22 (3 sider) i kategorien Ikke kategoriseret. Denne vejledning er vurderet som hjælpsom af 10 personer og har en gennemsnitlig bedømmelse på 4.4 stjerner ud af 5.5 anmeldelser. Har du et spørgsmål om PAC MCI-FD22, eller vil du spørge andre brugere om produktet?

Side 1/3
Multi Camera Input Interface
for Select Ford Vehicles
MCI-FD22
© 2017 AAMP Global. All rights reserved. PAC is a Power Brand of AAMP Global.
PAC-audio.com
C
Page 1
Rev. 070617
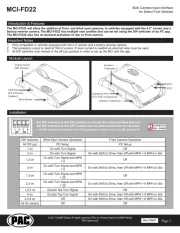
The MCI-FD22 will allow the addition of front, and blind spot cameras, in vehicles equipped with the 4.2 screen and a
The MCI-FD22 also has on-demand activation of rear or front camera.
Introduction & Features
Important Notes
1. Only compatible in vehicles equipped with the 4.2 screen and a factory reverse camera.
2. The accessory output is rated at 10A of current. If more current is needed an external relay must be used.
3. All DIP switches must remain in the off (up) position in order to set up the MCI with the app.
DIP switches Blind Spot Camera Operation Front Camera Operation
All Off (up) PC Setup PC Setup
1 on On with Turn Signal Off
2 on On with Turn Signal On with Shift to Drive, then Off with MPH > 6 MPH or 30s
1,2 on
On with Turn Signal and MPH
> 0
Off
3 on
On with Turn Signal and MPH
> 0
On with Shift to Drive, then Off with MPH > 6 MPH or 30s
1,3 on
On with Turn Signal and MPH
> 20
Off
2,3 on
On with Turn Signal and MPH
> 20
On with Shift to Drive, then Off with MPH > 6 MPH or 30s
1,2,3 on Double Tap Turn Signal Off
4 on Double Tap Turn Signal On with Shift to Drive, then Off with MPH > 6 MPH or 30s
2,3,4 on On with Shift to Drive, then Off with MPH > 6 MPH or 30sOff
All On (down) Off Off
Set DIP switches to the ON position to activate the corresponding features.
Set DIP switches to the OFF position for any features that are not desired.
***All DIP switches must remain in the off (up) position in order to set up the MCI with the PC
Installation
Module Layout
LED 1
LED 2
Interface
Connector 1
Expansion Port
(For VS41 Connection)
Interface Connector 2
Reset Button
USB Port
(For Firmware
Updates)
Feature Select
DIP switches
Multi Camera Input Interface
for Select Ford Vehicles
MCI-FD22
© 2017 AAMP Global. All rights reserved. PAC is a Power Brand of AAMP Global.
PAC-audio.com
C
Page 2
Rev. 070617
VIDEO OUTPUT
REVERSE CAMERA INPUT
FRONT CAMERA
LEFT CAMERA
RIGHT CAMERA
MCI-FD22-HAR
MCI-FD22
VS41
To Screen
To Steering
Column
To Vehicle
Harness
To Vehicle
Harness
Data controlled camera
switching cable (10-pin)
Fig. 1
Installation (cont.)
1. You can plug the MCI into a Windows PC and set up the blind spot and / or front camera
operation using the app. See page 3 for more details on the app.
OR
2. Set DIP switches to the ON position that correspond with the features you want to add.
The DIP switches must be set before connecting the interface to the vehicle harness. If you
change the DIP switch settings with the power harness connected, you must disconnect and
reconnect it for the changes to take effect.
3. Remove the factory screen and disconnect the factory harness.
4. Connect the factory harness into the black female connector on the MCI-FD22 harness.
5. Connect the black male connector on the MCI-FD22 harness to the factory screen.
6. Connect the video output of the VS41 harness to the input (female) side of the factory reverse
camera wire located on the screen side of the MCI-FD22 harness.
7. Connect the output (male) side of the factory reverse camera wire, located on the vehicle
side of the MCI-FD22 harness, to Input 1 on the VS41.
8. If you are adding a front camera, connect its video output to input 2 on the VS41 harness.
9. If you are adding blind spot cameras, connect the left camera to input 3 and the right camera to input 4 on the VS41 harness.
10. You can use the MCI-FD22 accessory output to power your cameras.
**Steps 11-14 only necessary in the Ford Transit**
11. Run the Yellow / Black wire over to the steering column.
12. Remove the steering column shroud and nd the gray factory plug seen in Fig 1.
13. Disconnect the factory harness, connect the male side of the MCI-FD22 harness to the steering column.
14. Connect the factory plug to the female side of the MCI-FD22 harness.
15. If you wish to use the on-demand activation feature, run and mount the toggle switch on the MCI-FD22 harness to your desired location.
The on-demand toggle switch will allow you to view the front or reverse camera at any time.
16. Connect the VS41 to the MCI.
17. Connect both the MCI module and the VS41 to their respective harnesses.
18. Turn the ignition on. LED1 should turn red.
19. The module can be reset to factory default settings by pressing and holding the reset button (on the side of the module) for 5 seconds. When
pressing and holding the button, both LEDs will blink red while the module is resetting. Once reset, LED1 will turn solid red.
Follow the example above to make all inputs work accordingly through the one camera input on the factory radio. Connect the 10-
pin harness from the VS41 harness into the Expansion Port on the MCI-FD22. Do not manually wire the trigger wires, or power and
ground leads, when using the Expansion Port connector. When the appropriate CAN-Bus signals are detected (ie. reverse, or turn
signal) the corresponding camera input will be automatically selected, and it’s video feed will be routed to the factory radio display.
Only Necessary in Ford Transit


Produkt Specifikationer

Mærke: PAC
Kategori: Ikke kategoriseret
Model: MCI-FD22

Har du brug for hjælp?

Hvis du har brug for hjælp til PAC MCI-FD22 stil et spørgsmål nedenfor, og andre brugere vil svare dig


Ikke kategoriseret PAC Manualer
PAC

PAC CAM-GM51 Manual

11 Juli 2025
PAC

PAC TY1A-RS Manual

11 Juli 2025
PAC

PAC SR-F15009HX Manual

10 Juli 2025
PAC

PAC SRK-RAM13HX Manual

10 Juli 2025
PAC

PAC AAI-TY3 Manual

30 Juni 2025
PAC

PAC SRK-GM14HX Manual

10 Marts 2025
PAC

PAC C2A-CHY Manual

19 Februar 2025
PAC

PAC MCI-FD22 Manual

19 Februar 2025
PAC

PAC GM6A-RST Manual

19 Februar 2025
PAC

PAC SWI-X Manual

19 Februar 2025

Ikke kategoriseret Manualer

Nyeste Ikke kategoriseret Manualer

Hozelock

Hozelock 5102 Manual

2 August 2025
ART

ART 310 Manual

2 August 2025
Navman

Navman MY450LMT Manual

2 August 2025
Navman

Navman MiVue 745 Manual

1 August 2025
Hitachi

Hitachi WR22SE Manual

1 August 2025
Synology

Synology M2D20 Manual

1 August 2025
Buffalo

Buffalo GC882 Manual

1 August 2025