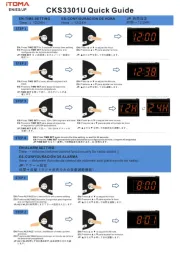
1) Press and hold the Snooze and Time buttons for 3 seconds to enter the Test Mode.
The display will show "7ES7" to indicate it is in
2) If within 1 minute no button is pressed, then it will exit the
Test Mode and return back
3) Press any button within 1 minute (except the Snooze & Time buttons, which has no
effect), it will exit the Test Mode immediately.
4) While in Test Mode, sliding the Function Switch will demonstrate the different functions
a) Function Switch at OFF, it will have a continuous "Vee" sound to indicate it is in the
Function Switch at BUZZ, it will demonstrate the buzzer sound.
Function Switch at VIB, it will demonstrate the vibrator.
Function Switch at VIB & BUZZ, it will demonstrate the buzzer sound & the vibrator.
5) After finish with the Test Mode, press any button (except the Snooze & Time buttons,
which has no effect) it will exit the Test Mode immediately.
W ING: TO T RE OR OCK Z D, DO NOTARN PREVEN FI SH HA AR
OSE IS E TO N OR M E. EXP TH APP ANCLI RAI OISTUR
arrowhead symbol, within an
equilateral triangle, is intended
to alert the user to the presence
of uninsulated “dangerous
voltage” within the product’s
enclosure that may be of sufficient
magnitude to constitute a risk
of electric shock to persons.
The exclamation point within an
equilateral triangle is intended
to alert the user to the presence
of important operating and
instructions in the literature
accompanying the appliance.
Normal function may be disturbed by strong electromagnetic interference. If this
is the case, normal function can be resumed by simply resetting the unit
following the procedure in the instructions manual. If function does not resume,
try moving the unit to another location.
1) Appuyez sur les boutons Snooze (rappel d'alarme) et Time (réglage de l'heure) et
maintenez-les enfoncés pendants 3 secondes pour entrer dans le mode de test.
L'afficheur montre « 7ES7 » pour indiquer qu'il se trouve en mode TEST.
2) Si dans la minute qui suit, aucun bouton n'est pressé, il sortira du mode de test et
reviendra en mode de réglage de l'heure.
3) En appuyant sur un bouton dans la minute qui suit (exception faite des boutons
Snooze (rappel d'alarme) & Time (réglage de l'heure), qui n'ont aucun effet), l'appareil
quittera immédiatement le mode de test.
4) Lorsque l'appareil se trouve en mode de test, faire glisser le commutateur de
fonction qui permet d'afficher les différentes fonctions du réveil :
a) Si le commutateur de fonction se trouve sur OFF, un « » retentira de manière BIP
continue pour indiquer que l'appareil se trouve en mode de test.
b) Si le commutateur de fonction se trouve sur BUZZ, il fera retentir l'avertisseur sonore.
c) Si le commutateur de fonction se trouve sur VIB, il fera retentir le vibrateur.
d) Si le commutateur de fonction se trouve sur VIB & BUZZ, il fera retentir l'avertisseur
5) Une fois les opérations terminées dans le mode de test, appuyez sur un bouton
quelconque (exception faite des boutons Snooze (rappel d'alarme) & Time (réglage
de l'heure), qui n'ont aucun effet) pour quitter immédiatement le mode de test.
IMPORTANT – Please read these instructions carefully before use and retain for future
reference. See operating instructions on back.
- Use only the supplied or recomended Sonic Alert adaptor to connect the
Warning: To prevent fire or shock hazard do not expose this appliance to rain or moisture.
Before connecting to mains/ power make sure that the requirements specified
on the apparatus corresponds to the available power supply in that country i.e.
- The ventilation should not be impeded by covering the ventilation openings with items
such as, newspaper, table cloth, curtains, etc;
- No naked flame sources, such as lighted candles should be placed on the apparatus.
- It shall not be exposed to dripping or splashing and that no objects filled with liquids,
such as vases, shall be placed on the apparatus.
- Do not place the product in closed bookcases or racks without proper ventilation.
Where the mains/ power plug is used as the disconnect device, the disconnect device
shall remain readily operable.
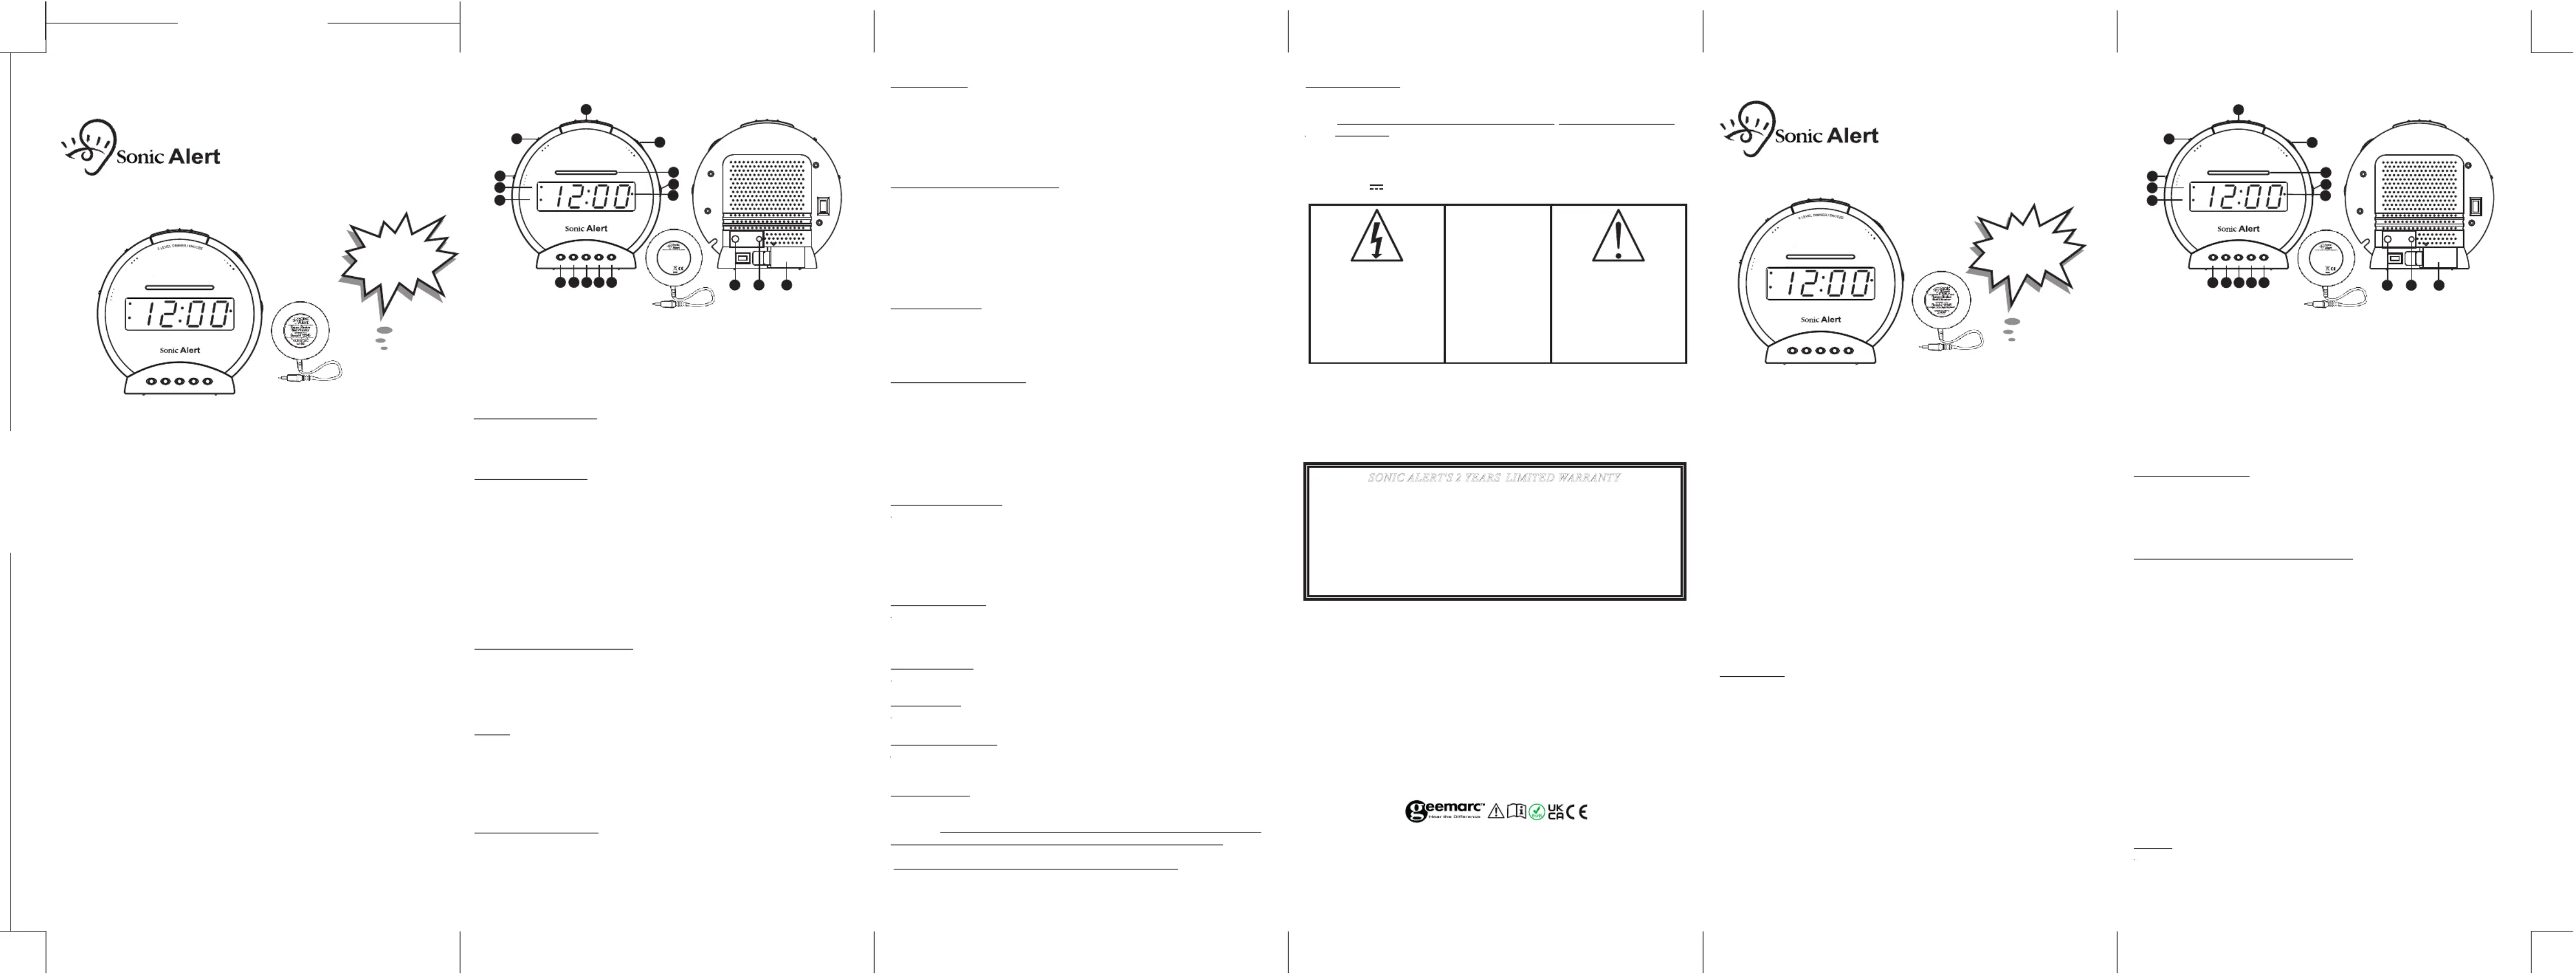
ALARM CLOCK WITH BED SHAKER
yalpsiD thgiL gnihsalF )61
Setting the Correct Time –
eht dloh dna sserP )1 and at the same time press the “TIME” Button (6) “FAST” Button
(9) “SLOW” button (10) or the to advance clock display unil you have desired time.
ehT )2 located in upper left corner of the clock display indicates the time is lighted dot (2)
PM. For AM time, this dot will not light up.
eht edilS )1 (12) to AL1 position, the alarm indicator “ALARM MODE SWITCH”
eht dloh dna sserP )2 button and at the same time press the “ALARM SET“ (5) “FAST”
Button (9) “SLOW“ button (10) or the to advance clock display until you reach
rof tes yltcerroc si emit mrala erus ekaM )3 AM or PM (1).
mrala ecnO )4 AL1 has been set, slide to AL2 position. , “ALARM MODE SWITCH” (12)
the alarm indicator will light up.“AL2” (17)
5) Press and hold the button and at the same time press the “ALARM SET” (5) “FAST”
Button (9) “SLOW” button (10) or the to advance clock display until you reach
c) “VIB/ BUZZ” for both sound and bed shaker
NOTE: once the wake up mode is chosen, this will apply to both alarms.
When the alarm is activated, alarm pattern of the buzzer / flashing display will be out of
sync with the vibrator. This means that when the buzzer / flashing display is ON, the
vibrator will be OFF and while the buzzer/ flashing display is OFF, the vibrator will be ON.
ALARM 1 - When Alarm 1 is activate, it will have 3 beeps for buzzer, then the vibrator.
This pattern is repeated until the alarm is stopped.
ALARM 2 - When Alarm 2 is activate, it will have 4 beeps for buzzer, then the vibrator.
This pattern is repeated until the alarm is stopped.
A g e A rm r n T e –djustin Th la Du atio im
Th defaul alar duratio tim settin minutes yo ma adjus th alar duratioe t m n e g is 30 ; u y t e m n
bet ee 1minut an minute desiredw n e d 59 s as . To t e m :adjus th alar duration
* P s d d e res an hol th AL. T n )SE butto (5 r x . e k y l w the fo si seconds Th cloc displa wil sho
defaul alar duratio '30' Releas tht m n as . e e AL t nse butto
* P s e to t e m n to e d , m res th “ N” n )MI butto (10 adjus th alar duratio th desire setting fro
* W n e y is w g e d m n , it w l n to e l he th displa sho in th desire alar duratio time il retur th norma
cloc mod afte seconds Th ne lar duratio tim settin become th nek e r 3 . e w a m n e g s e w
defaul an remain th memor unti yo chang againt d s in e y l u e it .
eht sserp yam uoy gninrom eht ni no snrut mrala eht nehW .1 to SNOOZE Button ( ) 3
stop the alarm temporarily. The alarm will shut off for minutes or for the predetermined 7
time you select from 1-30 minutes, and then turn on again. The snooze operation may
be repeated indefinitely until the alarm is turned off.
ehT .2 SNOOZE function of Alarm 1 and Alarm 2 is independent of each other.
Adjusting The Snooze Time –
The default snooze time setting is minutes but you may adjust the snooze time between 7
1 minute and 30 minutes as desired. To adjust the snooze time:
* Press and hold the for four seconds. The clock display will show SNOOZE Button ( )3
the default snooze time ' '. Release the snooze button7
* Press the to adjust the snooze time to the desired setting, from 1 “SLOW Button ( )”10
* When the display is showing the desired snooze time, it will return to the normal clock
mode after 3 seconds. The new snooze time setting becomes the new default and
remains in the memory until you change it again.
Alarm can be shut off temporary for the day or permanently shut off.
eht sserp ,ffo seog mrala nehW )1 button to turn off for the day and “ALARM OFF” (7)
come back on at the same time the next day, if alarm settings have not changed.
eht edils ,yltnenamrep ffo mrala eht tuhs oT )2 down to the “Alarm Function Switch” (8)
OFF position. The alarm will not come on until the is set “Alarm Function Switch”(8)
to “VIB/BUZZ”, “VIB”, or “BUZZ” position.
NOTE: The Alarm Off function of Alarm 1 and Alarm 2 is independent of each other.
There is a 5-level brightness control for the LED display. Press the SNOOZE button once
to change the display brightness. The brightness will cycle from 5-4-3-2-1-2-3-4-5 (from
bright to dim then from dim to bright).
*NOTE*: The dimmer function will not work, when the clock is in snooze mode.
1) To adjust the volume, rotate located on the lower right corner of VOLUME wheel (4)
eht tsujda oT )1 TONE, turn the located on the top right corner of the TONE wheel (14)
ta kcolc fo kcab eht ot kcaj rekahs deb eht hcattA )1 “VIBRATOR INPUT” (15).
edils rotarbiv no nrut oT )2 to “VIB/BUZZ” or “VIB” position.“Alarm Function Switch” (8)
.gnirps xob dna sserttam neewteb rotarbiv ecalP )3
To use the battery backup, you can install a 9-volt alkaline battery in the back of the clock
located under the Battery Compartment Cover (11). The battery needs to be purchased
separately. Note the LED display will not show during power failure but the clock
will still be running and keeping proper time until the power comes back. During a
power failure, the alkaline battery can only keep the clock IC running for up to 30 days.
(During a Power failure, the LED display will not show the time.)
NOTE: For the best results it is recommended that the battery be changed every 6
months. If the clock is not used for a while, it is recommended to remove the
battery to avoid damage to the clock from battery leakage.
Attach the to the back of DC9V IN next to “DC POWER INPUT” (13) “VIBRATOR
INPUT” (15); it is the smaller input of the two.
NOTE: IMPORTANT: do not confuse with the“DC POWER INPUT” (13) “VIBRATOR
Avertissement : pour éviter tout risque d'incendie ou d'électrocution, n'exposez
pas cet appareil à la pluie ou à l'humidité.
Avant de raccorder l'appareil au réseau électrique, assurez-vous que les exigences
spécifiées sur l'appareil correspondent à l'alimentation électrique disponible dans le pays,
soit CA100-240V~, 50/60 Hz.
-- La ventilation ne doit pas être entravée, les orifices d'aération doivent rester libres de
tout objet, tel que des journaux, des nappes, des rideaux, etc. ;
-- Aucune source de flamme nue, comme une bougie allumée ne doit être placée sur
-- L'appareil ne sera pas installé à proximité d'un dispositif qui goutte ou soumis à des
éclaboussures et aucun objet rempli de liquide ne doit être placé sur l'appareil, tel
-- Ne placez pas l'appareil dans un meuble fermé ou sur un rack ne disposant pas d'une
-- Lorsque la fiche secteur est utilisée comme dispositif de déconnexion, celle-ci doit
toujours être facilement accessible.
IMPORTANT – Veuillez lire attentivement cette notice et la conserver pour toute
consultation ultérieure. Voir les instructions de fonctionnement au verso
- Utilisez exclusivement l'adaptateur fourni ou recommandé Sonic Alert
RÉVEIL AVEC COUSSIN VIBRANT
Les caractéristiques du produit figurent dans le schéma ci-dessus :
( 1-emrala'd ruetacidnI )1 AL1)
)3 Bouton de rappel d'alarme/
Durée du rappel d'alarme/ Variateur
emulov ud fitator ruetceléS )4
erueh'l ed egalgér ed ruetatummoC )6
)7 DÉSACTIVATION de l'alarme
8) Commutateur du mode Alarme
sed edipar tnemeliféd ed notuoB )9
min./ heures/ Sélecteur 12h. ou 24h.
sed tnel tnemeliféd ed notuoB )01
elip al ed tnemitrapmoC )11
eértne'd noitatnemilA )31 CC
emulov ud fitator ruetceléS )
17) Indicateur d'alarme-2 (AL2)
Réglage correct de l'heure –
notuob el rus zeyuppA )1 et maintenez-le enfoncé, puis simultanément, « TIME » (heure) (6)
appuyez sur le bouton « FAST » (défilement rapide) (9) bouton « SLOW » ou sur le
(défilement lent) (10) pour faire défiler l'heure jusqu'au réglage voulu.
nU )2 logé dans le coin supérieur gauche du réveil indique les heures de point lumineux (2 )
l'après-midi au format américain (12h). Pour les heures matinales (AM), le point lumineux ne
Réglage de l'heure de déclenchement de l'alarme –
ressilg setiaF )1 le sur la position AL1, l'indicateur « SÉLECTIONNEUR D'ALARME » (12)
d'alarme s'allume.« AL1 » (1)
notuob el rus zeyuppA )2 et maintenez-le enfoncé, puis « RÉGLAGE de l'alarme (5)
simultanément, appuyez sur le bouton « FAST » (défilement rapide) (9) bouton ou sur le
«SLOW» (défilement lent) (10) pour faire défiler les heures jusqu'au réglage d'alarme voulu.
el ruop eélgér tnemetcerroc tse emrala'l ed tnemehcnelcéd ed erueh'l euq zeifiréV )3
matin ou l'après-midi (1).
emrala'l siof enU )4 AL1 réglée, faites glisser le sur la «SÉLECTIONNEUR D'ALARME» (12)
position AL2. , l'indicateur d'alarme s'allume..« AL2 » (17)
ressilg setiaF )5 le sur la position AL2, « SÉLECTIONNEUR D'ALARME » (12) l'indicateur
d'alarme « AL2 » (17) s'allume.
6) Appuyez sur le et maintenez-le enfoncé, puis bouton « RÉGLAGE de l'alarme (5)
simultanément, appuyez sur le bouton « FAST » (défilement rapide) (9) bouton ou sur le
«SLOW» (défilement lent) (10) pour faire défiler les heures jusqu'au réglage d'alarme voulu.
Sélection du format 12 heures ou 24 heures
– Le réglage de l'heure par défaut est 24 heures pour Europe, Le réglage
de l'heure par défaut est 12 heures pour UK, USA.
Appuyez sur le et maintenez-le enfoncé pendant 6 bouton Fast (défilement rapide) (9)
secondes pour entrer en mode de sélection de l'heure. Relâchez le lorsque bouton Fast (9)
l'écran affiche « 12 H » ou « 24 H ». Appuyez sur le bouton pour basculer entre les Fast (9)
formats 12 heures et 24 heures. Si aucune sélection n'est faite dans les 4 secondes, le dernier
format d'heure s'affichera et l'appareil reviendra en mode normal.
ressilg setiaf ,1 emrala'l revitca ruoP )1 le «SÉLECTIONNEUR D'ALARME» (12)
sur la position AL1. L'indicateur d'alarme s'allume.« AL1 » (1)
ressilg setiaf ,2 emrala'l revitca ruoP )2 le «SÉLECTIONNEUR D'ALARME» (12)
sur la position AL1. L'indicateur d'alarme s'allume.« AL2 » (17)
To select the wake up mode, slide the to your desired “Alarm Function Switch” (8)
Selecting 12 or 24 hours format –
– the clock is set to 12 hour for UK, USA and the clock is set to 24 hour for Europe
Press and hold the for 6 seconds to enter the hour Fast Button (9)
selection mode, release the when the display shows "12 H" or Fast Button (9)
"24 H". Press and release the hour button to toggle between 12 or 24 hours. If no
selection is made within 4 seconds, then the last displayed hour format will be
chosen and the display will return to the normal Time mode.
eht edils ,1 mralA elbane oT )1 to AL1 position. the alarm “ALARM MODE SWITCH” (12)
indicator will light up. “AL1” (1)
eht edils ,2 mralA elbane oT )2 to AL2 position, the alarm “ALARM MODE SWITCH” (12)
indicator will light up.“AL2” (17)
eht edils ,smrala htob elbane oT )3 to AL2 position, the alarm “ALARM SELECTOR” (1)
indicators and will light up.“AL1” (1) “AL2” (17)
9) Fast Min./ Hour Button /
nottuB ruoH /.niM wolS )01
MODEL:RHK009 093 HK009-056Rev01 -
210.00 mm
SONIC ALERT'S S 2 YEAR LIMITED WARRANTY
Fro th momen you Sonim e t r c Aler produc purchased Sonit t is , c Alert
guarante fo th perio fo years Th guarante doe no covee it r e d r 2 . e e s t r
accidents negligenc breakag an parts Th produc covere, e or e to y . e t is d
by e l e of y as d by e w.th lega guarante conformit provide applicabl la
Important: you receip par th guarante an mus retainer t is t of e e d t be d
an produce even warrant claims d in t of y .
Afte sale telephon number +44(0)170 37237r s e : 7 2
Th WEE ast Electrica an Electroni Equipment ha bee pu place E (W e l d c ) s n t in e
fo th product en lif ar recycle th bes war e s in d of e e d in e t y.
Whe thi produc ou orde leas no pu you domesti wast binn s t is t of r, p e do t t it in r c e .
Pleas us on th followin disposa optionse e e of e g l :
- e e s d t m in an e E . t Remov th batterie an deposi the appropriat WEE skip Deposi
th produc appropriat WEE skipe t in a e E .
- Or d e d t to e r. If u e a w , y d han th ol produc th retaile yo purchas ne one the shoul
t . s if u t e s u e n h d accep it Thu yo respec thes instruction yo ensur huma healt an
l .environmenta protection
CE nDeclaratio : Hereby c Soni Aler declare tha thi produc complianc wit tht s t s t is in e h e
essentia requirement an othel s d r
relevan provision th Electromagneti compatibilitt s of e c y
( C) , d of w V e e (LVD) /EU f .EM 2014/30/EU an Lo oltag Directiv 2014/35 (i applicable)
Th declaratio conformit ma consulte ww .geemarc.coe n of y y be d at w m
Sonic Boom Dual Alarm Clock with Bed Shaker
W hit
T t ees Mod
Pres Snooz ans e d
Tim bu to foe t n r 3
se scond
S zed ring S u nspeciali Hea ol tio
Sonic Boom Réveil double alarme avec vibreur
avec le
mode de stte
m ntai ene foz en ncés
Sn e et Time 3 ooz
secondes
S u ns s s d' onol tio Spéciali ée Auditi
For product support and help visit our website at www.geemarc.com
E-mail : help@geemarc.com telephone 01707 387602
lines are open 09h00 to 16h00 Mon to Fri
Parc de l’Etoile, 2 Rue Galilée, 59791 Grande-Synthe,France.
Manufacturer: Sonic Alert 850 Stephenson Hwy., Suite 323, Troy, MI
This product is made in China To Geemarc Telecom
Do not open- Removal of Label voids warranty
No user serviceable parts Inside.
E
L
D
I
M
M
E
V
E
L
R
5
Do not open- Removal of Label voids warranty
No user serviceable parts Inside.
E
L
D
IM
M
E
V
E
L
R
5
Par etoile ru Gali 5979 Grand Synth Cedexc de l’, 2 e lée, 1 e e , FRANCE
Input :100-240V~, 50/60Hz
Output: DC9V 0,65A / 5,85W